yahboom
HomeLearn
Solution
Blog
Online Store
About Us
EN/中文
ROSMASTER A1📖
01.Robot Configuration and Operation Guide
  • 0.Unboxing & Reviewing
  • 0.Assembly video
  • 1.Standard kit readme
  • 2.Quick start guide
  • 3.First trial
  • 4.Calibrate front wheel servo
  • 5.Enter Docker (For JETSON Nano and RPi 5)
02.AI Model Preparation
  • 1.AI Model Preparation
03.AI Model Basics
  • 1.AI large model types and principles
  • 2.RAG retrieval enhancement and model training samples
  • 3.Embodied intelligent robot system architecture
  • 4.Embodied intelligent functions core source code
04.AI Model Developmentnew
  • 1.Register a model service provider account
  • 2. Configuring API-KEY
  • 3. Introduction to Dify
  • 4. Basic Dify Features
  • 5. Deploy the RAG knowledge base
  • 6. AI Large Model Development - chatbot
  • 7. RAG knowledge base + chatbot
  • 8. AI agent workflow
  • 9. Custom wake-up response
  • 10. Core module testing tools
05.AI Model - Text Version
  • 1.Semantic understand and command follow
  • 2.Multimodal visual understand
  • 3.Multimodal visual understand + PTZ tracking
  • 4.Multimodal visual understand + visual following
  • 5.Multimodal visual understand + visual line patroling
  • 6.Multimodal visual understand + Depth Camera Distance Question Answering
  • 7.Multimodal visual understand+SLAM navigation
  • 8.Multimodal visual understand+SLAM navigation + visual line patroling
  • 9.Intention estimation + Multimodal visual understand + SLAM navigation + visual functions
06.AI Model - Voice Version
  • 1.Semantic understand and command follow
  • 2.Multimodal visual understand
  • 3.Multimodal visual understand + PTZ tracking
  • 4.Multimodal visual understand + visual following
  • 5.Multimodal visual understand + visual line patroling
  • 6.Multimodal visual understand + Depth Camera Distance Question Answering
  • 7.Multimodal visual understand+SLAM navigation
  • 8.Multimodal visual understand+SLAM navigation + visual line patroling
  • 9.Intention estimation + Multimodal visual understand + SLAM navigation + visual functions
07.Chassis Control Course
  • 1.ROS control
  • 2.Handle control
  • 3.Keyboard control
  • 4.Linear velocity calibration
  • 5.Angular velocity calibration
  • 6.URDF Model
08.Mediapipe Visual Course
  • 1.Hand detection
  • 2.Posture detection
  • 3.Overall detection
  • 4.Facial Landmark Detection
  • 5.Face detection
  • 6.Face special effects
  • 7.3D object recognition
  • 8.Brush
  • 9.Finger control
  • 10.Gesture Recognition
  • 11.Palm Targeting
  • 12.Fingertip trajectory recognition
09.Advanced Visual Course
  • 1.QR code
  • 2.Human Pose Estimation
  • 3.Object Detection
  • 4.AR Vision
  • 5.ROS+Opencv Basics
  • 6.Yolov8 Object Detection (ORIN)
  • 7.Deep Learning Object Tracking (ORIN)
10.USB Camera Vision Course
  • 01.Color tracking
  • 02.Face Tracking
  • 03.AprilTag machine code tracking
  • 04.KCF Object Tracking
  • 05.QR code tracking
  • 06.Mediapipe gesture tracking
  • 07.Meidpipe human posture tracking
  • 08.Color Follow
  • 09.Face Following
  • 10.AprilTag machine code following
  • 11.QR code follow
  • 12.Mediapipe gesture recognition and following
  • 13.Meidpipe human posture following
  • 14.Visual tracking autonomous driving
  • 15.QR code motion control
  • 16.Gesture motion control
11.Depth Camera Vision Course
  • 1.Basic use of depth camera
  • 2.Deep pseudo-color image
  • 3.Depth camera ranging
  • 4.Color block volume measurement
  • 5.Color Following
  • 6.Face Following
  • 7.QR code follow
  • 8.Machine code following
  • 9.KCF Object Following
  • 10.Mediapipe gesture following
  • 11.Mediapipe Posture Following
  • 12.Visual tracking autonomous driving
  • 13.Edge Detection
12.LiDAR Course
  • 1.Basic use of Lidar
  • 2.Lidar obstacle avoidance
  • 3.Lidar following
  • 4.Lidar patrol
  • 5.Gmapping-SLAM mapping
  • 6.Cartographer-SLAM mapping
  • 7.slam_toolbox mapping
  • 8.Navigation2 single-point navigation avoid
  • 9.Navigation2 multi-point navigation avoid
  • 10.Cartographer Repositioning navigation
  • 11.RTAB-Map mapping
  • 12.RTAB-Map navigation
  • 13.APP mapping navigation
13.Multi-vehicle Course
  • 1.Multi-vehicle control
  • 2.Multi-vehicle navigation
  • 3.Multi-vehicle platoon
14.Autonomous Driving expand(Need purchase track map)new
Multimodal visual understand+SLAM navigation
  • 1. Multimodal visual understand+SLAM navigation
Orin&RDKX5-Autonomous driving
  • 1. Venue placement and precautions
  • 2. Start testing
  • 3. Identify and debug
  • 4. Lane keeping
  • 5. Road sign detection
  • 6. Traffic light recognition
  • 7. Fixed point parking
  • 8. Steering decision
  • 9. Horn sounding
  • 10. Deceleration
  • 11. Speed limit
  • 12. Autonomous parking
  • 13. Comprehensive application
  • 14. Unmanned driving integrated AI large model
Jetson Nano-Autonomous driving
  • 1. Venue placement and precautions
  • 2. Start testing
  • 3. Identify and debug
  • 4. Lane keeping
  • 5. Road sign detection
  • 6. Traffic light recognition
  • 7. Fixed point parking
  • 8. Steering decision
  • 9. Horn sounding
  • 10. Deceleration
  • 11. Speed limit
  • 12. Autonomous parking
  • 13. Comprehensive application
Road network planning
  • 1. Introduction to Road Network Planning and Navigation
  • 2. Constructing a Pose Map
  • 3. Road Network Labelling
  • 4. Road Network Planning Combined with Sand Table Map Case Study
  • 5. Path Replanning
Model Training
  • 1. Data Collection
  • 2. Dataset Annotation
  • 3. YOLOv11 Model Training
  • 4. Model Format Conversion
15.YOLOv11 Development (ORIN)
  • 1.YOLO environment construction
  • 2.CLI use
  • 3.Object detection
  • 4.Instance segmentation
  • 5.Pose estimation
  • 6.Image classification
  • 7.Oriented object detection
  • 8.Model conversion
  • 9.Dataset annotation
  • 10.Model training conversion
  • 11.Model prediction
16.YOLOv11 Development (Raspberry Pi & Jetson Nano)
  • 1.YOLO environment construction
  • 2.CLI use
  • 3.Object detection
  • 4.Instance segmentation
  • 5.Pose estimation
  • 6.Image classification
  • 7.Oriented object detection
  • 8.Model conversion
  • 9.Model prediction
17.YOLOV11 development course(RDK X5)
  • 1.YOLO environment construction
  • 2.CLI use
  • 3.Object detection
  • 4.Instance segmentation
  • 5.Pose estimation
  • 6.Image classification
  • 7.Oriented object detection
  • 8.Model prediction
  • 9.Model Quantization
18.Main control board course
Jetson Nano B01
  • 1. Introduction to the Jetson Nano B01 SUB Board
  • 2. Burn the system image
  • 3. Re-read the memory card or USB drive that has been burned
  • 4. Startup system
  • 5. Jetson Nano B01 System and Desktop Introduction
  • 6. Memory card or USB flash drive expansion
  • 7. Network Configuration
  • 8. SSH remote login & file transfer
  • 9. VNC Remote Login
  • 10. Jetson Nano B01 system backup
  • 11. Jetson Nano Swap space increased
  • 12. Installation and use of Jtop
  • 13. Third-party board + USB drive to start the car
Jetson Orin Nano_NX
  • 1.Jetson Orin board introduction
  • 2.Restore the factory image system
  • 3.Backup SSD system
  • 4.SSD expansion
  • 5.Network configuration
  • 6.SSH remote login
  • 7.VNC remote control
  • 8.Remote file transfer
  • 9.Jtop tool
  • 10.Exchange space expansion
Raspberry Pi
  • 1. Introduction to Raspberry PI 5
  • 2. Raspberry PI system installation and backup
  • 3. Powering the Raspberry PI 5
  • 4. Startup of Raspberry PI 5
  • 5. Update and upgrade operating system
  • 6. Introduction to raspi-config tool
  • 7. config.txt file description
  • 8. Network Configuration
  • 9. remote access
  • 10. Transfer files remotely
  • 11. Set display resolution and rotation
  • 12. Set screen to sleep
  • 13. Play audio and video
  • 14. Using USB camera
  • 15. Using MIPI camera
  • 16. Get real-time temperature of Raspberry Pi
RDK X5
  • 1.Introduction to RDK X5 board
  • 2.Write system file
  • 3.Hardware interface description
  • 4.Install case and other accessories
  • 5.Network configuration
  • 6.Remote login
  • 7.Update system
  • 8.srpi-config user guide
  • 9.config. txt configuration file
  • 10.Self-startup setting
  • 11.RDK exclusive command usage
  • 12.Linux command usage
  • 13.GPIO readwrite operation
  • 14.Image classification algorithm
  • 15.Use USB camera
  • 16.Use MIPI camera
  • 17.Binocular camera depth algorithm
19.AI large model course(ORIN-Pi-RDK X5)
Offline large model (Text Interaction)
  • 0. AI Large Model Mirroring Explanation
  • 1. Deployment of large-scale AI models
  • 2.Installation of the large-scale model dialogue platform
  • 3. Meta AI Llama 3.2 model
  • 4. Alibaba Cloud Qwen3 Model
  • 5. Microsoft Phi-4 mini model
  • 6. DeepSeek DeepSeek-R1 model
  • 7. Alibaba Cloud Qwen2.5vl Visual Multimodal Large Model
  • 8. Google Gemma3 Visual Multimodal Large Model
  • 9. Llava Visual Multimodal Large Model
  • 10.MiniCPM-V Visual Multimodal Large Model
  • 11. Multimodal Visual Understanding Applications
  • 12. Multimodal Text-Based Image Application
  • 13. Multimodal Video Analysis Application
  • 14. Multimodal visual positioning applications
  • 15. Multimodal table scanning application
  • 16. Multimodal Autonomous Agent Application
Offline large model (Voice Interaction)
  • 0. Voice Interaction Hardware Connection (Must Read)
  • 1. Offline speech-to-text (ASR)
  • 2. Offline Text-to-Speech (TTS)
  • 3. AI large model voice interaction
  • 4. Multimodal visual understanding and voice interaction
  • 5. Multimodal Text-Based Image Application
  • 6. Multimodal Video Analysis Application
  • 7. Multimodal visual positioning applications
  • 8. Multimodal table scanning application
  • 9. Multimodal Autonomous Agent Applications
  • 10. AI large model offline voice assistant
Online large model (Text Interaction)
  • 1. OpenRouter Large Model API Aggregation Platform
  • 2. Multimodal visual understanding applications
  • 3. Multimodal visual positioning applications
  • 4. Multimodal table scanning application
  • 5. Multimodal Autonomous Agent Applications
Online large model (Voice Interaction)
  • 0. Voice Interaction Hardware Connection (Must Read)
  • 1. Online speech-to-text (ASR)
  • 2. Online Text-to-Speech (TTS)
  • 3. AI large model voice interaction
  • 4. Multimodal visual and voice interaction
  • 5. Multimodal visual positioning applications
  • 6. Multimodal table scanning application
  • 7. Multimodal Autonomous Agent Applications
  • 8. AI large model online voice assistant
20.AI large model course(Jetson NANO)
Offline large model (Text Interaction)
  • 4.Multimodal visual understand speech interaction
  • 0.AI large model system image instructions
  • 1.AI large model environment deployment
  • 2.Install large model dialogue platform
  • 3.Meta AI llama 3.2 model
  • 4.Alibaba Cloud Qwen2 model
  • 5.Alibaba Cloud Qwen3 model
  • 6.SUTD TinyLlama
  • 7.DeepSeek DeepSeek-R1 model
  • 8.Microsoft Phi-3
  • 9.Microsoft Orca Mini
  • 10.NVIDIA StarCoder2
  • 11.Google Gemma3 Visual Multimodal Large Model
  • 12.Offline Text to Speech (TTS)
  • 13.Offline Speech to Text (ASR)
Online large model (Text Interaction)
  • 1.OpenRouter large model API aggregation platform
  • 2.Multimodal visual understand application
  • 3.Multimodal visual localization application
  • 4.Multimodal table scanning application
  • 5.Multimodal autonomous proxy application
Online large model (Voice Interaction)
  • 0.Voice interaction hardware connection (ReadMe)
  • 1.Online speech-to-text (ASR)
  • 2.Online Text-to-Speech (TTS)
  • 3.AI large model voice interaction
  • 5.Multimodal visual position application
  • 6.Multimodal table scanning application
  • 7.Multimodal autonomous proxy application
  • 8.AI large model online voice assistant
21.Linux operating system course
  • 1.Introduction to Linux system
  • 2.Ubuntu file system
  • 3.Ubuntu common commands
  • 4.Ubuntu common editors
  • 5.Ubuntu software operation commands
  • 6.Virtual machine installation
  • 7.SSH remote control
  • 8.VNC remote control
  • 9.Transfer files remotely
  • 10.Driver library and communication
  • 11.Static IP and hotspot mode
  • 12.Bind device ID
  • 13.Capacity expansion and resource allocation
  • 14.Update system software sources
  • 15.Set root user password
  • 16.sudo free password
  • 17.Connect to WiFi network
  • 18.View system version
  • 19.Customized service management
  • 20.Back up system image
22.Docker Course
  • 1.Docker Introduction and Installation
  • 2.Docker basic commands
  • 3.Docker Submission and Multi-Terminal Access
  • 4.Docker Startup Script
  • 5.Docker-Vscode environment construction
23.ROS2 Basic Course
  • 1.Introduction to ROS2
  • 2.ROS2 install Humble
  • 3.ROS2 development environment
  • 4.ROS2 workspace
  • 5.ROS2 function package
  • 6.ROS2 node
  • 7.ROS2 topic communication
  • 8.ROS2 service communication
  • 9.ROS2 action communication
  • 10.ROS2 custom interface message
  • 11.ROS2 parameter service case
  • 12.ROS2 meta-function package
  • 13.ROS2 distributed communication
  • 14.ROS2 DDS
  • 15.ROS2 time related API
  • 16.ROS2 common command tools
  • 17.ROS2 rviz2 use
  • 18.ROS2 rqt toolbox
  • 19.ROS2 Launch startup file configuration
  • 20.ROS2 recording and playback tool
  • 21.ROS2 URDF model
  • 22.ROS2 Gazebo simulation platform
  • 23.ROS2 TF2 coordinate transformation
24.Image Processing Basics Course
  • 1. Introduction to Open Source CV
  • 2. Image reading and display
  • 3. Image writing
  • 4. Image quality
  • 5. Pixel Operation
  • 6. Image zoom
  • 7. Image cutting
  • 8. Image translation
  • 9. Image Mirroring
  • 10. Affine Transformation
  • 11. Image Rotation
  • 12. Perspective Transformation
  • 13. Grayscale processing
  • 14. Image Binarization
  • 15. Edge Detection
  • 16. Line drawing
  • 17. Rectangle and circle drawing
  • 18. Drawing text and pictures
25.Control Board STM32 Driver Course
  • 0. Notes (must read)
  • 1. About expansion board
  • 2. STM32 Development environment
  • 3. Button control
  • 4. FreeRTOS application
  • 5. Serial communication
  • 6. SBUS model aircraft remote control
  • 7. CAN bus communication
  • 8. RGB colorful light bar
  • 9. Timer interrupt to control PWM servo
  • 10. Control serial port servos
  • 11. Nine-axis attitude sensor to obtain data
  • 12. Control motor
  • 13. Timer captures the encoder data
  • 14. Robot kinematics analysis theory
  • 15. PID control robot movement
26.Control Board Main Control Communication Course
  • 1. Update the expansion board firmware
  • 2. Install Rosmaster driver library
  • 3. Jupyter lab basic usage tutorial
  • 4. Buzzer whistle
  • 5. Control PWM servo
  • 6. RGB colorful light bar special effects display
  • 7. Control motor
  • 8. Control robot movement
  • 9. Control Serial Servo
Download
  • MainBoard_AI_Pure_System
  • Mapping_APP(iOS_Android)
  • Robot_Image_System_File
  • Code-Firmware
  • VM-File
  • 3D Model File
  • Instruction Manual
  • Software_File
  • Hardware-Info
  • Other_Annex_File
Download ZIP

Welcome to ROSMASTER A1 repository

3.First trial

First Use

First Use1. Connecting the Car1. SSH Connection2. VNC Login2. Network SwitchingJetson Creating WiFiFill in your WiFi informationSet the priorityReboot to take effectVNC ConnectionRaspberry PiCreate a WiFi connectionFill in your WiFi informationSet the priorityReboot to take effectVNC ConnectionRDKX53. Modify the camera and lidar models in the ROS environment

1. Connecting the Car

Recommended Operational Procedure: Connect to the car's hotspot/plug in an Ethernet cable to obtain an IP address → Check the OLED screen's IP address → Log in via VNC → Turn off the automatic hotspot and connect to your own WiFi (for later large model functionality) → Check the OLED's updated IP address → Reconnect via VNC

The factory default hotspot name is: ROSMASTER-A1, password: 12345678, default IP: 192.168.1.11.

Regardless of the method used to connect to the car, both the computer and the car must be on the same LAN. The simplest requirement is to connect to the same WiFi or hotspot. Once connected, you can log in using the following method.

You can also directly connect the to an Ethernet cable. The OLED screen will automatically update its IP address after connecting to the Ethernet cable. The following instructions will demonstrate the various operations using the IP address after connecting to the Ethernet cable.

1. SSH Connection

We can use PuTTY, MobaXterm, or other SSH login tools to connect to the car. Here, we'll use PuTTY as an example. The PuTTY installation download address is as follows: Download PuTTY: latest release (0.83)

Select the installation version based on your computer. After successful installation, double-click to open the PuTTY interface. The PuTTY interface should look like the image below.
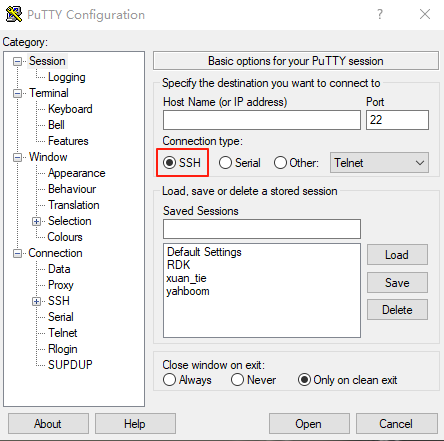
image-20250725102432201

Select SSH and enter the IP address displayed on the OLED in the Host Name (or IP address) field. My IP address is 192.168.2.92, so enter the IP address as shown below.
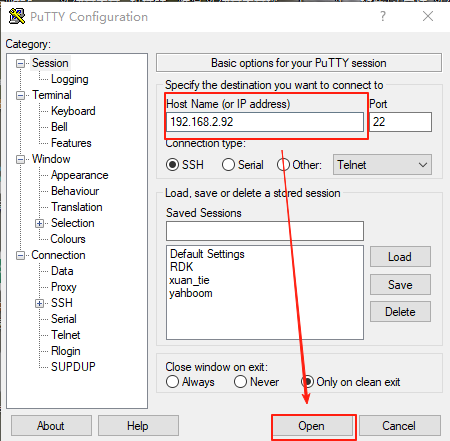
image-20250725102719479

Click Open. A terminal interface and a pop-up window will appear. Click Accept to accept the request, as shown below.
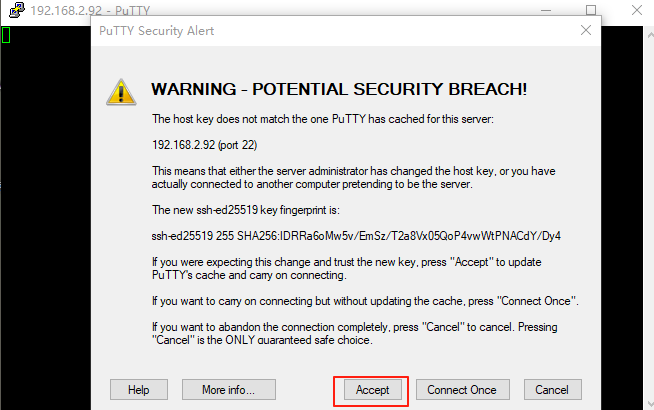
image-20250725102823043

The terminal will display "login as." Enter the username for the car board and press Enter. You will be prompted to enter your password. Enter your password. The username and password for each board are as follows:

主板用户名密码
树莓派5piyahboom
Jetson-Nanojetsonyahboom
Orin-Nanojetsonyahboom
RDK-X5sunriseyahboom

Assuming my is Orin-Nano, enter "jetson" and press Enter. Then enter the password. Nothing will be displayed when entering the password. Enter "yahboom" and press Enter.
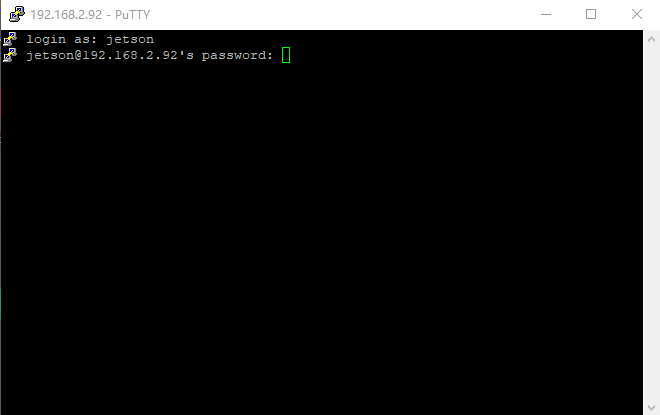
image-20250725103109017

The interface for a successful connection to the car is as follows:
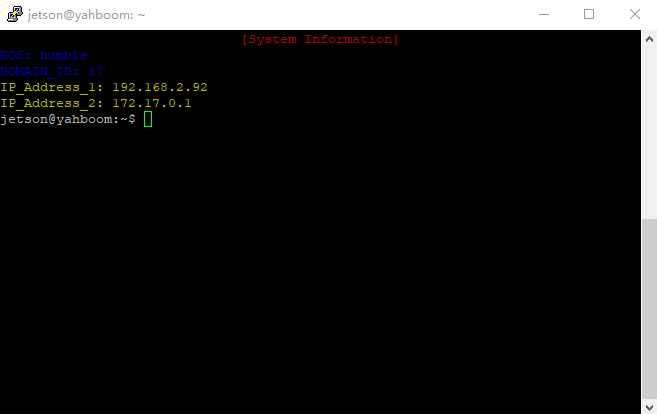
image-20250725103601663

This will only open a terminal; the graphical interface will not be displayed. Therefore, SSH is suitable for logging in when the graphical program is not running.

2. VNC Login

VNC allows users to remotely access and control another computer's desktop environment over a network. Therefore, if we need to access the desktop environment of the car, such as when we want to start the image display, we can use VNC to connect and log in to the car. The VNC download link is as follows: Download VNC Viewer by RealVNC®

Download and install according to your computer version. After successful installation, double-click to open it. The following screen will be displayed.
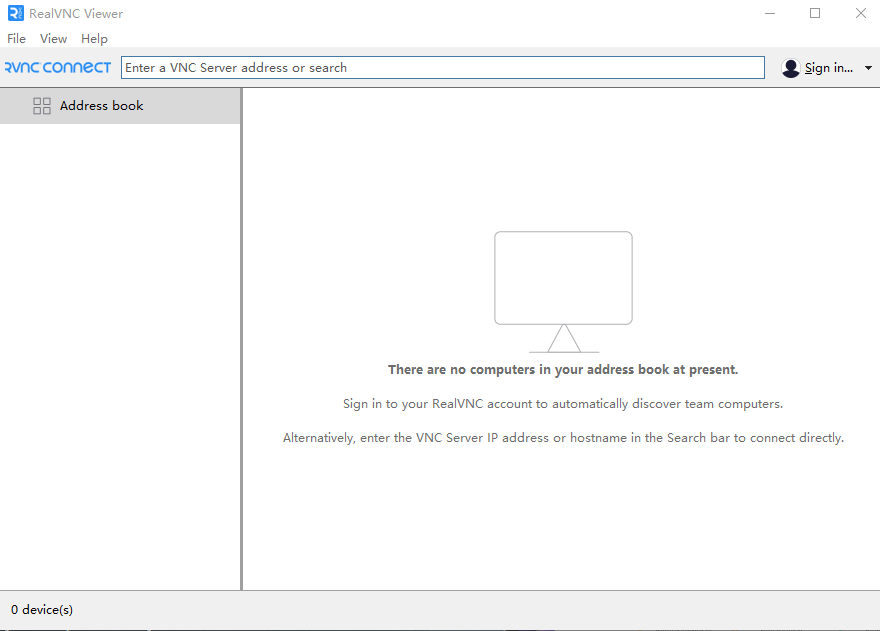
image-20250725105127650

Enter the IP address of your car. Mine is 192.168.2.92, as shown below.
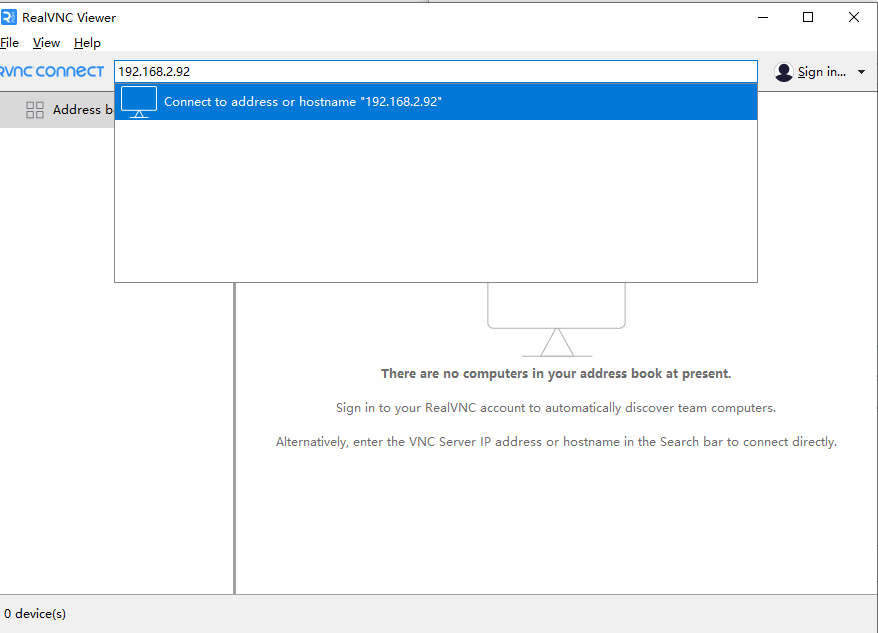
image-20250725105232162

Then press Enter.

image-20250725105315827

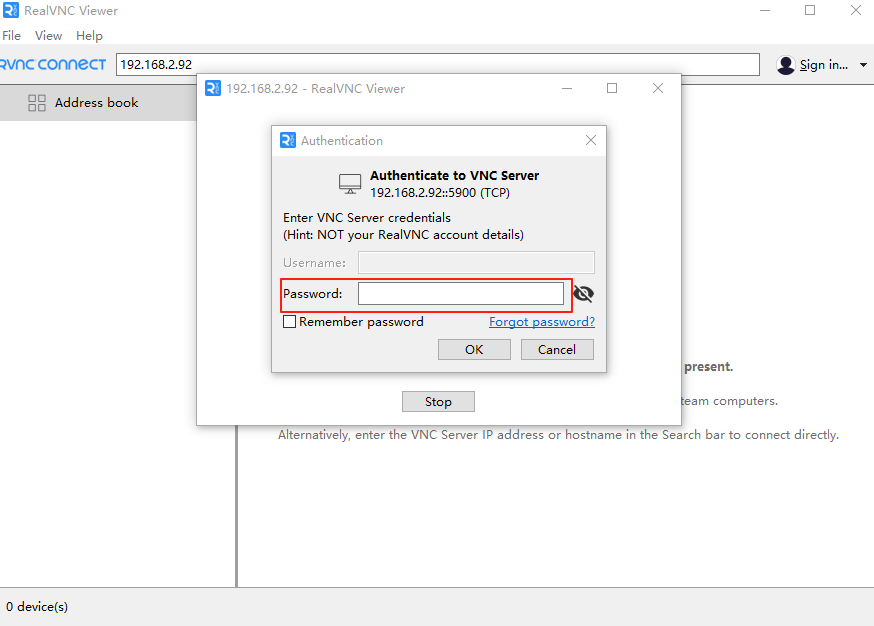
Enter your username in the Username field and your password in the Password field. Refer to the table in 1.1. The password for all s is "yahboom." Click OK to access the desktop, as shown below.
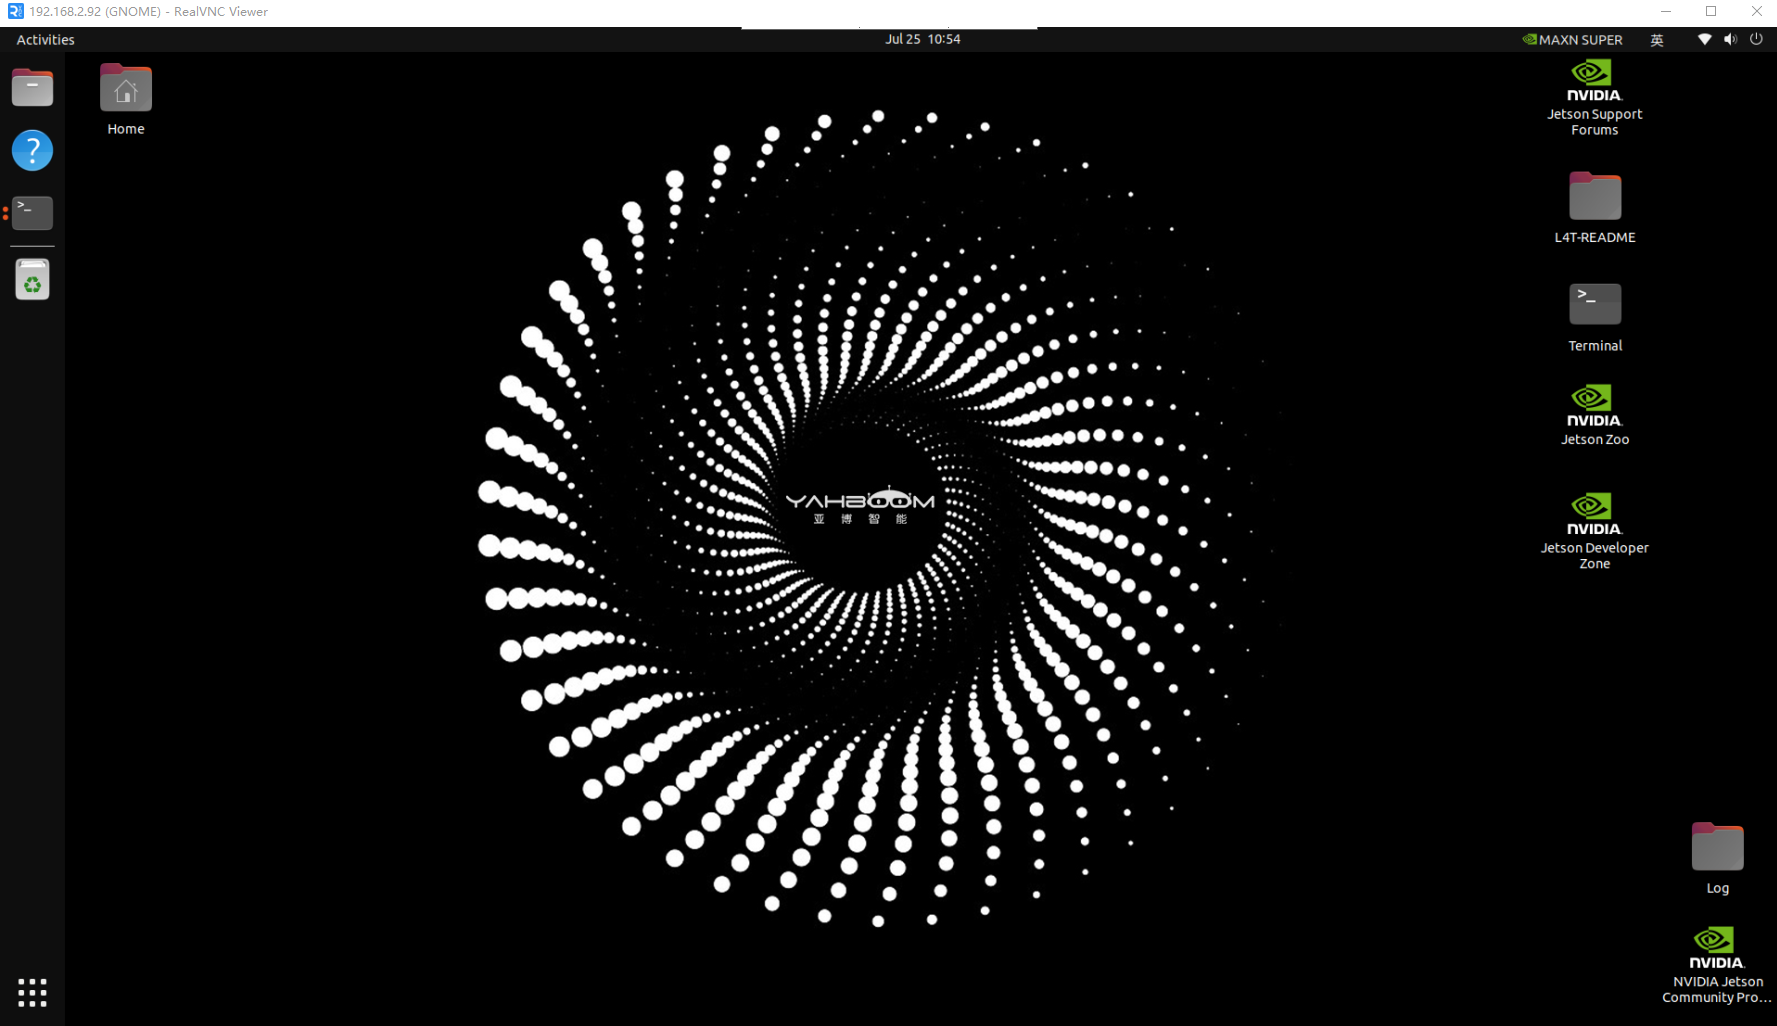
image-20250725105510621

If an abnormal screen displays, such as the one below,
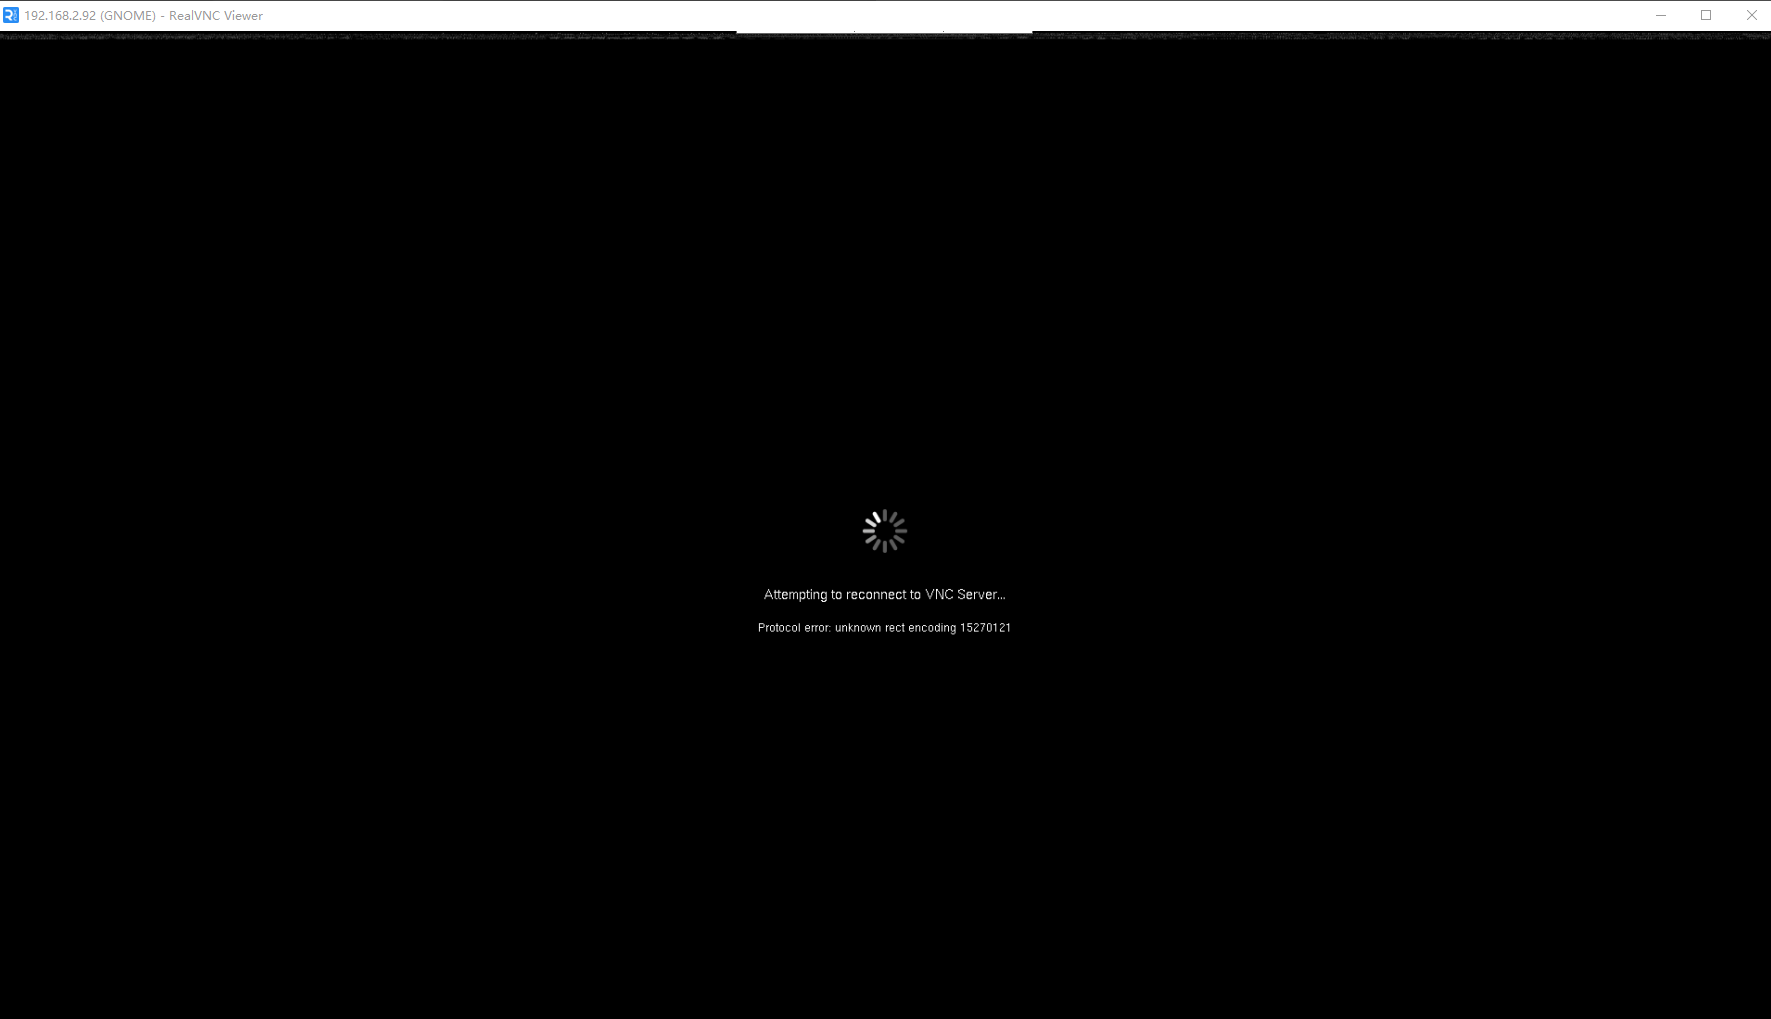
image-20250725105612931

and the system keeps crashing, you need to configure the settings as shown below.
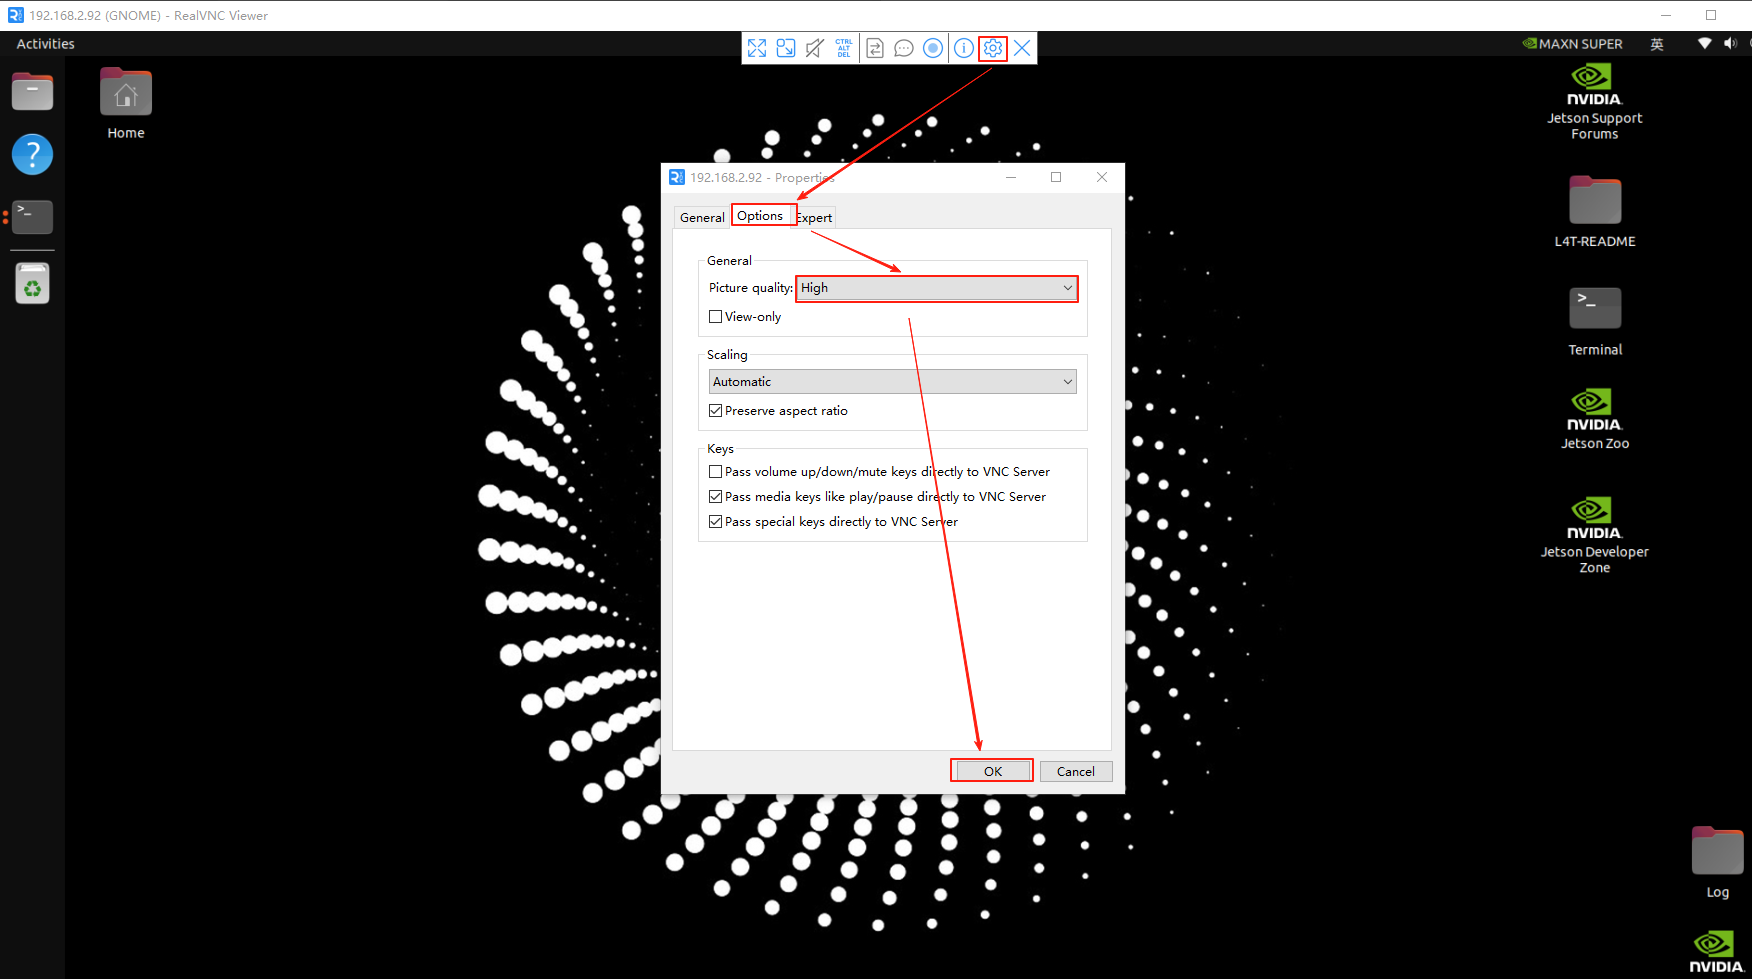
image-20250725105853102

Then reconnect. The Orin can only connect to one remote desktop at a time. If the connection fails, check whether the remote desktop is already connected.

After connecting, since large AI models require an internet connection, and the hotspot is only on the local area network and does not contain actual data, you will need to switch networks to facilitate the use of large AI models later.

2. Network Switching

Jetson

After successfully connecting remotely via VNC, switch to the new network.

Creating WiFi

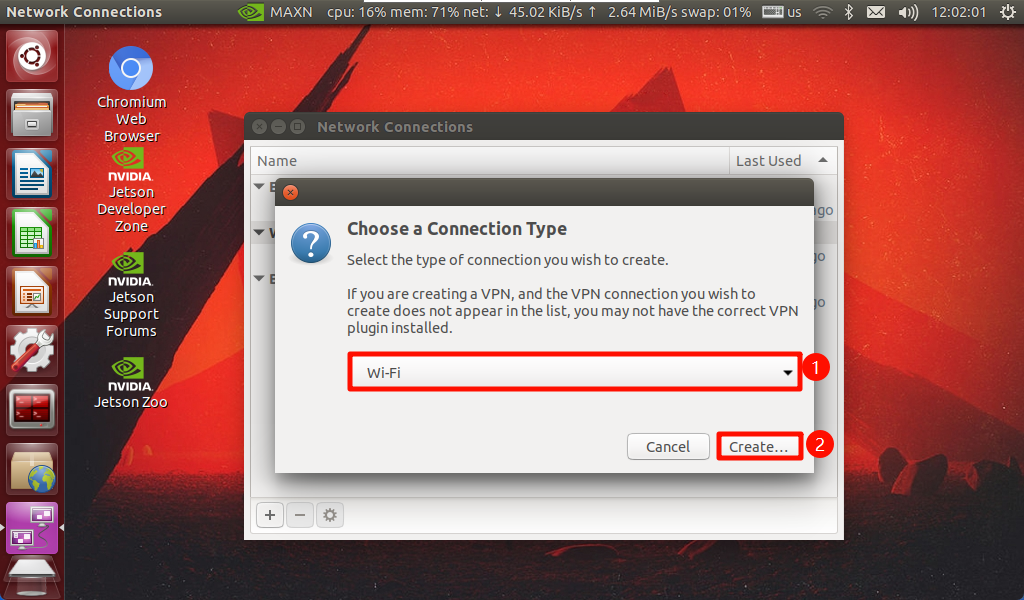
ORIN users, open a terminal and enter the command: nm-connection-editor to open the network connection panel.

Jetson nano users, click the "WiFi icon" → "Edit Connections."
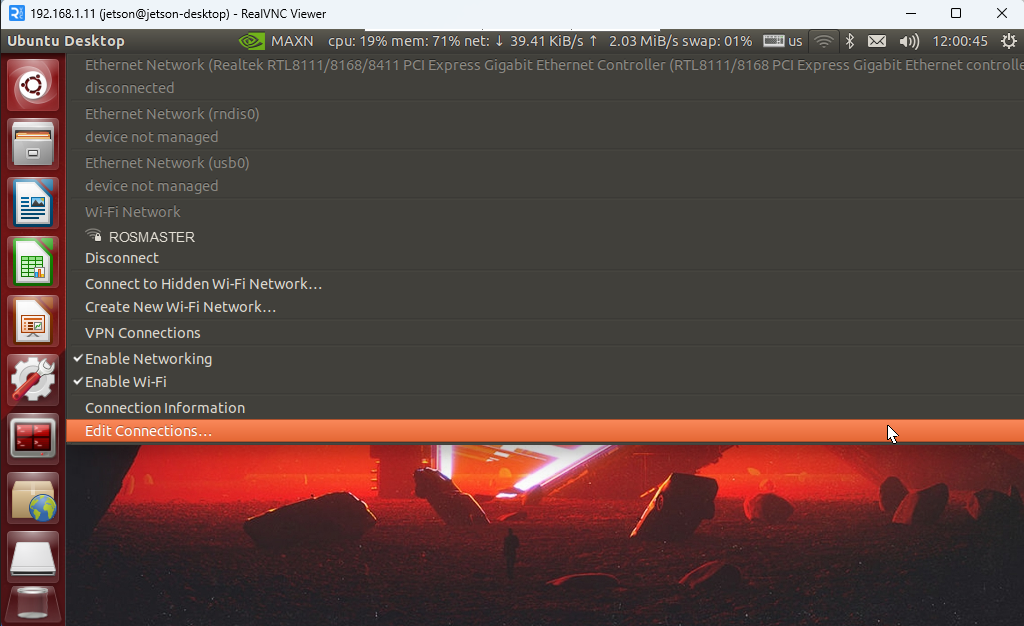
image-20240403181100909

Select "WiFi" → "+" in the lower left corner.
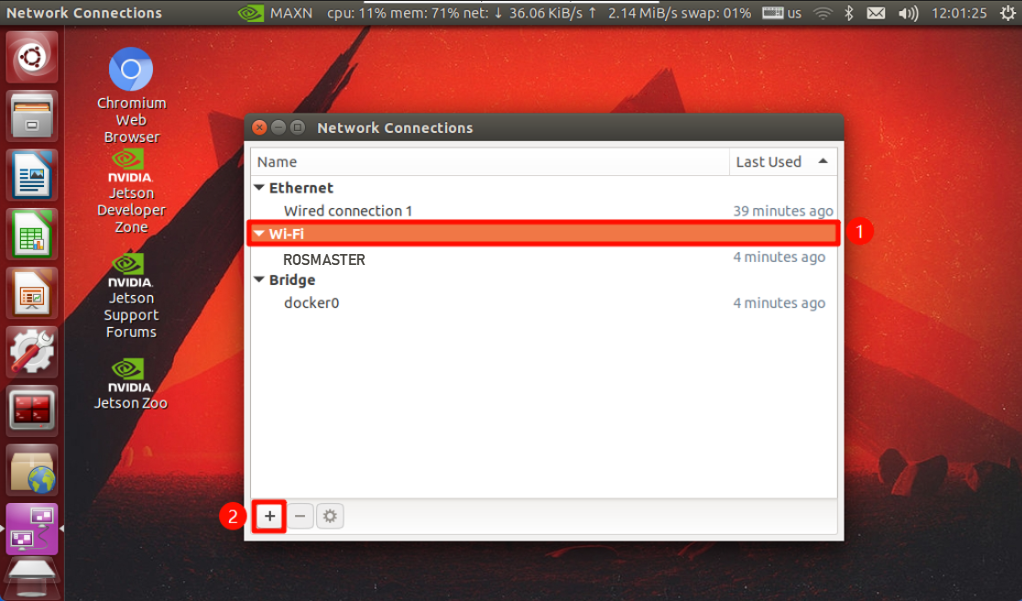
image-20240403181140533

image-20240403181208527

Fill in your WiFi information

This demonstrates connecting to the following WiFi: Yahboom2
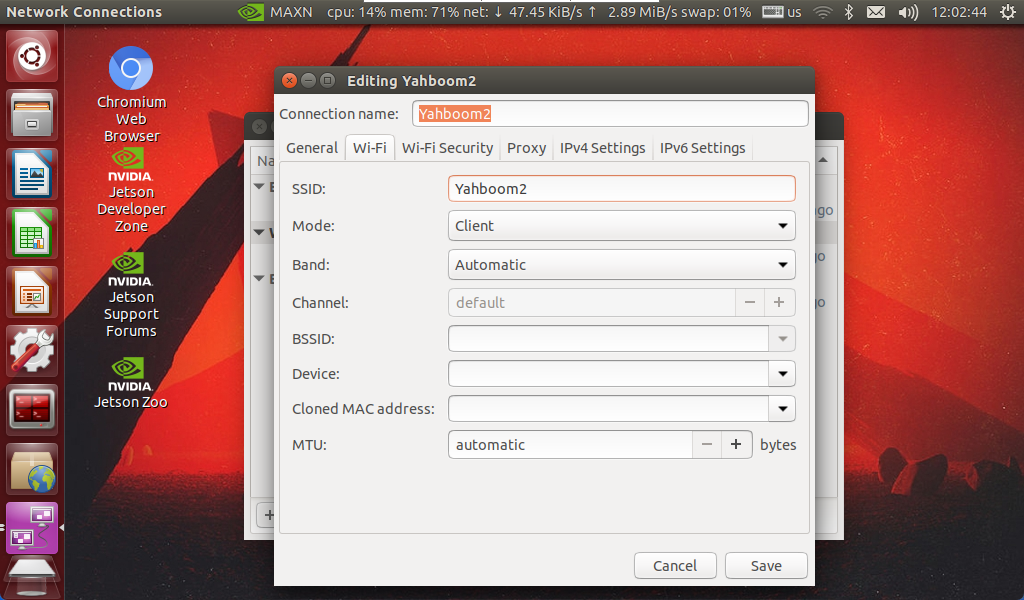
image-20240403181237943

image-20240403181332949

Set the priority

The priority determines the order in which the system prioritizes networks when booting. A higher number indicates a higher priority, and this method is preferred for booting!

xxxxxxxxxx
The ROSMASTER-A1's priority is 3. Therefore, to automatically connect to WiFi upon startup, the WiFi priority must be greater than 3.

image-20240403181443356

Reboot to take effect

After completing the settings, restart the Jetson and observe the IP address on the OLED display. If it changes, the connection is successful!

xxxxxxxxxx
If the IP address displayed on the OLED remains unchanged and the hotspot persists, it means that one of the WiFi name or passwords you entered was incorrect.

VNC Connection

Connect according to the OLED display's IP address; this will not be demonstrated here.

image-20240403181842140

Raspberry Pi

Switching to a different network after a successful VNC remote connection.

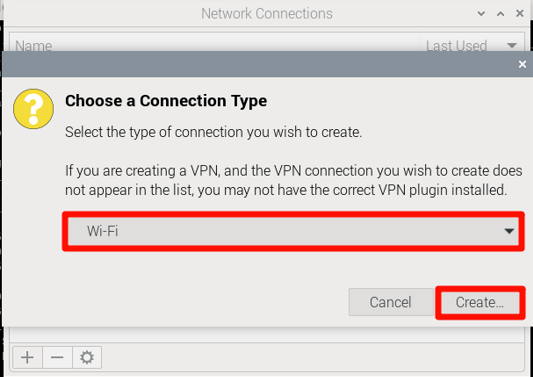
Create a WiFi connection

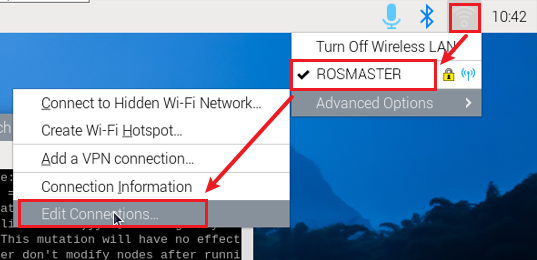
Click the WiFi icon → Advanced options → Edit connections

image-20240408104206422

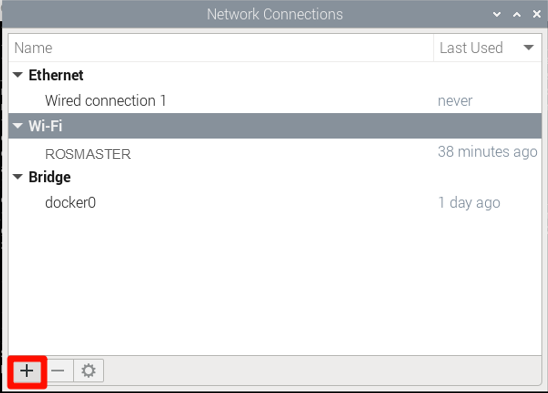
Select WiFi → Click the "+" icon in the lower left corner

image-20240408104235027

image-20240408104259309

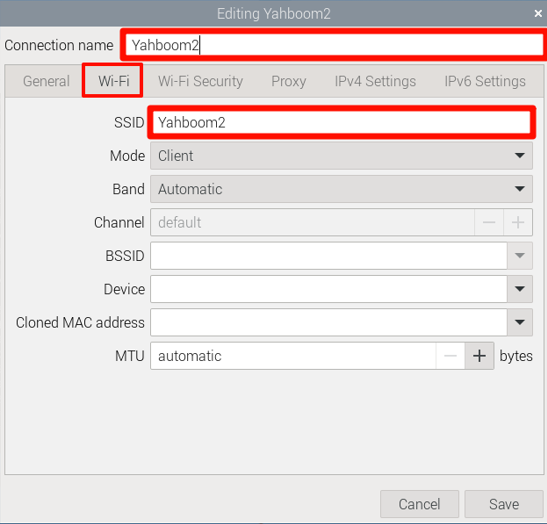
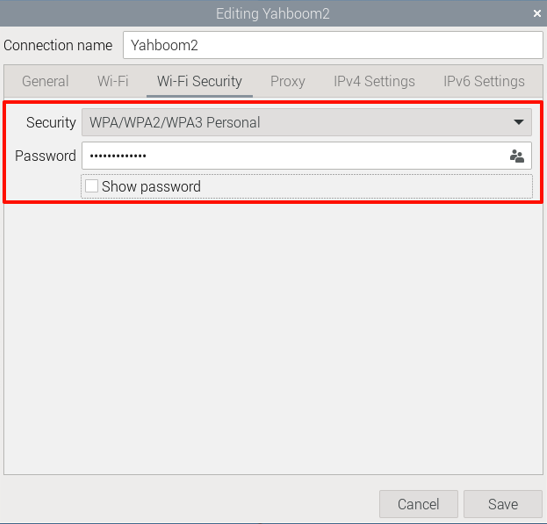
Fill in your WiFi information

xxxxxxxxxx
This demonstrates connecting to the following WiFi: Yahboom2
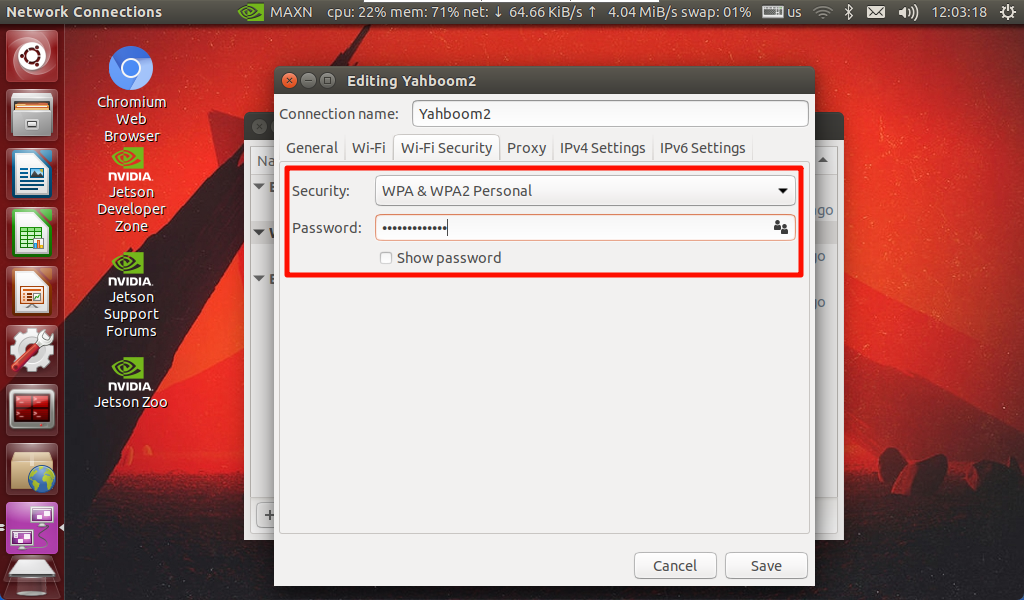
image-20240408104344180

image-20240408104416446

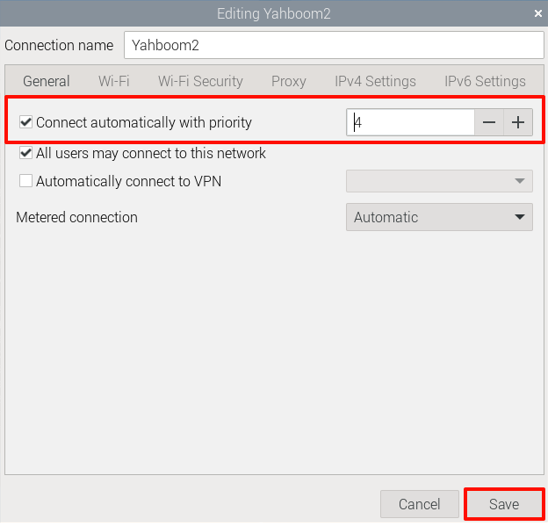
Set the priority

The priority determines the order in which the system prioritizes networks when booting. A higher number indicates a higher priority, and this method is preferred for booting!

xxxxxxxxxx
The ROSMASTER-A1's priority is 3. Therefore, to automatically connect to WiFi upon startup, the WiFi priority must be greater than 3.
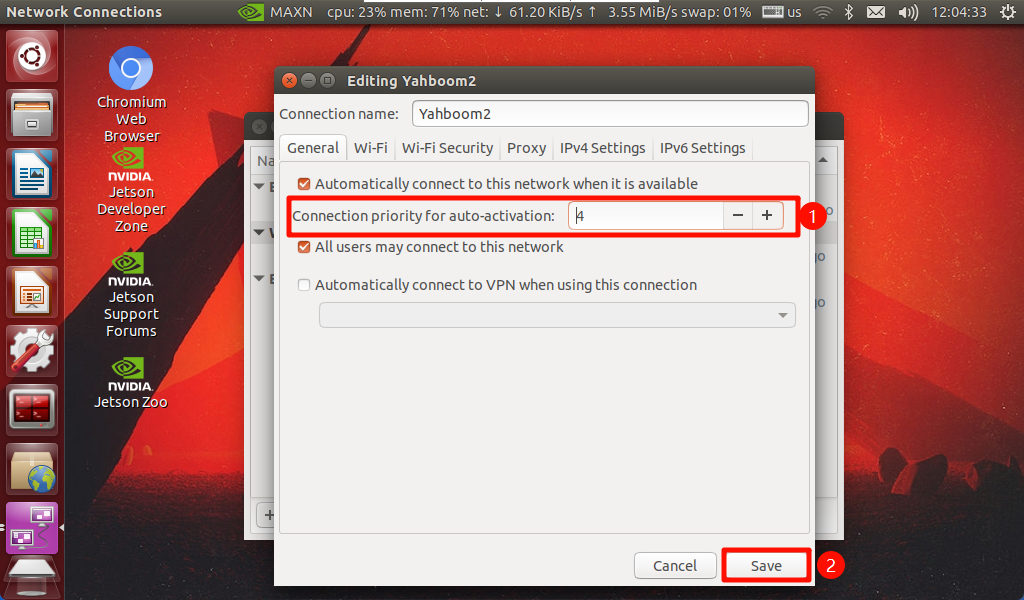
image-20240408104440732

Reboot to take effect

After completing the settings, reboot the Raspberry Pi and observe the IP address on the OLED display. If it changes, the connection is successful!

xxxxxxxxxx
If the IP address displayed on the OLED remains unchanged and the hotspot persists, it means that one of the WiFi name or passwords you entered was incorrect.

VNC Connection

Connect according to the OLED display's IP address; this will not be demonstrated here.
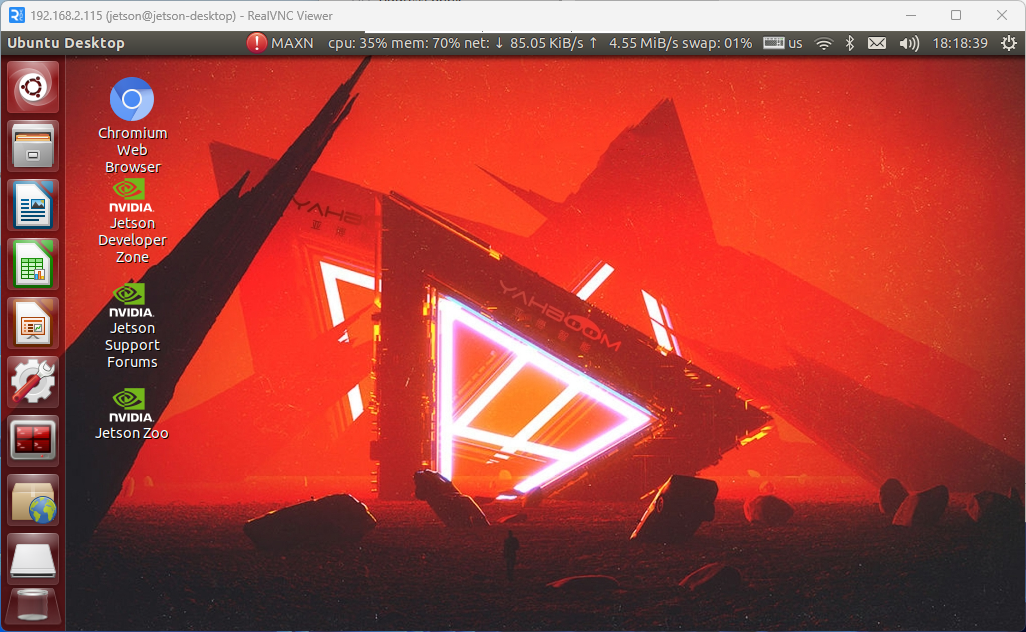
image-20240408104642741

RDKX5

Click the "WiFi icon" → "Edit Connection," and refer to the operation method for Jetson motherboards.

3. Modify the camera and lidar models in the ROS environment

Note: Since the ROSMASTER-A1 robot has two cameras and two lidars, the factory system is configured with routines for multiple devices. However, since it cannot automatically identify the product, you need to manually set the camera type and lidar model.
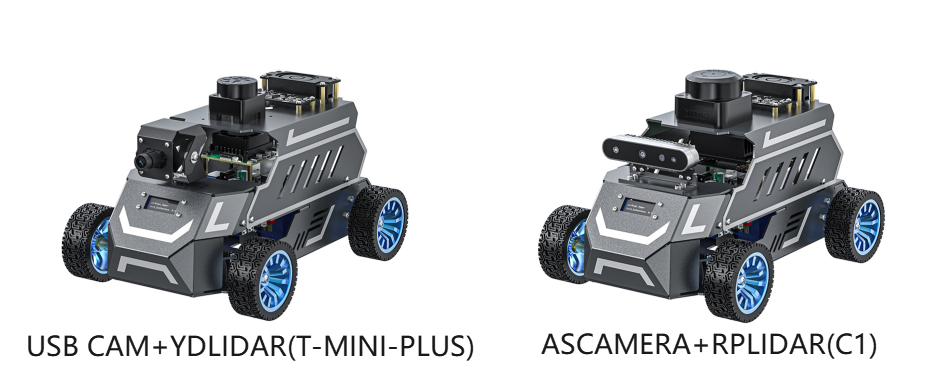
image-20250909203258618

  1. Open the robot system terminal

xxxxxxxxxx
# The Raspberry Pi 5 controller must first enter Docker. Repeat this step.
# If running the script to enter Docker fails, refer to the ROS/07, Docker Tutorial.
~/run_docker.sh
  1. Set the camera and lidar models. Select the command to run based on the selected devices.

If you are using the optional NUWA-HP60C depth camera and C1 lidar, please follow the settings below.

x
#orin,rdk
sh ~/Rosmaster/RobotType/set_A1_nuwa_c1.sh
#Raspberry Pi, Jetson Nano 
sh ~/yahboomcar_ros2_ws/software/RobotType/set_A1_nuwa_c1.sh

If you are using the optional NUWA-HP60C Depth Camera and Tmini lidar, please follow the settings below.

xxxxxxxxxx
#orin,rdk
sh ~/Rosmaster/RobotType/set_A1_nuwa_tmini.sh
#Raspberry Pi, Jetson Nano 
sh ~/yahboomcar_ros2_ws/software/RobotType/set_A1_nuwa_tmini.sh

If you are using the optional USB Camera and C1 lidar, please follow the settings below.

xxxxxxxxxx
#orin,rdk
sh ~/Rosmaster/RobotType/set_A1_usb_c1.sh
#Raspberry Pi, Jetson Nano 
sh ~/yahboomcar_ros2_ws/software/RobotType/set_A1_usb_c1.sh

If you are using the optional USB camera + Tmini lidar, please follow the settings below.

xxxxxxxxxx
#orin,rdk
sh ~/Rosmaster/RobotType/set_A1_usb_tmini.sh
#Raspberry Pi, Jetson Nano 
sh ~/yahboomcar_ros2_ws/software/RobotType/set_A1_usb_tmini.sh
  1. Check if the command has taken effect. Close the terminal, reopen it, and see if the corresponding product model is printed.
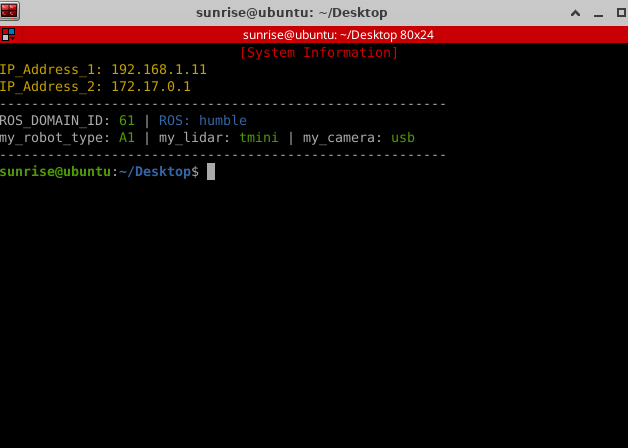
image-20250731161832414

Quick start guide
Calibrate front wheel servo

COMPANY

  • About us
  • Team Style
  • Blog

LEARNING & EXPLORATION

  • Tutorials
  • Edge AI hardware
  • Educational robots
  • Embedded intelligent hardware

WHERE TO BUY

  • Yahboom Online Store
  • Amazon
  • Alibaba
  • AliExpress
  • Mercado

TECHNOLOGY SUPPORT

  • Email: support@yahboom.com

BE A DISTRIBUTOR

  • Email: sales@yahboom.com
QR Code

Copyright © 2017-2026 Yahboom. All Rights Reserved.

EN/中文