Welcome to ROSMASTER A1 repository
17.Binocular camera depth algorithm
Binocular camera depth algorithm
Binocular camera depth algorithm1. Use of the stereo depth estimation algorithm1.1. Start with the RDK X5 official stereo cameraFunction installation and updateStart the binocular model launch file, which includes the algorithm and the startup of the binocular camera nodeExpected results1.2. Offline local image re-injection1.3. In addition, you can start the node through the component method2. Interface descriptionSubscribe to topicPost a topicParameter3. Notes
The stereo depth estimation algorithm is a StereoNet model trained on the SceneFlow dataset using the horizon [OpenExplorer]
The algorithm input is the stereo image data, which are the left and right views. The algorithm output is the depth of the left view.
This example uses the mipi stereo camera as the image data input source, uses the BPU for algorithm reasoning, publishes a topic message containing the left image of the stereo image and the perception result, and renders the algorithm result on the PC rviz2.
1. Use of the stereo depth estimation algorithm
1.1. Start with the RDK X5 official stereo camera
- Connect the power supply
- Connect the binocular mipi camera to the RDK X5, and note that the blue side is facing the HDMI port. Do not connect the wires in reverse, which will cause the left and right images to be swapped and the binocular algorithm to run incorrectly.
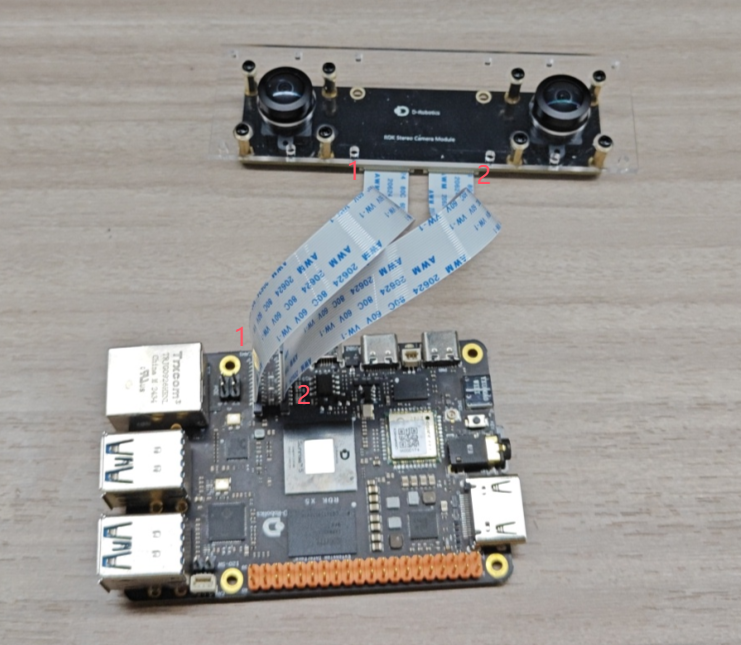
- Connect the development board and the display via an HDMI cable
- Log in to RDK X5 via MobaXterm or other ssh tools (please log in as the root user. Root login username: root password: root)
Function installation and update
- Before running the binocular depth algorithm, you need to ensure that the
tros-humble-mipi-camfunction package is above version 2.3.6 and thetros-humble-hobot-stereonetfunction package is above version 2.3.3. The command to query the function package version is as follows:
apt list | grep tros-humble-mipi-cam

xxxxxxxxxxapt list | grep tros-humble-hobot-stereonet

- If the version does not meet the requirements, you need to update it. Run the following command in the terminal of the RDK system to update it.
xxxxxxxxxxapt update
xxxxxxxxxxapt upgrade
- Note: In some old image versions, there may be a
tros-humble-stereonet-modelfunction package. You need to uninstall it before you can update the function package. Run the following command in the terminal of the RDK system:
Confirm that the system has the tros-humble-stereonet-model function package
xxxxxxxxxxapt list | grep tros-humble-hobot-stereonet-model
Uninstall
xxxxxxxxxxsudo apt-get remove tros-humble-stereonet-model
If the uninstallation fails, execute the forced deletion command (optional)
xxxxxxxxxxsudo dpkg --remove --force-all tros-humble-stereonet-model
Installing New packages
xxxxxxxxxxsudo apt install -y tros-humble-hobot-stereonet
- Confirm whether the camera connection is normal. Connect to RDK X5 via SSH and execute the following command. If the output is as shown in the figure, it means that the camera connection is normal.
xxxxxxxxxxi2cdetect -r -y 4i2cdetect -r -y 6
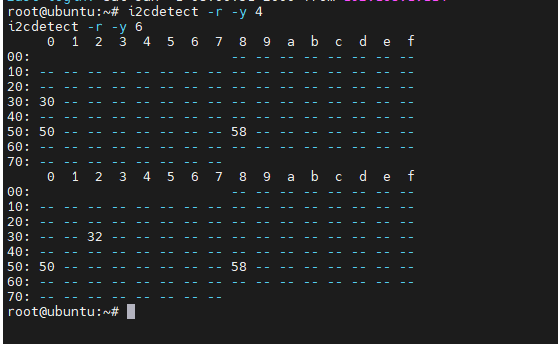
- Start the binocular algorithm, connect to RDK X5 via ssh, and execute the following command:
Configure tros.b humble environment
xxxxxxxxxxsource /opt/tros/humble/setup.bash
Start the stereo model launch file, which includes the algorithm and the startup of the stereo camera node.
xxxxxxxxxxros2 launch hobot_stereonet stereonet_model_web_visual_v2.launch.py \need_rectify:=False mipi_image_width:=640 mipi_image_height:=352 mipi_lpwm_enable:=True \height_min:=-10.0 height_max:=10.0 pc_max_depth:=5.0
- If the user wants to save the depth estimation results, you can add the following parameters to achieve it,
save_image_allturns on the save switch,save_freqcontrols the save frequency, and the image will be saved in thestereonet_imagesdirectory:
# Configure tros.b humble environment
xxxxxxxxxxsource /opt/tros/humble/setup.bash
Start the binocular model launch file, which includes the algorithm and the startup of the binocular camera node
xxxxxxxxxxros2 launch hobot_stereonet stereonet_model_web_visual_v2.launch.py \need_rectify:=False mipi_image_width:=640 mipi_image_height:=352 mipi_lpwm_enable:=True \height_min:=-10.0 height_max:=10.0 pc_max_depth:=5.0 \save_image_all:=True save_freq:=4
Expected results
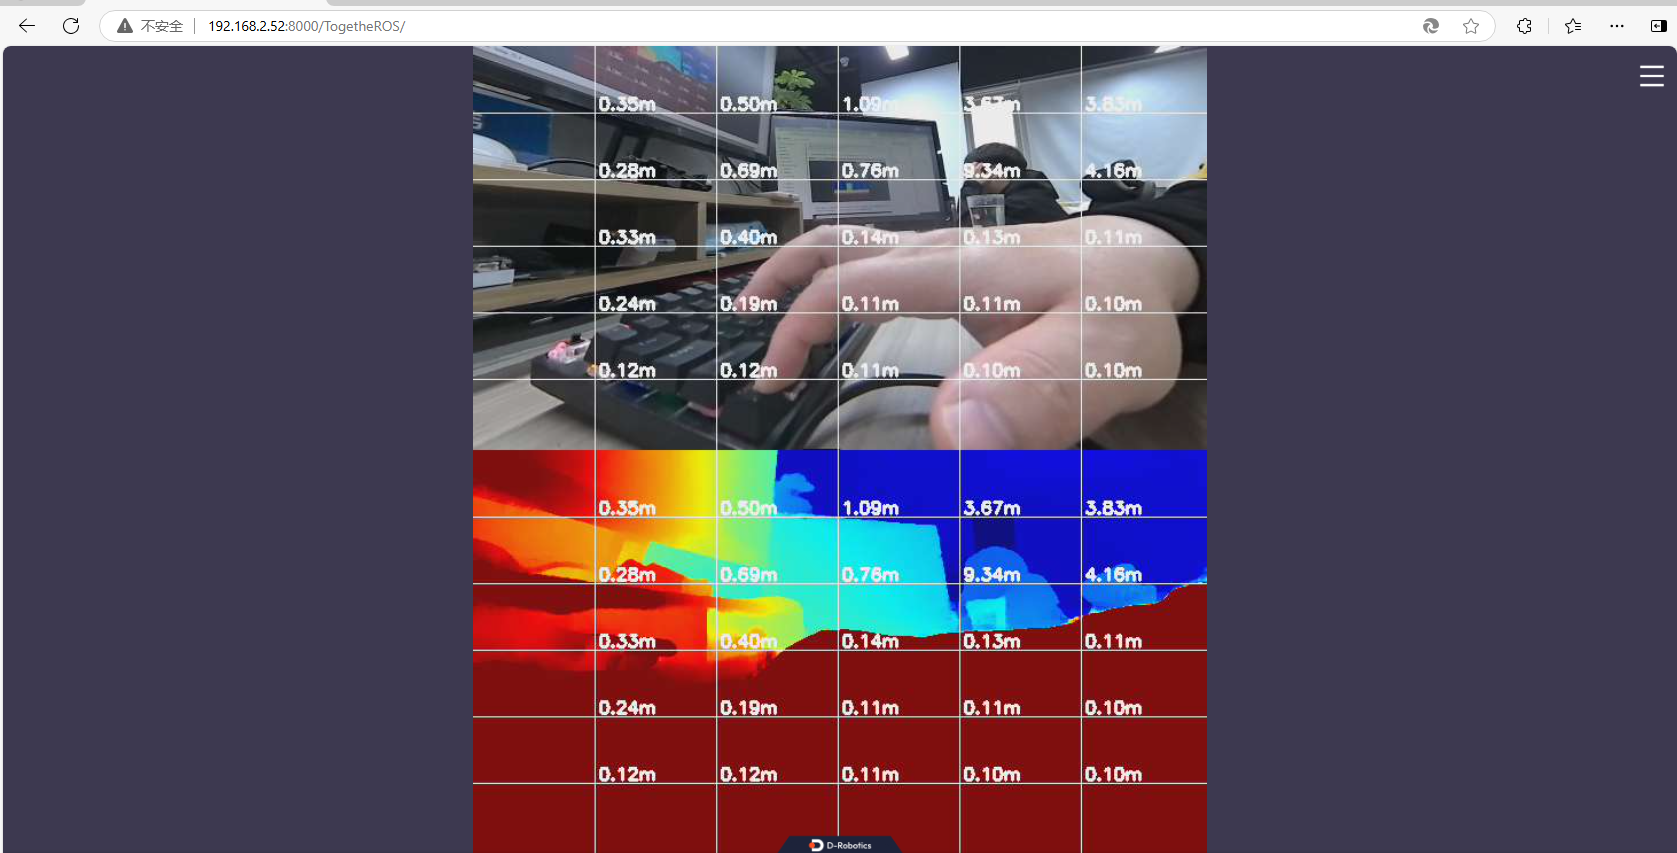
- To view the depth map via the web page, enter http://ip:8000 in the browser (the RDK X5 IP in the picture is 192.168.2.52):
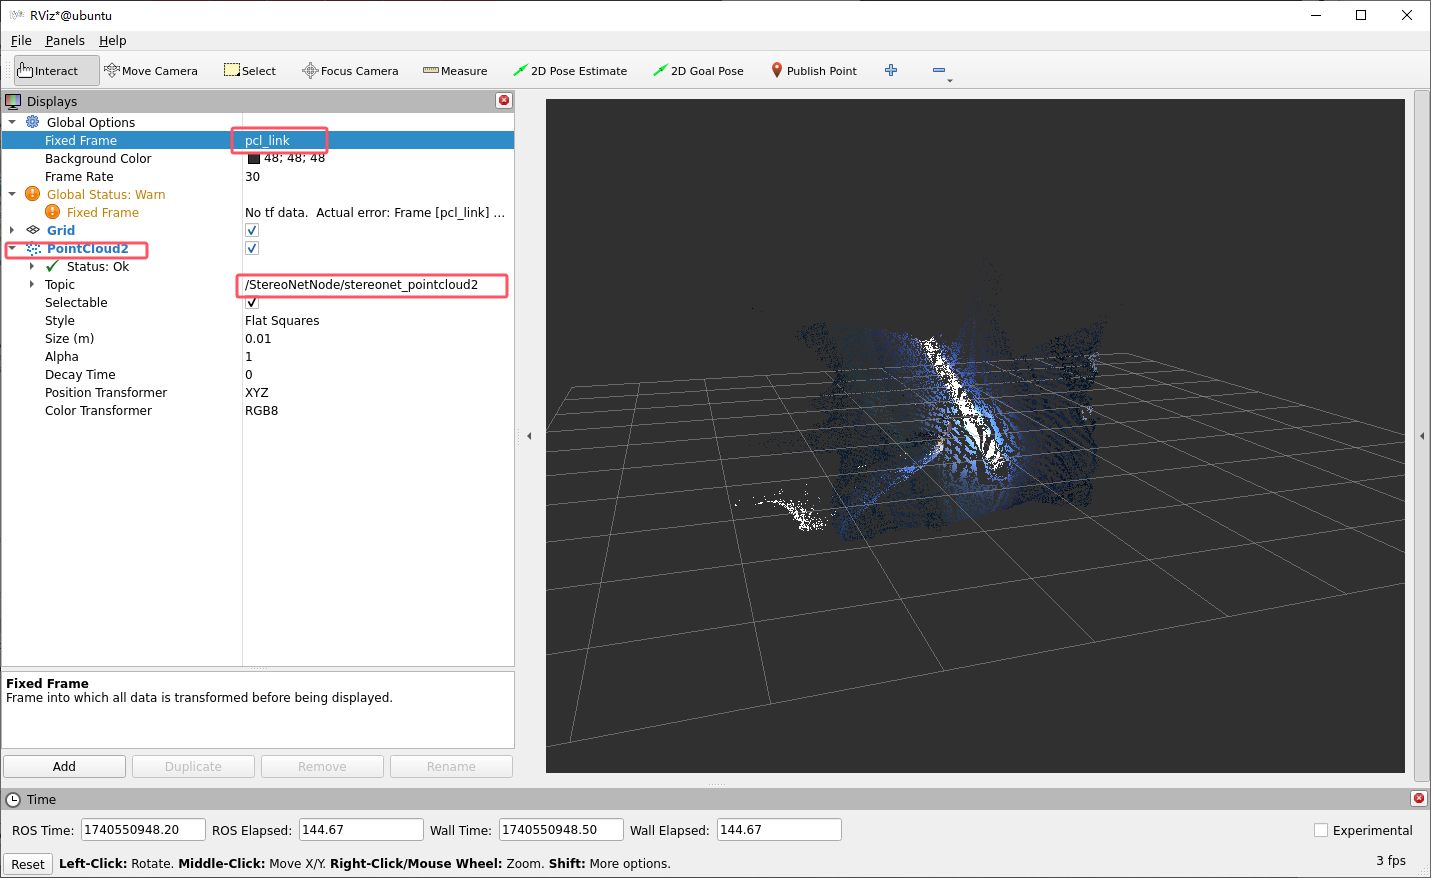
- To view point clouds through rviz, users need to have a certain ROS2 foundation, configure PC and RDK X5 to the same network segment, be able to ping each other, and subscribe to related topics published by the binocular model node before they can display point clouds in rviz. Note that the following configurations need to be made in rviz.
1.2. Offline local image re-injection
- If you want to use local images to evaluate the algorithm effect, you can use the following command to specify the algorithm operation mode, image data address and camera internal parameters, and ensure that the image data is dedistorted and aligned with the epipolar line. The image format is shown in the figure below. The first left-eye image is named left000000.png, the second left-eye image is named left000001.png, and so on. The corresponding first right-eye image is named right000000.png, the second right-eye image is named right000001.png, and so on. The algorithm traverses the images in sequence until all images are calculated:

- The algorithm runs offline as follows. Connect to RDK X5 via ssh and execute the following command. The offline running results will be saved in the
stereonet_imagesdirectory:
Configure tros.b humble environment
xxxxxxxxxxsource /opt/tros/humble/setup.bash
Start the stereo model launch file. Pay attention to the camera parameter settings. You need to manually enter the corrected parameters.
xros2 launch hobot_stereonet stereonet_model_web_visual.launch.py \need_rectify:=False use_local_image:=True local_image_path:=Offline Data Directory \stereonet_model_file_path:=/opt/tros/humble/share/hobot_stereonet/config/x5baseplus_alldata_woIsaac.bin postprocess:=v2 \camera_fx:=505.044342 camera_fy:=505.044342 camera_cx:=605.167053 camera_cy:=378.247009 base_line:=0.069046 \height_min:=-10.0 height_max:=10.0 pc_max_depth:=5.0 save_image_all:=True
The meanings of the parameters are as follows:
| Name | Parameter Value | Description |
|---|---|---|
| use_local_image | Default False | Whether to enable image reload mode |
| local_image_path | - | The directory where the image is reloaded |
| camera_fx | - | Camera internal parameters |
| camera_fy | - | Camera internal parameters |
| camera_cx | - | Camera internal parameters |
| camera_cy | - | Camera internal parameters |
| base_line | - | Baseline distance |
- After the algorithm runs successfully, you can also display the real-time rendering data through the web page and rviz, refer to the above
1.3. In addition, you can start the node through the component method
Configure tros.b humble environment.
xxxxxxxxxxsource /opt/tros/humble/setup.bash
Terminal 1 starts the binocular model launch file
xxxxxxxxxxros2 launch hobot_stereonet stereonet_model_component.launch.py \stereo_image_topic:=/image_combine_raw stereo_combine_mode:=1 need_rectify:=True \height_min:=0.1 height_max:=1.0 KMean:=10 stdv:=0.01 leaf_size:=0.05
Terminal 2 starts the mipi binocular camera launch file
xxxxxxxxxxros2 launch mipi_cam mipi_cam_dual_channel.launch.py \mipi_image_width:=1280 mipi_image_height:=640
2. Interface description
Subscribe to topic
| Name | Message Type | Explanation |
|---|---|---|
| /image_combine_raw | sensor_msgs::msg::Image | The topic of left and right eye spliced images published by the binocular camera node is used for model reasoning depth |
Post a topic
| Name | Message Type | Explanation |
|---|---|---|
| /StereoNetNode/stereonet_pointcloud2 | sensor_msgs::msg::PointCloud2 | Published Point Cloud Depth Topics |
| /StereoNetNode/stereonet_depth | sensor_msgs::msg::Image= | The published depth image, the pixel value is the depth, the unit is millimeter |
| /StereoNetNode/stereonet_visual | sensor_msgs::msg::Image | A relatively intuitive visual rendering image published |
Parameter
| Name | Parameter Value | Explanation |
|---|---|---|
| stereo_image_topic | Default/image_combine_raw | Subscribe to the topic name of the binocular image message |
| need_rectify | DefaultTrue | Whether to perform baseline alignment and dedistortion on the stereo data. The camera internal and external parameters are specified in the config/stereo.yaml file. |
| stereo_combine_mode | Default1 | The left and right images are often spliced together on one image before being published. 1 means top-bottom splicing, 0 means left-right splicing, indicating how the binocular algorithm splits the image |
| height_min | Default-0.2 | Filter out points whose height in the vertical direction of the camera is less than height_min, in meters |
| height_max | Default999.9 | Filter out points whose height in the vertical direction of the camera is greater than height_max, in meters |
| KMean | Default10 | When filtering sparse outliers, count the number of neighboring points of each point and the distance between each point and the 10 nearest points around it. |
| stdv | Default0.01 | When filtering sparse outliers, the threshold for judging whether it is an outlier is set to 0.01. |
| leaf_size | Default0.05 | Set the unit density of the point cloud, indicating that there is only one point in a 3D sphere with a radius of 0.05 meters |
3. Notes
- The input size of the model is width: 1280, height 640, and the image resolution released by the camera should be 1280x640
- If the format of the image released by the binocular camera is NV12, the stitching method of the binocular image must be up and down stitching
- The downward direction of the camera cable is the positive direction of the camera