yahboom
HomeLearn
Solution
Blog
Online Store
About Us
EN/中文
ROSMASTER A1📖
01.Robot Configuration and Operation Guide
  • 0.Unboxing & Reviewing
  • 0.Assembly video
  • 1.Standard kit readme
  • 2.Quick start guide
  • 3.First trial
  • 4.Calibrate front wheel servo
  • 5.Enter Docker (For JETSON Nano and RPi 5)
02.AI Model Preparation
  • 1.AI Model Preparation
03.AI Model Basics
  • 1.AI large model types and principles
  • 2.RAG retrieval enhancement and model training samples
  • 3.Embodied intelligent robot system architecture
  • 4.Embodied intelligent functions core source code
04.AI Model Developmentnew
  • 1.Register a model service provider account
  • 2. Configuring API-KEY
  • 3. Introduction to Dify
  • 4. Basic Dify Features
  • 5. Deploy the RAG knowledge base
  • 6. AI Large Model Development - chatbot
  • 7. RAG knowledge base + chatbot
  • 8. AI agent workflow
  • 9. Custom wake-up response
  • 10. Core module testing tools
05.AI Model - Text Version
  • 1.Semantic understand and command follow
  • 2.Multimodal visual understand
  • 3.Multimodal visual understand + PTZ tracking
  • 4.Multimodal visual understand + visual following
  • 5.Multimodal visual understand + visual line patroling
  • 6.Multimodal visual understand + Depth Camera Distance Question Answering
  • 7.Multimodal visual understand+SLAM navigation
  • 8.Multimodal visual understand+SLAM navigation + visual line patroling
  • 9.Intention estimation + Multimodal visual understand + SLAM navigation + visual functions
06.AI Model - Voice Version
  • 1.Semantic understand and command follow
  • 2.Multimodal visual understand
  • 3.Multimodal visual understand + PTZ tracking
  • 4.Multimodal visual understand + visual following
  • 5.Multimodal visual understand + visual line patroling
  • 6.Multimodal visual understand + Depth Camera Distance Question Answering
  • 7.Multimodal visual understand+SLAM navigation
  • 8.Multimodal visual understand+SLAM navigation + visual line patroling
  • 9.Intention estimation + Multimodal visual understand + SLAM navigation + visual functions
07.Chassis Control Course
  • 1.ROS control
  • 2.Handle control
  • 3.Keyboard control
  • 4.Linear velocity calibration
  • 5.Angular velocity calibration
  • 6.URDF Model
08.Mediapipe Visual Course
  • 1.Hand detection
  • 2.Posture detection
  • 3.Overall detection
  • 4.Facial Landmark Detection
  • 5.Face detection
  • 6.Face special effects
  • 7.3D object recognition
  • 8.Brush
  • 9.Finger control
  • 10.Gesture Recognition
  • 11.Palm Targeting
  • 12.Fingertip trajectory recognition
09.Advanced Visual Course
  • 1.QR code
  • 2.Human Pose Estimation
  • 3.Object Detection
  • 4.AR Vision
  • 5.ROS+Opencv Basics
  • 6.Yolov8 Object Detection (ORIN)
  • 7.Deep Learning Object Tracking (ORIN)
10.USB Camera Vision Course
  • 01.Color tracking
  • 02.Face Tracking
  • 03.AprilTag machine code tracking
  • 04.KCF Object Tracking
  • 05.QR code tracking
  • 06.Mediapipe gesture tracking
  • 07.Meidpipe human posture tracking
  • 08.Color Follow
  • 09.Face Following
  • 10.AprilTag machine code following
  • 11.QR code follow
  • 12.Mediapipe gesture recognition and following
  • 13.Meidpipe human posture following
  • 14.Visual tracking autonomous driving
  • 15.QR code motion control
  • 16.Gesture motion control
11.Depth Camera Vision Course
  • 1.Basic use of depth camera
  • 2.Deep pseudo-color image
  • 3.Depth camera ranging
  • 4.Color block volume measurement
  • 5.Color Following
  • 6.Face Following
  • 7.QR code follow
  • 8.Machine code following
  • 9.KCF Object Following
  • 10.Mediapipe gesture following
  • 11.Mediapipe Posture Following
  • 12.Visual tracking autonomous driving
  • 13.Edge Detection
12.LiDAR Course
  • 1.Basic use of Lidar
  • 2.Lidar obstacle avoidance
  • 3.Lidar following
  • 4.Lidar patrol
  • 5.Gmapping-SLAM mapping
  • 6.Cartographer-SLAM mapping
  • 7.slam_toolbox mapping
  • 8.Navigation2 single-point navigation avoid
  • 9.Navigation2 multi-point navigation avoid
  • 10.Cartographer Repositioning navigation
  • 11.RTAB-Map mapping
  • 12.RTAB-Map navigation
  • 13.APP mapping navigation
13.Multi-vehicle Course
  • 1.Multi-vehicle control
  • 2.Multi-vehicle navigation
  • 3.Multi-vehicle platoon
14.Autonomous Driving expand(Need purchase track map)new
Multimodal visual understand+SLAM navigation
  • 1. Multimodal visual understand+SLAM navigation
Orin&RDKX5-Autonomous driving
  • 1. Venue placement and precautions
  • 2. Start testing
  • 3. Identify and debug
  • 4. Lane keeping
  • 5. Road sign detection
  • 6. Traffic light recognition
  • 7. Fixed point parking
  • 8. Steering decision
  • 9. Horn sounding
  • 10. Deceleration
  • 11. Speed limit
  • 12. Autonomous parking
  • 13. Comprehensive application
  • 14. Unmanned driving integrated AI large model
Jetson Nano-Autonomous driving
  • 1. Venue placement and precautions
  • 2. Start testing
  • 3. Identify and debug
  • 4. Lane keeping
  • 5. Road sign detection
  • 6. Traffic light recognition
  • 7. Fixed point parking
  • 8. Steering decision
  • 9. Horn sounding
  • 10. Deceleration
  • 11. Speed limit
  • 12. Autonomous parking
  • 13. Comprehensive application
Road network planning
  • 1. Introduction to Road Network Planning and Navigation
  • 2. Constructing a Pose Map
  • 3. Road Network Labelling
  • 4. Road Network Planning Combined with Sand Table Map Case Study
  • 5. Path Replanning
Model Training
  • 1. Data Collection
  • 2. Dataset Annotation
  • 3. YOLOv11 Model Training
  • 4. Model Format Conversion
15.YOLOv11 Development (ORIN)
  • 1.YOLO environment construction
  • 2.CLI use
  • 3.Object detection
  • 4.Instance segmentation
  • 5.Pose estimation
  • 6.Image classification
  • 7.Oriented object detection
  • 8.Model conversion
  • 9.Dataset annotation
  • 10.Model training conversion
  • 11.Model prediction
16.YOLOv11 Development (Raspberry Pi & Jetson Nano)
  • 1.YOLO environment construction
  • 2.CLI use
  • 3.Object detection
  • 4.Instance segmentation
  • 5.Pose estimation
  • 6.Image classification
  • 7.Oriented object detection
  • 8.Model conversion
  • 9.Model prediction
17.YOLOV11 development course(RDK X5)
  • 1.YOLO environment construction
  • 2.CLI use
  • 3.Object detection
  • 4.Instance segmentation
  • 5.Pose estimation
  • 6.Image classification
  • 7.Oriented object detection
  • 8.Model prediction
  • 9.Model Quantization
18.Main control board course
Jetson Nano B01
  • 1. Introduction to the Jetson Nano B01 SUB Board
  • 2. Burn the system image
  • 3. Re-read the memory card or USB drive that has been burned
  • 4. Startup system
  • 5. Jetson Nano B01 System and Desktop Introduction
  • 6. Memory card or USB flash drive expansion
  • 7. Network Configuration
  • 8. SSH remote login & file transfer
  • 9. VNC Remote Login
  • 10. Jetson Nano B01 system backup
  • 11. Jetson Nano Swap space increased
  • 12. Installation and use of Jtop
  • 13. Third-party board + USB drive to start the car
Jetson Orin Nano_NX
  • 1.Jetson Orin board introduction
  • 2.Restore the factory image system
  • 3.Backup SSD system
  • 4.SSD expansion
  • 5.Network configuration
  • 6.SSH remote login
  • 7.VNC remote control
  • 8.Remote file transfer
  • 9.Jtop tool
  • 10.Exchange space expansion
Raspberry Pi
  • 1. Introduction to Raspberry PI 5
  • 2. Raspberry PI system installation and backup
  • 3. Powering the Raspberry PI 5
  • 4. Startup of Raspberry PI 5
  • 5. Update and upgrade operating system
  • 6. Introduction to raspi-config tool
  • 7. config.txt file description
  • 8. Network Configuration
  • 9. remote access
  • 10. Transfer files remotely
  • 11. Set display resolution and rotation
  • 12. Set screen to sleep
  • 13. Play audio and video
  • 14. Using USB camera
  • 15. Using MIPI camera
  • 16. Get real-time temperature of Raspberry Pi
RDK X5
  • 1.Introduction to RDK X5 board
  • 2.Write system file
  • 3.Hardware interface description
  • 4.Install case and other accessories
  • 5.Network configuration
  • 6.Remote login
  • 7.Update system
  • 8.srpi-config user guide
  • 9.config. txt configuration file
  • 10.Self-startup setting
  • 11.RDK exclusive command usage
  • 12.Linux command usage
  • 13.GPIO readwrite operation
  • 14.Image classification algorithm
  • 15.Use USB camera
  • 16.Use MIPI camera
  • 17.Binocular camera depth algorithm
19.AI large model course(ORIN-Pi-RDK X5)
Offline large model (Text Interaction)
  • 0. AI Large Model Mirroring Explanation
  • 1. Deployment of large-scale AI models
  • 2.Installation of the large-scale model dialogue platform
  • 3. Meta AI Llama 3.2 model
  • 4. Alibaba Cloud Qwen3 Model
  • 5. Microsoft Phi-4 mini model
  • 6. DeepSeek DeepSeek-R1 model
  • 7. Alibaba Cloud Qwen2.5vl Visual Multimodal Large Model
  • 8. Google Gemma3 Visual Multimodal Large Model
  • 9. Llava Visual Multimodal Large Model
  • 10.MiniCPM-V Visual Multimodal Large Model
  • 11. Multimodal Visual Understanding Applications
  • 12. Multimodal Text-Based Image Application
  • 13. Multimodal Video Analysis Application
  • 14. Multimodal visual positioning applications
  • 15. Multimodal table scanning application
  • 16. Multimodal Autonomous Agent Application
Offline large model (Voice Interaction)
  • 0. Voice Interaction Hardware Connection (Must Read)
  • 1. Offline speech-to-text (ASR)
  • 2. Offline Text-to-Speech (TTS)
  • 3. AI large model voice interaction
  • 4. Multimodal visual understanding and voice interaction
  • 5. Multimodal Text-Based Image Application
  • 6. Multimodal Video Analysis Application
  • 7. Multimodal visual positioning applications
  • 8. Multimodal table scanning application
  • 9. Multimodal Autonomous Agent Applications
  • 10. AI large model offline voice assistant
Online large model (Text Interaction)
  • 1. OpenRouter Large Model API Aggregation Platform
  • 2. Multimodal visual understanding applications
  • 3. Multimodal visual positioning applications
  • 4. Multimodal table scanning application
  • 5. Multimodal Autonomous Agent Applications
Online large model (Voice Interaction)
  • 0. Voice Interaction Hardware Connection (Must Read)
  • 1. Online speech-to-text (ASR)
  • 2. Online Text-to-Speech (TTS)
  • 3. AI large model voice interaction
  • 4. Multimodal visual and voice interaction
  • 5. Multimodal visual positioning applications
  • 6. Multimodal table scanning application
  • 7. Multimodal Autonomous Agent Applications
  • 8. AI large model online voice assistant
20.AI large model course(Jetson NANO)
Offline large model (Text Interaction)
  • 4.Multimodal visual understand speech interaction
  • 0.AI large model system image instructions
  • 1.AI large model environment deployment
  • 2.Install large model dialogue platform
  • 3.Meta AI llama 3.2 model
  • 4.Alibaba Cloud Qwen2 model
  • 5.Alibaba Cloud Qwen3 model
  • 6.SUTD TinyLlama
  • 7.DeepSeek DeepSeek-R1 model
  • 8.Microsoft Phi-3
  • 9.Microsoft Orca Mini
  • 10.NVIDIA StarCoder2
  • 11.Google Gemma3 Visual Multimodal Large Model
  • 12.Offline Text to Speech (TTS)
  • 13.Offline Speech to Text (ASR)
Online large model (Text Interaction)
  • 1.OpenRouter large model API aggregation platform
  • 2.Multimodal visual understand application
  • 3.Multimodal visual localization application
  • 4.Multimodal table scanning application
  • 5.Multimodal autonomous proxy application
Online large model (Voice Interaction)
  • 0.Voice interaction hardware connection (ReadMe)
  • 1.Online speech-to-text (ASR)
  • 2.Online Text-to-Speech (TTS)
  • 3.AI large model voice interaction
  • 5.Multimodal visual position application
  • 6.Multimodal table scanning application
  • 7.Multimodal autonomous proxy application
  • 8.AI large model online voice assistant
21.Linux operating system course
  • 1.Introduction to Linux system
  • 2.Ubuntu file system
  • 3.Ubuntu common commands
  • 4.Ubuntu common editors
  • 5.Ubuntu software operation commands
  • 6.Virtual machine installation
  • 7.SSH remote control
  • 8.VNC remote control
  • 9.Transfer files remotely
  • 10.Driver library and communication
  • 11.Static IP and hotspot mode
  • 12.Bind device ID
  • 13.Capacity expansion and resource allocation
  • 14.Update system software sources
  • 15.Set root user password
  • 16.sudo free password
  • 17.Connect to WiFi network
  • 18.View system version
  • 19.Customized service management
  • 20.Back up system image
22.Docker Course
  • 1.Docker Introduction and Installation
  • 2.Docker basic commands
  • 3.Docker Submission and Multi-Terminal Access
  • 4.Docker Startup Script
  • 5.Docker-Vscode environment construction
23.ROS2 Basic Course
  • 1.Introduction to ROS2
  • 2.ROS2 install Humble
  • 3.ROS2 development environment
  • 4.ROS2 workspace
  • 5.ROS2 function package
  • 6.ROS2 node
  • 7.ROS2 topic communication
  • 8.ROS2 service communication
  • 9.ROS2 action communication
  • 10.ROS2 custom interface message
  • 11.ROS2 parameter service case
  • 12.ROS2 meta-function package
  • 13.ROS2 distributed communication
  • 14.ROS2 DDS
  • 15.ROS2 time related API
  • 16.ROS2 common command tools
  • 17.ROS2 rviz2 use
  • 18.ROS2 rqt toolbox
  • 19.ROS2 Launch startup file configuration
  • 20.ROS2 recording and playback tool
  • 21.ROS2 URDF model
  • 22.ROS2 Gazebo simulation platform
  • 23.ROS2 TF2 coordinate transformation
24.Image Processing Basics Course
  • 1. Introduction to Open Source CV
  • 2. Image reading and display
  • 3. Image writing
  • 4. Image quality
  • 5. Pixel Operation
  • 6. Image zoom
  • 7. Image cutting
  • 8. Image translation
  • 9. Image Mirroring
  • 10. Affine Transformation
  • 11. Image Rotation
  • 12. Perspective Transformation
  • 13. Grayscale processing
  • 14. Image Binarization
  • 15. Edge Detection
  • 16. Line drawing
  • 17. Rectangle and circle drawing
  • 18. Drawing text and pictures
25.Control Board STM32 Driver Course
  • 0. Notes (must read)
  • 1. About expansion board
  • 2. STM32 Development environment
  • 3. Button control
  • 4. FreeRTOS application
  • 5. Serial communication
  • 6. SBUS model aircraft remote control
  • 7. CAN bus communication
  • 8. RGB colorful light bar
  • 9. Timer interrupt to control PWM servo
  • 10. Control serial port servos
  • 11. Nine-axis attitude sensor to obtain data
  • 12. Control motor
  • 13. Timer captures the encoder data
  • 14. Robot kinematics analysis theory
  • 15. PID control robot movement
26.Control Board Main Control Communication Course
  • 1. Update the expansion board firmware
  • 2. Install Rosmaster driver library
  • 3. Jupyter lab basic usage tutorial
  • 4. Buzzer whistle
  • 5. Control PWM servo
  • 6. RGB colorful light bar special effects display
  • 7. Control motor
  • 8. Control robot movement
  • 9. Control Serial Servo
Download
  • MainBoard_AI_Pure_System
  • Mapping_APP(iOS_Android)
  • Robot_Image_System_File
  • Code-Firmware
  • VM-File
  • 3D Model File
  • Instruction Manual
  • Software_File
  • Hardware-Info
  • Other_Annex_File
Download ZIP

Welcome to ROSMASTER A1 repository

13. Comprehensive application

Comprehensive application

1. Course Content

Note: This program runs on a sandbox map; you will need to adjust the program for your personal map.

This tutorial uses the factory-installed road sign and lane recognition models, moving them center on a sandbox map. Upon recognizing a road sign, it performs the corresponding road sign function action.

2. Program Path

Autonomous Driving Source Code Path: Lane Keeping: ~/yahboomcar_ros2_ws/yahboomcar_ws/src/auto_drive/auto_drive/auto_drive.py

Road Sign Recognition: ~/yahboomcar_ros2_ws/yahboomcar_ws/src/auto_drive/auto_drive/yolo_detect.py

3. Program Startup

3.1 Startup Command

  • Start camera + chassis + road signs and lane markings
xxxxxxxxxx
ros2 launch auto_drive auto_drive_bringup.launch.py
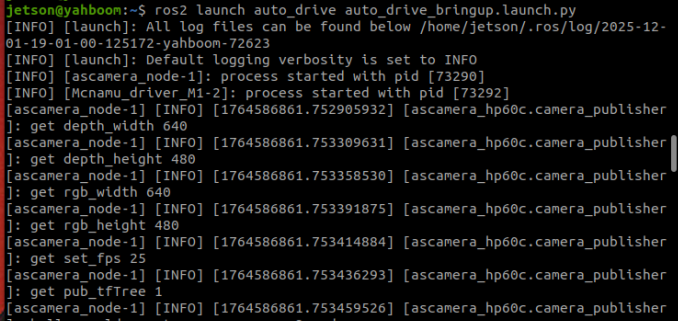
image-20251201190235179

After the program runs, a YOLO recognition screen will be displayed. The car will move centered within the lane and perform corresponding actions based on the road signs it detects during its journey. (If the terminal does not report any errors after starting the program, but the car does not move, you can run the following program to check the parameters.)
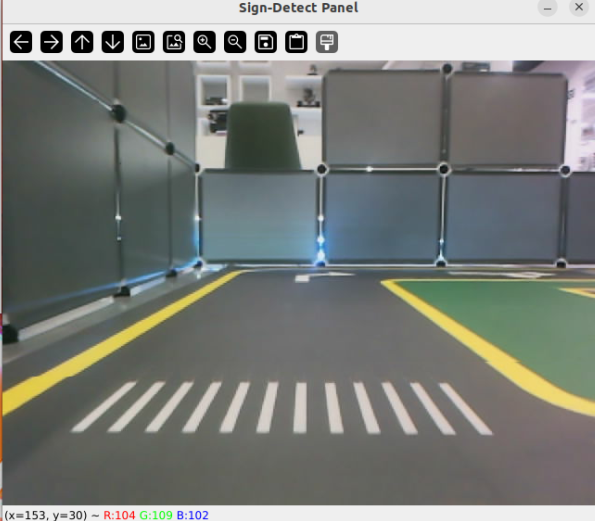
image-20251201203104004

  • Start the dynamic parameter configuration node
xxxxxxxxxx
ros2 run rqt_reconfigure rqt_reconfigure
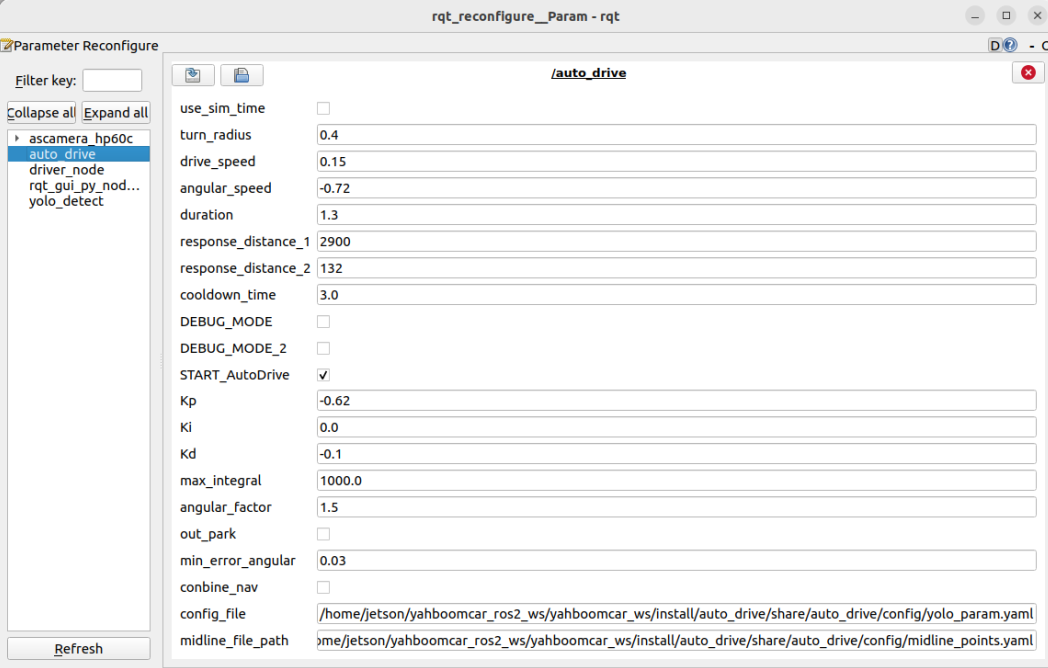
image-20251201190444966

If the car doesn't move, check two parameters: whether START_AutoDrive is checked and whether conbine_nav is false.

☑️ After modifying the parameters, click in the blank area of the GUI to enter the parameter values. Note that this only applies to the current startup; for permanent effects, the parameters need to be modified in the source code.

🛠 Parameter Explanation:

【turn_radius】: Turning radius. Normally, this parameter does not need to be changed.

【drive_speed】: Linear velocity. The car's speed. The factory default is 0.15. If you modify this parameter, you need to adjust other parameters accordingly.

【angular_speed】: Turning angular velocity.

【duration】: Right turn time for recognizing right turn signs.

【cooldown_time】: Road sign recognition cooldown time.

【DEBUG_MODE】: Visual debug parameter. Enabling this may affect centering.

【START_AutoDrive】: Controls car movement parameters. True means the car can move.

【kp, ki, kd】: Car centering PID parameters.

【turn_radius】: Turning radius. Normally, this parameter does not need to be changed.

【conbine_nav】: Required only when road network navigation is enabled and YOLO is activated. Enabling this will stop the car.

3.2 Car Movement After Recognizing Road Signs

  • Straight ahead

    • Drive at the set speed, or stop and resume driving after encountering a parking sign
  • Right turn

    • Trigger the fixed right turn action
  • Horn

    • Trigger car horn sound effect
  • Pedestrian crossing

    • Trigger car horn sound effect and reduce speed for 1 second
  • Speed limit

    • Reduce car speed for 3 seconds, then return to normal speed
  • School zone

    • Trigger car horn sound effect and reduce speed for 1 second
  • Parking lots A and B

    • Trigger preset fixed parking action
  • Traffic lights

    • Red light

      • Without road network planning, triggers disengagement of lane keeping assist.
      • With road network planning, cancels the current navigation task.
    • Green light

      • Without road network planning, triggers activation of lane keeping assist.
      • With road network planning, resumes the previous navigation task.

The right turn and parking positions are fixed. Since the program uses fixed actions, for better results, it is recommended to place them at these positions. If you need to place them elsewhere, you will need to readjust the fixed action timing.
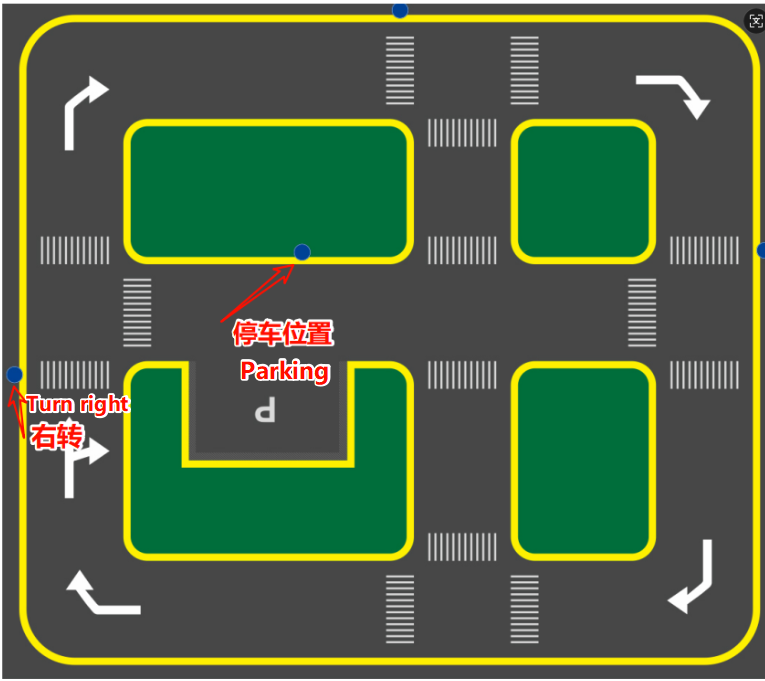
image-20251201191324580

3.3 Debugging Parameters

There are two methods for debugging parameters: temporary real-time debugging and permanent parameter modification debugging.

  • Temporary Real-Time Debugging

After running the program, run the dynamic parameter tuning command to debug:

xxxxxxxxxx
ros2 run rqt_reconfigure rqt_reconfigure
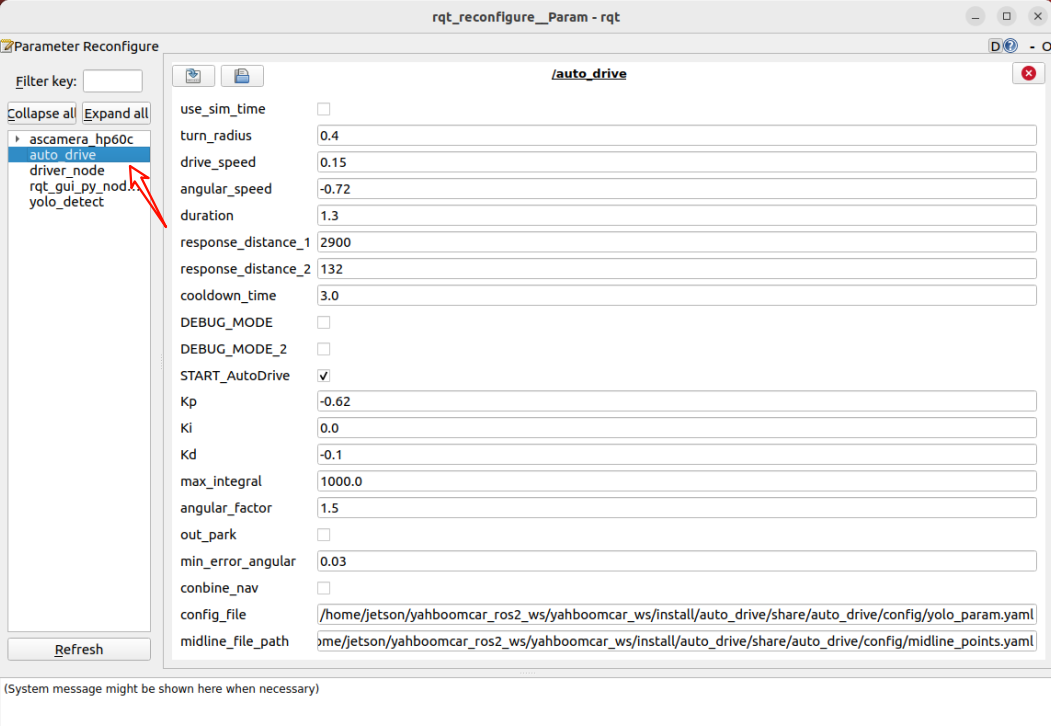
image-20251201192439098

Debugging Experience:

  1. If lane centering is unstable, refer to the chapter "4. Lane Keeping in Autonomous Driving".
  2. For right turn recognition, if the turn is insufficient or excessive, adjust the duration parameter to control the right turn time.
  3. To prevent frequent road sign recognition, modify cooldown_time, which represents the cooldown time between road sign recognitions.
  4. If lane centering adjustment is too slow, increase kp.
  • Permanently Modify Parameters for Debugging

By modifying parameter files to achieve permanent parameter changes, the parameter paths are:

~/yahboomcar_ros2_ws/yahboomcar_ws/src/auto_drive/config/auto_drive_node.yaml

~/yahboomcar_ros2_ws/yahboomcar_ws/src/auto_drive/config/yolo_param.yaml

~/yahboomcar_ros2_ws/yahboomcar_ws/src/auto_drive/config/midline_points.yaml

Three parameters represent: autonomous driving parameters, traffic sign recognition parameters, and lane centering parameters

Autonomous Driving Parameters:

auto_drive:                        
  ros__parameters:
    turn_radius: 0.4
    drive_speed: 0.15
    angular_speed: -0.72
    duration: 1.3
    response_distance_1: 2900
    response_distance_2: 132
    cooldown_time: 3.0
    DEBUG_MODE: False
    START_AutoDrive: True
    conbine_nav: False
    Kp: -0.62
    Ki: 0.0
    Kd: -0.1
    max_integral: 1000.0
    image_size: [640, 480]

The parameters above have the same meaning as the dynamically adjusted parameters. After modification, the program here will be called by default on the next run. Note the following during startup: START_AutoDrive: True and conbine_nav: False. These two parameters determine whether the car can run. conbine_nav: False is only required if road network navigation + autonomous driving is used.

Road Sign Recognition Parameters:

xxxxxxxxxx
#Road Sign Detection Inference Parameters
sign_detection:
  model_path: '/home/jetson/yahboomcar_ros2_ws/yahboomcar_ws/src/auto_drive/tools/sign_model.engine'
  conf: 0.92     # Sets the minimum confidence threshold for detection. Detected objects with confidence levels below this threshold will be ignored. Adjusting this value helps reduce false positives.
  iou: 0.7      # The overlap threshold used for non-maximum suppression (NMS). Lower values ••reduce detections by eliminating overlapping boxes.
  rect: True    # If enabled, performs minimum padding on the shorter side of the image until it is divisible by the stride, improving inference speed.
  half: True    # If enabled, uses half-precision inference, which speeds up model inference on supported GPUs with minimal impact on accuracy.
  device: "cuda:0"   # Inference device
  batch: 50          # Batch size. Larger batch sizes provide higher throughput, thus reducing the total time required for inference.
  max_det: 4        # Maximum number of objects to detect
  augment: False    # Enables Test-Time Augmentation (TTA) for prediction, which may improve detection robustness but slows down inference.
  verbose : False # Whether to output detailed inference information in the terminal.
  classes : [0, 1, 2, 3, 4, 5, 6, 8, 9, 10, 11, 12, 13]
​
line_detection:
# Lane detection inference parameters
  model_path: '/home/jetson/yahboomcar_ros2_ws/yahboomcar_ws/src/auto_drive/tools/lane_V6.engine'
  conf: 0.5 # Sets the minimum confidence threshold for detection. Detected objects with a confidence level below this threshold will be ignored. Adjusting this value helps reduce false positives.
  iou: 0.6 # Overlap threshold for non-maximum suppression (NMS). Lower values ••reduce detections by eliminating overlapping boxes.
  rect: True # If enabled, performs minimum padding on the shorter side of the image until it is divisible by the stride, improving inference speed.
  half: True # If enabled, uses half-precision inference, which speeds up model inference on supported GPUs with minimal impact on accuracy.
  device: "cuda:0" # Inference device
  batch: 50 # Batch size. Larger batch sizes provide higher throughput, thus reducing the total time required for inference.
  max_det: 4 # Maximum number of objects to detect
  augment: False # Enables test-time augmentation (TTA) for prediction, which may improve detection robustness but slow down inference.
  verbose: False # Whether to output detailed inference information to the terminal.
  

The above parameters can be used at the factory default settings and generally do not need to be modified.

Lane line centering parameters

midline_points:
  start_point:
    x: 360
    y: 477
  end_point:
    x: 355
    y: 424
  midline_length: 120
  mid_distance: [200,40]

The start_point and end_point parameters are used to calibrate the car's center point; see the course on centerline calibration for details. The midline_length parameter adjusts the car's turning timing on the sandbox map; a shorter value results in slower turns, and vice versa.

4. Source Code Analysis

4.1 auto_drive.py

Program source code path: ~/yahboomcar_ros2_ws/yahboomcar_ws/src/auto_drive/auto_drive/auto_drive.py

Control Flow consists of:

  1. Receiving and processing image data
  2. Detecting lane lines and traffic signs
  3. Determining control strategy based on detection results
  4. Issuing control commands (speed, direction)
  5. Repeating the above steps
  • Processing lane detection results
def __handle_lane_detect_result(self,left_box,right_box,frame):
        '''Processing lane detection results'''
        self.error_mode = 99
        error_angular = [0.0, 0.0]  # Default angle deviation
        
        if left_box is not None and right_box is not None and left_box[0]<right_box[0] :
            # If both left and right lane lines exist, draw them and their intersection
            self.error_mode=0  #Marking error modes: Centering mode: 0, Left-skewed mode: 1, Right-skewed mode: 2
            frame=self.lane_detect.draw_left_line(frame, left_box)# Draw left lane line
            frame=self.lane_detect.draw_right_line(frame, right_box)# Draw right lane line
            frame,x_center,y_center=self.lane_detect.draw_center_point(frame,left_box,right_box)# Draw estimated center point of the lane
            left_lane_offset,right_lane_offset=self.lane_detect.cal_lane_lateral_offset(left_box,right_box)
            # self.get_logger().info(f"left_lane_offset: {left_lane_offset:.2f} , right_lane_offset: {right_lane_offset:.2f} ")
            error_angular=self.lane_detect.cal_error_angular(x_center,y_center)# Calculate angular error between vehicle and center point
            
        elif left_box is not None and right_box is None and left_box[0]<320:
            self.error_mode=1
            self.lane_detect.prev_center=None
            frame=self.lane_detect.draw_left_line(frame, left_box)
        elif right_box is not None and left_box is None :
            self.error_mode=2
            self.lane_detect.prev_center=None
            frame=self.lane_detect.draw_right_line(frame, right_box)
        else:
            self.lane_detect.prev_center=None
​
        # When turn action is activated, temporarily suspend lane line speed control
        if self.turn_action_active:
            return frame
​
        if self.error_mode==0 :
            # Centering
            if error_angular[1]>=0.03 or error_angular[1]<=-0.03:
                if abs(error_angular[1])<0.3:
                    angular_z=self.pid_controller.pid_control(error_angular[1])
                    angular_z=min(angular_z,0.3)
                    angular_z=max(angular_z,-0.3)
                    self.__set_current_speed(linear_x=self.drive_speed,angular_z=angular_z)
​
​
        elif self.error_mode==1:
            # Only left lane line exists
            if_infer=self.lane_detect.IF_lane_intersection(left_box)
            if if_infer is not None:
                self.__set_current_speed(linear_x=self.drive_speed,angular_z=self.angular_speed)
            else:
                self.__set_current_speed(linear_x=self.drive_speed,angular_z=0.0)
        else:
            self.__set_current_speed(linear_x=self.drive_speed,angular_z=0.0)
​
        # Display angular deviation on the image
        cv2.putText(frame, f"Angle Dev: {error_angular[1]:.2f} rad", (10, 90), cv2.FONT_HERSHEY_SIMPLEX, 0.8, (255, 0, 255), 2)
        frame=self.lane_detect.draw_midline(frame)
        return frame
  • auto_drive node's sign_callback callback function subscribes to the /sign_detect topic, then executes actions corresponding to traffic signs in the handle_events thread.
    def handle_events(self):
        '''Handling target recognition events'''
        while True:
            try:
                object:Object=self.event_queue.get(timeout=0.2)
            except queue.Empty:
                continue 
            if self.__check_cooldown(object.class_name):
                continue
            # self.get_logger().info(f'{object.class_name} handle')
            
            if object.class_name=="straight" and self.sign_enable_list[10]:
                self.go_straight()
            elif object.class_name=="turnright" and self.sign_enable_list[11]:
                self.turn('right')
            elif object.class_name=="turnright_ground":
                pass
            elif object.class_name=="honking" and self.sign_enable_list[1]:
                self.car_horn()
            elif object.class_name== "sidewalk" and self.sign_enable_list[6]:
                self.sidewalk()
            elif object.class_name=="sidewalk_ground" and self.sign_enable_list[7]:
                pass
            elif object.class_name=="speedlimit" and self.sign_enable_list[8]:
                self.speedlimit()
            elif object.class_name=="stop" and self.sign_enable_list[9]:
                self.stop()
            elif object.class_name=="school" and self.sign_enable_list[5]:
                self.school()
            elif object.class_name=="parkA" and self.sign_enable_list[2]:
                    self.parking_A()
            elif object.class_name=="parkB" and self.sign_enable_list[3]:
                self.parking_A()
            elif object.class_name=="greenlight" and self.sign_enable_list[0]:
                self.greenlight()
            elif object.class_name =="redlight" and self.sign_enable_list[4]:
                self.redlight()
            elif object.class_name=="yellowlight" and self.sign_enable_list[13]:
                pass
            elif object.class_name=="out_park" :
                self.out_parking()
​
​

4.2、yolo_detect.py

Program source code is located at ~/yahboomcar_ros2_ws/yahboomcar_ws/src/auto_drive/auto_drive/yolo_detect.py

Control Flow

  1. Image Callback (image_callback):

    • Convert ROS image message to OpenCV format
    • Put image into processing queue
  2. Sign Detection Processing (handle_sign):

    • Get image frame from queue

    • Perform object detection using YOLO model

    • Process detection results:

      • Filter out ignored signs (e.g., "turnright_ground", "sidewalk_ground")
      • Publish detected sign information
      • Display FPS and inference time in debug mode
      • Show detection results in real-time
xxxxxxxxxx
def handle_sign(self):
        '''Process road sign detection results in the image'''
        while True:
            try:
                frame = self.sign_detect.image_queue.get(timeout=0.01)
            except queue.Empty:
                continue  
            infer_start = time.time()
            results=self.sign_detect.get_infer_result(frame,True)
            for res in results:
                if res.boxes is not None:
                    annotated_frame = res.plot()
                    boxes = res.boxes
                    for i in range(len(boxes)):
                        box_coords = boxes.xyxy[i].tolist()# Get bounding box coordinates (xyxy format: xmin, ymin, xmax, ymax)
                        class_name = res.names[int(boxes.cls[i].item())]# Get object name
                        confidence = boxes.conf[i].item()# Get confidence score
​
                        # Check if it's an ignored sign
                        if class_name in self.ignored_signs:
                            # rospy.loginfo(f"Ignoring sign: {class_name}")
                            continue  # Skip ignored signs
​
​
                        # Publish detection results
                        if self.sign_pub_counter % 5 == 0:
                            self.sign_publisher.publish(DetectionObject(
                                class_name=class_name,
                                confidence=confidence,
                                xmin=float(box_coords[0]),
                                ymin=float(box_coords[1]),
                                xmax=float(box_coords[2]),
                                ymax=float(box_coords[3])
                            ))
                        self.sign_pub_counter += 1
        
            if self.DEBUG_MODE:
                infer_end = time.time()
                # Update FPS
                self.frame_count += 1
                curr_time = time.time()
                time_diff = curr_time - self.prev_time
                if time_diff >= 1.0:
                    self.fps = self.frame_count / time_diff
                    self.frame_count = 0
                    self.prev_time = curr_time
                # Display FPS on the image
                cv2.putText(annotated_frame,f"FPS: {self.fps:.2f}",(10, 25),cv2.FONT_HERSHEY_SIMPLEX,0.6,(0, 255, 0),1,)
                # Display inference time
                infer_time = (infer_end - infer_start) * 1000
                cv2.putText(annotated_frame, f"Infer: {infer_time:.1f} ms", (10, 45),cv2.FONT_HERSHEY_SIMPLEX, 0.6, (0, 255, 255), 1)
​
            cv2.imshow("Sign-Detect Panel", annotated_frame)
            cv2.waitKey(1)

The main thread is responsible for receiving images, while worker threads are responsible for processing images and performing detection tasks. Inter-thread communication is achieved through a queue.

4.2、yolov11_infer.py

The program's source code is located at ~/yahboomcar_ros2_ws/yahboomcar_ws/src/auto_drive/auto_drive/utils/yolov11_infer.py

Control Flow

Sign_Detect class:

  • When creating a Sign_Detect instance, load and parse the configuration file.

  • Call the init_yolo_engine() method:

    • Initialize the image queue (maximum capacity 10)
    • Set model inference parameters (confidence, IOU threshold, etc.)
    • Load the YOLO model
  • Add the image to the processing queue using the put_image method

  • Obtain the inference result using the get_infer_result method

  • Perform object detection using the YOLO model

Lane_Detect class:

  • Lane line detection: Detects lane lines in the image using the YOLO model.
  • Lane center point calculation: Calculates the center points of the left and right lane lines.
  • Lane departure detection: Calculates the vehicle's offset angle and distance relative to the lane.
  • Visualization: Provides various plotting methods for displaying detection results.
xxxxxxxxxx
class Sign_Detect(YOLO_MODEL):
    """Road sign detection"""
    def __init__(self,config_file_path):
        with open(config_file_path, "r") as file:
            full_config = yaml.safe_load(file)
            self.config_param = full_config.get("sign_detection", {})
...
​
class Lane_Detect(YOLO_MODEL):
    """Lane detection model"""
    def __init__(self,config_file_path:str,
                 midline_file_path:str):
        with open(config_file_path, "r") as file:
            full_config = yaml.safe_load(file)
            self.config_param = full_config.get("line_detection", {})
        with open(midline_file_path, "r") as file:
            self.point_config = yaml.safe_load(file)
...

Autonomous parking
Unmanned driving integrated AI large model

COMPANY

  • About us
  • Team Style
  • Blog

LEARNING & EXPLORATION

  • Tutorials
  • Edge AI hardware
  • Educational robots
  • Embedded intelligent hardware

WHERE TO BUY

  • Yahboom Online Store
  • Amazon
  • Alibaba
  • AliExpress
  • Mercado

TECHNOLOGY SUPPORT

  • Email: support@yahboom.com

BE A DISTRIBUTOR

  • Email: sales@yahboom.com
QR Code

Copyright © 2017-2026 Yahboom. All Rights Reserved.

EN/中文