yahboom
HomeLearn
Solution
Blog
Online Store
About Us
EN/中文
Building:bit Superkit📖
0.First Trial Video
1.Assembly Course
  • 1.1Mobile shooter
  • 1.2Pretty car
  • 1.3Clip robot
  • 1.4Proficient carrier
  • 1.5Skip car
  • 1.6Freestyle
  • 1.7Spider
  • 1.8Lifting platform
  • 1.9Biped robot
  • 1.10Changing Face
  • 1.11Carousel
  • 1.12Oscillating fan
  • 1.13Airplane
  • 1.14Unicycle
  • 1.15Auto-door
  • 1.16Dragon knight
  • 1.17Ultrasonic handheld rangefinder
  • 1.18Small flying car obstacle avoidance
  • 1.19Changing face
  • 1.20Adjustable RGB light
  • 1.21Adjustable fan
  • 1.22Photosensitive emergency light
  • 1.23Smart alarm clock
  • 1.24Light-controlled bipedal robot
  • 1.25Swimming robot avoid objects
  • 1.26Fleeing spider
  • 1.27Temperature humidity reminder
  • 1.28Temperature-controlled fan
  • 1.29Color recognition machine
  • 1.30Color-recognizing automatic door
  • 1.31Rokcer color changing light
  • 1.32Rokcer transporter
2.Preparation before class
  • 2.1 About BBC microbit
  • 2.2 Super:bit expansion board
  • 2.3 MakeCode Graphical Programming Guide
  • 2.4 MakeCode graphical API
  • 2.5 Python Programming Guide
  • 2.6 Superbit MicroPython API
  • 2.7 Notes on charging and battery use
3.Basic modeling MakeCode course
0.Basic course
  • 1.Buzzer play music
  • 2.Control RGB color
  • 3.Control all RGB lights
  • 4.Drive 270°building block servo
  • 5.Drive 180° servo
  • 6.Drive motor
A.Mobile shooter
  • 1.Cannonball shooting
  • 2.Music fortress
  • 3.APP control
  • 4.Micro:bit handle control
  • 5.WiFi camera control
B.Pretty car
  • 1.Dancer
  • 2.APP control
  • 3.Micro:bit handle control
  • 4.WiFi camera control
C.Clip robot
  • 1.Dancing and singing
  • 2.Button control clip
  • 3.APP control
  • 4.Micro:bit handle control
  • 5.WiFi camera control
D.Proficient carrier
  • 1.Dancing
  • 2.Button control shovel
  • 3.Transportation
  • 4.APP control
  • 5.Micro:bit handle control
  • 6.WiFi camera control
E.Skip car
  • 1.Dance battle
  • 2.Button control skip car
  • 3.Powerful carrier
  • 4.APP control
  • 5.Micro:bit handle control
  • 6.WiFi camera control
F.Freestyle
  • 1.Dancing and singing
  • 2.Freestyle advance
  • 3.APP control
  • 4.Micro:bit handle control
G.Spider
  • 1.Spider advance
  • 2.The dancing spider
  • 3.APP control
  • 4.Micro:bit handle control
  • 5.WiFi camera control
H.Lifting platform
  • 1.Automatic Lift
  • 2.Button control platform
  • 3.APP control
  • 4.Micro:bit handle control
I.Biped robot
  • 1.Walking
  • 2.Dancing and singing
  • 3.APP control
  • 4.Micro:bit handle control
J.Changing Face
  • 1.Changing face
  • 2.Bite the hand crocodile
  • 3.APP control
  • 4.Micro:bit handle control
K.Carousel
  • 1.Music carousel
  • 2.APP control
  • 3.Micro:bit handle control
L.Oscillating fan
  • 1.Colorful windmill
  • 2.Summer cooling artifact
  • 3.APP control
  • 4.Micro:bit handle control
M.Airplane
  • 1.Sailing Prelude
  • 2.APP control
  • 3.Micro:bit handle control
N.Unicycle
  • 1.Clumsy reptile
  • 2.APP control
  • 3.Micro:bit handle control
O.Auto-door
  • 1.Soldiers on duty
  • 2.Music door
  • 3.APP control
  • 4.Micro:bit handle control
P.Dragon knight
  • 1.Waving wings
  • 2.APP control
  • 3.Microbit handle control
4.Basic modeling Python course
0.Basic course
  • 1.Buzzer play music
  • 2.Control RGB color
  • 3.Control all RGB lights
  • 4.Drive 270° building block servo
  • 5.Drive 180° servo
  • 6.Drive motor
  • 7.Drive stepper motor
A.Mobile shooter
  • 1.Cannonball shooting
  • 2.Music fortress
  • 3.Micro:bit handle control
B.Pretty car
  • 1.Dancer
  • 2.Micro:bit handle control
C.Clip robot
  • 1.Dancing and singing
  • 2.Button control clip
  • 3.Micro:bit handle control
D.Proficient carrier
  • 1.Dancing
  • 2.Button control shovel
  • 3.Transportation
  • 4.Micro:bit handle control
E.Skip car
  • 1.Dance battle
  • 2.Button control skip car
  • 3.Powerful carrier
  • 4.Microbit handle control
F.Freestyle
  • 1.Dancing and singing
  • 2.Freestyle advance
  • 3.Micro:bit handle control
G.Spider
  • 1.Spider advance
  • 2.The dancing spider
  • 3.Micro:bit handle control
H.Lifting platform
  • 1.Automatic Lift
  • 2.Button control platform
  • 3.Micro:bit handle control
I.Biped robot
  • 1.Walking
  • 2.Dancing and singing
  • 3.Micro:bit handle control
J.Changing Face
  • 1.Changing face
  • 2.Bite the hand crocodile
  • 3.Micro:bit handle control
K.Carousel
  • 1.Music carousel
  • 2.Micro:bit handle control
L.Oscillating fan
  • 1.Colorful windmill
  • 2.Summer cooling artifact
  • 3.Micro:bit handle control
M.Airplane
  • 1.Sailing Prelude
  • 2.Micro:bit handle control
N.Unicycle
  • 1.Clumsy reptile
  • 2.Micro:bit handle control
O.Auto-door
  • 1.Soldiers on duty
  • 2.Music door
  • 3.Microbit handle control
P.Dragon knight
  • 1.Waving wings
  • 2.Micro:bit handle control
5.Sensor Advanced MakeCode coursenew
3.Sensor expansion course
  • 3.1 Avoiding car
  • 3.2 Changing Face
  • 3.3 Adjustable fan
  • 3.4 Photosensitive robot
  • 3.5 Swimming robot
  • 3.6 Spiders sense human body
  • 3.7 Temperature control fan
  • 3.8 Automatic safety door
  • 3.9 Rocker carrier car
2.Sensor basic course
  • 2.1 Hand-held range finder
  • 2.2 Adjustable RGB light
  • 2.3 Emergency light
  • 2.4 Vibrating alarm clock
  • 2.5 Infrared detection broadcast
  • 2.6Human body infrared detection broadcast
  • 2.7 Temperature and humidity broadcaster
  • 2.8 Color recognition machine
  • 2.9 Rocker control light
1.Sensor principle
  • 1.1 About ultrasonic sensors
  • 1.2 Ultrasonic ranging
  • 1.3 About potentiometers
  • 1.4 Adjust potentiometer
  • 1.5 About photosensitive sensors
  • 1.6 Read the light intensity
  • 1.7 About infrared modules
  • 1.8 Obstacle detection
  • 1.9 Introduction of module
  • 1.10 Human body detection
  • 1.11 About temperature-humidity modules
  • 1.12 Read temperature humidity
  • 1.13 About color recognition sensors
  • 1.14 Color recognition
  • 1.15 About rocker module
  • 1.16 Control rocker
6.Sensor Advanced Python coursenew
1.Sensor principle
  • 1.1 About ultrasonic sensorsnew
  • 1.2 Ultrasonic rangingnew
  • 1.3 About potentiometersnew
  • 1.4 Adjust potentiometernew
  • 1.5 About photosensitive sensorsnew
  • 1.6 Read the light intensitynew
  • 1.7 About infrared modulesnew
  • 1.8 Obstacle detectionnew
  • 1.9 About human infrared sensing modulesnew
  • 1.10 Human body detectionnew
  • 1.11 About temperature-humidity modulesnew
  • 1.12 Read temperature humiditynew
  • 1.13 About color recognition sensorsnew
  • 1.14 Color recognitionnew
  • 1.15 About rocker modulenew
  • 1.16 Control rockernew
2.Sensor basic course
  • 2.1 Hand-held range findernew
  • 2.2 Adjustable RGB lightnew
  • 2.3 Emergency lightnew
  • 2.4 Vibrating alarm clocknew
  • 2.5 Infrared detection broadcastnew
  • 2.6 Human body infrared detection broadcastnew
  • 2.7 Temperature and humidity broadcasternew
  • 2.8 Color recognition machinenew
  • 2.9 Rocker control lightnew
3.Sensor expansion course
  • 3.1 Avoiding carnew
  • 3.2 Changing Facenew
  • 3.3 Adjustable fannew
  • 3.4 Photosensitive robotnew
  • 3.5 Swimming robotnew
  • 3.6 Spiders sense human bodynew
  • 3.7 Temperature control fannew
  • 3.8 Automatic safety doornew
  • 3.9 Rocker carriernew
Download
  • APP(iOS_Android)
  • Code_PythonLibrary
  • Hardware manual
  • Bluetooth communication protocol
  • Assembly Instructions Manual
  • Makecode offline software
Download ZIP

Welcome to Building:bit Superkit repository

3.APP control

APP control

APP control1. Learning objectives2. Building blocks3. Motor wiring4. Programming5. Experimental Phenomenon5.1 Download APP5.2 APP remote controlAPP interface function introduction:

1. Learning objectives

In this course, we mainly learn how to use MakeCode graphical programming to realize Bluetooth APP remote control Clip robot.


2. Building blocks

For the building blocks steps, please refer to the installation drawings of [Assembly Course]--[Clip robot] in the materials or the building blocks installation book.


3. Motor wiring

Insert the motor wiring on the left side of the car into the M1 interface of the Super:bit expansion board, and the black wire is close to the battery side;

Insert the motor wiring on the right side of the car into the M3 interface of the Super:bit expansion board, and the black wire is close to the battery side;

Insert the building blocks servo wiring into the S1 interface of the Super:bit expansion board, and the orange servo wiring is inserted into the yellow pin of S1.

As shown in the figure below:
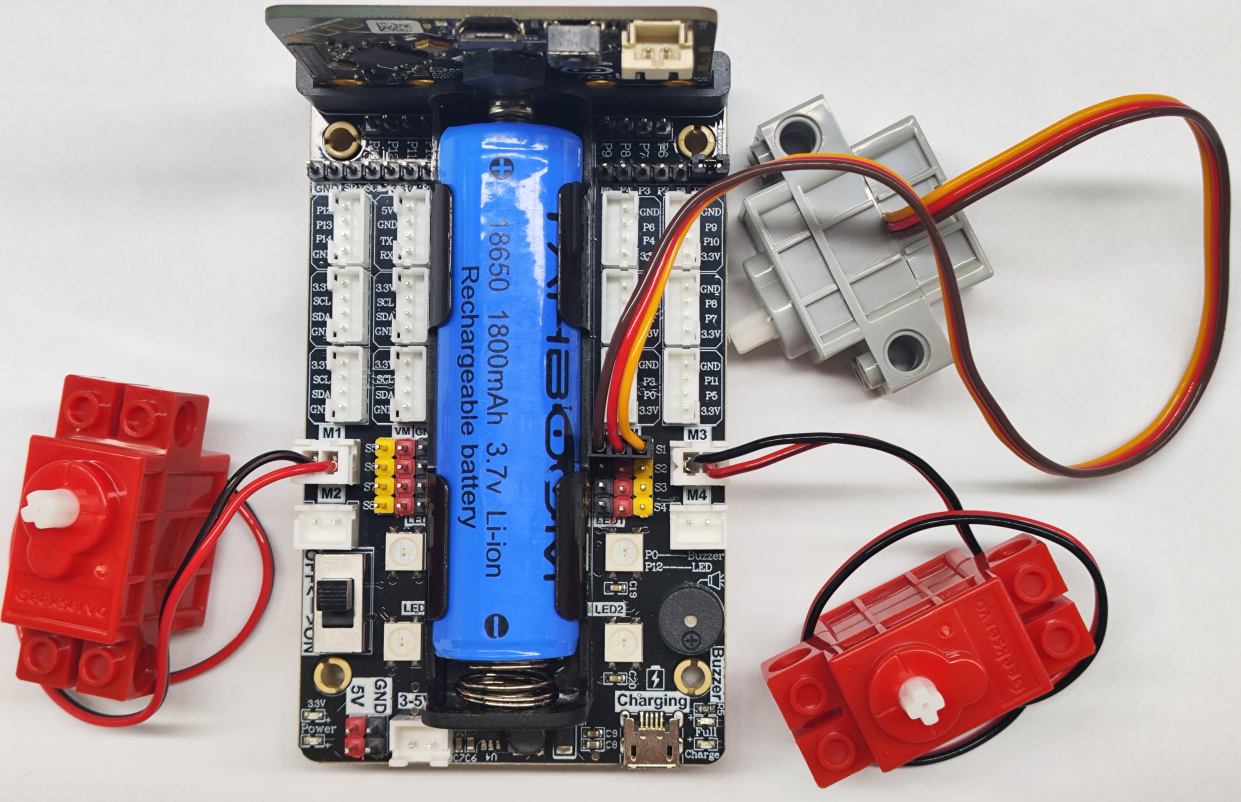
image-20250607163959305

! Notes:

When taking the course related to the building block servo for the first time, we need to remove the gear on the servo and upload the program of this course to the micro:bit; then turn on the power switch of the Super:bit expansion board and wait for the building block servo to turn to the initial position; then, we can turn off the power, adjust the clip to open to the widest point, and then install the servo gear. (If you have used Clip robot and servo-related programs before, you can skip this step)
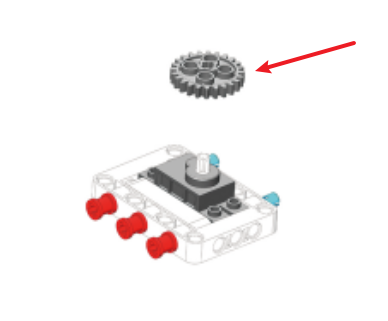
image-20250607094947210


4. Programming

Method 1 Online programming:

First, connect the micro:bit to the computer via a USB data cable, and a U disk will pop up on the computer. Click the URL in the U disk: https://makecode.microbit.org/ to enter the programming interface. Then, add the Yahboom smart software package https://github.com/YahboomTechnology/SuperBitLibV2 to start programming.

Method 2 Offline Programming:

Open the offline programming software MakeCode and enter the programming interface. Click [New] and add the Yahboom smart software package https://github.com/YahboomTechnology/SuperBitLibV2 to start programming.

For the summary program of this course, please open the microbit-Clip-robot-APP-control.hex we provide in the MakeCode programming interface to view it.


5. Experimental Phenomenon

5.1 Download APP

Android users please use the mobile browser to scan the following QR code to download and install the APP;

Apple users please use the hand camera to scan the QR code to download and install the APP.
image.png

! Note: During the installation or use of the APP, if the mobile phone prompts that any permissions need to be obtained, please select "Agree".

5.2 APP remote control

1) After the program is successfully downloaded, turn on the power switch of the car, and the micro:bit dot matrix will display the "S" pattern, as shown in the figure below, which is the state of Bluetooth not being connected.
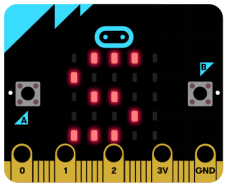
image.png

2) Turn on the Bluetooth of your mobile phone and open our APP. You can see the interface as shown below. Click Allow APP to use location information.
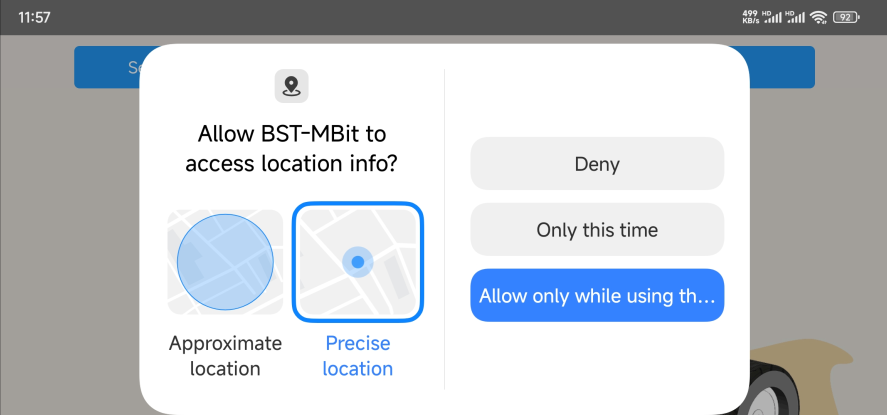
image.png

3) After the mobile phone is close to the car and waits for a while, the Bluetooth will automatically connect; if it is not automatically connected, we can click [Search Bluetooth devices] to search for the device to connect.
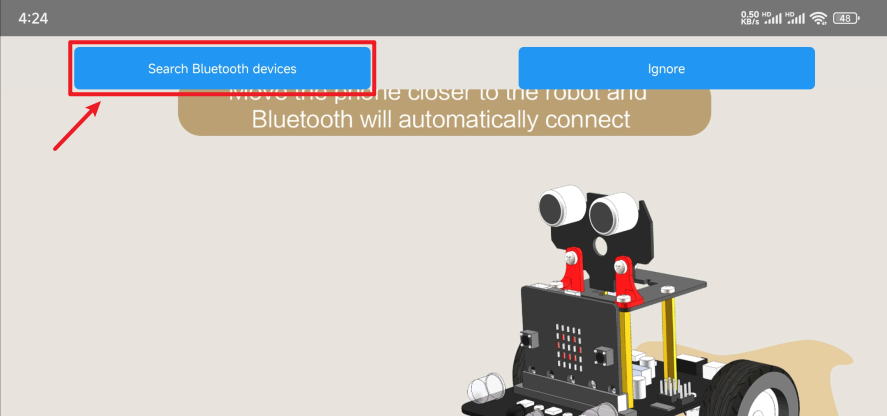
image.png

After the Bluetooth is successfully connected, a smiley face pattern will be displayed on the micro:bit dot matrix; if the Bluetooth is disconnected, a crying face pattern will be displayed on the dot matrix.
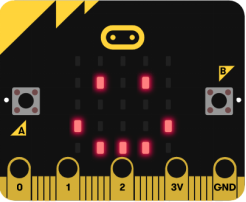
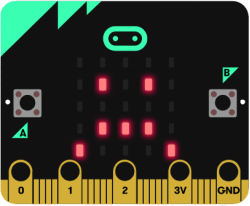
image.png image.png

[Bluetooth successful connection status] [Bluetooth disconnection status]

APP interface function introduction:

Main control interface:

  • The forward button controls the car to move forward;
  • The backward button controls the car to move backward;
  • The left turn button controls the car to rotate left;
  • The right button controls the car to rotate right;
  • Piano key 1 controls the clamp to release;
  • Piano key 2 controls the clamp to clamp;
  • Press the piano key to hear the buzzer play different tones.
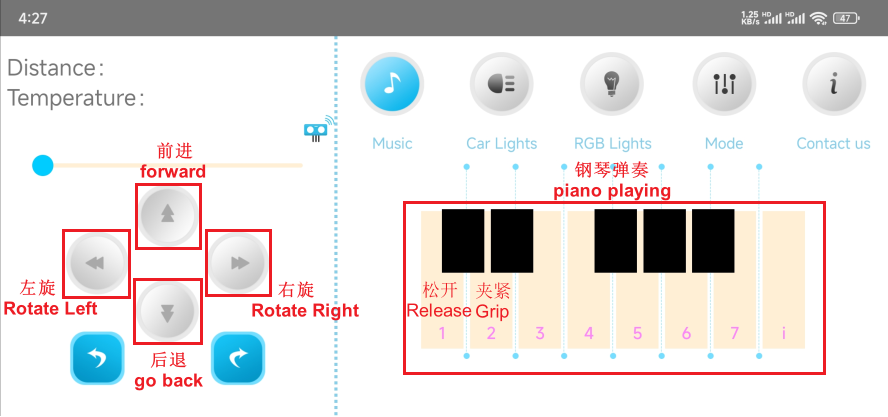
image.png

Car light interface:

image.png

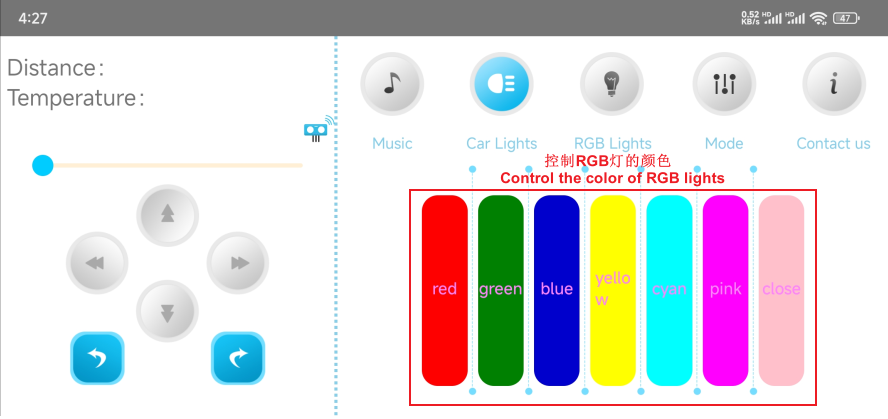
RGB light interface:

Due to the upgrade of micro:bit V2 motherboard, the Bluetooth code control has deleted the RGB light control and changed to dot matrix display.
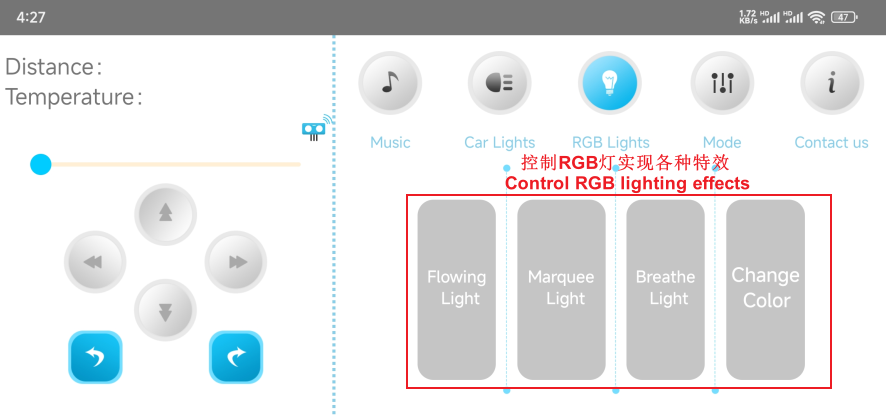
image.png

The buttons under the mode option have not yet defined any functions.

Button control clip
Micro:bit handle control

COMPANY

  • About us
  • Team Style
  • Blog

LEARNING & EXPLORATION

  • Tutorials
  • Edge AI hardware
  • Educational robots
  • Embedded intelligent hardware

WHERE TO BUY

  • Yahboom Online Store
  • Amazon
  • Alibaba
  • AliExpress
  • Mercado

TECHNOLOGY SUPPORT

  • Email: support@yahboom.com

BE A DISTRIBUTOR

  • Email: sales@yahboom.com
QR Code
QR Code

Copyright © 2017-2026 Yahboom. All Rights Reserved.

EN/中文