yahboom
HomeLearn
Solution
Blog
Online Store
About Us
EN/中文
MicroROS-Pi5📖
01. Introduction
  • 0.Unpacking and reviewing video
  • 1. ReadMe - learning route
  • 2. Introduction to lidar
  • 3. Introduction to microROS control board
  • 4. FAQ
  • 5. About charging
02. Assembly course
  • Assembly steps
03. Preparation
  • First Trial
  • 1. Write firmware
  • 2. MicroROS control board parameter configuration
  • 3. Connect to MicroROS agent
  • 4. Connect to WIFI in hotspot mode
04. Quick start control course
  • 1. Self start handle control
  • 2. Close the self-starting handle control process
  • 3. Quick start keyboard control
  • 4. Map navigation and APP control
05. Robot basic course
  • 1. Robot information release
  • 2. Robot keyboard control
  • 3. Robot handle control
  • 4. Robot state estimation
  • 5. Linear speed calibration
  • 6. Angular velocity calibration
  • 7. Robot URDF model
06. ROS+OpenCV course
  • 1. Getting started with Opencv CV
  • 2. Geometric transformation
  • 3. Image processing and drawing
  • 4. Open Source CV image beautification
  • 5. QR code creation and recognition
  • 6. AR vision
  • 7. ROS+Opencv application
07. Mediapipe course
  • 1. Hand detection
  • 2. Posture detection
  • 3. Overall detection
  • 4. Face detection
  • 5. Face recognition
  • 6. Face effects
  • 7. 3D object recognition
  • 8. Brush
  • 9. Finger control
  • 10 .Gesture recognition
08. Robot visual interaction
  • 1. Monocular camera calibration
  • 2. Color tracking
  • 3. Object recognition and tracking
  • 4. Face recognition tracking
  • 5. Autonomous driving line patrol
  • 6. QR code motion control
  • 7. Gesture control of basic movement of the car
  • 8. Control the car movement with your palm
  • 9. Gesture control car action group
  • 10. Palm control of the two-dimensional gimbal servo
09. Lidar course
  • 1. Lidar avoid
  • 2. Lidar following
  • 3. Lidar guard
  • 4. Lidar patrol
  • 5. Gmapping mapping
  • 6. Cartographer mapping
  • 7. Navigation2 navigation avoid
  • 8. ROS Robot APP mapping
  • 9. ROS Robot APP navigation
10. Multi-machine course
  • 1. Multi-machine handle control
  • 2. Multi-machine keyboard control
  • 3. Multi-machine navigation
11. Linux basic course
  • 1. Introduction to Linux system
  • 2. Ubuntu file system
  • 3. Ubuntu common commands
  • 4. Ubuntu common editors
  • 5. Ubuntu software operation commands
  • 6. Virtual machine installation
  • 7. SSH remote control
  • 8. VNC remote control
  • 9. Transfer files remotely
  • 10. Driver library and communication
  • 11. Static IP and hotspot mode
  • 12. Bind device ID
  • 13. Capacity expansion and resource allocation
  • 14. Update system software sources
  • 15. Set root user password
  • 16. sudo free password
  • 17. Connect to WiFi network
  • 18. View system version
  • 19. Customized service management
  • 20. Back up system image
12. RPi basic setting course
  • 1. Update and upgrade operating system
  • 2. Introduction to raspi-config tool
  • 3. config.txt file description
  • 4. Network Configuration
  • 5. remote access
  • 6. Transfer files remotely
  • 7. Set display resolution and rotation
  • 8. Set screen to sleep
  • 9. Get real-time temperature of Raspberry Pi
  • 10. Play audio and video
  • 11. Using USB camera
  • 12. Using MIPI camera
13. Docker course
  • 1. Overview and installation
  • 2. Common commands
  • 3. Docker images deeply understand and publish images
  • 4. Docker hardware interaction and data processing
  • 5. Enter the robot's docker container
14. ROS2 basic course
  • 1. Introduction to ROS2
  • 2. ROS2 install Humble
  • 3. ROS2 development environment
  • 4. ROS2 workspace
  • 5. ROS2 function package
  • 6. ROS2 node
  • 7.ROS2 topic communication
  • 8.ROS2 service communication
  • 9.ROS2 action communication
  • 10.ROS2 custom interface message
  • 11.ROS2 parameter service case
  • 12.ROS2 meta-function package
  • 13.ROS2 distributed communication
  • 14.ROS2 DDS
  • 15.ROS2 time related API
  • 16.ROS2 common command tools
  • 17.ROS2 rviz2 use
  • 18.ROS2 rqt toolbox
  • 19.ROS2 Launch startup file configuration
  • 20.ROS2 recording and playback tool
  • 21.ROS2 URDF model
  • 22.ROS2 Gazebo simulation platform
  • 23.ROS2 TF2 coordinate transformation
15. microROS control board development environment
  • 1. Introduction to microROS control board
  • 2. Set up ESP32-IDF development environment
  • 3. ESP32-IDF configuration tool
  • 4. Install ESP32-microros components
  • 5. Install and start microROS agent
  • 6. Flash-tool burning firmware
16. ESP32 basic course
  • 1. Turn on the LED light
  • 2. Button function
  • 3. Drive the buzzer
  • 4. Serial communication
  • 5. Battery voltage detection
  • 6. Drive PWM servo
  • 7. Drive motor
  • 8. Read motor encoder data
  • 9. PID controls car speed
  • 10. Read IMU data
  • 11. Read radar data
  • 12. Flash access data
  • 13. Partition table and memory
  • 14. Bluetooth communication
  • 15. WiFi networking
  • 16. Robot kinematics analysis
  • 17.ROS-WiFi camera module
17. microROS basic course
  • 1. Publish topic
  • 2. Subscribe topic
  • 3. Multi-topic subscribe and publish
  • 4. Subscribe buzzer topics
  • 5. Subscribe PWM servo topics
  • 6. Subscribe speed control topics
  • 7. Release speed topic
  • 8. Release IMU data topic
  • 9. Publish lidar data topics
  • 10. Customized transmission method
Download
  • Mapping_APP(iOS_Android)
  • Source code
  • Hardware information
  • VM image file
  • RPi5 imgae file
  • Instruction Manual
  • 3D Model File
  • ROS2_Basic_VM
Download ZIP
FAQ
  • 1、1.USB camera abnormal termination

Welcome to MicroROS-Pi5 repository

当製品の日本語版マニュアル資料は、こちらからご取得ください。

8. Brush

Brush

1、Introduction

  • MediaPipe is an open source data stream processing machine learning application development framework developed by Google. It is a graph-based data processing pipeline for building and using multiple forms of data sources, such as video, audio, sensor data, and any time series data. MediaPipe is cross-platform and can run on embedded platforms (Raspberry Pi, etc.), mobile devices (iOS and Android), workstations and servers, and supports mobile GPU acceleration.

    MediaPipe provides cross-platform, customizable ML solutions for real-time and streaming media. The core framework of MediaPipe is implemented in C++ and provides support for languages such as Java and Objective C. The main concepts of MediaPipe include Packet, Stream, Calculator, Graph and Subgraph.

    Features of MediaPipe:

    • End-to-end acceleration: Built-in fast ML inference and processing accelerates even on commodity hardware.

    • Build once, deploy anywhere: Unified solutions for Android, iOS, desktop/cloud, web and IoT.

    • Ready-to-use solutions: Cutting-edge ML solutions that showcase the full capabilities of the framework.

    • Free and open source: frameworks and solutions under Apache2.0, fully extensible and customizable.

2、Brush

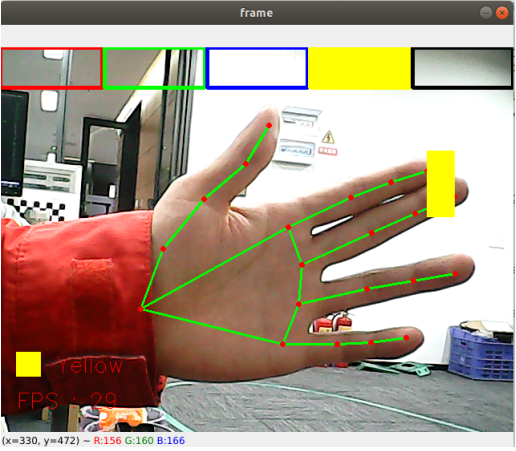
When the right and middle fingers are merged, they are in the selection state, and a color selection box pops up. When the two fingertips move to the corresponding color position, select the color (where 'is an eraser');

The middle and middle fingers are in a drawing state and can be drawn freely on the drawing board.

2.1、Start

After entering the docker container, enter the following command in the terminal.

cd ~/yahboomcar_ws/src/yahboomcar_mediapipe/yahboomcar_mediapipe
python3 09_VirtualPaint.py

image-20240125180739509

2.2、Code

After entering the docker container, the location of the source code of this function is as follows

xxxxxxxxxx
/root/yahboomcar_ws/src/yahboomcar_mediapipe/yahboomcar_mediapipe/09_VirtualPaint.py
​x
#!/usr/bin/env python3
# encoding: utf-8
import math
import time
import cv2 as cv
import numpy as np
import mediapipe as mp

xp = yp = pTime = boxx = 0
tipIds = [4, 8, 12, 16, 20]
imgCanvas = np.zeros((480, 640, 3), np.uint8)
brushThickness = 5
eraserThickness = 100
top_height = 50
Color = "Red"
ColorList = {
    'Red': (0, 0, 255),
    'Green': (0, 255, 0),
    'Blue': (255, 0, 0),
    'Yellow': (0, 255, 255),
    'Black': (0, 0, 0),
}

class handDetector:
    def __init__(self, mode=False, maxHands=2, detectorCon=0.5, trackCon=0.5):
        self.tipIds = [4, 8, 12, 16, 20]
        self.mpHand = mp.solutions.hands
        self.mpDraw = mp.solutions.drawing_utils
        self.hands = self.mpHand.Hands(
            static_image_mode=mode,
            max_num_hands=maxHands,
            min_detection_confidence=detectorCon,
            min_tracking_confidence=trackCon )
        self.lmDrawSpec = mp.solutions.drawing_utils.DrawingSpec(color=(0, 0, 255), thickness=-1, circle_radius=15)
        self.drawSpec = mp.solutions.drawing_utils.DrawingSpec(color=(0, 255, 0), thickness=10, circle_radius=10)

    def findHands(self, frame, draw=True):
        self.lmList = []
        img_RGB = cv.cvtColor(frame, cv.COLOR_BGR2RGB)
        self.results = self.hands.process(img_RGB)
        if self.results.multi_hand_landmarks:
            for handLms in self.results.multi_hand_landmarks:
                if draw: self.mpDraw.draw_landmarks(frame, handLms, self.mpHand.HAND_CONNECTIONS, self.lmDrawSpec, self.drawSpec)
                else: self.mpDraw.draw_landmarks(frame, handLms, self.mpHand.HAND_CONNECTIONS)
            for id, lm in enumerate(self.results.multi_hand_landmarks[0].landmark):
                h, w, c = frame.shape
                cx, cy = int(lm.x * w), int(lm.y * h)
                # print(id, cx, cy)
                self.lmList.append([id, cx, cy])
        return frame, self.lmList

    def fingersUp(self):
        fingers=[]
        # Thumb
        if (self.calc_angle(self.tipIds[0],
                            self.tipIds[0] - 1,
                            self.tipIds[0] - 2) > 150.0) and (
                self.calc_angle(
                    self.tipIds[0] - 1,
                    self.tipIds[0] - 2,
                    self.tipIds[0] - 3) > 150.0): fingers.append(1)
        else:
            fingers.append(0)
        # 4 finger
        for id in range(1, 5):
            if self.lmList[self.tipIds[id]][2] < self.lmList[self.tipIds[id] - 2][2]:
                fingers.append(1)
            else:
                fingers.append(0)
        return fingers


    def get_dist(self, point1, point2):
        x1, y1 = point1
        x2, y2 = point2
        return abs(math.sqrt(math.pow(abs(y1 - y2), 2) + math.pow(abs(x1 - x2), 2)))

    def calc_angle(self, pt1, pt2, pt3):
        point1 = self.lmList[pt1][1], self.lmList[pt1][2]
        point2 = self.lmList[pt2][1], self.lmList[pt2][2]
        point3 = self.lmList[pt3][1], self.lmList[pt3][2]
        a = self.get_dist(point1, point2)
        b = self.get_dist(point2, point3)
        c = self.get_dist(point1, point3)
        try:
            radian = math.acos((math.pow(a, 2) + math.pow(b, 2) - math.pow(c, 2)) / (2 * a * b))
            angle = radian / math.pi * 180
        except:
            angle = 0
        return abs(angle)


if __name__ == '__main__':
    capture = cv.VideoCapture(0)
    capture.set(6, cv.VideoWriter.fourcc('M', 'J', 'P', 'G'))
    capture.set(cv.CAP_PROP_FRAME_WIDTH, 640)
    capture.set(cv.CAP_PROP_FRAME_HEIGHT, 480)
    print("capture get FPS : ", capture.get(cv.CAP_PROP_FPS))
    hand_detector = handDetector(detectorCon=0.85)
    while capture.isOpened():
        ret, frame = capture.read()
        # frame = cv.flip(frame, 1)
        h, w, c = frame.shape
        frame,lmList = hand_detector.findHands(frame, draw=False)
        if len(lmList) != 0:
            # print(lmList)
            # tip of index and middle fingers
            x1, y1 = lmList[8][1:]
            x2, y2 = lmList[12][1:]
            fingers = hand_detector.fingersUp()
            if fingers[1] and fingers[2]:
                # print("Seclection mode")
                if y1 < top_height:
                    if 0 < x1 < int(w / 5) - 1:
                        boxx = 0
                        Color = "Red"
                    if int(w / 5) < x1 < int(w * 2 / 5) - 1:
                        boxx = int(w / 5)
                        Color = "Green"
                    elif int(w * 2 / 5) < x1 < int(w * 3 / 5) - 1:
                        boxx = int(w * 2 / 5)
                        Color = "Blue"
                    elif int(w * 3 / 5) < x1 < int(w * 4 / 5) - 1:
                        boxx = int(w * 3 / 5)
                        Color = "Yellow"
                    elif int(w * 4 / 5) < x1 < w - 1:
                        boxx = int(w * 4 / 5)
                        Color = "Black"
                cv.rectangle(frame, (x1, y1 - 25), (x2, y2 + 25), ColorList[Color], cv.FILLED)
                cv.rectangle(frame, (boxx, 0), (boxx + int(w / 5), top_height), ColorList[Color], cv.FILLED)
                cv.rectangle(frame, (0, 0), (int(w / 5) - 1, top_height), ColorList['Red'], 3)
                cv.rectangle(frame, (int(w / 5) + 2, 0), (int(w * 2 / 5) - 1, top_height), ColorList['Green'], 3)
                cv.rectangle(frame, (int(w * 2 / 5) + 2, 0), (int(w * 3 / 5) - 1, top_height), ColorList['Blue'], 3)
                cv.rectangle(frame, (int(w * 3 / 5) + 2, 0), (int(w * 4 / 5) - 1, top_height), ColorList['Yellow'], 3)
                cv.rectangle(frame, (int(w * 4 / 5) + 2, 0), (w - 1, top_height), ColorList['Black'], 3)
            if fingers[1] and fingers[2] == False and math.hypot(x2 - x1, y2 - y1) > 50:
                # print("Drawing mode")
                if xp == yp == 0: xp, yp = x1, y1
                if Color == 'Black':
                    cv.line(frame, (xp, yp), (x1, y1), ColorList[Color], eraserThickness)
                    cv.line(imgCanvas, (xp, yp), (x1, y1), ColorList[Color], eraserThickness)
                else:
                    cv.line(frame, (xp, yp), (x1, y1), ColorList[Color], brushThickness)
                    cv.line(imgCanvas, (xp, yp), (x1, y1), ColorList[Color], brushThickness)
                cv.circle(frame, (x1, y1), 15, ColorList[Color], cv.FILLED)
                xp, yp = x1, y1
            else: xp = yp = 0
        imgGray = cv.cvtColor(imgCanvas, cv.COLOR_BGR2GRAY)
        _, imgInv = cv.threshold(imgGray, 50, 255, cv.THRESH_BINARY_INV)
        imgInv = cv.cvtColor(imgInv, cv.COLOR_GRAY2BGR)
        frame = cv.bitwise_and(frame, imgInv)
        frame = cv.bitwise_or(frame, imgCanvas)
        if cv.waitKey(1) & 0xFF == ord('q'): break
        cTime = time.time()
        fps = 1 / (cTime - pTime)
        pTime = cTime
        text = "FPS : " + str(int(fps))
        cv.rectangle(frame, (20, h - 100), (50, h - 70), ColorList[Color], cv.FILLED)
        cv.putText(frame, Color, (70, h - 75), cv.FONT_HERSHEY_SIMPLEX, 0.9, (0, 0, 255), 1)
        cv.putText(frame, text, (20, h-30), cv.FONT_HERSHEY_SIMPLEX, 0.9, (0, 0, 255), 1)
        cv.imshow('frame', frame)
    capture.release()
    cv.destroyAllWindows()


3D object recognition
Finger control

COMPANY

  • About us
  • Team Style
  • Blog

LEARNING & EXPLORATION

  • Tutorials
  • Edge AI hardware
  • Educational robots
  • Embedded intelligent hardware

WHERE TO BUY

  • Yahboom Online Store
  • Amazon
  • Alibaba
  • AliExpress
  • Mercado

TECHNOLOGY SUPPORT

  • Email: support@yahboom.com

BE A DISTRIBUTOR

  • Email: sales@yahboom.com
QR Code

Copyright © 2017-2026 Yahboom. All Rights Reserved.

EN/中文