yahboom
HomeLearn
Solution
Blog
Online Store
About Us
EN/中文
MicroROS-Pi5📖
01. Introduction
  • 0.Unpacking and reviewing video
  • 1. ReadMe - learning route
  • 2. Introduction to lidar
  • 3. Introduction to microROS control board
  • 4. FAQ
  • 5. About charging
02. Assembly course
  • Assembly steps
03. Preparation
  • First Trial
  • 1. Write firmware
  • 2. MicroROS control board parameter configuration
  • 3. Connect to MicroROS agent
  • 4. Connect to WIFI in hotspot mode
04. Quick start control course
  • 1. Self start handle control
  • 2. Close the self-starting handle control process
  • 3. Quick start keyboard control
  • 4. Map navigation and APP control
05. Robot basic course
  • 1. Robot information release
  • 2. Robot keyboard control
  • 3. Robot handle control
  • 4. Robot state estimation
  • 5. Linear speed calibration
  • 6. Angular velocity calibration
  • 7. Robot URDF model
06. ROS+OpenCV course
  • 1. Getting started with Opencv CV
  • 2. Geometric transformation
  • 3. Image processing and drawing
  • 4. Open Source CV image beautification
  • 5. QR code creation and recognition
  • 6. AR vision
  • 7. ROS+Opencv application
07. Mediapipe course
  • 1. Hand detection
  • 2. Posture detection
  • 3. Overall detection
  • 4. Face detection
  • 5. Face recognition
  • 6. Face effects
  • 7. 3D object recognition
  • 8. Brush
  • 9. Finger control
  • 10 .Gesture recognition
08. Robot visual interaction
  • 1. Monocular camera calibration
  • 2. Color tracking
  • 3. Object recognition and tracking
  • 4. Face recognition tracking
  • 5. Autonomous driving line patrol
  • 6. QR code motion control
  • 7. Gesture control of basic movement of the car
  • 8. Control the car movement with your palm
  • 9. Gesture control car action group
  • 10. Palm control of the two-dimensional gimbal servo
09. Lidar course
  • 1. Lidar avoid
  • 2. Lidar following
  • 3. Lidar guard
  • 4. Lidar patrol
  • 5. Gmapping mapping
  • 6. Cartographer mapping
  • 7. Navigation2 navigation avoid
  • 8. ROS Robot APP mapping
  • 9. ROS Robot APP navigation
10. Multi-machine course
  • 1. Multi-machine handle control
  • 2. Multi-machine keyboard control
  • 3. Multi-machine navigation
11. Linux basic course
  • 1. Introduction to Linux system
  • 2. Ubuntu file system
  • 3. Ubuntu common commands
  • 4. Ubuntu common editors
  • 5. Ubuntu software operation commands
  • 6. Virtual machine installation
  • 7. SSH remote control
  • 8. VNC remote control
  • 9. Transfer files remotely
  • 10. Driver library and communication
  • 11. Static IP and hotspot mode
  • 12. Bind device ID
  • 13. Capacity expansion and resource allocation
  • 14. Update system software sources
  • 15. Set root user password
  • 16. sudo free password
  • 17. Connect to WiFi network
  • 18. View system version
  • 19. Customized service management
  • 20. Back up system image
12. RPi basic setting course
  • 1. Update and upgrade operating system
  • 2. Introduction to raspi-config tool
  • 3. config.txt file description
  • 4. Network Configuration
  • 5. remote access
  • 6. Transfer files remotely
  • 7. Set display resolution and rotation
  • 8. Set screen to sleep
  • 9. Get real-time temperature of Raspberry Pi
  • 10. Play audio and video
  • 11. Using USB camera
  • 12. Using MIPI camera
13. Docker course
  • 1. Overview and installation
  • 2. Common commands
  • 3. Docker images deeply understand and publish images
  • 4. Docker hardware interaction and data processing
  • 5. Enter the robot's docker container
14. ROS2 basic course
  • 1. Introduction to ROS2
  • 2. ROS2 install Humble
  • 3. ROS2 development environment
  • 4. ROS2 workspace
  • 5. ROS2 function package
  • 6. ROS2 node
  • 7.ROS2 topic communication
  • 8.ROS2 service communication
  • 9.ROS2 action communication
  • 10.ROS2 custom interface message
  • 11.ROS2 parameter service case
  • 12.ROS2 meta-function package
  • 13.ROS2 distributed communication
  • 14.ROS2 DDS
  • 15.ROS2 time related API
  • 16.ROS2 common command tools
  • 17.ROS2 rviz2 use
  • 18.ROS2 rqt toolbox
  • 19.ROS2 Launch startup file configuration
  • 20.ROS2 recording and playback tool
  • 21.ROS2 URDF model
  • 22.ROS2 Gazebo simulation platform
  • 23.ROS2 TF2 coordinate transformation
15. microROS control board development environment
  • 1. Introduction to microROS control board
  • 2. Set up ESP32-IDF development environment
  • 3. ESP32-IDF configuration tool
  • 4. Install ESP32-microros components
  • 5. Install and start microROS agent
  • 6. Flash-tool burning firmware
16. ESP32 basic course
  • 1. Turn on the LED light
  • 2. Button function
  • 3. Drive the buzzer
  • 4. Serial communication
  • 5. Battery voltage detection
  • 6. Drive PWM servo
  • 7. Drive motor
  • 8. Read motor encoder data
  • 9. PID controls car speed
  • 10. Read IMU data
  • 11. Read radar data
  • 12. Flash access data
  • 13. Partition table and memory
  • 14. Bluetooth communication
  • 15. WiFi networking
  • 16. Robot kinematics analysis
  • 17.ROS-WiFi camera module
17. microROS basic course
  • 1. Publish topic
  • 2. Subscribe topic
  • 3. Multi-topic subscribe and publish
  • 4. Subscribe buzzer topics
  • 5. Subscribe PWM servo topics
  • 6. Subscribe speed control topics
  • 7. Release speed topic
  • 8. Release IMU data topic
  • 9. Publish lidar data topics
  • 10. Customized transmission method
Download
  • Mapping_APP(iOS_Android)
  • Source code
  • Hardware information
  • VM image file
  • RPi5 imgae file
  • Instruction Manual
  • 3D Model File
  • ROS2_Basic_VM
Download ZIP
FAQ
  • 1、1.USB camera abnormal termination

Welcome to MicroROS-Pi5 repository

当製品の日本語版マニュアル資料は、こちらからご取得ください。

12. Using MIPI camera

Using MIPI camera

Using MIPI cameraConfigure cameraUse cameraPreview cameraPhotographrpicam-stillVideorpicam-vidError resolutionWeb page preview cameraRun scriptWeb access

The Raspberry Pi 5 combines the previous CSI and DSI interfaces into two dual-purpose CSI/DSI (MIPI) ports.

Configure camera

When using a Raspberry Pi camera or a third-party camera, you can modify the camera configuration according to the following table:

Camera moduleFile located at: /boot/firmware/config.txt
V1 Camera (OV5647)dtoverlay=ov5647
V2 camera (IMX219)dtoverlay=imx219
HQ Camera (IMX477)dtoverlay=imx477
GS camera (IMX296)dtoverlay=imx296
Camera module 3 (IMX708)dtoverlay=imx708
IMX290 and IMX327dtoverlay=imx290,clock-frequency=74250000
or (both modules share the IMX290 kernel driver; for the correct frequency,
see the module vendor's instructions)
dtoverlay=imx290,clock-frequency=37125000
IMX378 typedtoverlay=imx378
OV9281 seriesdtoverlay=ov9281

If you are not using the official Raspberry Pi camera, you can modify the config.txt file as shown in the table and add the dtoverlay content to the /boot/firmware/config.txt file.

xxxxxxxxxx
sudo nano /boot/firmware/config.txt

image-20240102190604786

For example: Raspberry Pi uses IMX219 camera, connect the camera to the Raspberry Pi J4 interface, and then modify the /boot/firmware/config.txt file:
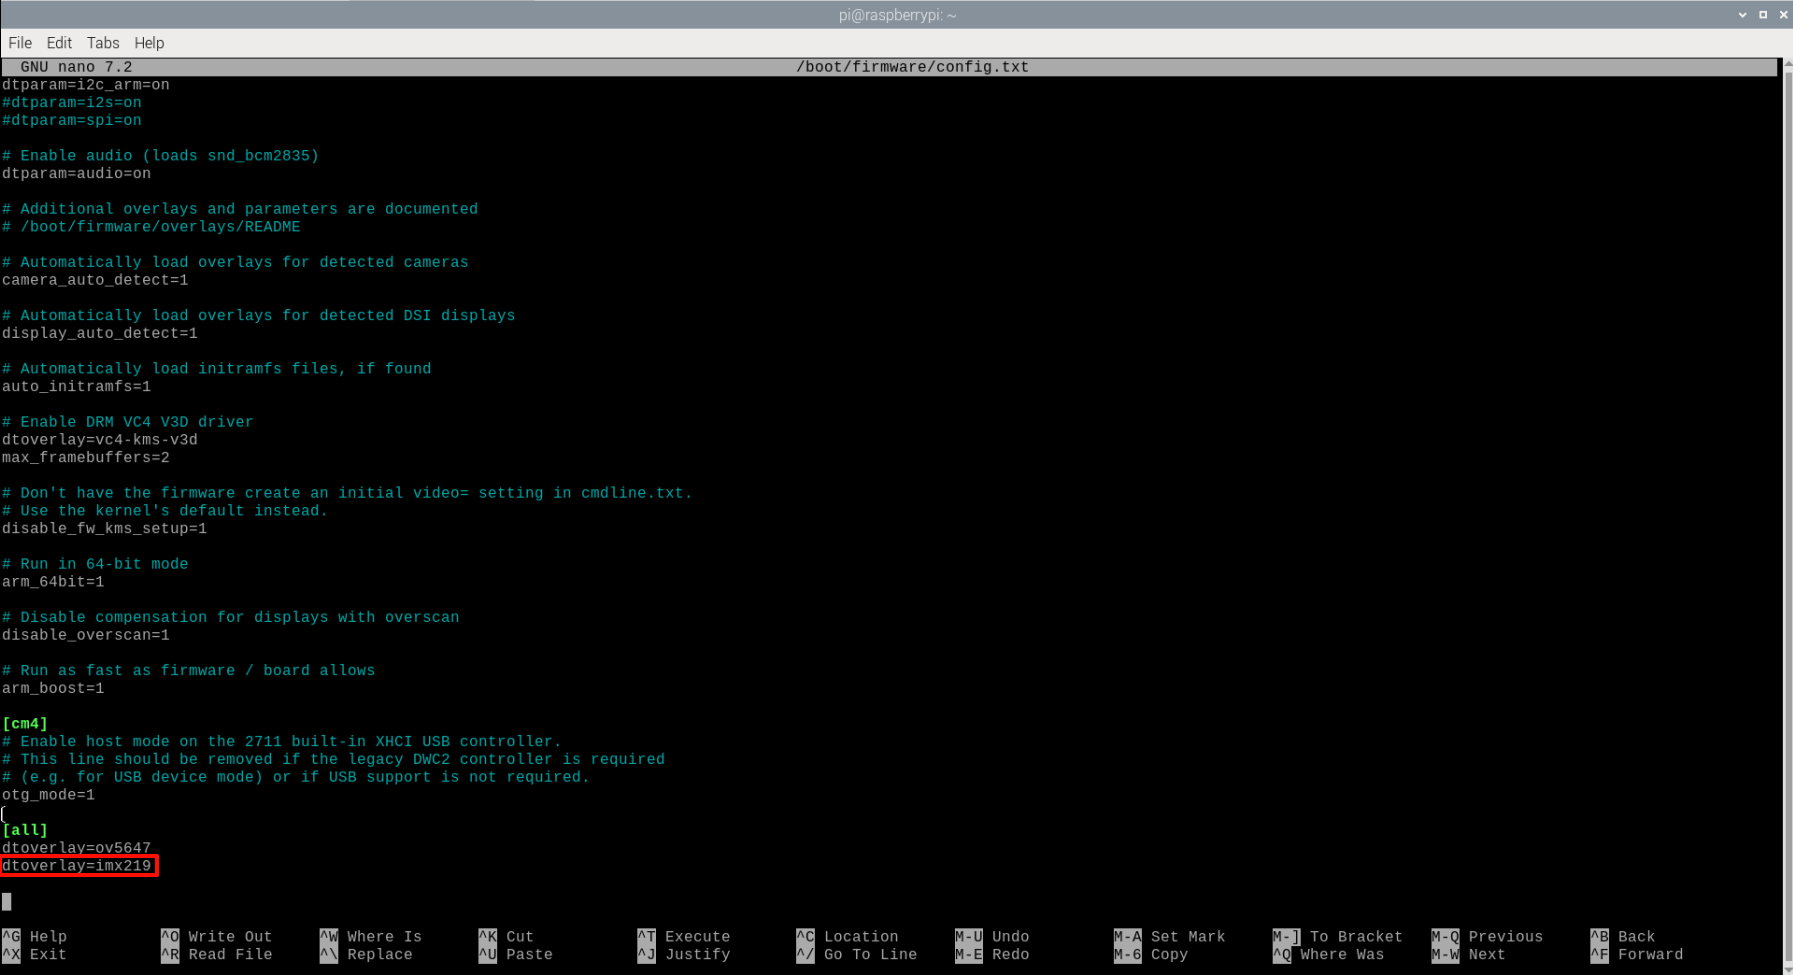
image-20240102190547875

xxxxxxxxxx
To use the IMX219 camera, it needs to be connected to the J4 interface of Raspberry Pi 5 for recognition!

Modify the configuration file and restart to take effect!

Use camera

Preview camera

  • rpicam-hello

Entering this command in the terminal will display the preview window for about 5 seconds.

  • rpicam-hello -t 0

Running this command in the terminal will always display the preview window. You can use the window close button and Ctrl+C to exit!

Photograph

  • rpicam-jpeg -o test.jpg

Display a preview for 5 seconds, then capture the image and save it as a test.jpg file

  • rpicam-jpeg -o test.jpg -t 2000 --width 640 --height 480

Show a preview for 2 seconds, then capture and save the image as a test.jpg file, with the image having a width of 640 pixels and a height of 480 pixels.

rpicam-still

This command can be used to save files in different formats:

xxxxxxxxxx
rpicam-still -e png -o test.png
rpicam-still -e bmp -o test.bmp
rpicam-still -e rgb -o test.data
rpicam-still -e yuv420 -o test.data
  • Raw image capture

xxxxxxxxxx
rpicam-still -r -o test.jpg
  • Time-lapse shooting

Capture images continuously at intervals of 2 seconds for a total capture duration of 30 seconds, and save each image as a file name similar to image0001.jpg:

xxxxxxxxxx
rpicam-still -t 30000 --timelapse 2000 -o image%04d.jpg

Video

rpicam-vid

Commands for video recording using the camera module on the Raspberry Pi.

Example: Record 10 seconds of video and write to test.h264 file

xxxxxxxxxx
rpicam-vid -t 10000 -o test.h264

play video

xxxxxxxxxx
vlc test.h264

Note: If the test.h264 file cannot be played and an error occurs, please try the following method to solve it.

Error resolution

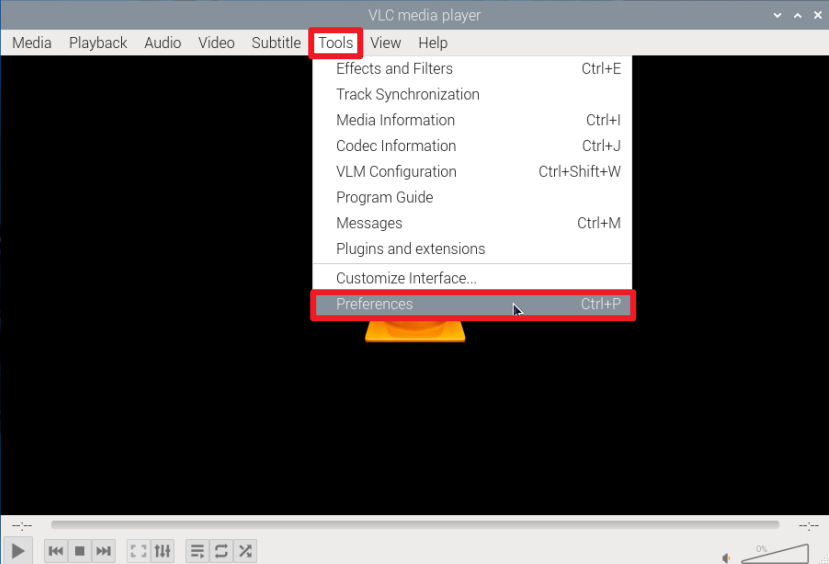
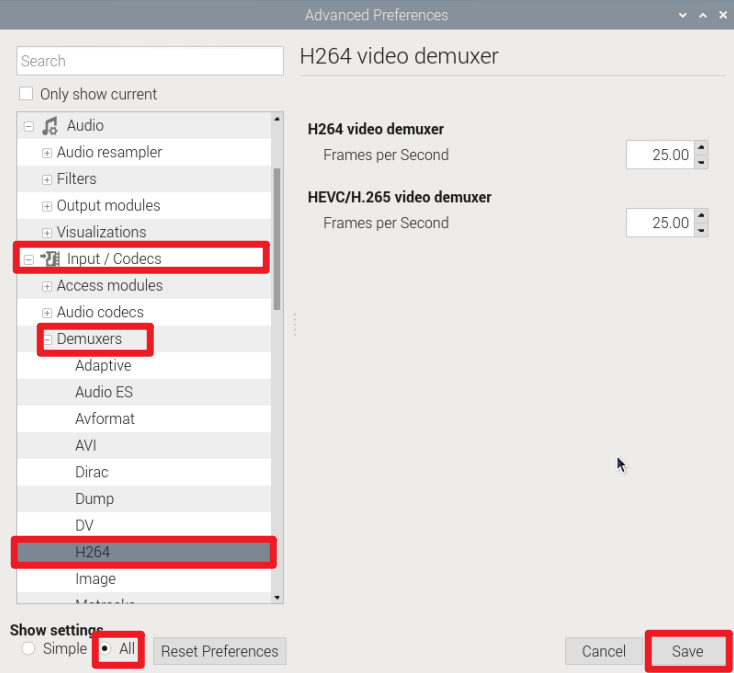
Modify the frame rate of H264 playback per second
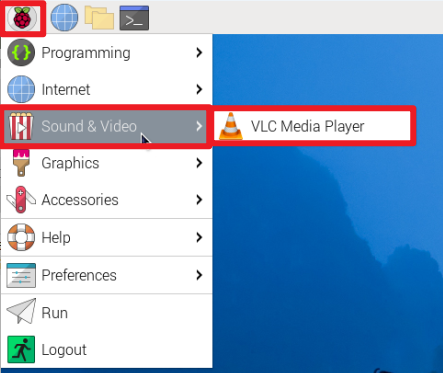
image-20231212203607442

image-20231212203645482

image-20231215142018906

Web page preview camera

Use Python script files to preview camera images on web pages.

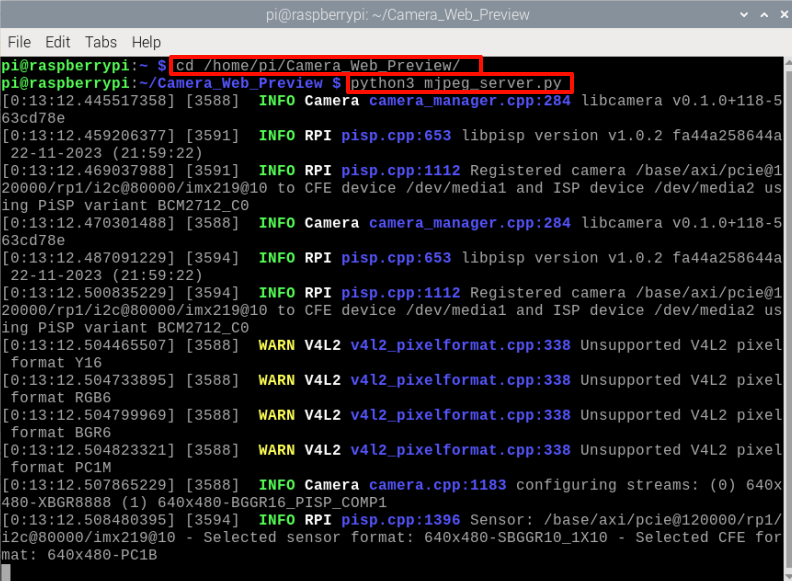
Run script

Code path:/home/pi/Camera_Web_Preview/

xxxxxxxxxx
cd /home/pi/Camera_Web_Preview/
python3 mjpeg_server.py

image-20240102192836885

Web access

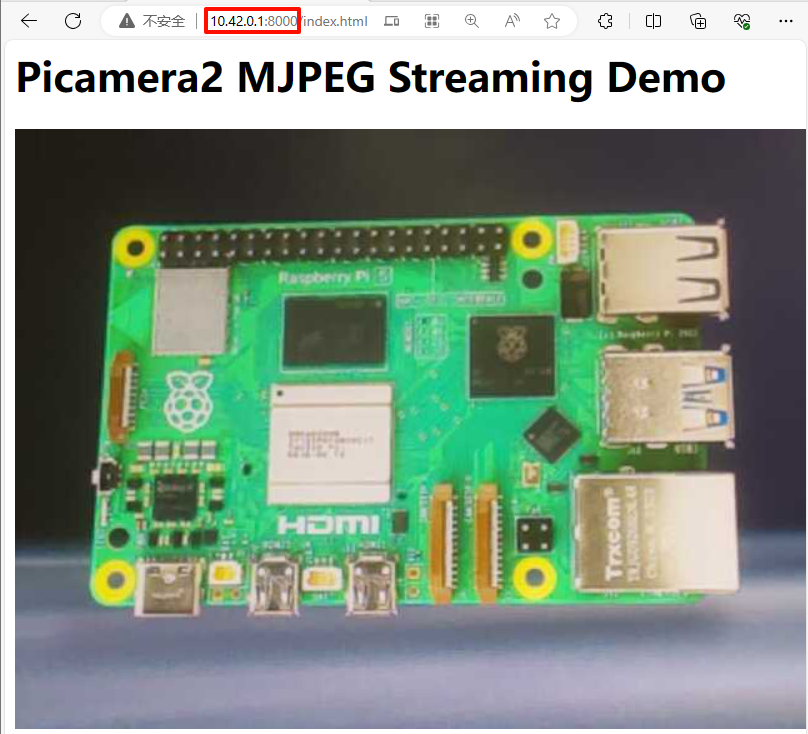
Devices under the same LAN can enter :8000 through the browser to view the real-time camera view!

xxxxxxxxxx
Example:
Raspberry Pi IP: 10.42.0.1
Web access: 10.42.0.1:8000

image-20240102193907445

xxxxxxxxxx
If you want to set up auto-start at boot, you can search for information online and set the script file to auto-start at boot!
Using USB camera
Overview and installation

COMPANY

  • About us
  • Team Style
  • Blog

LEARNING & EXPLORATION

  • Tutorials
  • Edge AI hardware
  • Educational robots
  • Embedded intelligent hardware

WHERE TO BUY

  • Yahboom Online Store
  • Amazon
  • Alibaba
  • AliExpress
  • Mercado

TECHNOLOGY SUPPORT

  • Email: support@yahboom.com

BE A DISTRIBUTOR

  • Email: sales@yahboom.com
QR Code
QR Code

Copyright © 2017-2026 Yahboom. All Rights Reserved.

EN/中文