Welcome to MicroROS-Pi5 repository
当製品の日本語版マニュアル資料は、こちらからご取得ください。
First Trial
MicroROS-Pi5:First Trial
MicroROS-Pi5:First Trial一、joystick controlStart the carjoystick control2. Remote controlVNC Remote: Windows Remote Desktop ConnectionVNC installationVNC connectionTurn off the auto-start handle control after power onTemporarily closedpermanently closed3. Keyboard control carStart and connect to the agentEnter dockerView ROS nodesStart keyboard control4. Autonomous driving line patrolStart and connect to the agentEnter dockerStart autonomous driving line patrolselected routeStart patrolling
This tutorial is just a simplified version, mainly paired with quick-start videos!
After receiving the product, install the car according to the assembly tutorial, and connect the Type-C data cable, handle receiver and USB camera.
一、joystick control
Start the car
Turn on the power switch and the car will start for about 30 seconds. You can press the START button on the handle. If the buzzer of the car makes a beep sound, it means that the handle can be used to control it.
xxxxxxxxxxIf there is no buzzer sound, it may be that the MicroROS control board firmware is incorrect or the agent is not connected successfully!It is common that the agent fails to connect successfully. You can press the RESET button on the MicroROS control panel and wait for about 10 seconds.The most accurate solution:You can refer to the remote control tutorial below and directly enter the Raspberry Pi system to view
joystick control
Before officially using the USB controller to control, you need to press the R1 button.
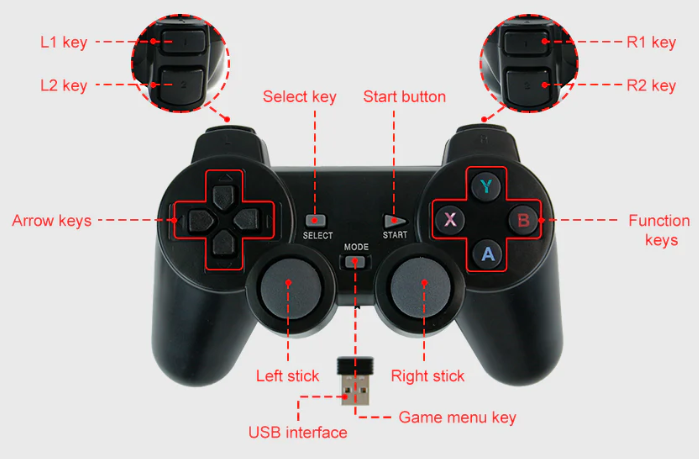
| USB handle button | control function |
|---|---|
| Left joystick up | The car moves forward |
| Left joystick down | Car backs up |
| Right joystick to the right | Car turns right |
| Right rocker left | Car turns left |
| X | Steering gear to the left |
| B | Steering gear to the right |
| A | Servo down |
| Y | Servo up |
2. Remote control
We demonstrate the use of VNC remote here. VNC remote needs to ensure that both remote devices are on the same LAN!
xxxxxxxxxxOur MicroROS-Pi5 car comes with a hotspot at the factory, which allows the computer to connect to the hotspot of the car, thus ensuring that the two are on the same LAN!
VNC Remote: Windows Remote Desktop Connection
VNC installation
xxxxxxxxxxhttps://www.realvnc.com/en/connect/download/viewer/
VNC connection
The IP corresponding to Raspberry Pi hotspot mode is 10.42.0.1
system message
xxxxxxxxxxusername:pipassword:yahboom
Hot information
xxxxxxxxxxname:Micro_rospassword:12345678
If you want to connect your own WIFI in hotspot mode, you can read the 【4. Network configuration tutorial in hotspot mode (must read)】 in Section 4
Turn off the auto-start handle control after power on
The MicroROS car will automatically start the program when it is turned on. The two terminals displayed are starting the agent and starting docker.
Temporarily closed
Display information about all processes on the system:
xxxxxxxxxxps -A
Forcefully terminate the process:
xxxxxxxxxxkill -9 [PID]
permanently closed
Modify startup script file
xxxxxxxxxxvi /home/pi/ros2_humble.sh
In the video, press "E" to enter editing!
3. Keyboard control car
Start and connect to the agent
xxxxxxxxxxsh ~/start_agent_rpi5.sh
Enter docker
xxxxxxxxxxsh ros2_humble.sh
View ROS nodes
xxxxxxxxxxros2 node list
Start keyboard control
The mouse needs to stay on the keyboard control command terminal to control the car!
xxxxxxxxxxros2 run yahboomcar_ctrl yahboom_keyboard
4. Autonomous driving line patrol
Start and connect to the agent
xxxxxxxxxxsh ~/start_agent_rpi5.sh
Enter docker
xxxxxxxxxxsh ros2_humble.sh
Start autonomous driving line patrol
xxxxxxxxxxros2 run yahboomcar_astra follow_line
selected route
After the camera screen is loaded, press the "R" key to select it. It is recommended to choose a brightly colored route!
Start patrolling
After successfully selecting the route, press the space bar to start following the route!