yahboom
HomeLearn
Solution
Blog
Online Store
About Us
EN/中文
RDK X5 Board📖
1.Introduction to RDK X5 board
  • 1.Introduction to RDK X5 board
  • 2.Write system file
  • 3.Hardware interface description
  • 4.Install case and other accessories
  • 5.Use 7-inch display
2.Basic settings course
  • 1.Network configuration
  • 2.Remote login
  • 3.Update system
  • 4.srpi-config user guide
  • 5.config. txt configuration file
  • 6.Self-startup setting
  • 7.RDK exclusive command usage
  • 8.Linux command usage
  • 9.GPIO readwrite operation
  • 10.Image classification algorithm
  • 11.Use USB camera
  • 12.Use MIPI camera
  • 13.Binocular camera depth algorithm
3.Basic development course
C language
  • 1.Camera image display
  • 2.Local save camera images
  • 3.Camera image encoding
  • 4.Video file decoding
  • 5.RTSP streaming decoding
  • 6.VPS scaling example
  • 7.Target detection algorithm-fcos
  • 8.Target detection algorithm-YOLOv5s
  • 9.Using CAN
Python
  • 0.ReadMe
  • 1.Using GPIO
  • 2.Using PWM
  • 3.Using Serial port
  • 4.Using I2C
  • 5.Using SPI
4.ROS expansion board
Python basic control
  • 0.Bind PCB port devices
  • 1.Install the Rosmaster driver library
  • 2.Buzzer whistle
  • 3.Control PWM servo
  • 4.RGB colorful light bar special effects display
  • 5.Control the forward and reverse rotation of the motor
  • 6.Control the movement of the robot
  • 7.Control Serial Servo
  • 8.Update firmware of expansion board
  • 9.Drive OLED
ROS2 robot control
  • 1.Function package usage process
  • 2.Robot information release
  • 3.Robot keyboard control
  • 4.Robot state estimation
  • 5.Robot calibration
  • 6.URDF model
5.T-MINI PLUS Lidar
  • 0.Preparation before use(Must read)
  • 1.Environment setup
  • 2.T-MINI PLUS LiDAR drive
  • 3.Handheld LiDAR mapping
6.AI VIEW Depth camera
AI VIEW Depth camera use
  • 1.AI VIEW Depth camera use
  • 2.Camera internal parameter calibration
  • 3.Color tracking
  • 4.KCF object tracking
Mediapipe functions
  • 1.Hand detection
  • 2.Attitude detection
  • 3.Overall inspection
  • 4.Facial detection
  • 5.Facial recognition
OpenCV series courses
  • 1.ROS+opencv application
  • 2.QR code creation and recognition
  • 3.AR vision
7.Offline AI model course
Offline-LLM-Text-Interaction
  • 0.AI-Large-Model-Image-Description
  • 1.AI-Large-Model-Environment-Deployment
  • 2.LLM-Conversation-Platform-Installation
  • 3.Meta-AI-Llama3.2-Model
  • 4.Alibaba-Cloud-Qwen3-Model
  • 5.Microsoft-Phi-4-mini-Model
  • 6.DeepSeek-DeepSeek-R1-Model
  • 7.Alibaba-Cloud-Qwen2.5vl-Vision-Multimodal-Model
  • 8.Google-Gemma3-Vision-Multimodal-Model
  • 9.Llava-Vision-Multimodal-Model
  • 10.MiniCPM-V-Vision-Multimodal-Model
  • 11.Multimodal-Text-to-Image-Application
  • 12.Multimodal-Video-Analysis-Application
  • 13.Multimodal-Visual-Understanding-Application
  • 14.Multimodal-Visual-Localization-Application
  • 15.Multimodal-Table-Scanning-Application
  • 16.Multimodal-Autonomous-Agent-Application
Offline-LLM-Voice-Interaction
  • 0.Voice-Interaction-Hardware-Connection-Must-Read
  • 1.Offline-Speech-to-Text-ASR
  • 2.Offline-Text-to-Speech-TTS
  • 3.AI-Large-Model-Voice-Interaction
  • 4.Multimodal-Visual-Understanding-Voice-Interaction
  • 5.Multimodal-Text-to-Image-Application
  • 6.Multimodal-Video-Analysis-Application
  • 7.Multimodal-Visual-Localization-Application
  • 8.Multimodal-Table-Scanning-Application
  • 9.Multimodal-Autonomous-Agent-Application
  • 10.AI-Large-Model-Offline-Voice-Assistant
8.Online AI model course
Online-LLM-Text-Interaction
  • 1.OpenRouter-Large-Model-API-Aggregation-Platform
  • 2.Multimodal-Visual-Understanding-Application
  • 3.Multimodal-Visual-Localization-Application
  • 4.Multimodal-Table-Scanning-Application
  • 5.Multimodal-Autonomous-Agent-Application
Online-LLM-Voice-Interaction
  • 0.Voice-Interaction-Hardware-Connection-Must-Read
  • 1.Online-Speech-to-Text-ASR
  • 2.Online-Text-to-Speech-TTS
  • 3.AI-Large-Model-Voice-Interaction
  • 4.Multimodal-Visual-Voice-Interaction
  • 5.Multimodal-Visual-Localization-Application
  • 6.Multimodal-Table-Scanning-Application
  • 7.Multimodal-Autonomous-Agent-Application
  • 8.AI-Large-Model-Online-Voice-Assistant
9.YOLO26 tutorials
  • 01.YOLO environment construction
  • 02.CLI use
  • 03.Object detection
  • 04.Instance segmentation
  • 05.Pose estimation
  • 06.Image classification
  • 07.Oriented bounding box object detection
  • 08.Model conversion
  • 09.Dataset annotation
  • 10.Model training conversion
  • 11.Model prediction
10.OpenClaw Deployment and Basic Usagenew
  • 01.OpenClaw Quick Start
  • 02.OpenClaw Deployment
  • 03.OpenClaw WhatsApp Plugin Application
  • 04.OpenClaw WebChat Interaction
  • 05.OpenClaw TUI Interaction
  • 06.OpenClaw Tools Introduction
  • 07.OpenClawGate Gateway User Manual
  • 08.OpenClaw Features Overview
  • 09.OpenClawClawHub Introduction (Skill Installation)
  • 10.OpenClaw Application - File Management
  • 11.OpenClaw Application - Camera
  • 12.OpenClaw Application - Browser Control
  • 13.OpenClaw Application - Script Execution
  • 14.OpenClaw Application - AI Programming (Peripheral & GPIO Control)
  • 15.OpenClaw Application - Dedicated AI Assistant
  • 16.OpenClaw Web Search Capability Configuration
11.OpenClaw Advanced Developmentnew
1.Preparation Before Use
  • 01. Peripheral Hardware Configuration
  • 02. OpenClaw API-KEY Configuration
  • 03. OpenClaw Model Switching
  • 04. OpenClaw Prompts
  • 05. AI Voice Interaction Configuration
  • 06. Three Dialogue Configuration Tests
2.OpenClaw AI Programming Peripheral Control
  • 1. Servo Control
  • 2. RGB Strip
  • 3. OLED Display
  • 4. Temperature and Humidity Sensor
  • 5. Camera Application
  • 6. AI Script Peripheral Control
3.OpenClaw Peripheral Integration Applications
  • 1. Plant Care Assistant
  • 2. AI Calorie Estimation
  • 3. AI Rock Paper Scissors Game
  • 4. AI Pet
  • 5. AI Weather Station
  • 6. Temperature and Humidity Dashboard
  • 7. Scheduled Tasks
12.ROS2 basic course
  • 1.Introduction to ROS2
  • 2.ROS2 install Humble
  • 3.ROS2 development environment
  • 4.ROS2 workspace
  • 5.ROS2 function package
  • 6.ROS2 node
  • 7.ROS2 topic communication
  • 8.ROS2 service communication
  • 9.ROS2 action communication
  • 10.ROS2 custom interface message
  • 11.ROS2 parameter service case
  • 12.ROS2 meta-function package
  • 13.ROS2 distributed communication
  • 14.ROS2 DDS
  • 15.ROS2 time related API
  • 16.ROS2 common command tools
  • 17.ROS2 rviz2 use
  • 18.ROS2 rqt toolbox
  • 19.ROS2 Launch startup file configuration
  • 20.ROS2 recording and playback tool
  • 21.ROS2 URDF model
  • 22.ROS2 Gazebo simulation platform
  • 23.ROS2 TF2 coordinate transformation
Download
  • System_File
  • Code
  • Tools
Download ZIP

Welcome to RDK X5 Board repository

2.Camera internal parameter calibration

2、Camera internal parameter calibration

1. Preparation before calibration

  • A large chessboard of known size. This tutorial uses a 9x6 checkerboard and a 20mm square, which should be flattened during calibration. Calibration uses the internal vertices of the chessboard, therefore the "10x7" chessboard uses the internal vertex parameter "9x6", as shown in the following example. Any specification of calibration board is acceptable, just adjust the parameters. An open area without obstacles or calibration board patterns

  • Monocular camera for publishing images through ROS

2. Start calibration

Install the function package camera_calibration for calibration, taking Humble as an example.

Input following command in terminal.

sudo apt install ros-humble-camera-calibration*

Before calibration, start the camera until all calibrations are completed before turning off the camera.

Start the camera.

Input following command in terminal.

xxxxxxxxxx
ros2 launch astra_camera gemini.launch.xml

Input following command in terminal to view the topic.

xxxxxxxxxx
ros2 topic list

The topic we need to use for calibrating RGB color images is/camera/color/image_raw

Run the calibration program.

Input following command in terminal.

xxxxxxxxxx
ros2 run camera_calibration cameracalibrator --size 9x6 --square 0.02 --ros-args --remap /image:=/camera/color/image_raw

Size: Calibrate the number of internal corners of the chessboard, for example 9X6, with a total of six rows and nine columns of corners.

Square: The side length of a chessboard, measured in meters.

Topic name:/camera/color/image_raw. If you are starting usc_cam, please modify it to /image_raw

image-20230426161833099

X: The left and right movement of the checkerboard in the camera's field of view

Y: The up and down movement of the checkerboard in the camera's field of view

Size: The forward and backward movement of the checkerboard in the camera's field of view

Skew: Tilt rotation of checkerboard pattern in camera field of view

As shown in the above figure, it is necessary to capture the image by flipping it up, down, back, left, right, left, and right so that the X, Y, Size, and Skew on the right turn green, as shown in the figure below. Then click CALIBRATE to start calibration.
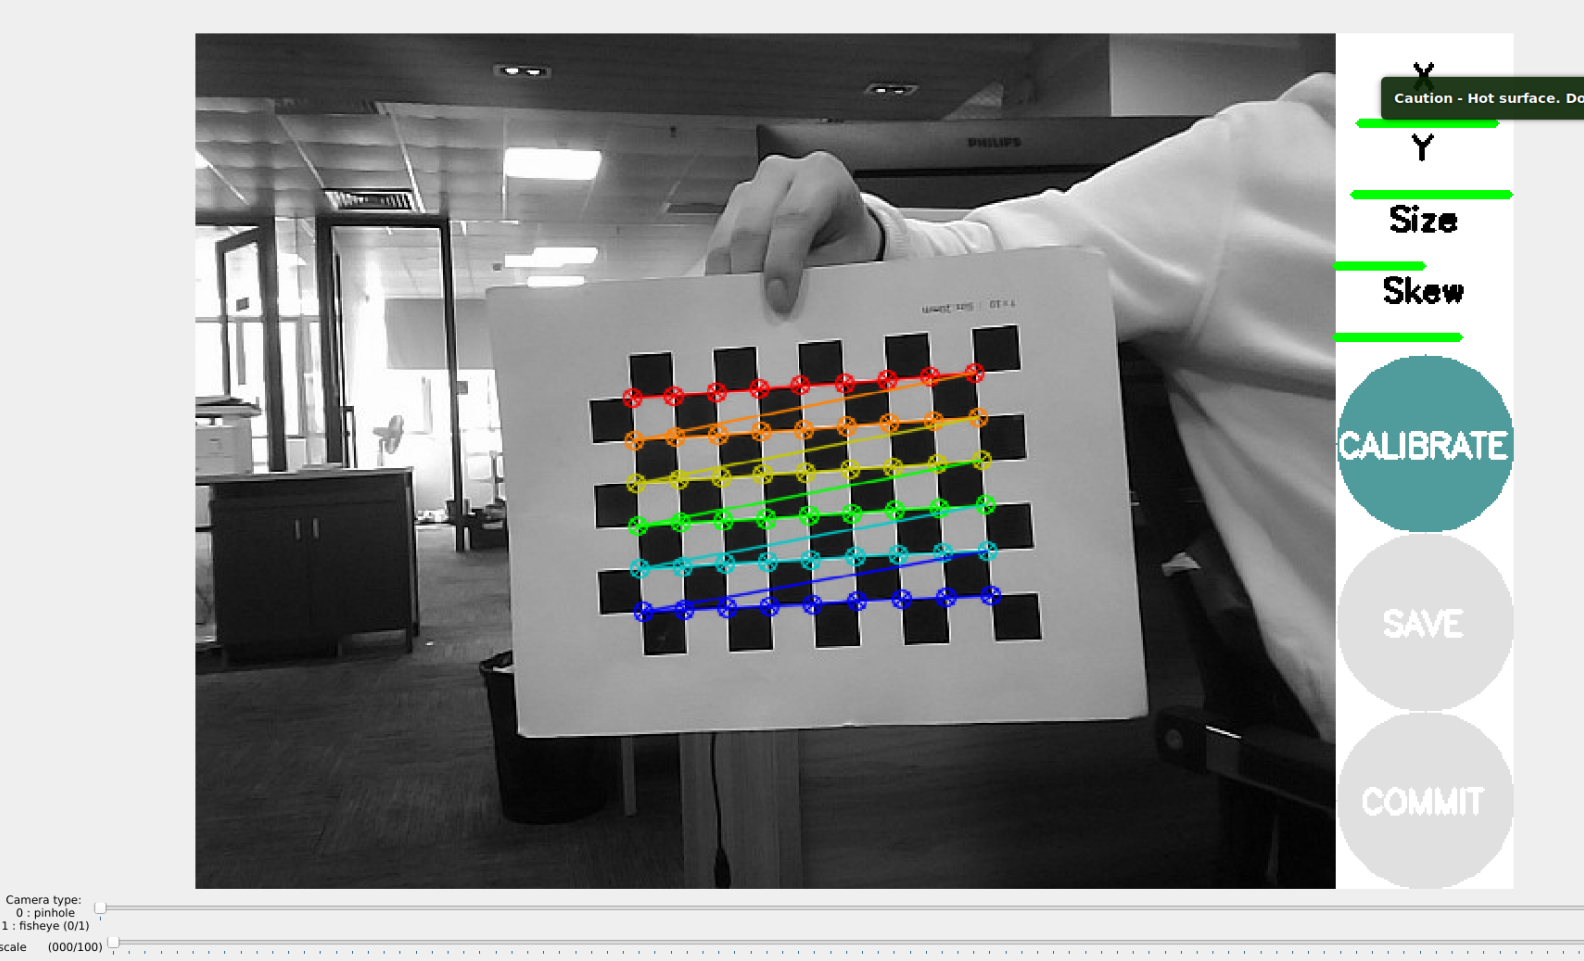
image-20230426162103880

After calibration is complete, click SAVE, as shown in the following figure.
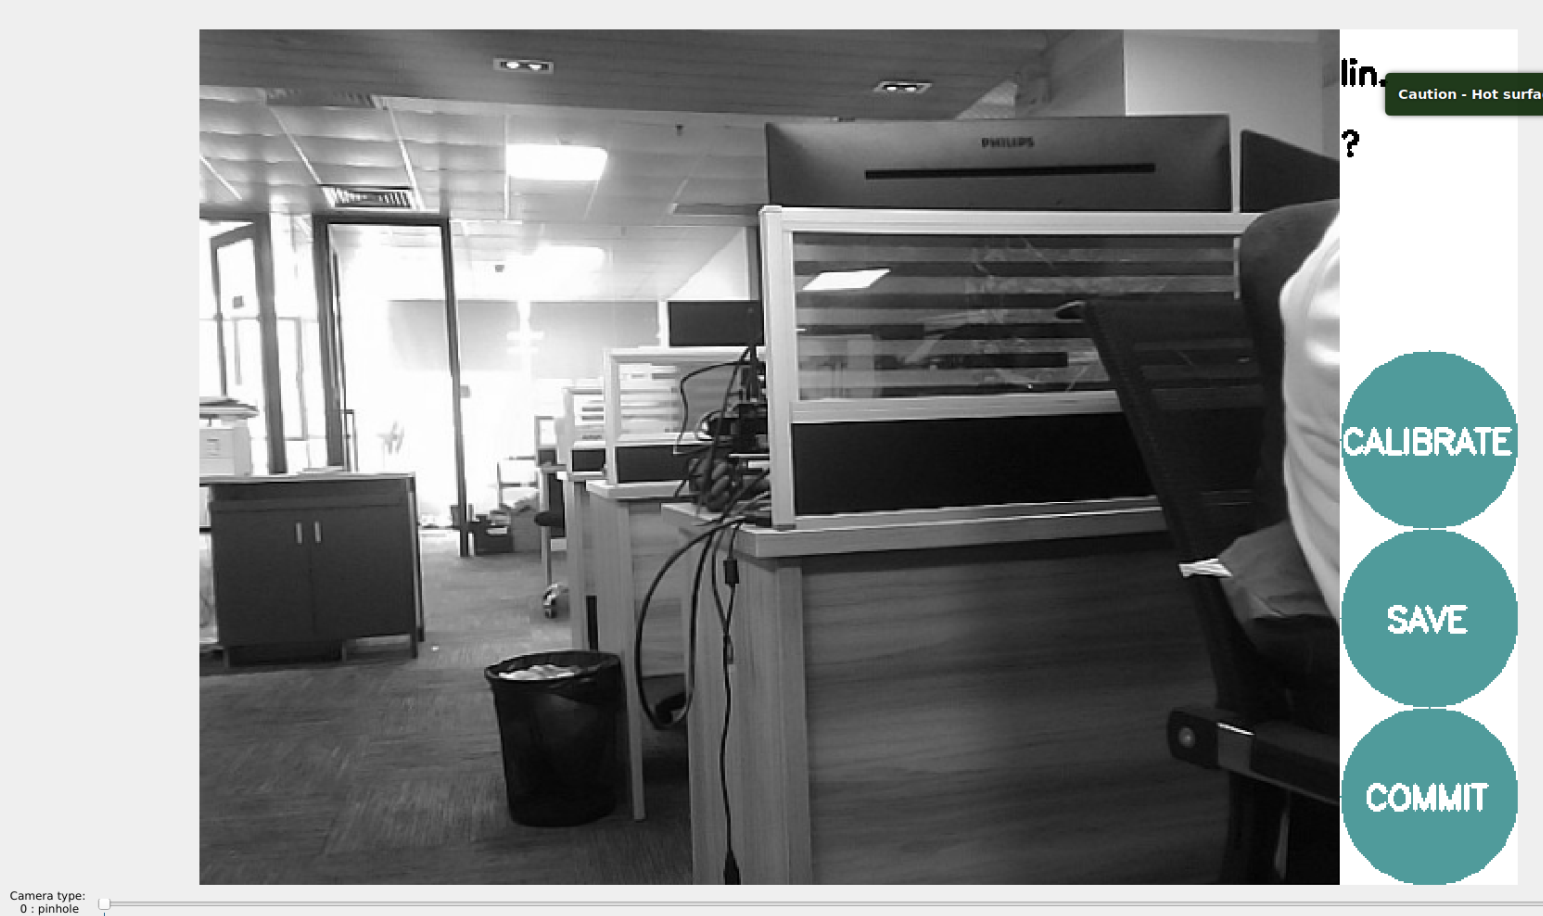
image-20230426162241771

The calibration results are saved to 【/tmp/calibrationdata. tar. gz】 in the terminal directory where the calibration program is launched.

After calibration is complete, you can move out the file 【/tmp/calibrationdata. tar. gz】 to see its contents

xxxxxxxxxx
sudo mv /tmp/calibrationdata.tar.gz ~

Input following command in terminal.

xxxxxxxxxx
cd ~
tar -xvf calibrationdata.tar.gz

We will obtain the calibrated png file, ost.yaml, and ost.txt files in the terminal directory

Since the Gemini2 driver loads the pre calibrated built-in parameters in the code when starting, there is no need to load these calibrated parameters. However, when starting the USB camera, parameters need to be loaded. Therefore, after calibration, the parameters need to be replaced with the original built-in parameters. The calibrated ost.yaml needs to be renamed camera_info.yaml, and then the original camera_info.yaml needs to be replaced. Docker terminal input is used,

xxxxxxxxxx
#Copy file to /opt/ros/humble/share/usb_cam/config
sudo cp ost.yaml /opt/ros/humble/share/usb_cam/config
#Switch to /opt/ros/humble/share/usb_cam/config
cd /opt/ros/humble/share/usb_cam/config
#Backup the original camera_info.yaml
sudo mv camera_info.yaml camera_info_BK.yaml
#Rename ost.yaml为camera_info.yaml
sudo mv ost.yaml camera_info.yaml
AI VIEW Depth camera use
Color tracking

COMPANY

  • About us
  • Team Style
  • Blog

LEARNING & EXPLORATION

  • Tutorials
  • Edge AI hardware
  • Educational robots
  • Embedded intelligent hardware

WHERE TO BUY

  • Yahboom Online Store
  • Amazon
  • Alibaba
  • AliExpress
  • Mercado

TECHNOLOGY SUPPORT

  • Email: support@yahboom.com

BE A DISTRIBUTOR

  • Email: sales@yahboom.com
QR Code

Copyright © 2017-2026 Yahboom. All Rights Reserved.

EN/中文