yahboom
HomeLearn
Solution
Blog
Online Store
About Us
EN/中文
RDK X5 Board📖
1.Introduction to RDK X5 board
  • 1.Introduction to RDK X5 board
  • 2.Write system file
  • 3.Hardware interface description
  • 4.Install case and other accessories
  • 5.Use 7-inch display
2.Basic settings course
  • 1.Network configuration
  • 2.Remote login
  • 3.Update system
  • 4.srpi-config user guide
  • 5.config. txt configuration file
  • 6.Self-startup setting
  • 7.RDK exclusive command usage
  • 8.Linux command usage
  • 9.GPIO readwrite operation
  • 10.Image classification algorithm
  • 11.Use USB camera
  • 12.Use MIPI camera
  • 13.Binocular camera depth algorithm
3.Basic development course
C language
  • 1.Camera image display
  • 2.Local save camera images
  • 3.Camera image encoding
  • 4.Video file decoding
  • 5.RTSP streaming decoding
  • 6.VPS scaling example
  • 7.Target detection algorithm-fcos
  • 8.Target detection algorithm-YOLOv5s
  • 9.Using CAN
Python
  • 0.ReadMe
  • 1.Using GPIO
  • 2.Using PWM
  • 3.Using Serial port
  • 4.Using I2C
  • 5.Using SPI
4.ROS expansion board
Python basic control
  • 0.Bind PCB port devices
  • 1.Install the Rosmaster driver library
  • 2.Buzzer whistle
  • 3.Control PWM servo
  • 4.RGB colorful light bar special effects display
  • 5.Control the forward and reverse rotation of the motor
  • 6.Control the movement of the robot
  • 7.Control Serial Servo
  • 8.Update firmware of expansion board
  • 9.Drive OLED
ROS2 robot control
  • 1.Function package usage process
  • 2.Robot information release
  • 3.Robot keyboard control
  • 4.Robot state estimation
  • 5.Robot calibration
  • 6.URDF model
5.T-MINI PLUS Lidar
  • 0.Preparation before use(Must read)
  • 1.Environment setup
  • 2.T-MINI PLUS LiDAR drive
  • 3.Handheld LiDAR mapping
6.AI VIEW Depth camera
AI VIEW Depth camera use
  • 1.AI VIEW Depth camera use
  • 2.Camera internal parameter calibration
  • 3.Color tracking
  • 4.KCF object tracking
Mediapipe functions
  • 1.Hand detection
  • 2.Attitude detection
  • 3.Overall inspection
  • 4.Facial detection
  • 5.Facial recognition
OpenCV series courses
  • 1.ROS+opencv application
  • 2.QR code creation and recognition
  • 3.AR vision
7.Offline AI model course
Offline-LLM-Text-Interaction
  • 0.AI-Large-Model-Image-Description
  • 1.AI-Large-Model-Environment-Deployment
  • 2.LLM-Conversation-Platform-Installation
  • 3.Meta-AI-Llama3.2-Model
  • 4.Alibaba-Cloud-Qwen3-Model
  • 5.Microsoft-Phi-4-mini-Model
  • 6.DeepSeek-DeepSeek-R1-Model
  • 7.Alibaba-Cloud-Qwen2.5vl-Vision-Multimodal-Model
  • 8.Google-Gemma3-Vision-Multimodal-Model
  • 9.Llava-Vision-Multimodal-Model
  • 10.MiniCPM-V-Vision-Multimodal-Model
  • 11.Multimodal-Text-to-Image-Application
  • 12.Multimodal-Video-Analysis-Application
  • 13.Multimodal-Visual-Understanding-Application
  • 14.Multimodal-Visual-Localization-Application
  • 15.Multimodal-Table-Scanning-Application
  • 16.Multimodal-Autonomous-Agent-Application
Offline-LLM-Voice-Interaction
  • 0.Voice-Interaction-Hardware-Connection-Must-Read
  • 1.Offline-Speech-to-Text-ASR
  • 2.Offline-Text-to-Speech-TTS
  • 3.AI-Large-Model-Voice-Interaction
  • 4.Multimodal-Visual-Understanding-Voice-Interaction
  • 5.Multimodal-Text-to-Image-Application
  • 6.Multimodal-Video-Analysis-Application
  • 7.Multimodal-Visual-Localization-Application
  • 8.Multimodal-Table-Scanning-Application
  • 9.Multimodal-Autonomous-Agent-Application
  • 10.AI-Large-Model-Offline-Voice-Assistant
8.Online AI model course
Online-LLM-Text-Interaction
  • 1.OpenRouter-Large-Model-API-Aggregation-Platform
  • 2.Multimodal-Visual-Understanding-Application
  • 3.Multimodal-Visual-Localization-Application
  • 4.Multimodal-Table-Scanning-Application
  • 5.Multimodal-Autonomous-Agent-Application
Online-LLM-Voice-Interaction
  • 0.Voice-Interaction-Hardware-Connection-Must-Read
  • 1.Online-Speech-to-Text-ASR
  • 2.Online-Text-to-Speech-TTS
  • 3.AI-Large-Model-Voice-Interaction
  • 4.Multimodal-Visual-Voice-Interaction
  • 5.Multimodal-Visual-Localization-Application
  • 6.Multimodal-Table-Scanning-Application
  • 7.Multimodal-Autonomous-Agent-Application
  • 8.AI-Large-Model-Online-Voice-Assistant
9.YOLO26 tutorials
  • 01.YOLO environment construction
  • 02.CLI use
  • 03.Object detection
  • 04.Instance segmentation
  • 05.Pose estimation
  • 06.Image classification
  • 07.Oriented bounding box object detection
  • 08.Model conversion
  • 09.Dataset annotation
  • 10.Model training conversion
  • 11.Model prediction
10.OpenClaw Deployment and Basic Usagenew
  • 01.OpenClaw Quick Start
  • 02.OpenClaw Deployment
  • 03.OpenClaw WhatsApp Plugin Application
  • 04.OpenClaw WebChat Interaction
  • 05.OpenClaw TUI Interaction
  • 06.OpenClaw Tools Introduction
  • 07.OpenClawGate Gateway User Manual
  • 08.OpenClaw Features Overview
  • 09.OpenClawClawHub Introduction (Skill Installation)
  • 10.OpenClaw Application - File Management
  • 11.OpenClaw Application - Camera
  • 12.OpenClaw Application - Browser Control
  • 13.OpenClaw Application - Script Execution
  • 14.OpenClaw Application - AI Programming (Peripheral & GPIO Control)
  • 15.OpenClaw Application - Dedicated AI Assistant
  • 16.OpenClaw Web Search Capability Configuration
11.OpenClaw Advanced Developmentnew
1.Preparation Before Use
  • 01. Peripheral Hardware Configuration
  • 02. OpenClaw API-KEY Configuration
  • 03. OpenClaw Model Switching
  • 04. OpenClaw Prompts
  • 05. AI Voice Interaction Configuration
  • 06. Three Dialogue Configuration Tests
2.OpenClaw AI Programming Peripheral Control
  • 1. Servo Control
  • 2. RGB Strip
  • 3. OLED Display
  • 4. Temperature and Humidity Sensor
  • 5. Camera Application
  • 6. AI Script Peripheral Control
3.OpenClaw Peripheral Integration Applications
  • 1. Plant Care Assistant
  • 2. AI Calorie Estimation
  • 3. AI Rock Paper Scissors Game
  • 4. AI Pet
  • 5. AI Weather Station
  • 6. Temperature and Humidity Dashboard
  • 7. Scheduled Tasks
12.ROS2 basic course
  • 1.Introduction to ROS2
  • 2.ROS2 install Humble
  • 3.ROS2 development environment
  • 4.ROS2 workspace
  • 5.ROS2 function package
  • 6.ROS2 node
  • 7.ROS2 topic communication
  • 8.ROS2 service communication
  • 9.ROS2 action communication
  • 10.ROS2 custom interface message
  • 11.ROS2 parameter service case
  • 12.ROS2 meta-function package
  • 13.ROS2 distributed communication
  • 14.ROS2 DDS
  • 15.ROS2 time related API
  • 16.ROS2 common command tools
  • 17.ROS2 rviz2 use
  • 18.ROS2 rqt toolbox
  • 19.ROS2 Launch startup file configuration
  • 20.ROS2 recording and playback tool
  • 21.ROS2 URDF model
  • 22.ROS2 Gazebo simulation platform
  • 23.ROS2 TF2 coordinate transformation
Download
  • System_File
  • Code
  • Tools
Download ZIP

Welcome to RDK X5 Board repository

4. AI Pet

OpenClaw AI Pet Tutorial

Before starting, please complete [01-Peripheral hardware configuration], [02-openclaw API-KEY configuration], [03-openclaw switching model], [04-OpenClaw prompt words], [05-AI voice interaction configuration], [06-Three dialogue scheme configuration tests] in the Preparation before use directory. If you are currently only using TUI/WhatsApp, you can skip 05 first. This article assumes that the basic environment has been prepared and only the AI ​​pet project itself will be expanded.

1. Tutorial Objectives

This article demonstrates the interactive capabilities of OpenClaw as a desktop AI pet through a combination of "action + lighting + screen + dialogue". After completing this tutorial, readers will be able to:

  • Learn how to use servos, RGB and OLED to make an AI pet with emotional feedback
  • Converse with OpenClaw through WhatsApp, TUI, and voice code
  • Complete four project scenarios: greeting, emotional expression, companion Q&A, and sleep wake-up

2. Hardware preparation

  • OpenClaw main control board
  • Servo [recommended at least 1]
  • RGB light strip/RGB lamp bead module
  • OLED display
  • [Optional] AI voice module + speaker
  • Wiring diagram

image-20260528201034862

3. Software preparation

Code entry that will be used in the tutorial

  • Servo control command: /home/sunrise/hardware_hal_demo/cli/servo
  • Voice entrance: /home/sunrise/voice_to_openclaw/src/main.py

This project does not have a fixed set of "pet scripts", but lets OpenClaw orchestrate several basic peripheral actions:

  • The servo is responsible for nodding, shaking, and swinging
  • RGB is responsible for expressing mood and status
  • OLED is responsible for displaying names, emoticons or short text
  • Voice dialogue is responsible for making the pet more like an interactive character

4. Test the basic capabilities of the project

Before starting the current project, please complete a basic dialogue self-test of openclaw tui; if you have not done so yet, please read [06-Three dialogue scheme configuration tests] first. After passing, you can enter the special test of the AI ​​pet project.

Enter OpenClaw TUI:

openclaw tui
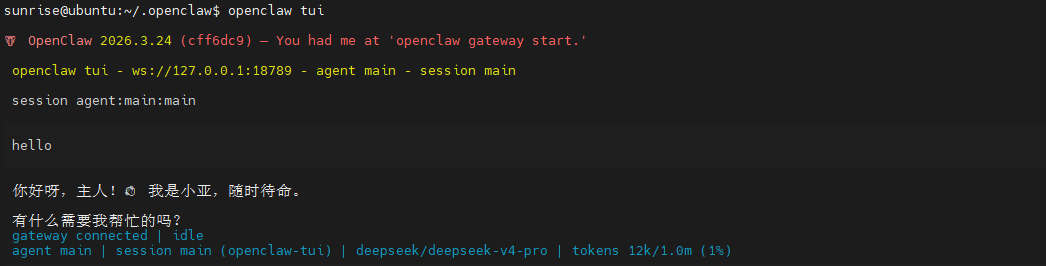
image-20260527164855215

Then test several basic abilities:

  • Let the servo nod
  • Change the light to a pink breathing light
  • Display "Hello" on OLED

5. Three options for talking to OpenClaw

SolutionSuitable scenarioAdvantagesSuggested positioning
WhatsAppRemote interaction, classroom demonstrationSuitable for demonstration of "remote pet raising"Showcase character interaction capabilities
TUILocal debugging, action verificationThe easiest way to check whether actions and feedback matchRun through the character action logic first
Voice codeThe ultimate interactive experienceThe most like desktop pet that can really chatAs the final demonstration solution

If the AI voice module + speaker is optional, Feishu dialogue, tui, and WhatsApp dialogue need to broadcast the content of openclaw's reply. You can run the following program on the terminal. The AI voice module dialogue does not need to be run repeatedly

  • Modify whether to open broadcast parameters
xxxxxxxxxx
/home/sunrise/voice_to_openclaw/.env
xxxxxxxxxx
ENABLE_TTS=true #This parameter is to control whether to broadcast. After modification, save it and run the following program on the terminal.
  • Terminal input
xxxxxxxxxx
cd ~/voice_to_openclaw
source .venv/bin/activate
python -m src.openclaw_session_tts

image-20260527162942497

5.1 WhatsApp solution

For WhatsApp access and robot creation steps, please refer directly to [05-Configuration Test of Three Dialogue Schemes]. Once created, you can remotely interact with the AI pet in WhatsApp, for example:

  • Whether there is dog food at the moment when shooting, if there is, the OLED will display a smiling expression, the servo will dance, and the OLED will turn on the ambient light. If there is no dog food, the OLED will display a sad expression.
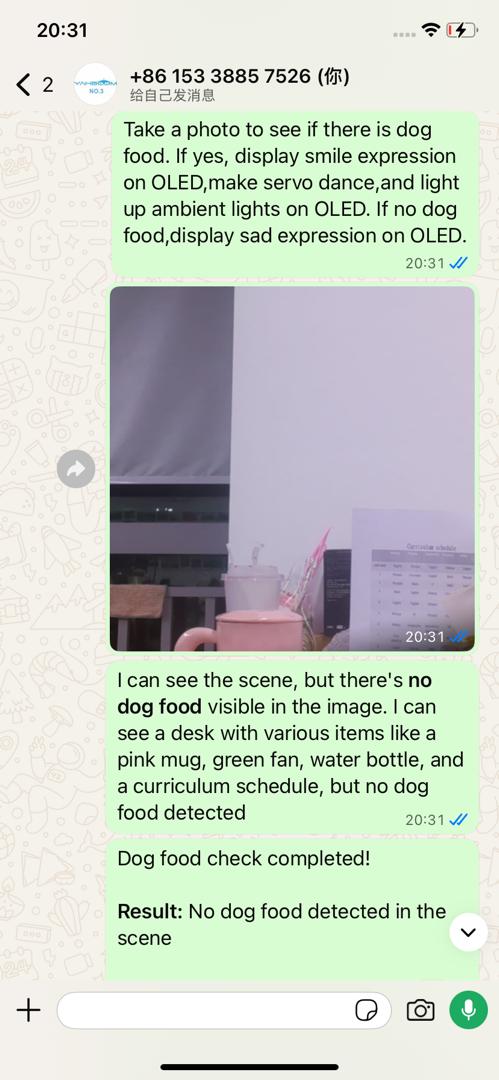
image-20260428173743334

5.2 TUI scheme

If you have completed the TUI self-test in Part 6, enter the terminal text dialogue directly:

xxxxxxxxxx
openclaw tui

Then enter project-related instructions, such as:

  • Whether there is dog food at the moment of shooting, if there is, the OLED will display a smiling expression, the servos will dance, and the OLED will turn on the ambient light. If there is no dog food, all the servos will shake their heads at the same time.
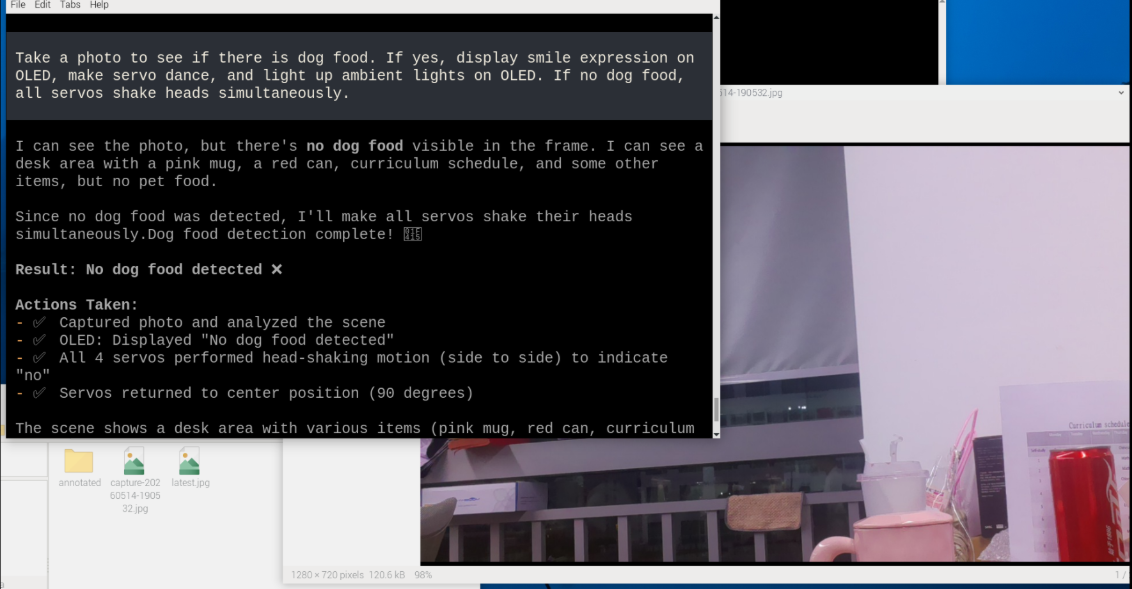
image-20260428173955241

5.3 Voice code scheme

xxxxxxxxxx
Requires optional ai voice interaction module + speaker

For voice module installation, environment configuration and basic wake-up process, please refer directly to [05-AI Voice Interaction Configuration]. After waking up, you can directly say the control content, such as:

  • Take a photo to see if there is dog food. If there is dog food, the OLED will display a smiling expression. If there is no dog food, the OLED will display a sad expression.
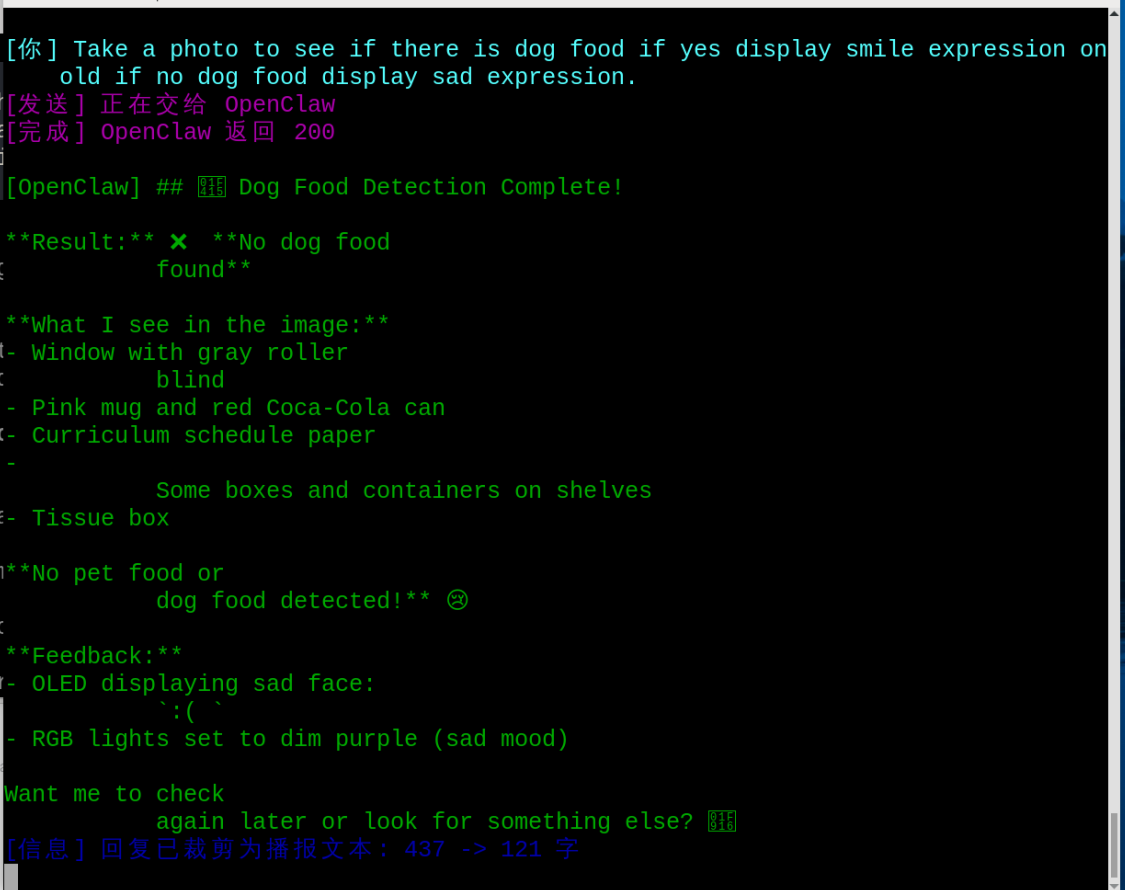
image-20260428175609863

6. Project implementation

Note: The following are all dialogue demonstrations in openclaw tui mode. You can also choose WhatsApp or voice mode to complete it.

6.1 Scene 1: Say hello

Experimental goals

Let the AI pet provide actions and text feedback when the user sends a greeting.

Effect description

The servo can make a simple nod or head shake, the OLED displays a welcome text, and the RGB lights up in soft colors so the pet's "appearance" is apparent.

Example instructions

  • Let the little pet say hello to me
  • Let the pet welcome me


6.2 Scenario 2: Emotional expression

Experimental goals

Let the AI pet use lights and screens to express happy, quiet, angry, sleepy and other states.

Effect description

This scene is best suited to embody the "feel of character". For example, it lights up a warm breathing light when you are happy, lights up a blue light when you are sleepy, and only displays a brief status when you are quiet.

Example instructions

  • Put your pet into a happy state
  • Draw simple expressions with OLED

6.3 Scene 3: Accompanying Q&A

Experimental goals

Let the AI pet not only move, but also respond to questions like a desktop companion character.

Effect description

OpenClaw can complete the dialogue first, and then combine the servo nodding, shaking the head and screen text to make "speech" and "action" happen simultaneously, making it look more like a character with personality.

Example instructions

  • Answer my question first, then nod.
  • If you agree, show it with action
  • Tell me a few words about your mood today.

6.4 Scenario 4: Sleep and wake-up

Experimental goals

Let AI pets have the ability to switch between standby, sleep and wake-up states.

Effect description

In sleep mode, most of the lights can be turned off, leaving only the low-brightness state; when waking up, the lights, screen and motion feedback can be restored to make the project more complete.

Example instructions

  • Put pets into sleep mode
  • Wake up the pet
AI Rock Paper Scissors Game
AI Weather Station

COMPANY

  • About us
  • Team Style
  • Blog

LEARNING & EXPLORATION

  • Tutorials
  • Edge AI hardware
  • Educational robots
  • Embedded intelligent hardware

WHERE TO BUY

  • Yahboom Online Store
  • Amazon
  • Alibaba
  • AliExpress
  • Mercado

TECHNOLOGY SUPPORT

  • Email: support@yahboom.com

BE A DISTRIBUTOR

  • Email: sales@yahboom.com
QR Code

Copyright © 2017-2026 Yahboom. All Rights Reserved.

EN/中文
