yahboom
HomeLearn
Solution
Blog
Online Store
About Us
EN/中文
RDK X5 Board📖
1.Introduction to RDK X5 board
  • 1.Introduction to RDK X5 board
  • 2.Write system file
  • 3.Hardware interface description
  • 4.Install case and other accessories
  • 5.Use 7-inch display
2.Basic settings course
  • 1.Network configuration
  • 2.Remote login
  • 3.Update system
  • 4.srpi-config user guide
  • 5.config. txt configuration file
  • 6.Self-startup setting
  • 7.RDK exclusive command usage
  • 8.Linux command usage
  • 9.GPIO readwrite operation
  • 10.Image classification algorithm
  • 11.Use USB camera
  • 12.Use MIPI camera
  • 13.Binocular camera depth algorithm
3.Basic development course
C language
  • 1.Camera image display
  • 2.Local save camera images
  • 3.Camera image encoding
  • 4.Video file decoding
  • 5.RTSP streaming decoding
  • 6.VPS scaling example
  • 7.Target detection algorithm-fcos
  • 8.Target detection algorithm-YOLOv5s
  • 9.Using CAN
Python
  • 0.ReadMe
  • 1.Using GPIO
  • 2.Using PWM
  • 3.Using Serial port
  • 4.Using I2C
  • 5.Using SPI
4.ROS expansion board
Python basic control
  • 0.Bind PCB port devices
  • 1.Install the Rosmaster driver library
  • 2.Buzzer whistle
  • 3.Control PWM servo
  • 4.RGB colorful light bar special effects display
  • 5.Control the forward and reverse rotation of the motor
  • 6.Control the movement of the robot
  • 7.Control Serial Servo
  • 8.Update firmware of expansion board
  • 9.Drive OLED
ROS2 robot control
  • 1.Function package usage process
  • 2.Robot information release
  • 3.Robot keyboard control
  • 4.Robot state estimation
  • 5.Robot calibration
  • 6.URDF model
5.T-MINI PLUS Lidar
  • 0.Preparation before use(Must read)
  • 1.Environment setup
  • 2.T-MINI PLUS LiDAR drive
  • 3.Handheld LiDAR mapping
6.AI VIEW Depth camera
AI VIEW Depth camera use
  • 1.AI VIEW Depth camera use
  • 2.Camera internal parameter calibration
  • 3.Color tracking
  • 4.KCF object tracking
Mediapipe functions
  • 1.Hand detection
  • 2.Attitude detection
  • 3.Overall inspection
  • 4.Facial detection
  • 5.Facial recognition
OpenCV series courses
  • 1.ROS+opencv application
  • 2.QR code creation and recognition
  • 3.AR vision
7.Offline AI model course
Offline-LLM-Text-Interaction
  • 0.AI-Large-Model-Image-Description
  • 1.AI-Large-Model-Environment-Deployment
  • 2.LLM-Conversation-Platform-Installation
  • 3.Meta-AI-Llama3.2-Model
  • 4.Alibaba-Cloud-Qwen3-Model
  • 5.Microsoft-Phi-4-mini-Model
  • 6.DeepSeek-DeepSeek-R1-Model
  • 7.Alibaba-Cloud-Qwen2.5vl-Vision-Multimodal-Model
  • 8.Google-Gemma3-Vision-Multimodal-Model
  • 9.Llava-Vision-Multimodal-Model
  • 10.MiniCPM-V-Vision-Multimodal-Model
  • 11.Multimodal-Text-to-Image-Application
  • 12.Multimodal-Video-Analysis-Application
  • 13.Multimodal-Visual-Understanding-Application
  • 14.Multimodal-Visual-Localization-Application
  • 15.Multimodal-Table-Scanning-Application
  • 16.Multimodal-Autonomous-Agent-Application
Offline-LLM-Voice-Interaction
  • 0.Voice-Interaction-Hardware-Connection-Must-Read
  • 1.Offline-Speech-to-Text-ASR
  • 2.Offline-Text-to-Speech-TTS
  • 3.AI-Large-Model-Voice-Interaction
  • 4.Multimodal-Visual-Understanding-Voice-Interaction
  • 5.Multimodal-Text-to-Image-Application
  • 6.Multimodal-Video-Analysis-Application
  • 7.Multimodal-Visual-Localization-Application
  • 8.Multimodal-Table-Scanning-Application
  • 9.Multimodal-Autonomous-Agent-Application
  • 10.AI-Large-Model-Offline-Voice-Assistant
8.Online AI model course
Online-LLM-Text-Interaction
  • 1.OpenRouter-Large-Model-API-Aggregation-Platform
  • 2.Multimodal-Visual-Understanding-Application
  • 3.Multimodal-Visual-Localization-Application
  • 4.Multimodal-Table-Scanning-Application
  • 5.Multimodal-Autonomous-Agent-Application
Online-LLM-Voice-Interaction
  • 0.Voice-Interaction-Hardware-Connection-Must-Read
  • 1.Online-Speech-to-Text-ASR
  • 2.Online-Text-to-Speech-TTS
  • 3.AI-Large-Model-Voice-Interaction
  • 4.Multimodal-Visual-Voice-Interaction
  • 5.Multimodal-Visual-Localization-Application
  • 6.Multimodal-Table-Scanning-Application
  • 7.Multimodal-Autonomous-Agent-Application
  • 8.AI-Large-Model-Online-Voice-Assistant
9.YOLO26 tutorials
  • 01.YOLO environment construction
  • 02.CLI use
  • 03.Object detection
  • 04.Instance segmentation
  • 05.Pose estimation
  • 06.Image classification
  • 07.Oriented bounding box object detection
  • 08.Model conversion
  • 09.Dataset annotation
  • 10.Model training conversion
  • 11.Model prediction
10.OpenClaw Deployment and Basic Usagenew
  • 01.OpenClaw Quick Start
  • 02.OpenClaw Deployment
  • 03.OpenClaw WhatsApp Plugin Application
  • 04.OpenClaw WebChat Interaction
  • 05.OpenClaw TUI Interaction
  • 06.OpenClaw Tools Introduction
  • 07.OpenClawGate Gateway User Manual
  • 08.OpenClaw Features Overview
  • 09.OpenClawClawHub Introduction (Skill Installation)
  • 10.OpenClaw Application - File Management
  • 11.OpenClaw Application - Camera
  • 12.OpenClaw Application - Browser Control
  • 13.OpenClaw Application - Script Execution
  • 14.OpenClaw Application - AI Programming (Peripheral & GPIO Control)
  • 15.OpenClaw Application - Dedicated AI Assistant
  • 16.OpenClaw Web Search Capability Configuration
11.OpenClaw Advanced Developmentnew
1.Preparation Before Use
  • 01. Peripheral Hardware Configuration
  • 02. OpenClaw API-KEY Configuration
  • 03. OpenClaw Model Switching
  • 04. OpenClaw Prompts
  • 05. AI Voice Interaction Configuration
  • 06. Three Dialogue Configuration Tests
2.OpenClaw AI Programming Peripheral Control
  • 1. Servo Control
  • 2. RGB Strip
  • 3. OLED Display
  • 4. Temperature and Humidity Sensor
  • 5. Camera Application
  • 6. AI Script Peripheral Control
3.OpenClaw Peripheral Integration Applications
  • 1. Plant Care Assistant
  • 2. AI Calorie Estimation
  • 3. AI Rock Paper Scissors Game
  • 4. AI Pet
  • 5. AI Weather Station
  • 6. Temperature and Humidity Dashboard
  • 7. Scheduled Tasks
12.ROS2 basic course
  • 1.Introduction to ROS2
  • 2.ROS2 install Humble
  • 3.ROS2 development environment
  • 4.ROS2 workspace
  • 5.ROS2 function package
  • 6.ROS2 node
  • 7.ROS2 topic communication
  • 8.ROS2 service communication
  • 9.ROS2 action communication
  • 10.ROS2 custom interface message
  • 11.ROS2 parameter service case
  • 12.ROS2 meta-function package
  • 13.ROS2 distributed communication
  • 14.ROS2 DDS
  • 15.ROS2 time related API
  • 16.ROS2 common command tools
  • 17.ROS2 rviz2 use
  • 18.ROS2 rqt toolbox
  • 19.ROS2 Launch startup file configuration
  • 20.ROS2 recording and playback tool
  • 21.ROS2 URDF model
  • 22.ROS2 Gazebo simulation platform
  • 23.ROS2 TF2 coordinate transformation
Download
  • System_File
  • Code
  • Tools
Download ZIP

Welcome to RDK X5 Board repository

2.QR code creation and recognition

2.QR code creation and recognition

2.1、QR code

2.1.1、QR Code Introduction

QR code is a type of two-dimensional barcode, which comes from the abbreviation of "Quick Response" in English, meaning quick response. It originated from the inventor's hope that QR codes can quickly decode their content. QR codes not only have large information capacity, high reliability, and low cost, but also can represent various textual information such as Chinese characters and images. They have strong confidentiality and anti-counterfeiting capabilities, and are very convenient to use. More importantly, QR code technology is open-source.

2.1.2、QR codes Characteristics

The data values in QR codes contain duplicate information (redundant values). Therefore, even if up to 30% of the QR code structure is damaged, it does not affect the readability of the QR code. The storage space of QR codes can reach up to 7089 bits or 4296 characters, including punctuation and special characters, which can be written into the QR code. In addition to numbers and characters, words and phrases (such as website addresses) can also be encoded. As more data is added to the QR code, the code size increases and the code structure becomes more complex.

2.1.3、QR code creation and recognition

1)Create QR code
  • Code path

    ~/orbbec_ws/src/yahboomcar_visual/simple_qrcode/QRcode_Create.py
  • Installation package

    xxxxxxxxxx
    python3 -m pip install qrcode pyzbar
    sudo apt-get install libzbar-dev
  • Start

    xxxxxxxxxx
    cd ~/orbbec_ws/src/yahboomcar_visual/simple_qrcode
    python QRcode_Create.py

    After the program runs, it will prompt for the generated content, and the enter key will confirm the content. Here, taking the creation of the "yahobom" string as an example.
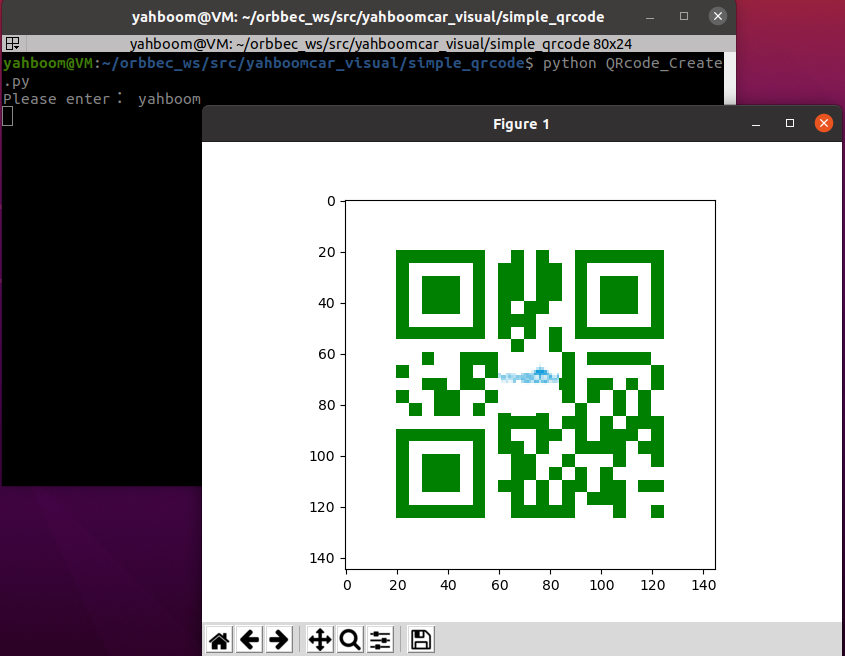
    image-20230620154805683

  • Core source code analysis

    ​x
    #Create qrcode object
    qr = qrcode.QRCode(
        version=1,
        error_correction=qrcode.constants.ERROR_CORRECT_H,
        box_size=5,
        border=4,)
    #各参数含义
    '''version:值为1~40的整数,控制二维码的大小(最小值是1,是个12×12的矩阵)。
    如果想让程序自动确定,将值设置为 None 并使用 fit 参数即可。
    error_correction:控制二维码的错误纠正功能。可取值下列4个常量。
    ERROR_CORRECT_L:大约7%或更少的错误能被纠正。
    ERROR_CORRECT_M(默认):大约15%或更少的错误能被纠正。
    ROR_CORRECT_H:大约30%或更少的错误能被纠正。
    box_size:控制二维码中每个小格子包含的像素数。
    border:控制边框(二维码与图片边界的距离)包含的格子数(默认为4,是相关标准规定的最小值)'''
    #qrcode二维码添加logo
    #Meaning of each parameter
    '''Version: An integer ranging from 1 to 40 that controls the size of the QR code (with a minimum value of 1, it is a 12 × 12 matrix).
    If you want the program to automatically determine, set the value to None and use the fit parameter.
    Error Correction: Controls the error correction function of the QR code. The following four constants can be taken as values.
    VNet CORD_L: Approximately 7% or less of errors can be corrected.
    VNet CORD.M (default): Approximately 15% or less of errors can be corrected.
    ROR-CORRECT-H: Approximately 30% or less of errors can be corrected.
    Box_2: Controls the number of pixels contained in each small cell of the QR code.
    Border: controls the number of cells contained in the border (the distance between the QR code and the image boundary) (default is 4, which is the minimum value specified by relevant standards)'''
    #QR Code QR Code Add Logo
    my_file = Path(logo_path)
    if my_file.is_file(): img = add_logo(img, logo_path)
    #Add data
    qr.add_data(data)
    # fill data
    qr.make(fit=True)
    # Generate images
    img = qr.make_image(fill_color="green", back_color="white")
2)Identify QR code
  • Code path

    xxxxxxxxxx
    ~/orbbec_ws/src/yahboomcar_visual/yahboomcar_visual/QRcode_Parsing.py
  • Start

    xxxxxxxxxx
    ros2 launch astra_camera gemini.launch.xml
    ros2 run yahboomcar_visual QRcode_Parsing
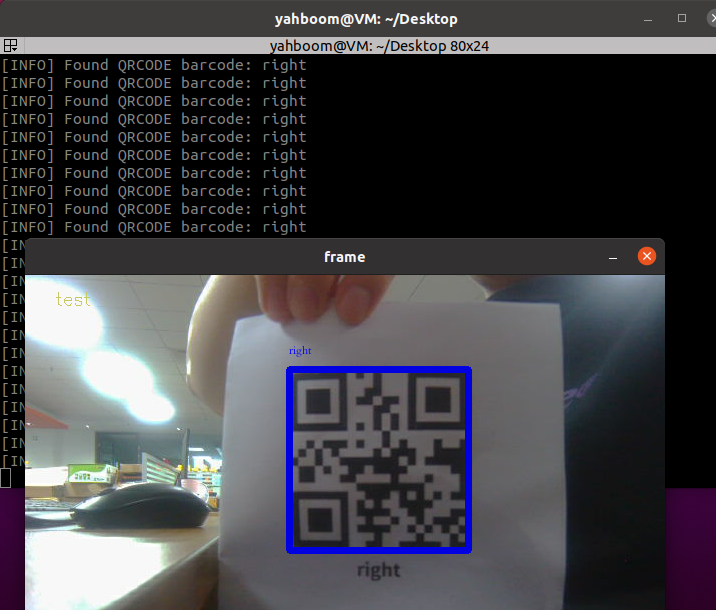
    image-20230620155618854

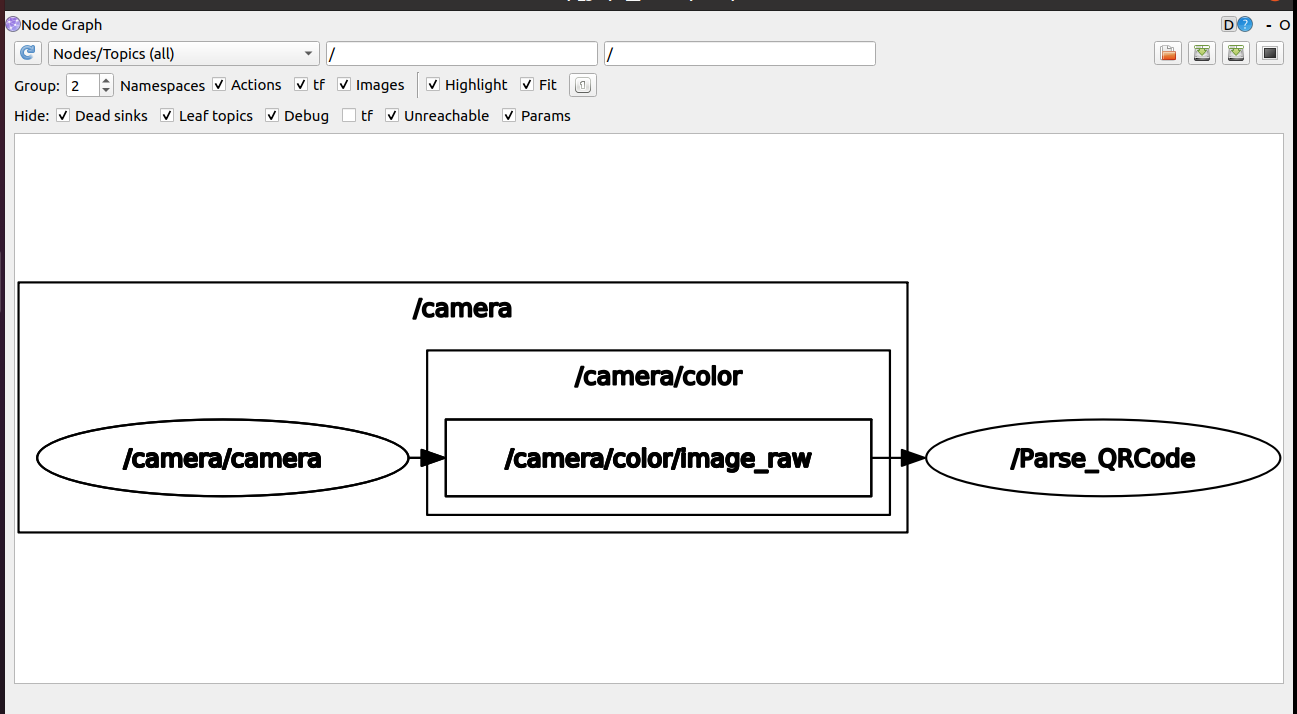
  • View node communication diagram

    xxxxxxxxxx
    ros2 run rqt_graph rqt_graph

    image-20230620155758541

  • Core source code analysis

    xxxxxxxxxx
    #Subscribe to color image information
    self.sub_img = self.create_subscription(CamImage,'/camera/color/image_raw',self.handleTopic,100)
    #Passing image data to the parsing image function in the callback function
    frame = self.decodeDisplay(frame)
    #Analyze images
    def decodeDisplay(self,image):
        gray = cv.cvtColor(image, cv.COLOR_BGR2GRAY)
        # The output Chinese characters need to be converted to Unicode encoding first
        barcodes = pyzbar.decode(gray)
        for barcode in barcodes:
            # Extract the position of the boundary box of the TWO-DIMENSIONAL code
            # Draw the bounding box for the bar code in the image
            (x, y, w, h) = barcode.rect
            cv.rectangle(image, (x, y), (x + w, y + h), (225, 0, 0), 5)
            encoding = 'UTF-8'
            # to draw it, you need to convert it to a string
            barcodeData = barcode.data.decode(encoding)
            barcodeType = barcode.type
            # Draw the data and type on the image
            pilimg = Image.fromarray(image)
            # create brush
            draw = ImageDraw.Draw(pilimg)  # Print on picture
            # parameter 1: font file path, parameter 2: font size
            fontStyle = ImageFont.truetype("/home/yahboom/orbbec_ws/src/yahboomcar_visual/yahboomcar_visual/Block_Simplified.TTF", size=12, encoding=encoding)
            # Parameter 1: print coordinates, parameter 2: text, parameter 3: font color, parameter 4: font
            draw.text((x, y - 25), str(barcode.data, encoding), fill=(255, 0, 0), font=fontStyle)
            # PIL picture to CV2 picture
            image = np.array(pilimg)
            # Print barcode data and barcode type to terminal
            print("[INFO] Found {} barcode: {}".format(barcodeType, barcodeData))
            return image


ROS+opencv application
AR vision

COMPANY

  • About us
  • Team Style
  • Blog

LEARNING & EXPLORATION

  • Tutorials
  • Edge AI hardware
  • Educational robots
  • Embedded intelligent hardware

WHERE TO BUY

  • Yahboom Online Store
  • Amazon
  • Alibaba
  • AliExpress
  • Mercado

TECHNOLOGY SUPPORT

  • Email: support@yahboom.com

BE A DISTRIBUTOR

  • Email: sales@yahboom.com
QR Code

Copyright © 2017-2026 Yahboom. All Rights Reserved.

EN/中文