yahboom
HomeLearn
Solution
Blog
Online Store
About Us
EN/中文
RDK X5 Robot📖
01. RDK-X5-Robot Introduction
  • 1.Introduction
  • 2.Common Problem Analysis
  • 3.Battery and charger usage precautions
  • 4.TF card expand capacity
02. Assembly Tutorial
  • Assembly Tutorial
  • Assembly Video-1
  • Assembly Video-2
  • Assembly Video-3
  • Assembly Video-4
03. Remote Control Course
  • 1.Mobile APP remote control
  • 2.USB Wireless Controller Remote Control
04. ROS Driver Board Course
  • 1. Introduction of extension board
  • 2. Set up STM32 development environment
  • 3. Key control buzzer sound
  • 4. FreeRTOS application
  • 5. Serial communication
  • 6. SBUS model remote control
  • 7. CAN bus communication
  • 8. RGB color light strip
  • 9. Timer interrupt control PWM servo
  • 10. Control serial steering gear
  • 11. Nine-axis attitude sensor to obtain data
  • 12. Control motor forward and reverse
  • 13. The timer captures encoder data
  • 14. Theory of robot kinematics analysis
  • 15. PID control robot motion
05. Basic Control Course
  • 1.Update expansion board firmware
  • 2.Install Python driver library
  • 3.Set the car type
  • 4.Open and close APP program control
  • 5.Turn hotspot mode on and off
  • 6.Buzzer sound
  • 7.Control the motor to rotate forward and reverse
  • 8.Controlling robot movement
  • 9.OLED display
  • 10.Control fans and lighting effects
06. Development Environment
  • 1. Virtual machine installation and use
  • 2. Linux Basics
  • 3. Remote connection
  • 4. Multi-machine communication configuration
  • 5. Bind device ID
  • 6. Image installation and backup
07. ROS2 Basic Course
  • 1. Introduction to ROS2
  • 2. ROS2 install Humble
  • 3. ROS2 development environment
  • 4. ROS2 workspace
  • 5. ROS2 function package
  • 6. ROS2 node
  • 7. ROS2 topic communication
  • 8. ROS2 service communication
  • 9. ROS2 action communication
  • 10. ROS2 custom interface message
  • 11. ROS2 parameter service case
  • 12. ROS2 meta-function package
  • 13. ROS2 distributed communication
  • 14. ROS2 DDS
  • 15. ROS2 time related API
  • 16. ROS2 common command tools
  • 17. ROS2 rviz2 use
  • 18. ROS2 rqt toolbox
  • 19. ROS2 Launch startup file configuration
  • 20. ROS2 recording and playback tool
  • 21. ROS2 URDF model
  • 22. ROS2 Gazebo simulation platform
  • 23. ROS2 TF2 coordinate transformation
08. Robot Chassis Control Course
  • 1. PID algorithm theory
  • 2. Robot information release
  • 3. Robot control
  • 4. Robot state estimation
  • 5. Robot calibration
  • 6. Robot trajectory tracking
  • 7. URDF Model
09. LiDAR Course
  • 1. Introduction and use of lidar
  • 2. Lidar obstacle avoidance
  • 3. Lidar tracking
  • 4. Lidar guard
  • 5. Lidar patrol
  • 6. gmapping mapping algorithm
  • 7. Cartographer mapping algorithm
  • 8. Navigation and obstacle avoidance
  • 9. App Mapping and Navigation
10. OpenCV Course
  • 1. Getting started with OpenCV
  • 2. OpenCV geometric transformation
  • 3. OpenCV Image Processing
  • 4. OpenCV image beautification
  • 5. QR code creation and recognition
11. Mipi Camera Course
  • 1. Camera driver
  • 2. Adjust the color HSV value
  • 3. Color recognition
  • 4. Color Tracking
  • 5. Color Follow
  • 6. QR code instructions
  • 7. Face Detection
  • 8. Object Detection
  • 9. Visual line patrol-OpenCV
  • 10. Visual line patrol-deep learning
  • 11. Human body tracking
  • 12. Gesture control
12. Depth Camera Course
  • 1. Use of Depth Camera
  • 2. Camera intrinsic calibration
  • 3. ROS+OpenCV Basics
  • 4. AR Vision
  • 5. Color Tracking
  • 6. Object Tracking
  • 7. RTAB-Map 3D Mapping Navigation
13. Multi-robot Synchronous Control
  • Multi-vehicle synchronous control
Remote login control
  • 1. VNC and SSH remote login
  • 2. Jupyter lab login and case code running
Download
  • System_File
  • Code
  • VM_File
  • Software_Tools
  • Hardware_Info
  • Firmware
  • Instruction_Manual
  • ROS2_Basic_VM
Download ZIP

Welcome to RDK X5 Robot repository

2. Jupyter lab login and case code running

Jupyter lab login and case code running

1.Jupyter lab login

1.1 LAN connection

Note: Using the factory image provided by Yahboom, SSH, VNC, jupyter lab and other related environments are configured, and the boot is self-starting. Please do not reconfigure it yourself, otherwise exceptions will occur, and you will need to follow the tutorial to re-burn the factory image.

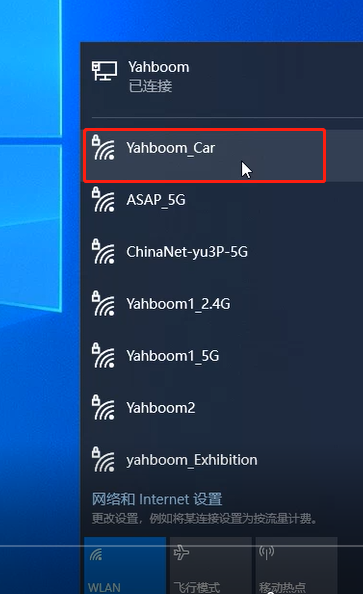
Connect your Windows computer to the car to send out a hotspot, taking the Raspberry Pi 4WD car as an example. The computer finds the wifi name of the car Yahboom_car (the hotspot name and password issued by other models of products can be viewed according to the manual), enter the password: 12345678 to connect, the default IP address of the car is 192.168 .50.1 . (The IP address of other models of products is not necessarily this. You can check it according to the manual, or through the oled display connected to the product. The default IP addresses of other products are 192.168.1.11 and 192.168.8.88).

If the computers are on the same network and have been verified to be able to log in via VNC or SSH, you can generally log in to jupyter lab directly and skip the mutual IP ping verification process.
 

1.2 Check network connectivity

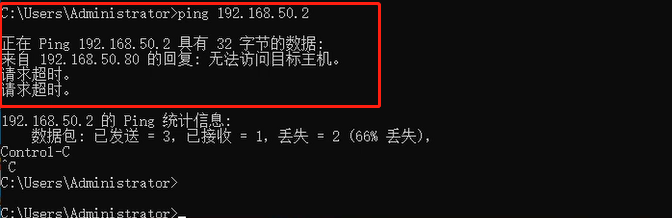
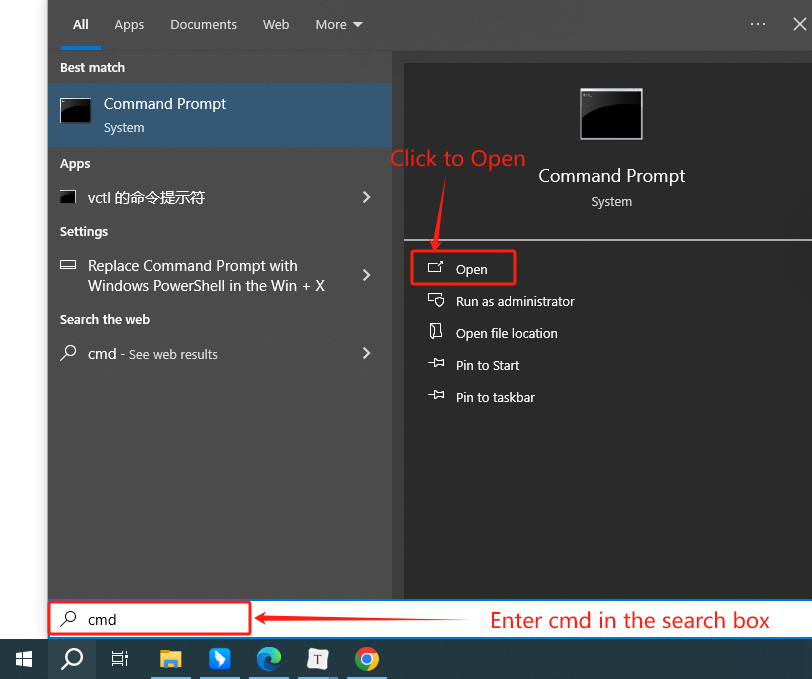
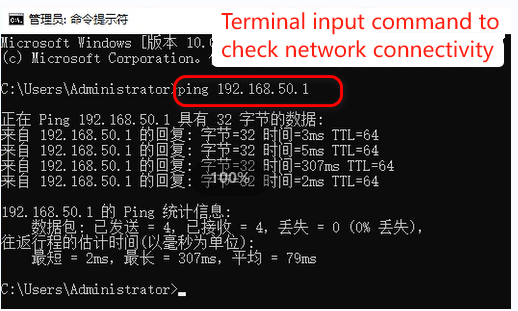
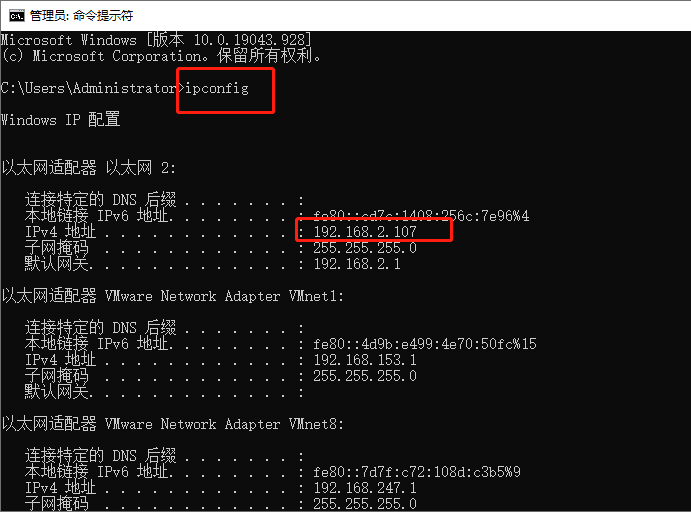
Enter cmd in the computer search window to open the command running window, and ping the IP address of the car in the terminal (for example: ping 192.168.50.1) to check whether the network is open. If a reply appears, it means that the network is smooth. If the target host cannot be accessed, it means that the network is not smooth. You need to check whether the firewall is turned on on the computer and turn off anti-virus software such as Tinder.


Note: If the motherboard system is connected to its own router network, or is not a spontaneous hotspot product (a network connected through a distribution network or network cable). Both the car system terminal and the windows computer terminal need to ping each other's IP. If one party cannot ping successfully (windows computers check the IP address through the command ipconfig, and the motherboard system checks the IP address through the command ifconfig). It means there is a problem with the network. Please change to another LAN to connect. Please do not connect to the campus network. The campus network is blocked and remote login such as VNC and SSH is not possible.


1.3 Jupyter lab login

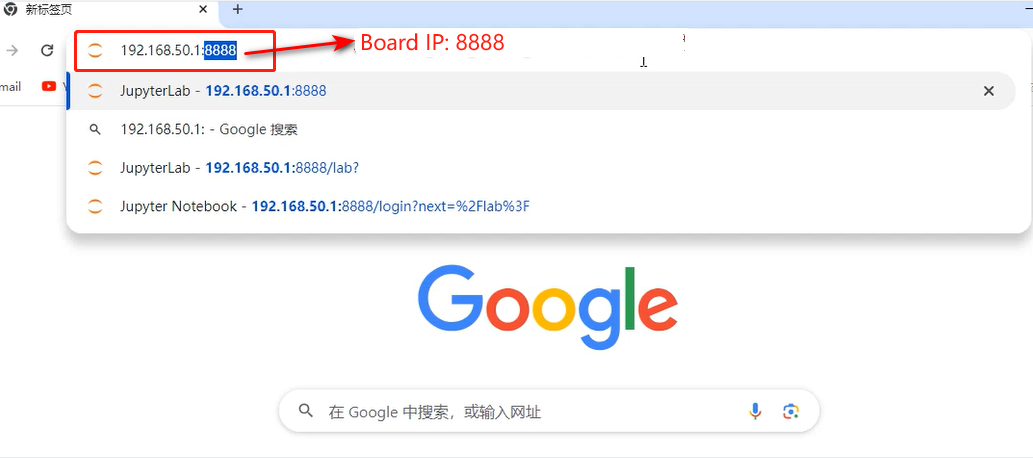
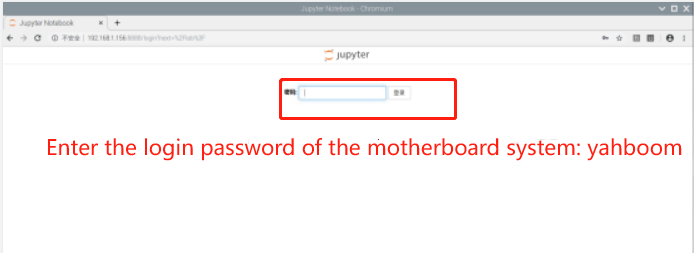
Open Google Chrome on your computer and enter the IP address of the car to log in. For example, the IP address of the spontaneous hotspot of the Raspberry Pi 4wd car is 192.168.50.1. Enter 192.168.50.1:8888 in the browser. Press the Enter button to log in. In the pop-up interface, enter the system password: yahboom. Please note that it is case-sensitive. After remembering the password, you do not need to enter the password again when you log in next time.
2. Run the case code

Taking the Raspberry Pi 4WD car as an example, the following interface will appear after successfully logging into jupyter lab.
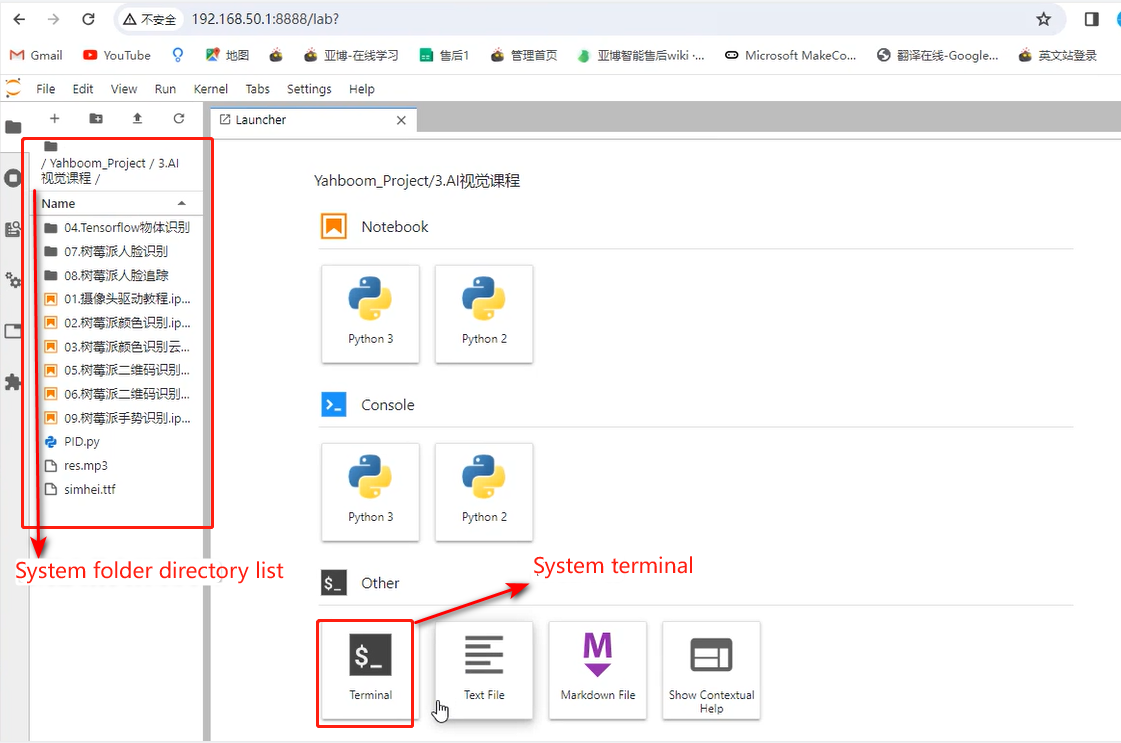


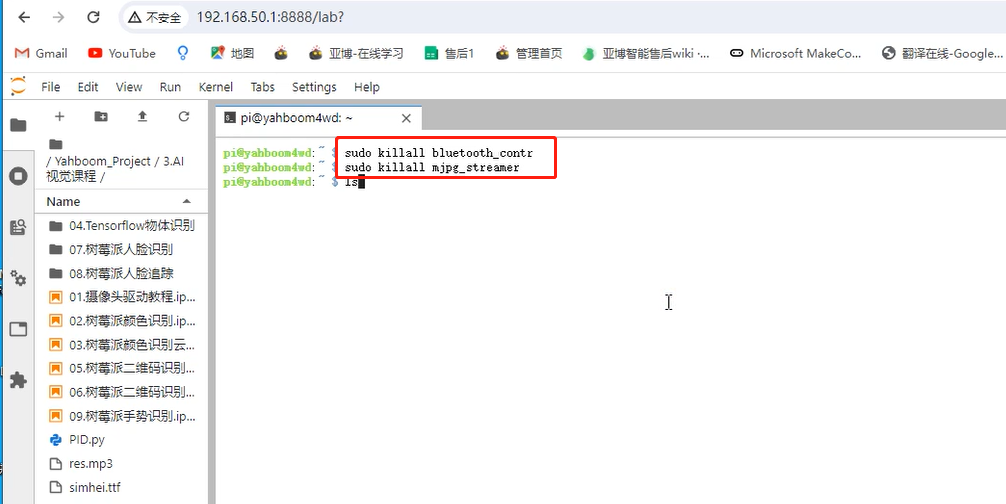
Open the terminal and close the process used for the mobile app to start the connection class. Failure to close it will occupy peripheral resources and cause the case code to run abnormally. The operation methods of other types of products are different. For details, you can check the closing and opening chapters of the APP's self-starting factory program. If you close the large program permanently, you don't need to repeat this operation every time you turn on the computer.


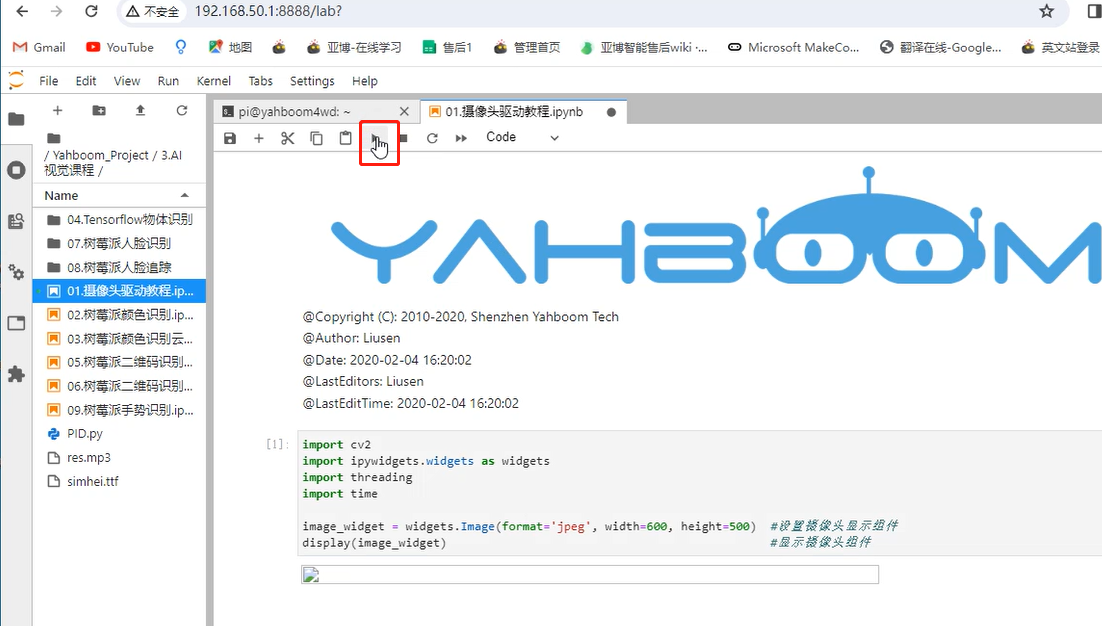
This time, we take the case of driving the camera on the Raspberry Pi 4wd car as an example. Find the driver code in the corresponding path of the driver camera and open it. Click single-step execution to run the code section by section, and wait until the code is executed. You can open the camera screen.
 

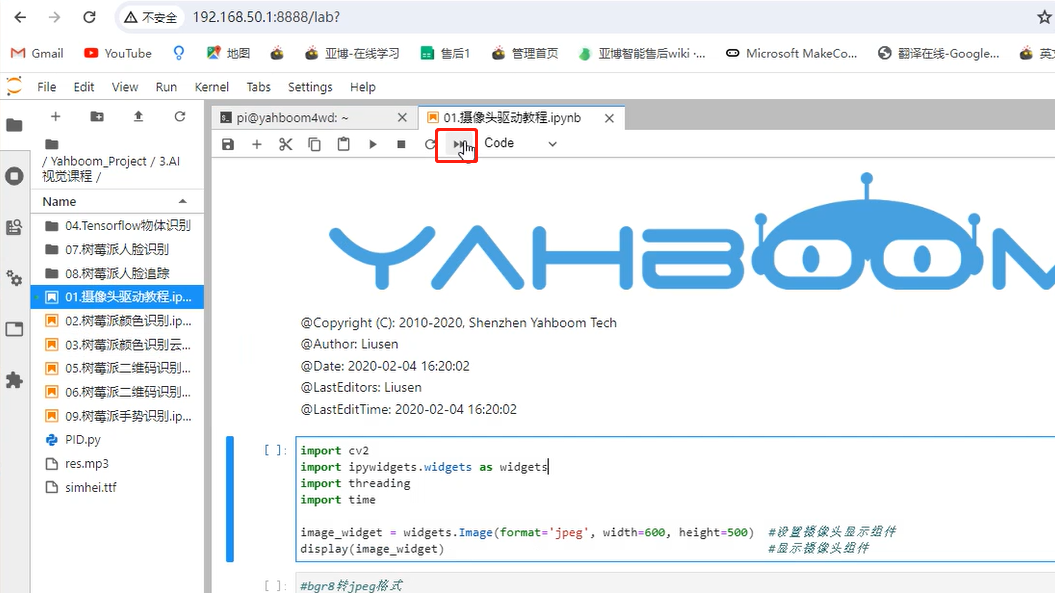
You can also click the Run All button yourself, and the code will run quickly.


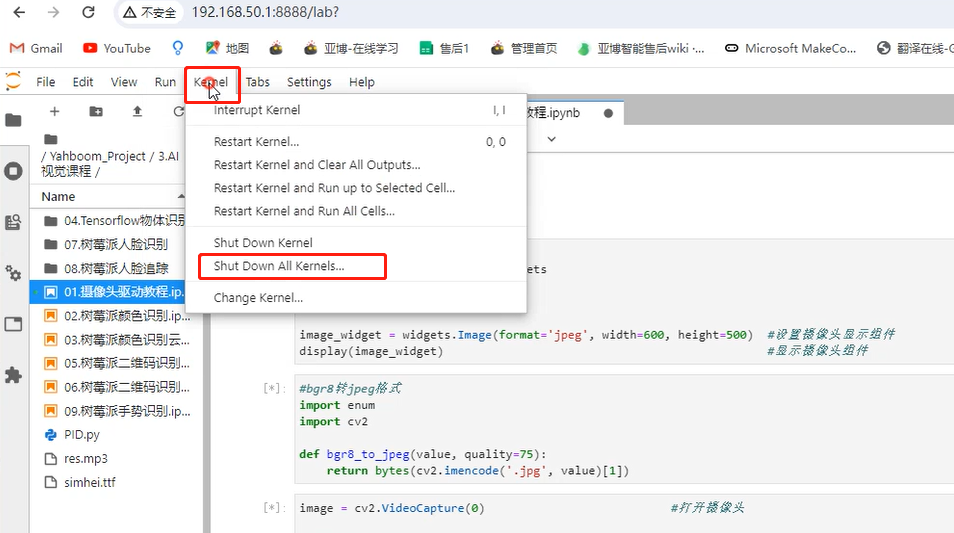
Each time you finish running a case, you need to close the running process, otherwise an exception will occur when running the next case.
 

For other functions in jupyter lab, you can view tutorials in other chapters, or refer to the official website tutorial.

https://jupyterlab.readthedocs.io/en/stable/user/interface.html

VNC and SSH remote login

COMPANY

  • About us
  • Team Style
  • Blog

LEARNING & EXPLORATION

  • Tutorials
  • Edge AI hardware
  • Educational robots
  • Embedded intelligent hardware

WHERE TO BUY

  • Yahboom Online Store
  • Amazon
  • Alibaba
  • AliExpress
  • Mercado

TECHNOLOGY SUPPORT

  • Email: support@yahboom.com

BE A DISTRIBUTOR

  • Email: sales@yahboom.com
QR Code

Copyright © 2017-2026 Yahboom. All Rights Reserved.

EN/中文