yahboom
HomeLearn
Solution
Blog
Online Store
About Us
EN/中文
RDK X5 Robot📖
01. RDK-X5-Robot Introduction
  • 1.Introduction
  • 2.Common Problem Analysis
  • 3.Battery and charger usage precautions
  • 4.TF card expand capacity
02. Assembly Tutorial
  • Assembly Tutorial
  • Assembly Video-1
  • Assembly Video-2
  • Assembly Video-3
  • Assembly Video-4
03. Remote Control Course
  • 1.Mobile APP remote control
  • 2.USB Wireless Controller Remote Control
04. ROS Driver Board Course
  • 1. Introduction of extension board
  • 2. Set up STM32 development environment
  • 3. Key control buzzer sound
  • 4. FreeRTOS application
  • 5. Serial communication
  • 6. SBUS model remote control
  • 7. CAN bus communication
  • 8. RGB color light strip
  • 9. Timer interrupt control PWM servo
  • 10. Control serial steering gear
  • 11. Nine-axis attitude sensor to obtain data
  • 12. Control motor forward and reverse
  • 13. The timer captures encoder data
  • 14. Theory of robot kinematics analysis
  • 15. PID control robot motion
05. Basic Control Course
  • 1.Update expansion board firmware
  • 2.Install Python driver library
  • 3.Set the car type
  • 4.Open and close APP program control
  • 5.Turn hotspot mode on and off
  • 6.Buzzer sound
  • 7.Control the motor to rotate forward and reverse
  • 8.Controlling robot movement
  • 9.OLED display
  • 10.Control fans and lighting effects
06. Development Environment
  • 1. Virtual machine installation and use
  • 2. Linux Basics
  • 3. Remote connection
  • 4. Multi-machine communication configuration
  • 5. Bind device ID
  • 6. Image installation and backup
07. ROS2 Basic Course
  • 1. Introduction to ROS2
  • 2. ROS2 install Humble
  • 3. ROS2 development environment
  • 4. ROS2 workspace
  • 5. ROS2 function package
  • 6. ROS2 node
  • 7. ROS2 topic communication
  • 8. ROS2 service communication
  • 9. ROS2 action communication
  • 10. ROS2 custom interface message
  • 11. ROS2 parameter service case
  • 12. ROS2 meta-function package
  • 13. ROS2 distributed communication
  • 14. ROS2 DDS
  • 15. ROS2 time related API
  • 16. ROS2 common command tools
  • 17. ROS2 rviz2 use
  • 18. ROS2 rqt toolbox
  • 19. ROS2 Launch startup file configuration
  • 20. ROS2 recording and playback tool
  • 21. ROS2 URDF model
  • 22. ROS2 Gazebo simulation platform
  • 23. ROS2 TF2 coordinate transformation
08. Robot Chassis Control Course
  • 1. PID algorithm theory
  • 2. Robot information release
  • 3. Robot control
  • 4. Robot state estimation
  • 5. Robot calibration
  • 6. Robot trajectory tracking
  • 7. URDF Model
09. LiDAR Course
  • 1. Introduction and use of lidar
  • 2. Lidar obstacle avoidance
  • 3. Lidar tracking
  • 4. Lidar guard
  • 5. Lidar patrol
  • 6. gmapping mapping algorithm
  • 7. Cartographer mapping algorithm
  • 8. Navigation and obstacle avoidance
  • 9. App Mapping and Navigation
10. OpenCV Course
  • 1. Getting started with OpenCV
  • 2. OpenCV geometric transformation
  • 3. OpenCV Image Processing
  • 4. OpenCV image beautification
  • 5. QR code creation and recognition
11. Mipi Camera Course
  • 1. Camera driver
  • 2. Adjust the color HSV value
  • 3. Color recognition
  • 4. Color Tracking
  • 5. Color Follow
  • 6. QR code instructions
  • 7. Face Detection
  • 8. Object Detection
  • 9. Visual line patrol-OpenCV
  • 10. Visual line patrol-deep learning
  • 11. Human body tracking
  • 12. Gesture control
12. Depth Camera Course
  • 1. Use of Depth Camera
  • 2. Camera intrinsic calibration
  • 3. ROS+OpenCV Basics
  • 4. AR Vision
  • 5. Color Tracking
  • 6. Object Tracking
  • 7. RTAB-Map 3D Mapping Navigation
13. Multi-robot Synchronous Control
  • Multi-vehicle synchronous control
Remote login control
  • 1. VNC and SSH remote login
  • 2. Jupyter lab login and case code running
Download
  • System_File
  • Code
  • VM_File
  • Software_Tools
  • Hardware_Info
  • Firmware
  • Instruction_Manual
  • ROS2_Basic_VM
Download ZIP

Welcome to RDK X5 Robot repository

8. RGB color light strip

8. RGB color light strip

8. RGB color light strip8.1. Experimental purpose8.2. Configure pin information8.3. Analysis of experimental flow chart8.4. Core code interpretation8.5. Hardware connection8.6. Experimental effect

8.1. Experimental purpose

The SPI communication of STM32 is used to simulate the communication protocol of WS2812B module and drive the RGB light strip to display the effect.

8.2. Configure pin information

  1. Import ioc file from Beep project and name it RGB_Strip.

According to the schematic diagram, the pin of the RGB light bar connection is PB5. The driving mode of the RGB light bar can use timer PWM output or SPI output, and the PB5 pin can be redefined as timer PWM or SPI output. Considering the subsequent timer conflict problem, SPI communication mode is used here to drive the RGB light bar.

image-20220310121200684

  1. Set the mode of SPI3 to Transmit Only Master, so that pin PB5 is automatically set to SPI3_MOSI.
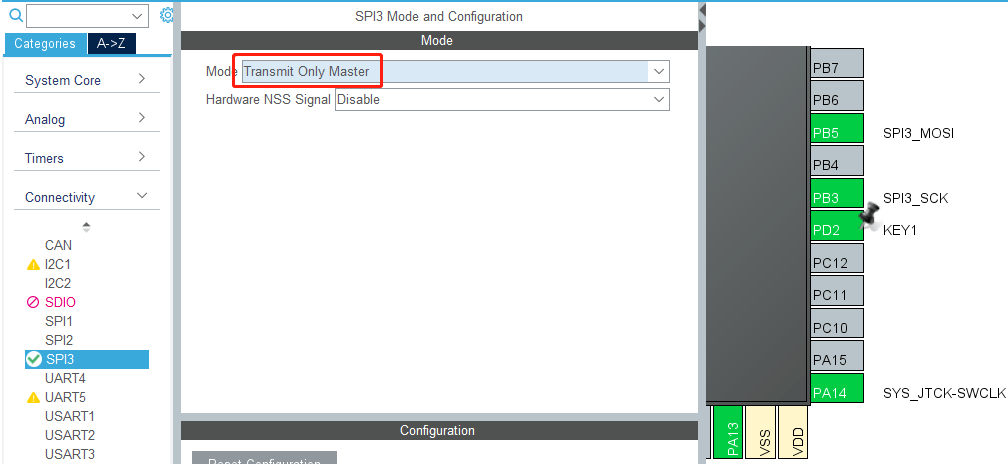
image-20220310121657636

  1. Modify the parameters of data sent by SPI3. Refer to the following picture for specific parameters.
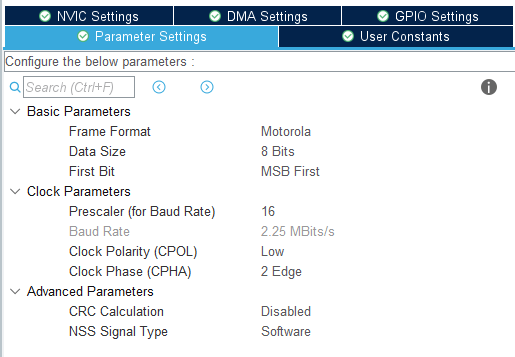
image-20220310122044198

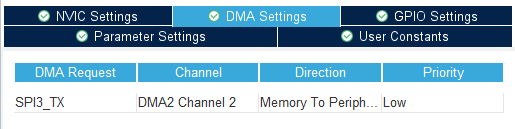
  1. Add DMA Settings for SPI3_TX.

image-20220310122201542


8.3. Analysis of experimental flow chart
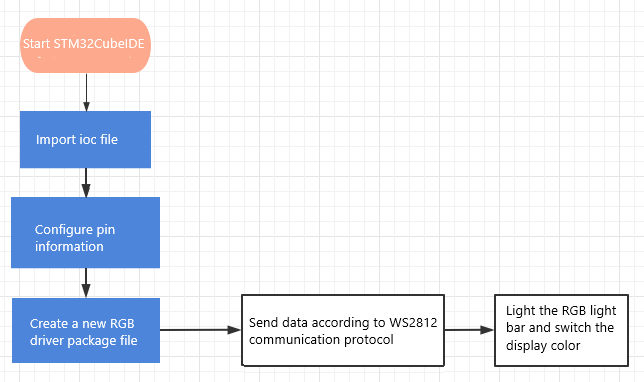
image-20220310122606469

8.4. Core code interpretation

  1. Create bsp_rgb.h and bsp_rgb.c, and add the following content to bsp_rgb.h:
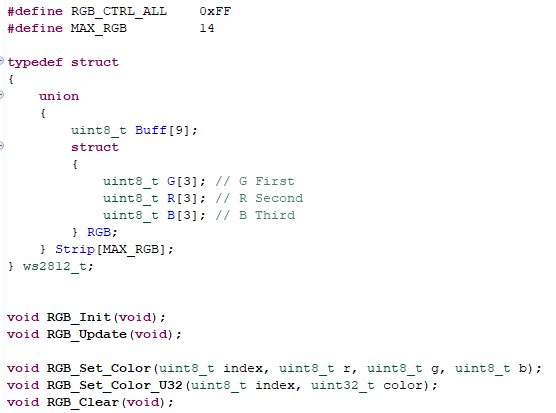
image-20220310122940996

Among them, the ws2812_t structure is used to store the cache data of the light bar.

  1. Create the following content in the bsp_rgb.c file: According to the communication protocol of WS2812, the three bits of SPI are simulated to the one bit of WS2812. When the value of SPI output three digits is 0b110, it corresponds to the high level of WS2812; when the value of SPI output three digits is 0b100, it corresponds to the low level of WS2812.
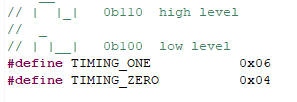
image-20220310141349255

  1. WS2812_Set_Color_One() function sets a single RGB light color value, index=[0, MAX_RGB-1], RGB=[0x00000000, 0x00FFFFFF], RGB value permutation: red in the front, middle is green, the last is blue.
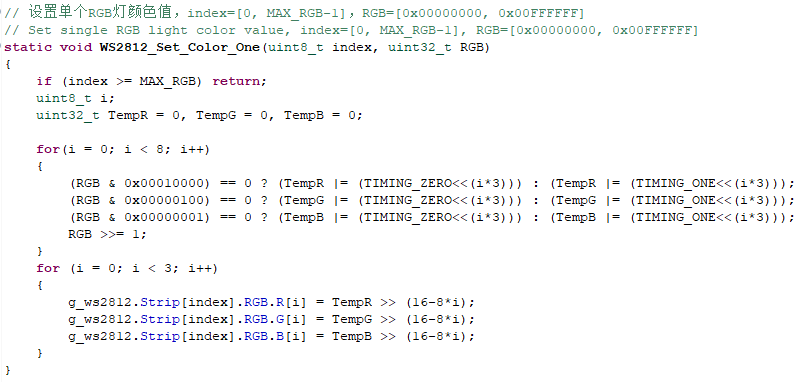
image-20220310140859723

  1. RGB_Set_Color(index, r, g, b) and RGB_Set_Color_U32(index, color) Set the RGB strip color value. index=[0, MAX_RGB-1] controls the color of the corresponding lamp bead, and index=255 controls the color of all lamp bead.
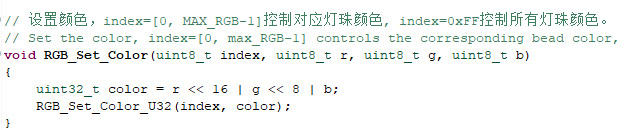
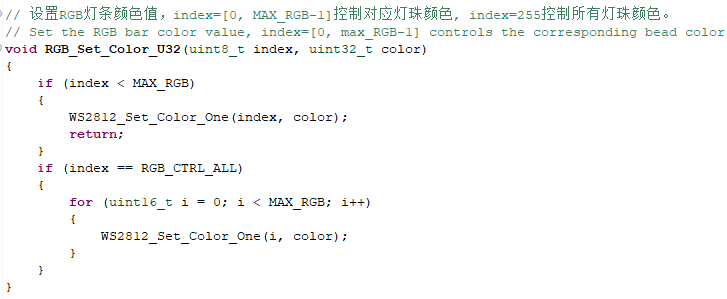
image-20220310142550074

image-20220310142255241

5.RGB_Clear() Clears the RGB indicator cache.
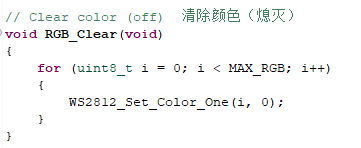
image-20220310142722177

  1. The RGB_Update() function refreshed the RGB light bar color. The RGB light must call the RGB_Update() function to refresh the display after changing the color, otherwise it will not produce the effect.

image-20220310142814164

  1. Send data using DMA of SPI3.

image-20220310143105281

8.5. Hardware connection

Since the RGB indicator bar needs to be connected to the position of the RGB indicator bar on the expansion board, the interface has been set for anti-reverse connection. You can insert the interface in the correct direction.
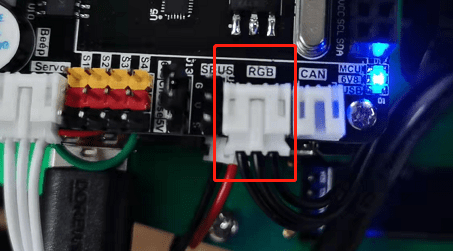
image-20220326173802535

8.6. Experimental effect

After burning the program, the LED light flashes every 200 milliseconds, and the RGB light strip displays red, green, and blue in turn, switching a color every 500 milliseconds.

CAN bus communication
Timer interrupt control PWM servo

COMPANY

  • About us
  • Team Style
  • Blog

LEARNING & EXPLORATION

  • Tutorials
  • Edge AI hardware
  • Educational robots
  • Embedded intelligent hardware

WHERE TO BUY

  • Yahboom Online Store
  • Amazon
  • Alibaba
  • AliExpress
  • Mercado

TECHNOLOGY SUPPORT

  • Email: support@yahboom.com

BE A DISTRIBUTOR

  • Email: sales@yahboom.com
QR Code

Copyright © 2017-2026 Yahboom. All Rights Reserved.

EN/中文