yahboom
HomeLearn
Solution
Blog
Online Store
About Us
EN/中文
RDK X5 Robot📖
01. RDK-X5-Robot Introduction
  • 1.Introduction
  • 2.Common Problem Analysis
  • 3.Battery and charger usage precautions
  • 4.TF card expand capacity
02. Assembly Tutorial
  • Assembly Tutorial
  • Assembly Video-1
  • Assembly Video-2
  • Assembly Video-3
  • Assembly Video-4
03. Remote Control Course
  • 1.Mobile APP remote control
  • 2.USB Wireless Controller Remote Control
04. ROS Driver Board Course
  • 1. Introduction of extension board
  • 2. Set up STM32 development environment
  • 3. Key control buzzer sound
  • 4. FreeRTOS application
  • 5. Serial communication
  • 6. SBUS model remote control
  • 7. CAN bus communication
  • 8. RGB color light strip
  • 9. Timer interrupt control PWM servo
  • 10. Control serial steering gear
  • 11. Nine-axis attitude sensor to obtain data
  • 12. Control motor forward and reverse
  • 13. The timer captures encoder data
  • 14. Theory of robot kinematics analysis
  • 15. PID control robot motion
05. Basic Control Course
  • 1.Update expansion board firmware
  • 2.Install Python driver library
  • 3.Set the car type
  • 4.Open and close APP program control
  • 5.Turn hotspot mode on and off
  • 6.Buzzer sound
  • 7.Control the motor to rotate forward and reverse
  • 8.Controlling robot movement
  • 9.OLED display
  • 10.Control fans and lighting effects
06. Development Environment
  • 1. Virtual machine installation and use
  • 2. Linux Basics
  • 3. Remote connection
  • 4. Multi-machine communication configuration
  • 5. Bind device ID
  • 6. Image installation and backup
07. ROS2 Basic Course
  • 1. Introduction to ROS2
  • 2. ROS2 install Humble
  • 3. ROS2 development environment
  • 4. ROS2 workspace
  • 5. ROS2 function package
  • 6. ROS2 node
  • 7. ROS2 topic communication
  • 8. ROS2 service communication
  • 9. ROS2 action communication
  • 10. ROS2 custom interface message
  • 11. ROS2 parameter service case
  • 12. ROS2 meta-function package
  • 13. ROS2 distributed communication
  • 14. ROS2 DDS
  • 15. ROS2 time related API
  • 16. ROS2 common command tools
  • 17. ROS2 rviz2 use
  • 18. ROS2 rqt toolbox
  • 19. ROS2 Launch startup file configuration
  • 20. ROS2 recording and playback tool
  • 21. ROS2 URDF model
  • 22. ROS2 Gazebo simulation platform
  • 23. ROS2 TF2 coordinate transformation
08. Robot Chassis Control Course
  • 1. PID algorithm theory
  • 2. Robot information release
  • 3. Robot control
  • 4. Robot state estimation
  • 5. Robot calibration
  • 6. Robot trajectory tracking
  • 7. URDF Model
09. LiDAR Course
  • 1. Introduction and use of lidar
  • 2. Lidar obstacle avoidance
  • 3. Lidar tracking
  • 4. Lidar guard
  • 5. Lidar patrol
  • 6. gmapping mapping algorithm
  • 7. Cartographer mapping algorithm
  • 8. Navigation and obstacle avoidance
  • 9. App Mapping and Navigation
10. OpenCV Course
  • 1. Getting started with OpenCV
  • 2. OpenCV geometric transformation
  • 3. OpenCV Image Processing
  • 4. OpenCV image beautification
  • 5. QR code creation and recognition
11. Mipi Camera Course
  • 1. Camera driver
  • 2. Adjust the color HSV value
  • 3. Color recognition
  • 4. Color Tracking
  • 5. Color Follow
  • 6. QR code instructions
  • 7. Face Detection
  • 8. Object Detection
  • 9. Visual line patrol-OpenCV
  • 10. Visual line patrol-deep learning
  • 11. Human body tracking
  • 12. Gesture control
12. Depth Camera Course
  • 1. Use of Depth Camera
  • 2. Camera intrinsic calibration
  • 3. ROS+OpenCV Basics
  • 4. AR Vision
  • 5. Color Tracking
  • 6. Object Tracking
  • 7. RTAB-Map 3D Mapping Navigation
13. Multi-robot Synchronous Control
  • Multi-vehicle synchronous control
Remote login control
  • 1. VNC and SSH remote login
  • 2. Jupyter lab login and case code running
Download
  • System_File
  • Code
  • VM_File
  • Software_Tools
  • Hardware_Info
  • Firmware
  • Instruction_Manual
  • ROS2_Basic_VM
Download ZIP

Welcome to RDK X5 Robot repository

10. Visual line patrol-deep learning

Visual Line Patrol (Deep Learning)

Visual Line Patrol (Deep Learning)1. Program Function Description2. Introduction to Deep Learning3. Program reference path4. Program startup

Note: This case needs to be run as root user, and administrator privileges are required to call the MIPI camera!

Switch to root user

xxxxxxxxxx
su root

Password: yahboom

1. Program Function Description

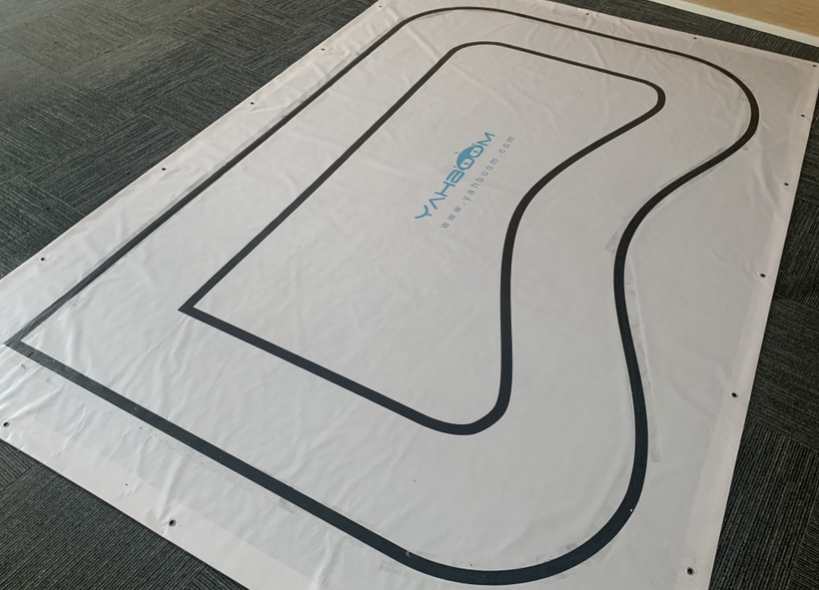
After the program is started, the car can use the deep learning model to automatically follow the [black] path line. Applicable to similar scenarios as shown in the figure below,
1685602154029

The [L1] button on the handle can lock/open the motion control of the car. When the motion control is turned on, the function will be locked; when the motion control is locked, the function can be turned on.

Note: This case needs to be switched to the root user to run, and administrator privileges are required to call the MIPI camera!

2. Introduction to Deep Learning

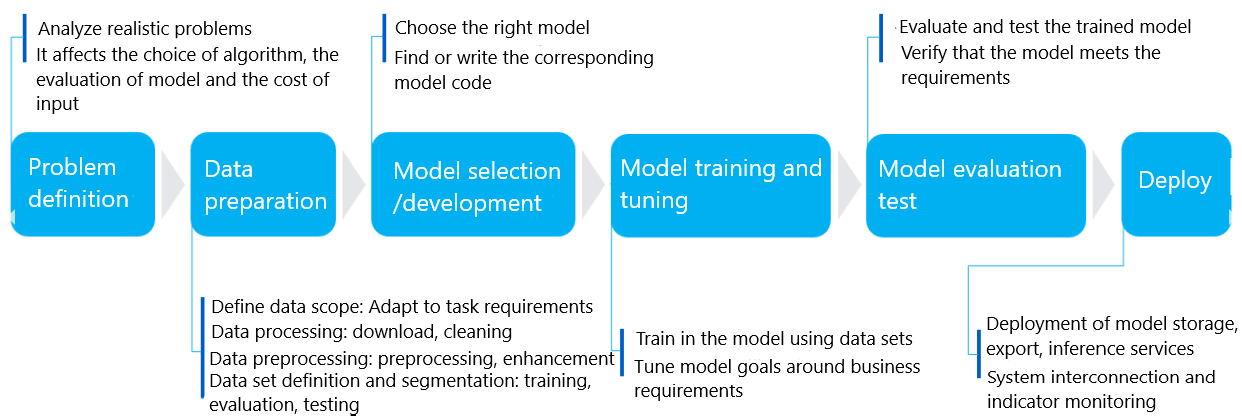
Compared with traditional image processing, deep learning can enable machine vision to adapt to more changes, thereby improving the accuracy in complex environments. The following figure is the basic process of deep learning.
1684835949993

The core purpose of machine learning is to help us solve problems, which can be divided into six main steps:

  • Problem definition: What problem do we want to solve? For example, in the case of visual line patrol, we need to identify the position of the line in the image.

  • Data preparation: Prepare data for the problem to be solved. For example, we need to prepare photos of various line patrol scenes for machine learning.

  • Model selection/development: A model is a set of processes for processing data, which is what we often hear about: CNN convolutional neural network, GAN generative adversarial network, RNN recurrent neural network, etc.

  • Model training and tuning: Put data into the model and train to get the optimal parameters, which can be understood as the process of machine learning.

  • Model evaluation test: Just like a quiz, we give some data to the trained model to see how it works.

  • Deployment: After everything is ready, you can put the trained model on the robot, that is, formally impart knowledge to a robot, and it can solve the problem raised before.

In the car code, a set of trained line-following models has been deployed, which means that you can skip the machine learning steps mentioned above and directly enter the deployment phase.

3. Program reference path

After SSH connects to the car, the source code of this function is located at,

/home/sunrise/yahboomcar_ws/src/yahboomcar_deeplearning/line_follower_perception/src/line_follower_perception.cpp

4. Program startup

Appropriately adjust the MIPI camera angle downward so that it can recognize the black path line and the background is not cluttered.

After SSH connects to the car, the terminal runs,

xxxxxxxxxx
ros2 launch line_follower_perception linefollower_perception_launch.py

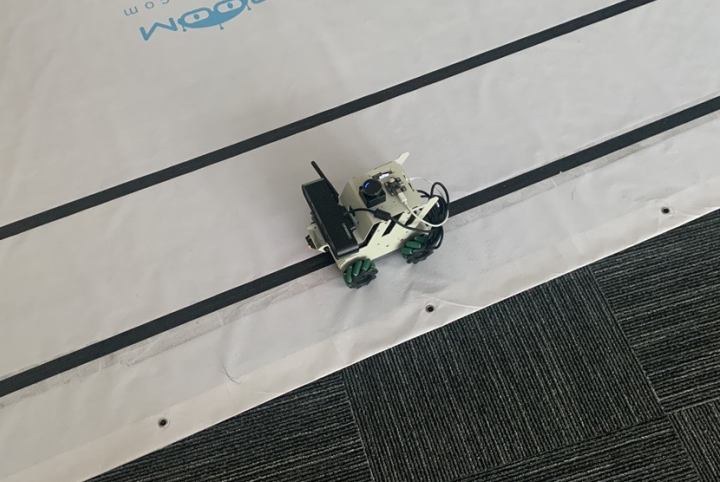
You can see that the car can follow the black path line.
1685671786224


Visual line patrol-OpenCV
Human body tracking

COMPANY

  • About us
  • Team Style
  • Blog

LEARNING & EXPLORATION

  • Tutorials
  • Edge AI hardware
  • Educational robots
  • Embedded intelligent hardware

WHERE TO BUY

  • Yahboom Online Store
  • Amazon
  • Alibaba
  • AliExpress
  • Mercado

TECHNOLOGY SUPPORT

  • Email: support@yahboom.com

BE A DISTRIBUTOR

  • Email: sales@yahboom.com
QR Code

Copyright © 2017-2026 Yahboom. All Rights Reserved.

EN/中文