Welcome to RDK X5 Robot repository
2. Linux Basics
Linux Basics
Linux Basics2.1. Introduction to Linux System2.2, Ubuntu Overview2.3, Ubuntu file system2.4, Common commands2.4.1, Add2.4.2, Delete2.4.3, Change2.4.4, check2.4.5, Others2.5, Editor2.5.1, vim2.5.2, nano2.5.3, gedit2.6, Ubuntu software operation commands
2.1. Introduction to Linux System
Linux is an open source operating system. Its kernel was first released by Linus Benedict Torvalds on October 5, 1991. It inherits the network-centric design concept of Unix and is a stable multi-user network operating system.
In March 1994, Linux 1.0 was released with 170,000 lines of code. It was released under a completely free and free agreement at the time, and then officially adopted the GPL agreement.
In January 1995, Bob Young founded RedHat, which took GNU and Linux as the core and integrated more than 400 open source program modules to create a branded Linux, namely RedHat Linux, called Linux distribution, which was sold on the market.
In June 1996, the Linux 2.0 kernel was released, which can support multiple processors.
- Main features of Linux
Free and open source; fully compatible with POSIX 1.0 standard; multi-user, multi-tasking; has a good interface; supports multiple platforms.
- Linux major versions
There are about 300 Linux distributions, almost all of which can be run as server systems. Linux distributions rarely copy each other. The popular Linux server distributions are mainly the following:
Red Hat Enterprise Linux: This is the first Linux distribution for the commercial market. It has a server version and supports many processor architectures.
Debian: Debian is extremely stable, which makes it very suitable for servers.
CentOS: CentOS is an enterprise-level Linux distribution that is rebuilt using free source code from Red Hat Enterprise Linux. This rebuilt version completely removes registered trademarks and a very subtle change in Binary packages.
Ubuntu: Ubuntu is a derivative of Debian that focuses on its application in this market. It is common on servers, cloud computing, and even some mobile devices running Ubuntu Linux.
2.2, Ubuntu Overview
Ubuntu is a Linux operating system that focuses on desktop applications. Ubuntu is based on the Debian distribution and the Gnome desktop environment. Since version 11.04, the Ubuntu distribution has abandoned the Gnome desktop environment and changed to Unity. Since Ubuntu 18.04 LTS, Ubuntu distribution has started to use GNOME3 desktop environment again. In almost every Linux-related list, Ubuntu based on Debian has a place. Canonical's Ubuntu outperforms all other Linux server distributions - from simple installation, excellent hardware discovery, to world-class commercial support, Ubuntu has established unattainable and strict standards
2.3, Ubuntu file system
Unlike Windows, Ubuntu does not have the concept of drive letters. There is only one root directory [/], and all files are under it
xxxxxxxxxx├── bin # bin is the abbreviation of Binary. It stores the most commonly used executable files (binary) in the system.├── boot # Here are the Linux kernel and system startup files, including Grub and lilo launcher programs.├── dev # dev is the abbreviation of Device. This directory stores Linux external devices, such as hard disks, partitions, keyboards, mice, USB, etc.├── etc # This directory is used to store all configuration files and subdirectories required for system management, such as passwd, hostname, etc.├── home # The user's home directory. In Linux, each user has his own directory, which is generally named after the user's account.│ └── yahboom # User│ ├── Desktop # Desktop│ ├── Documents # Documents│ ├── Downloads # Downloads│ ├── Music # Music│ ├── Pictures # Pictures│ ├── Public # Shared│ ├── Templates # Templates│ ├── Videos # Videos│ ...│ ...├── lost+found # This directory is usually empty. When the system is shut down illegally, some scattered files are stored here.├── lib # Stores shared library files, including many library files used by programs in /bin and /sbin.├── media # CD-ROM and USB devices automatically mounted by Ubuntu system, storing temporarily read files.├── mnt # As the mount point of the mounted file system.├── opt # As the storage directory for optional files and programs, it is mainly used by third-party developers to easily install and uninstall their software.├── proc # This directory is a virtual directory, which is a mapping of system memory. It stores all processes marked as files. Compared with cpuinfo, it stores data on the current working status of the CPU.├── root # This directory is the user home directory of the system administrator, also known as the super-authority user.├── sbin # s means Super User. It stores system management programs used by system administrators, such as system management, directory query and other key command files.├── srv # Stores service data provided by the system.├── sys # System device and file hierarchy, and provides detailed kernel data information to user programs.├── usr # Stores files and directories related to system users.│ ├── bin # Standard commands for users and administrators│ ├── games # Stores small games that come with XteamLinux│ ├── include # Used to store header files, c or c++, required for developing and compiling applications under Linux│ ├── lib # Link libraries for applications and packages│ ├── local # Application directory installed by the system administrator│ ├── sbin # Stores management programs used by the root super user│ └── src # Linux open source code│ └── share # Stores shared data│ ...├── var # Variable-length files, especially some record data, such as log files and printer files│ ├── backups│ ├── cache # Application cache directory│ ├── crash # System error message│ ├── log # Log file│ ├── mail # Email│ └── tmp # Temporary file directory│ ...├── tmp # This directory is used to store some temporary files. All users have read and write permissions to this directory....2.4, Common commands
2.4.1, Add
Create a new file
xtouch test.txtCreate a new folder```pythonmkdir test # Create a filemkdir -p test/src # Create a test folder and create a src folder in the test folder
Copy
xxxxxxxxxxsudo cp test.txt test_copy.txt # Copy a file2.4.2, Delete
| -i | Execute interactively |
|---|---|
| -f | Force deletion, ignore non-existent files, no prompt |
| -r | Recursively delete the contents of the directory |
xxxxxxxxxxsudo rm test.txt # Delete files | Empty folderssudo rm -r test # Delete folders and their contents2.4.3, Change
- mv Move, rename
xxxxxxxxxxsudo mv test test_new # Change the test folder to test_newsudo mv test.txt test_new.txt # Change the test.txt file to test_new.txt- chmod Modify file permissions
Permission settings
| Symbol | Meaning |
|---|---|
| + | Add permissions |
| - | Revoke permissions |
| = | Set permissions |
rwx
| Letter permissions | Meaning |
|---|---|
| r | read means read permissions. For a directory, if there is no r permission, it means that the contents of this directory cannot be viewed through ls. |
| w | write means write permissions. For a directory, if there is no w permission, it means that new files cannot be created in the directory. |
| x | excute indicates executable permission. For a directory, if there is no x permission, it means that you cannot enter the directory through cd. |
xxxxxxxxxxsudo chmod +rwx test.txt
Shortcut to add all permissions
xxxxxxxxxxsudo chmod 777 test.txt
- Change password
Set root password
xxxxxxxxxxsudo passwd root
Set username and password
xxxxxxxxxxsudo passwd username
2.4.4, check
- Check system version
xxxxxxxxxxlsb_release -a # Release version numberuname -a # Kernel version and system bit numbercat /proc/version # Kernel version and gcc version- Check hardware information
xxxxxxxxxxcurl cip.cc or ifconfig # Check IP addresscat /proc/cpuinfo or lscpu # cpu informationsudo dmidecode -t memory # Memory informationdf -h # Check the space of all mounted file systemswhich python3 # View command locationv4l2-ctl --list-formats-ext # View camera device parametersnproc # View the number of cores- View file information
xxxxxxxxxxla # Display all subdirectories and files under the specified directory, including hidden filesll # Display detailed information of the file in a list formatls -h # Display file size in a humanized waycat test.txt # View file contenttree # View file directory (need to install tree)tree installation command
xxxxxxxxxxsudo apt install tree
- Finding Files
xxxxxxxxxxfind ./ -name test.sh # Find all files or directories named test.sh in the current directoryfind ./ -name '*.sh' # Find all files or directories with the suffix .sh in the current directoryfind ./ -name "[A-Z]*" # Find all files or directories starting with uppercase letters in the current directory2.4.5, Others
- tar command
Tar usage format: tar [parameter] package file name file
xxxxxxxxxx-c # Generate archive file, create package file-v # List the detailed process of archiving and dearchiving, and display the progress-f # Specify the archive file name, f must be followed by .tar file, so the option must be placed at the end-t # List the files contained in the archive-x # Unzip the archive filePackage
xxxxxxxxxxtar -cvf xxx.tar * # All files in the current directorytar -cvf xxx.tar *.txt # Files ending with .txttar -cvf xxx.tar my-file my-dir # Package the specified directory or fileUnpack
xxxxxxxxxxtar -xvf xxx.tar # Unpack to the current directorytar -xvf xxx.tar -C my-dir # Unzip to the specified directory (need to create the my-dir directory first)- zip, unzip commands
Compressed file: zip [-r] target file (no extension) source file
xxxxxxxxxxzip bak * # All files in the current directory, you can also specify a filezip -r bak * # All files in the current directory & directory recursivelyUnzip file: unzip -d directory file after decompression compressed file
xxxxxxxxxxunzip -d ./target_dir bak.zip # Unzip to the specified directoryunzip bak.zip # Unzip to the current directory- ln command
Soft link: Soft link does not occupy disk space, and the soft link becomes invalid if the source file is deleted. Commonly used, can be created for files or folders
xxxxxxxxxxln -s source file link fileHard link: Hard link can only link ordinary files, not directories. Even if the source file is deleted, the link file still exists
xxxxxxxxxxln source file link file- scp remote copy
xxxxxxxxxxscp jetson@192.168.16.66:/home/jetson/xxx.tar.gz /home/yahboom/ # Copy files from remote to localscp /home/yahboom/xxx.png jetson@192.168.16.66:/home/jetson/ # Copy files from local to remotescp -r jetson@192.168.16.66:/home/jetson/test /home/yahboom/ # Copy directory from remote to local -rscp -r /home/yahboom/test jetson@192.168.16.66:/home/jetson/ # Copy directory from local to remote -r- wget file download
Search for a random image address on Baidu as an example.
xxxxxxxxxxwget "https://img0.baidu.com/it/u=3911542037,2006161295&fm=224&fmt=auto&gp=0.jpg" # Download ordinary files (double quotes are required for Baidu links)wget -O yahboom.jpg "https://img0.baidu.com/it/u=3911542037,2006161295&fm=224&fmt=auto&gp=0.jpg" # Save the file with the specified file name- Others
xxxxxxxxxxnautilus . # Open the current filecd ~ # Switch to the current user's home directory (/home/user directory)cd . # Switch to the current directorycd - # You can enter the last directorycd / # Switch to the system root directory/pwd # Display the current pathecho "HelloWorld" # Output HelloWorld information to the consolewhich # View command location2.5, Editor
2.5.1, vim
vim is an upgraded version of vi. The most common difference is that it can display some special information of system files in multiple colors.
- Installation command
xxxxxxxxxxsudo apt install vim
- Three main modes
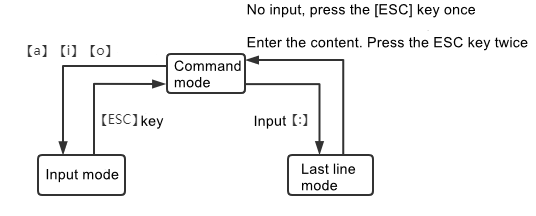
Command mode (edit mode): default mode, move cursor, cut/paste text (interface performance: file name is displayed in the lower left corner or is empty) Insert mode (input mode): modify text (interface performance: —INSERT– is displayed in the lower left corner) In insert mode, press the ESC key to return to command mode Last line mode (extended mode): save, exit, etc. (interface performance: —VISUAL– is displayed in the lower left corner) In last line mode, press the ESC key twice in a row to return to last line mode
- Mode switching
Command mode switches to edit mode
xxxxxxxxxxi # Insert mode to enter edit modea # Append mode to enter edit modeo # Start editing at the beginning of the next line of the current lineO # Start editing at the beginning of the previous line of the current lineCommand mode switches to last line mode
xxxxxxxxxx: # Enter a colon [:]Switch from last line mode to command mode: press [esc]
Switch from edit mode to command mode: press [esc]
Esc key: exit to current mode
Esc key: always return to command mode
- Last line mode
xxxxxxxxxxw # Saveq # Exitq! # Force exitx # Save and exitset nu # Display line numberset # nonu Hide line number0,$d # vim deletes all file contents:/string # Search for string string from the cursor backwards; press n to locate the next one, and shfit+n to locate the previous one.g/string # Search for string. Make the cursor stop at the beginning of the first line of string found.- Command mode
xxxxxxxxxxyy # copyp # paste3yy # copy 3 lines2p # paste twicedd # cut3dd # cut 3 linesu # undoCtrl + r # reverse undodd # delete current linedG # delete current line to the end of the filedH # delete current line to the beginning of the filegg # jump to the first line of the current documentG # jump to the last line of the current document^ # jump to the beginning of the current line$ # jump to the end of the current lineh # move left one characterj # move down one linek # move up one linel # move right one characterPageDown (or Ctrl+F) # scroll down one screenPageUp (or Ctrl+B) # scroll up one screen2.5.2, nano
nano is a text editor for Unix and Unix-like systems, a copy of Pico.
- Installation
xxxxxxxxxxsudo apt install nano
Create/Open File
xxxxxxxxxxnano path + file nameFor example: nano test_nano.txt
Control Commands
xxxxxxxxxxCtrl+v # Next pageCtrl+y # Previous pageCtrl+w # Search for a word or phraseCtrl+x # Close current text, exit nano, return to shellCtrl+\ # Search and replaceCtrl+k # Cut text lineCtrl+u # Paste text lineCtrl+c # Display cursor position in text2.5.3, gedit
The usage of gedit is not much different from Notepad in Windows.
In the editor, we can click the "Open" button to browse the list of recently opened files and open the file; click the "Save" button to save the file currently being edited; click the menu bar on the right to perform more operations, etc. The shortcut keys are the same as those in Windows:
xxxxxxxxxxCtrl + s to save the fileCtrl + Shift + s to save asCtrl + f to search for text contentThe gedit editor must be started when the interface can be displayed. It cannot be started remotely without an interface such as ssh, jupyter, putty, etc.
2.6, Ubuntu software operation commands
sudo apt-get update # Update sourcesudo apt-get install package # Install packagesudo apt-get remove package # Delete packagesudo apt-cache search package # Search for software packagesudo apt-cache show package # Get package information, such as description, size, version, etc.sudo apt-get install package --reinstall # Reinstall packagesudo apt-get -f install # Repair installationsudo apt-get remove package --purge # Delete package, including configuration files, etc.sudo apt-get build-dep package # Install related compilation environmentsudo apt-get upgrade # Update installed packagessudo apt-get dist-upgrade # Upgrade systemsudo apt-cache depends package # Understand which packages the package depends onsudo apt-cache rdepends package # View which packages the package depends onsudo apt-get source package # Download the source code of the packagesudo apt-get clean && sudo apt-get autoclean # Clean up useless packagessudo apt-get check # Check for damaged dependencies