Welcome to RDK X5 Robot repository
5. QR code creation and recognition
QR code creation and recognition
QR code creation and recognition5.1. QR QR code5.1.1. Introduction to QR QR code5.1.2. QR QR code structure5.1.3. Characteristics of QR QR code5.2, Program Function Description5.3, Program code reference path5.4, Program Startup5.4.1, Create QR Code5.4.2, QR code recognition5.5, core source code analysis5.5.1、QRcode_Create.py5.5.2, QRcode_Parsing.py
5.1. QR QR code
5.1.1. Introduction to QR QR code
QR code is a type of two-dimensional barcode. QR comes from the abbreviation of "Quick Response" in English, which means quick response. It comes from the inventor's hope that QR code can allow its content to be decoded quickly. QR code not only has large information capacity, high reliability and low cost, but also can represent a variety of text information such as Chinese characters and images. It has strong confidentiality and anti-counterfeiting properties and is very convenient to use. More importantly, the QR code technology is open source.
5.1.2. QR QR code structure
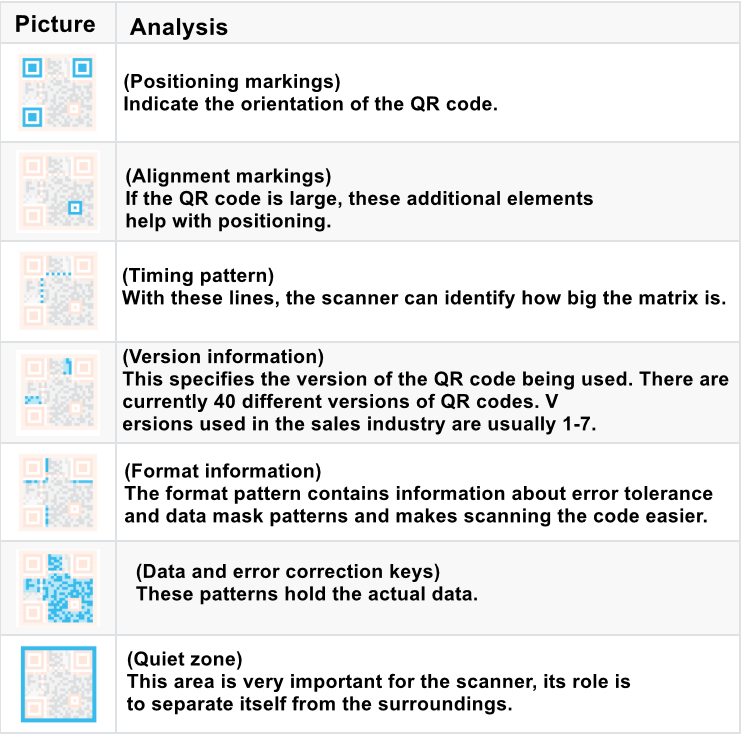
5.1.3. Characteristics of QR QR code
The data value in the QR code contains repeated information (redundant value). Therefore, even if up to 30% of the QR code structure is destroyed, it does not affect the readability of the QR code. The storage space of the QR code is up to 7089 bits or 4296 characters, including punctuation and special characters, which can be written into the QR code. In addition to numbers and characters, words and phrases (such as URLs) can also be encoded. As more data is added to the QR code, the code size increases and the code structure becomes more complex.
5.2, Program Function Description
After running the QR code creation program, enter the QR code content to generate a QR code image and save it locally.
After running the QR code recognition program, the created QR code image will be read and recognized, the recognition result will be output and the image will be saved locally.
The image can be visualized by configuring VSCode to connect with the car.
5.3, Program code reference path
After SSH connects to the car, the source code of this function is located at,
xxxxxxxxxx/home/sunrise/yahboomcar_ws/src/yahboomcar_astra/qrcode_examples
The command to install the required package is,
xxxxxxxxxxpython3 -m pip install qrcode pyzbarsudo apt-get install libzbar-dev
The factory system image has been installed.
5.4, Program Startup
5.4.1, Create QR Code
After SSH connects to the car, open the terminal and input,
xxxxxxxxxx#Switch to the directory where the code is locatedcd /home/sunrise/yahboomcar_ws/src/yahboomcar_astra/qrcode_examples#Run the QR code creation programpython3 QRcode_Create.pyAfter the program runs, you will be prompted to enter the generated content, and press Enter to confirm the content. Here we take the creation of the "yahboom" string as an example,

The created QR code is saved in the path,
xxxxxxxxxx/home/sunrise/yahboomcar_ws/src/yahboomcar_astra/qrcode_examples/figures/myQRcode.jpg
Remotely connect to the car in VSCode, enter the /home/sunrise/yahboomcar_ws/src/yahboomcar_astra/qrcode_examples/figures directory, you can click on the picture to view the QR code,
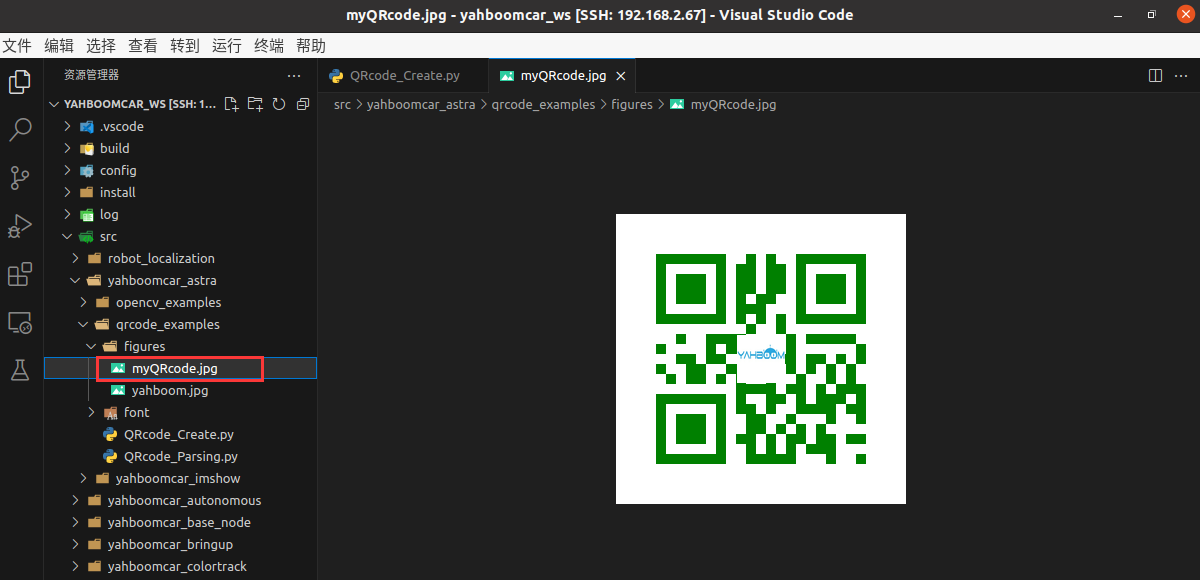
Take out your phone and try to scan the displayed QR code, the scan result will be the characters of yahboom.
5.4.2, QR code recognition
After SSH connects to the car, open the terminal and input,
xxxxxxxxxx#Switch to the directory where the code is locatedcd /home/sunrise/yahboomcar_ws/src/yahboomcar_astra/qrcode_examples#Run the QR code recognition programpython3 QRcode_Parsing.py
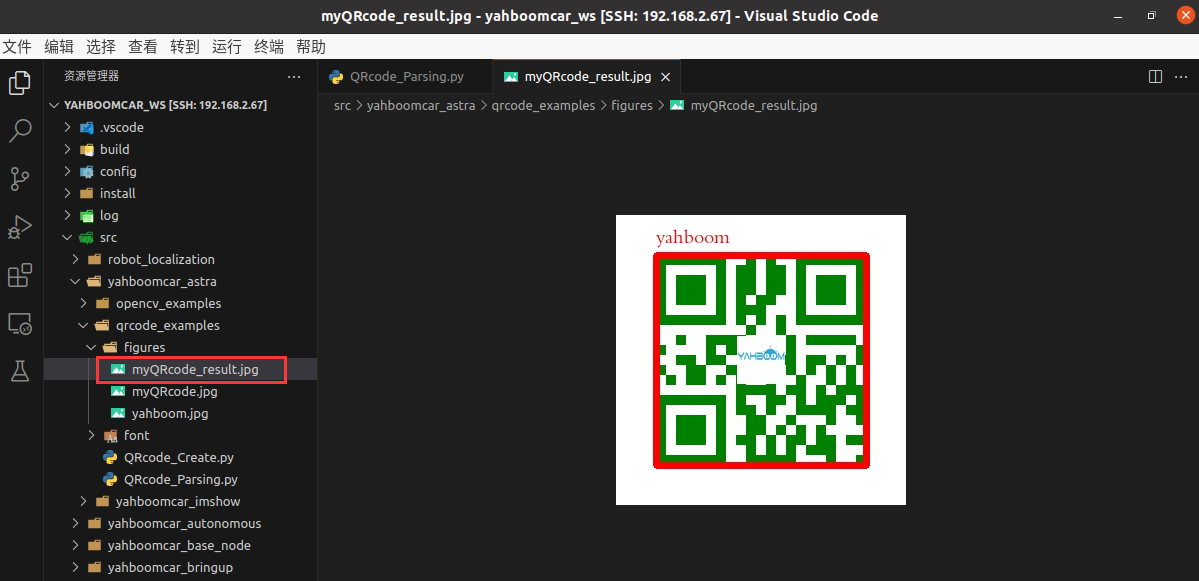
The program will print out the recognized content in the terminal and save the recognition result image to the path,
xxxxxxxxxx/home/sunrise/yahboomcar_ws/src/yahboomcar_astra/qrcode_examples/figures/myQRcode_result.jpg
SSH connect to the car in VSCode, enter the /home/sunrise/yahboomcar_ws/src/yahboomcar_astra/qrcode_examples/figures directory, you can click on the image to view the QR code,
5.5, core source code analysis
5.5.1、QRcode_Create.py
x#Create qrcode objectqr = qrcode.QRCode(version=1,error_correction=qrcode.constants.ERROR_CORRECT_H,box_size=10,border=4,)#Meaning of each parameter'''version: An integer with a value of 1 to 40, which controls the size of the QR code (the minimum value is 1, which is a 12×12 matrix).If you want the program to determine it automatically, set the value to None and use the fit parameter.error_correction: Controls the error correction function of the QR code. The following 4 constants can be used.ERROR_CORRECT_L: About 7% or less errors can be corrected.ERROR_CORRECT_M (default): About 15% or less errors can be corrected.ERROR_CORRECT_H: About 30% or less errors can be corrected.box_size: controls the number of pixels contained in each small grid in the QR code.border: controls the number of grids contained in the border (the distance between the QR code and the image border) (the default is 4, which is the minimum value specified by the relevant standards)'''
# Generate imageimg = qr.make_image(fill_color="green", back_color="white")# Add dataqr.add_data(data)# Fill dataqr.make(fit=True)# Add logomy_file = Path(logo_path)if my_file.is_file(): img = add_logo(img, logo_path)5.5.2, QRcode_Parsing.py
def decodeDisplay(image, font_path):gray = cv.cvtColor(image, cv.COLOR_BGR2GRAY)# You need to convert the output Chinese characters into Unicode encoding format firstbarcodes = pyzbar.decode(gray)for barcode in barcodes:# Extract the position of the bounding box of the QR code(x, y, w, h) = barcode.rect# Draw the bounding box of the barcode in the imagecv.rectangle(image, (x, y), (x + w, y + h), (225, 0, 0), 5)encoding = 'UTF-8'# Draw it, you need to convert it into a string firstbarcodeData = barcode.data.decode(encoding)barcodeType = barcode.type# Draw the data and type on the imagepilimg = Image.fromarray(image)# Create a brushdraw = ImageDraw.Draw(pilimg)# Parameter 1: font file path, parameter 2: font sizefontStyle = ImageFont.truetype(font_path, size=20, encoding=encoding)# Parameter 1: print coordinates, parameter 2: text, parameter 3: font color, parameter 4: fontdraw.text((x, y - 30), str(barcode.data, encoding), fill=(0, 0, 255), font=fontStyle)# Convert PIL image to cv2 imageimage = np.array(pilimg)# Print barcode data and barcode type to the terminalprint("[INFO] Found {} barcode: {}".format(barcodeType, barcodeData))return image