Welcome to MSPM0 Smart Robot Car repository
2.K210 color tracking
K210 Color Tracking
K210 Color Tracking1. Hardware Connection2. Code Analysis3. Main Functions4. K210 Method for Extracting Specified Color LAB Thresholds5. K210 Program Burning6. Experimental Phenomena
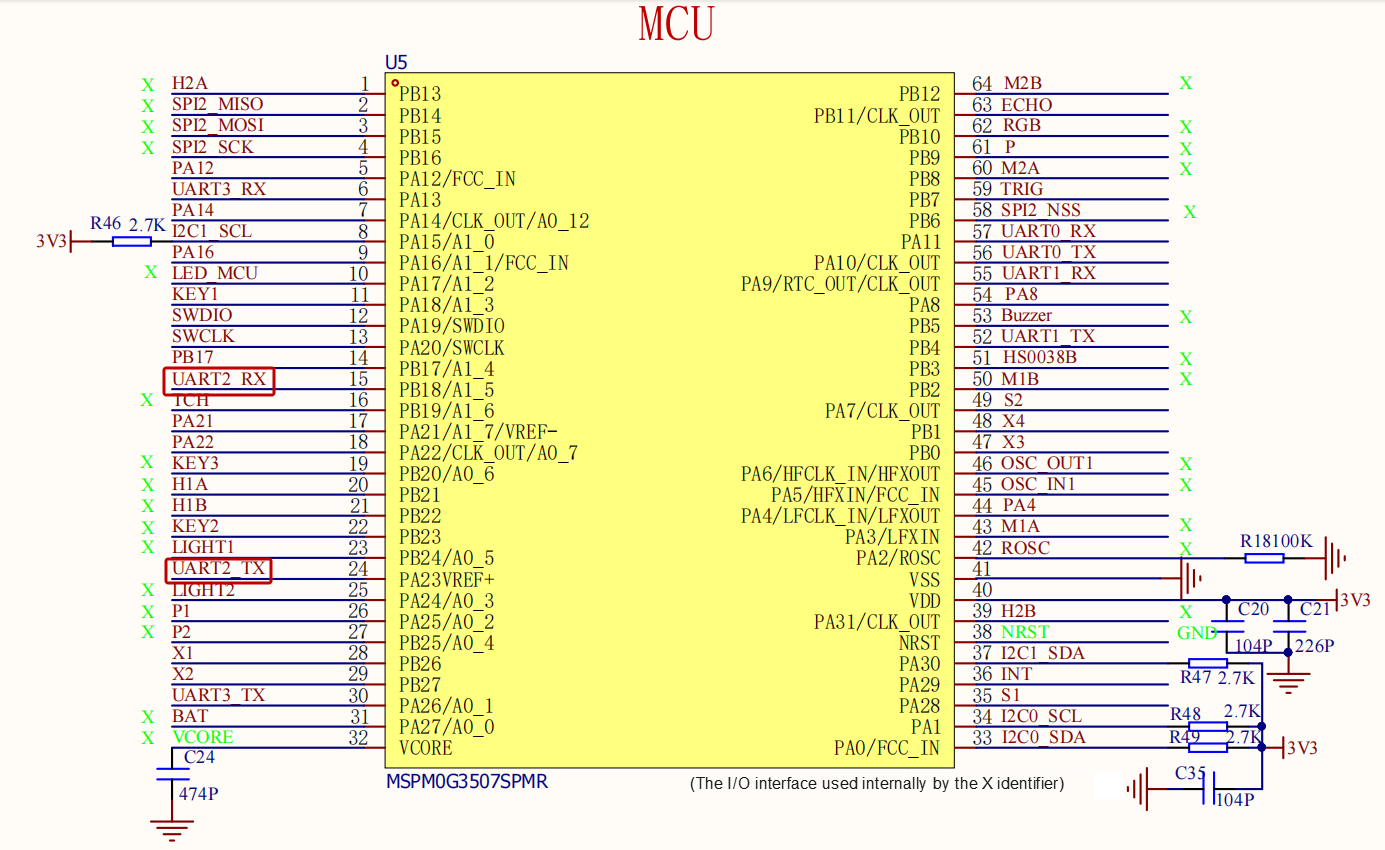
1. Hardware Connection
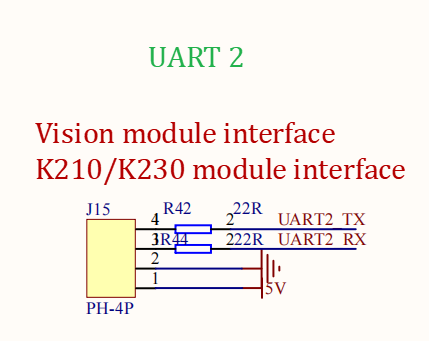
| K210 Vision Module | MSPM0G3507 |
|---|---|
| 5V | 5V |
| GND | GND |
| RX | TX2 |
| TX | RX2 |
Physical Connection

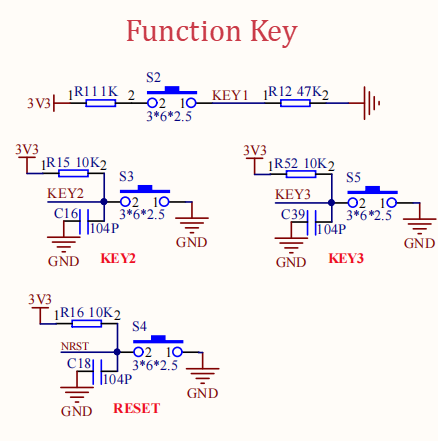
Schematic Diagram
2. Code Analysis
Control Principle
K210 Protocol
| Experiment Routine | Start Symbol | Length | Routine Number | Routine Group | Data Amount | x | Separator | y | Separator | w | Separator | h | Separator | Checksum | End Symbol |
|---|---|---|---|---|---|---|---|---|---|---|---|---|---|---|---|
| Color Recognition | $ | XX | 01 | BB | 04 | XXX | , | XXX | , | XXX | , | XXX | , | XX | # |
Control Flow Chart
bsp_k210_use.c
xxxxxxxxxx// 处理K210发来的单字节数据 / Process single byte data from K210void recv_k210msg(uint8_t recv_msg) { // 检测包头'$',开始接收新消息 / Detect packet header '$', start receiving new message if (recv_msg == '$') { new_flag = 1; } // 检测包尾'#',结束接收并校验 / Detect packet tail '#', end reception and verify if(recv_msg == '#' ) { if( buf_len == r_index) // 数据长度匹配 / Data length matches { new_flag = 0; tou_flag = 0; len_flag = 0; // 校验和计算:减去接收的校验和字节 / Checksum calculation: subtract received checksum byte buf_crc -= buf_msg[r_index-1]; buf_crc %= 256; if(buf_crc == buf_msg[r_index-1]) // 校验正确 / Checksum correct { deal_recvmsg(); // 处理接收数据 / Process received data } else // 校验失败 / Checksum failed { r_index = 0; buf_crc = 0; } } } // 正在接收新消息时的处理逻辑 / Processing logic when receiving new message if(new_flag == 1 ) { // 首次接收包头 / First time receiving packet header if(recv_msg == '$' && tou_flag == 0) { tou_flag = 1; } else { // 存储数据并递增索引 / Store data and increment index buf_msg[r_index++] = recv_msg; buf_crc += recv_msg; // 未获取长度时,从首字节读取长度 / When length not obtained, read length from first byte if(len_flag == 0) { buf_len = buf_msg[0]; len_flag = 1; } } }}// 解析接收的完整消息 / Parse received complete messagevoid deal_recvmsg(void){ //长度校验 / Length verification if(r_index!=buf_len) { buf_len = 0; return ; } // 提取有效数据(过滤逗号) / Extract valid data (filter commas) for(index = 0 ;index<number;index++) { if(buf_msg[4+index] == 0x2c && i_duo ==0)//遇到逗号且未过滤 / Encounter comma and not filtered { i_duo = 1; continue; } data[data_i++]=buf_msg[4+index];//存储有效数据 / Store valid data i_duo =0; } // 重置接收状态 / Reset receive state buf_crc = 0; r_index = 0; memset(buf_msg,0,sizeof(buf_msg)); // 处理解析后的数据 / Process parsed data deal_data(eg_num); k210部分源码
xxxxxxxxxx# 数据发送函数(按自定义串口协议封装坐标、尺寸和消息,生成可直接发送的完整协议帧) / Data sending function (encapsulates coordinates, dimensions and messages according to custom serial protocol, generates complete protocol frame ready for sending)def send_data(x, y, w, h, msg): start = 0x24 # 帧头(对应ASCII字符'$'),标识协议帧的开始 / Frame header (corresponds to ASCII character '$'), marks start of protocol frame end = 0x23 # 帧尾(对应ASCII字符'#'),标识协议帧的结束 / Frame footer (corresponds to ASCII character '#'), marks end of protocol frame length = 5 # 基础长度(初始值=5,包含后续4个固定字段+1个校验位占位) / Base length (initial value=5, contains 4 fixed fields + 1 checksum placeholder) class_num = 0x01 # 例程编号(固定为0x01,与接收端约定的功能标识,颜色识别) / Routine number (fixed as 0x01, function identifier agreed with receiver, color recognition) class_group = 0xBB # 例程组(固定为0xBB,与接收端约定的功能分类标识) / Routine group (fixed as 0xBB, function group identifier agreed with receiver) data_num = 0x00 # 数据量(初始为0,后续统计实际封装的数据元素个数) / Data amount (initial 0, will count actual encapsulated data elements later) fenge = 0x2C # 分隔符(对应ASCII字符','),用于区分不同数据段,方便接收端解析 / Separator (corresponds to ASCII character ','), used to distinguish different data segments for easy receiver parsing crc = 0 # 校验和(初始为0,用于验证数据完整性,防止传输错误) / Checksum (initial 0, used to verify data integrity and prevent transmission errors) data = [] # 数据列表(存储待封装的坐标、尺寸、消息等实际数据) / Data list (stores actual data to be encapsulated like coordinates, dimensions, messages) ... if x == 0 and y == 0 and w == 0 and h == 0: pass else: # 封装x坐标(小端模式:低位字节在前,高位字节在后) / Encapsulate x coordinate (little-endian: low byte first, high byte second) low = x & 0xFF # 取x的低8位 / Get low 8 bits of x high = x >> 8 & 0xFF # 取x的高8位 / Get high 8 bits of x data.extend([low, fenge, high, fenge]) # 按「低位,高位,」格式添加到数据列表 / Add to data list in "low,high," format low = y & 0xFF high = y >> 8 & 0xFF data.extend([low, fenge, high, fenge]) low = w & 0xFF high = w >> 8 & 0xFF data.extend([low, fenge, high, fenge]) low = h & 0xFF high = h >> 8 & 0xFF data.extend([low, fenge, high, fenge]) # 若消息不为空,遍历字符并转换为十进制后封装 / If message not empty, iterate through characters and convert to decimal before encapsulation if msg is not None: for i in range(len(msg)): hec = str_int(msg[i]) # 调用str_int函数,将单个字符转为十进制 / Call str_int function to convert single character to decimal data.extend([hec, fenge]) data_num = len(data) # 更新数据量(数据列表的元素总数) / Update data amount (total elements in data list) length += data_num # 更新总长度(基础长度+数据列表长度) / Update total length (base length + data list length) # 组装核心数据段(不含帧头、帧尾、校验和的中间数据) / Assemble core data segment (middle data excluding frame header, footer, checksum) send_merr = [length, class_num, class_group, data_num] # 添加实际数据 / Add actual data send_merr.extend(data) # 计算校验和(对核心数据段所有元素求和,对256取模确保结果在0-255范围) / Calculate checksum (sum all elements of core data segment, modulo 256 to ensure result in 0-255 range) for i in range(len(send_merr)): crc += send_merr[i] crc = crc % 256 # 组装完整协议帧(帧头 + 核心数据段 + 校验和 + 帧尾) / Assemble complete protocol frame (frame header + core data segment + checksum + frame footer) send_merr.insert(0, start) send_merr.append(crc) send_merr.append(end) ... # 定义颜色阈值(LAB格式) / Define color thresholds (LAB format)red_threshold = (30, 100, 40, 80, 10, 70)green_threshold = (50, 70, -55, -35, 10, 30)blue_threshold = (35, 74, -128, 53, -65, -20)# 目标颜色阈值(初始使用红色) / Target color threshold (initially use red)target_threshold = list(red_threshold)3. Main Functions
Color_Trace
| Function Prototype | void Color_Trace(int x, int y, int w, int h) |
|---|---|
| Function Description | Target tracking control function based on color recognition: when target area width and height are not 0, applies first-order low-pass filtering to target center X coordinate and area, calculates X direction (left-right) position deviation and Y direction (forward-backward) area deviation, after PID calculation and limiting, controls car movement through Motion_Car_Control; if target area width and height are 0, stops car |
| Input Parameters | x: Target area top-left X coordinate y: Target area top-left Y coordinate w: Target area width h: Target area height |
| Return Value | None |
BSP_Loop
| Function Prototype | void BSP_Loop(void) |
|---|---|
| Function Description | Main loop function: enables motor control, displays x, y, w, h parameters of k210_msg on OLED, calls Color_Trace function to implement color tracking control based on target area parameters |
| Input Parameters | None |
| Return Value | None |
4. K210 Method for Extracting Specified Color LAB Thresholds
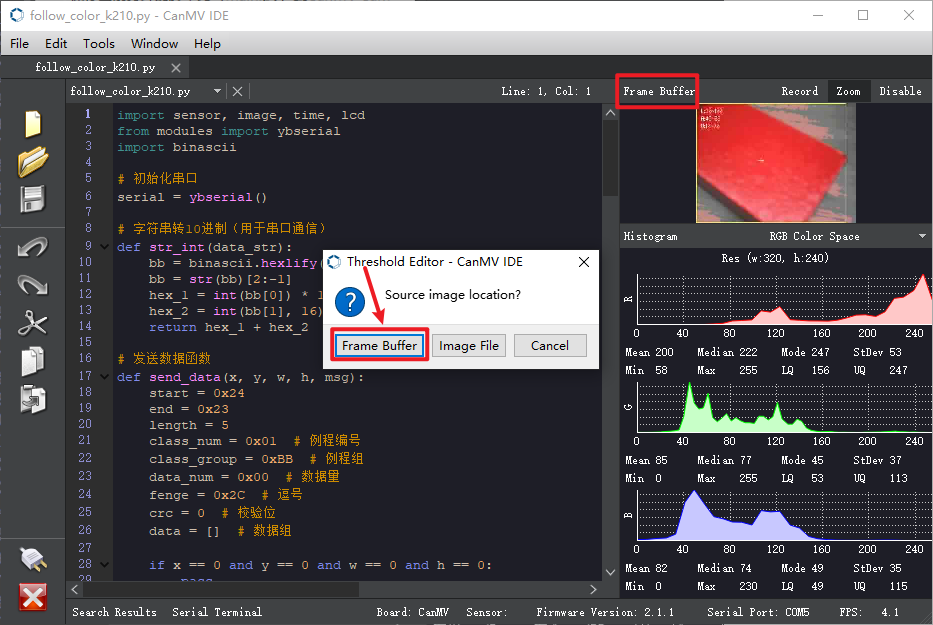
After connecting to CanMV IDE via micro USB, drag follow_color_k210.py to CanMV IDE to open it, then need to first click the run button, ensure the color to be recognized appears in the frame buffer, here using red as an example, click menu bar Tools -> Machine Vision -> Threshold Editor, get image from frame buffer
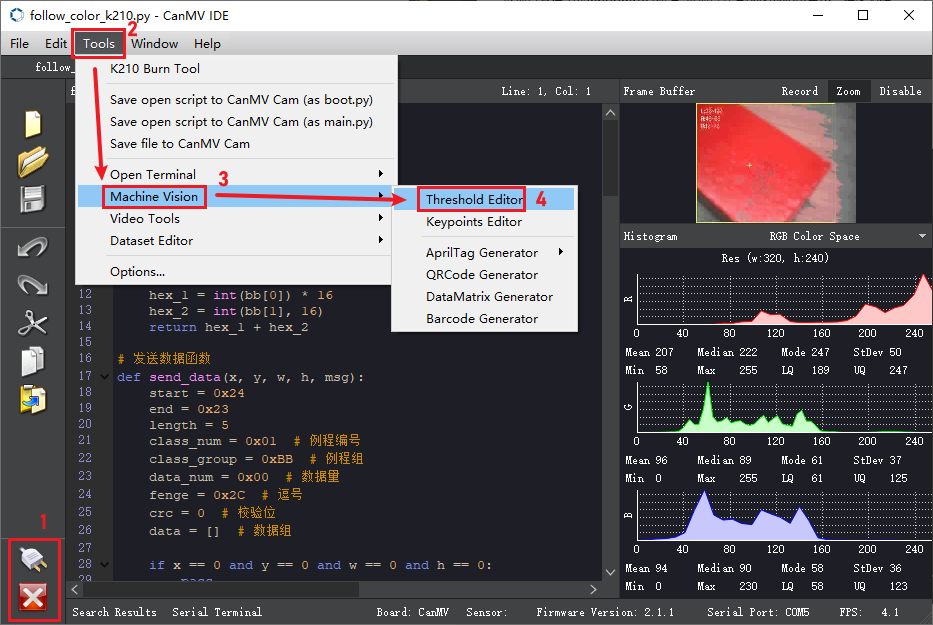
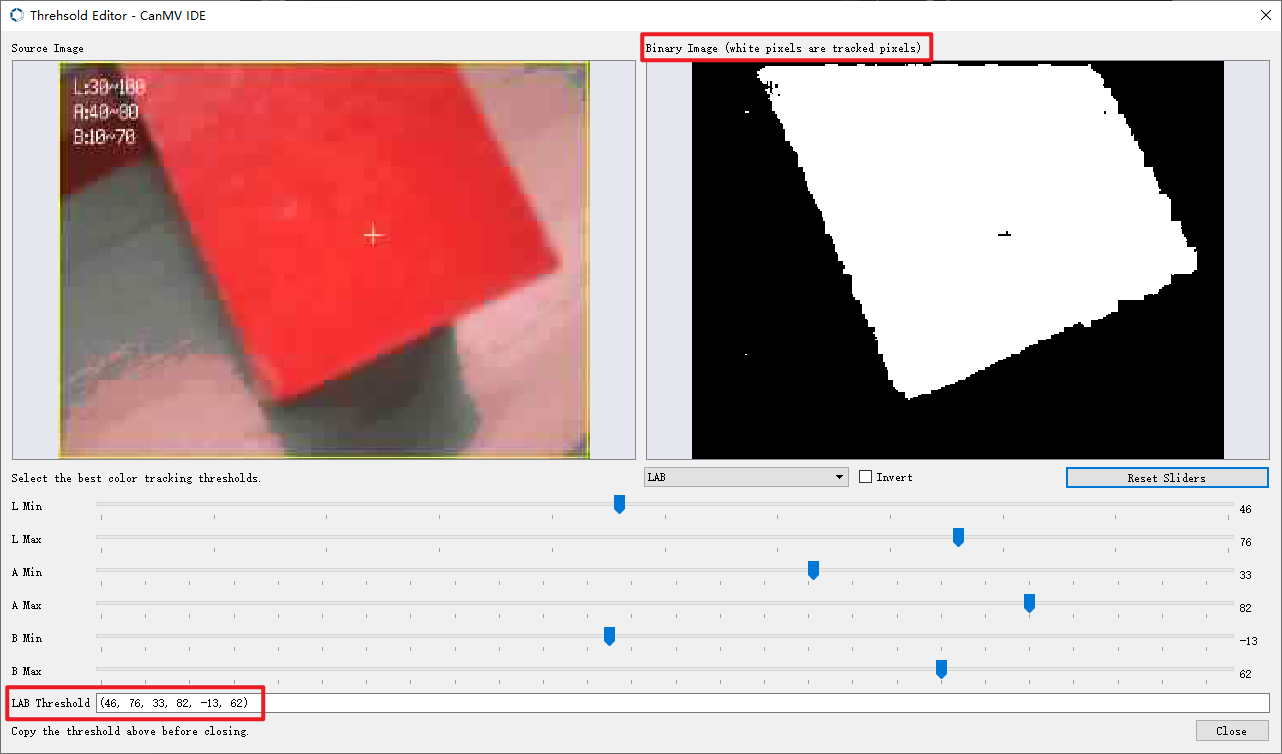
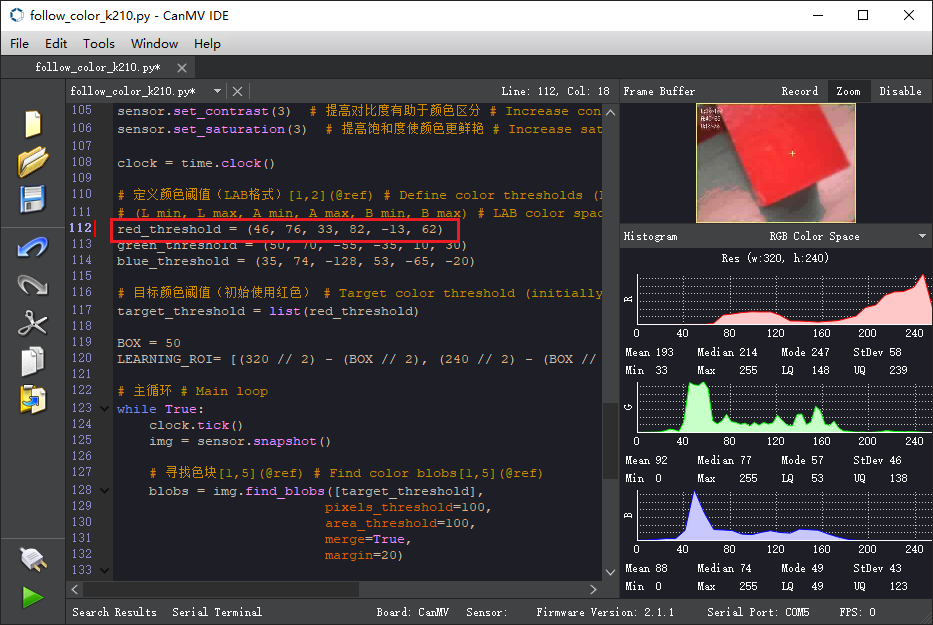
You can manually drag the slider positions to adjust thresholds, white pixels are tracked, finally fill in the LAB thresholds to our color thresholds
5. K210 Program Burning
After downloading and opening CanMV IDE, we need to first drag the follow_color_k210.py file from the k210 source code provided in this course to CanMV IDE to open it, then connect the IDE, here using helloworld.py as example
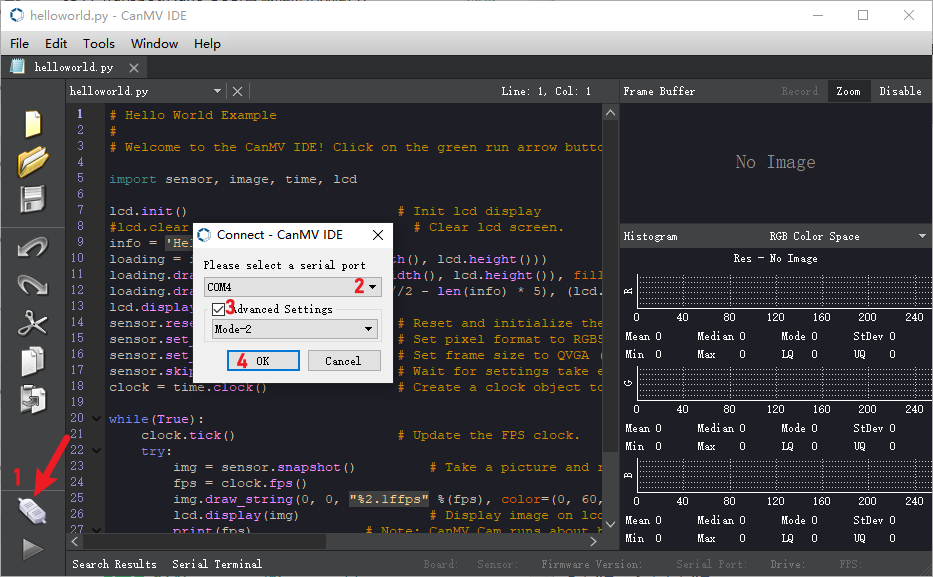
After successful IDE connection, the phenomenon is as follows
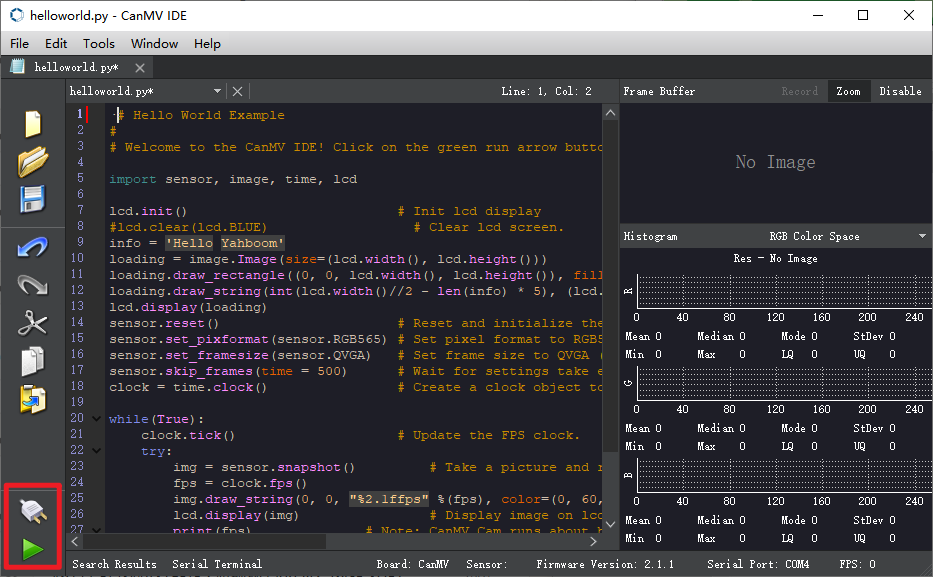
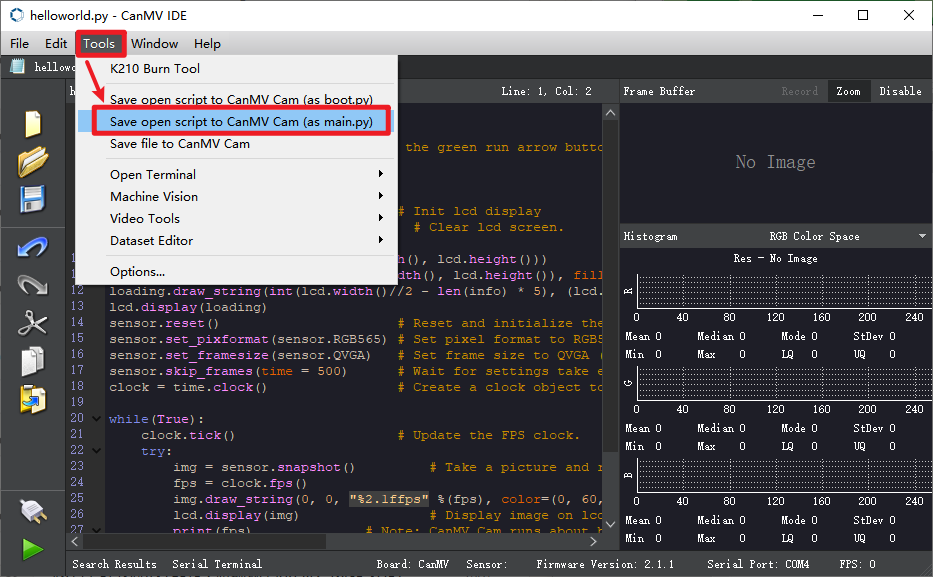
Here we use helloworld.py as an example, open the top menu bar Tools -> Save currently open script as (main.py) to CanMV Cam
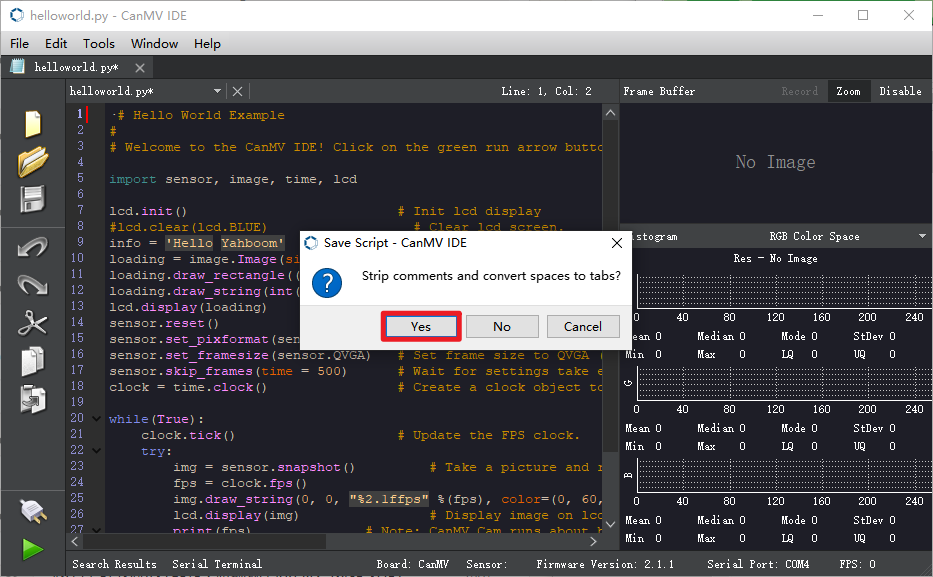
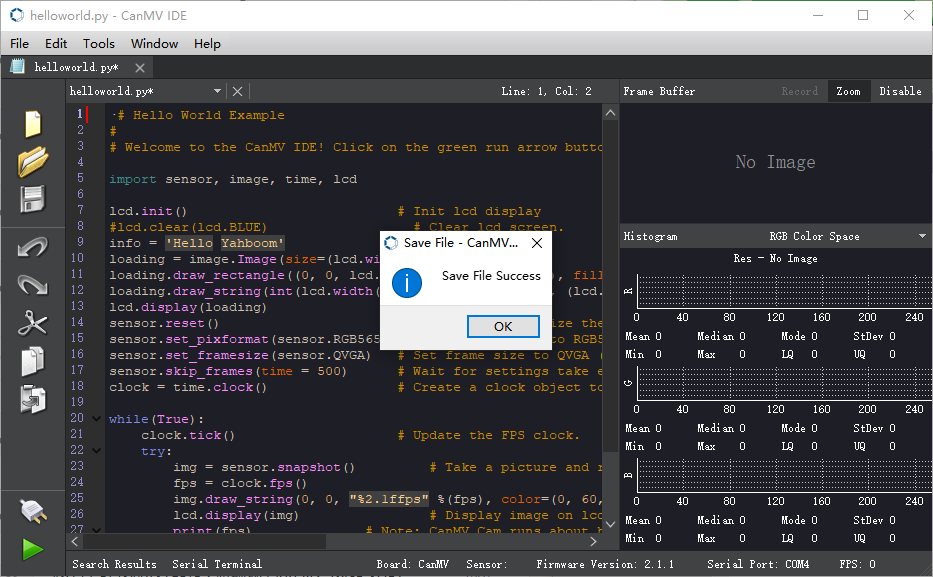
Both Yes/No can be selected here. When the following status appears, the write is successful.
6. Experimental Phenomena
After burning the program, the car will follow red color blocks by default. When the color is far from the car, the car moves forward; when the color is close to the car, the car moves backward; when the color moves left/right, the car also follows left/right, keeping the recognized color in the center of the screen. It is recommended not to move the color block too quickly, otherwise it may leave the recognition area.