yahboom
HomeLearn
Solution
Blog
Online Store
About Us
EN/中文
Jetson AGX Thor📖
1.Get started
  • 01.Learning Route
  • 02.Getting Started Quickly
2.Jetson basic course
  • 01.Jetson board introduction
  • 02.Flashing a Pure Jetson System via SDK
  • 03.Flashing a Pure Jetson System via USB Drive
  • 04.Flashing the Jetson Bootloader using L4T
  • 05.Replacing the SSD
  • 06.Install Jetpack environment
  • 07.Backup SSD system
  • 08.Restore factory image system
  • 09.SSD expansion
  • 10.SSD Speed Test
3.Basic setting course
  • 01.Basic knowledge
  • 02.Network configuration
  • 03.SSH remote login
  • 04.VNC remote control
  • 05.Remote file transfer
  • 06.Jtop tool
  • 07.Exchange space expansion
  • 08.Use VSCode
  • 09.Use VMware
  • 10.Change screen resolution
  • 11.Virtual Desktop
  • 12.Set root user password
  • 13.Configure sudo passwordless operation
  • 14.Managing custom services
  • 15.View system version information
4.OpenCV basic course
  • 01.Image reading
  • 02.Image saving
  • 03.Image modification
  • 04.Image scaling
  • 05.Image cropping
  • 06.Image translation
  • 07.Image mirroring
  • 08.Image grayscale conversion
  • 09.Image binarization
  • 10.Image edge detection
  • 11.Add line segments
  • 12.Add rectangles
  • 13.Add circular shape
  • 14.Add ellipses
  • 15.Add polygons
  • 16.Add Text
5.Vision basic course
  • 01.USB camera preview
  • 02.Use Jupyter Lab
  • 03.Use JetCam
6.Vision advanced course
01.Environment construction
  • 01.TensorFlow
  • 02.PyTorch
  • 03.Torchvision
  • 04.Torchaudio
02.DeepStream development
  • 01.DeepStream environment
  • 02.Four types of detection(traffic)
03.YOLO26 development
  • 01.YOLO Environment Setup
  • 02.CLI Usage
  • 03.Object Detection
  • 04.Instance Segmentation
  • 05.Pose Estimation
  • 06.Image Classification
  • 07.Oriented Bounding Boxes Object Detection
  • 08.Model Conversion
  • 09.Dataset Annotation
  • 10.Model Training_Conversion
  • 11.Model Prediction
04.Mediapipe development
  • 01.Mediapipe environment
  • 02.Hand detection
  • 03.Face detection
  • 04.Face effects
  • 05.3D object recognition
  • 06.Virtual brush
  • 07.Gesture recognition
  • 08.Finger control
  • 09.Posture estimation
  • 10.Face mask
  • 11.Overall detection
  • 12.Green scene removal(Human)
05.QR code recognition
  • 01.Barcode Recognition
  • 02.QR Code Recognition
  • 03.Machine Code Recognition
  • 04.Handwritten Digit Recognition
7.Docker basic course
  • 01.Docker introduction
  • 02.Docker installation
  • 03.Docker command
  • 04.Docker usage
  • 05.Docker interaction
8.ROS2-jazzy
1.ROS2 basic course
  • 1.Introduction to ROS2
  • 2.ROS2 install Jazzy
  • 3.ROS2 development environment
  • 4.ROS2 workspace
  • 5.ROS2 function package
  • 6.ROS2 node
  • 7.ROS2 topic communication
  • 8.ROS2 service communication
  • 9.ROS2 action communication
  • 10.ROS2 custom interface message
  • 11.ROS2 parameter service case
  • 12.ROS2 meta-function package
  • 13.ROS2 distributed communication
  • 14.ROS2 DDS
  • 15.ROS2 time related API
  • 16.ROS2 common command tools
  • 17.ROS2 rviz2 use
  • 18.ROS2 rqt toolbox
  • 19.ROS2 Launch startup file configuration
  • 20.ROS2 recording and playback tool
  • 21.ROS2 URDF model
  • 22.ROS2 Gazebo simulation platform
  • 23.ROS2 TF2 coordinate transformation
2.ROS2 vision course
  • 01.Camera preview (USB)
  • 02.Camera calibration (USB)
  • 03.AR vision (USB)
9.Offline AI model course
Offline large model (Text Interaction)
  • 1.Al large model environment deployment
  • 2.Install large model dialogue platform
  • 3.Meta Al Llama3.2 model
  • 4.Alibaba Cloud Qwen3 model
  • 5.Microsoft Phi-4-mini model
  • 6.DeepSeek DeepSeek-R1 model
  • 7.Alibaba Cloud Qwen2.5v visual multimodal large model
  • 8.Google Gemma3 visual multimodal large model
  • 9.Lava visual multimodal large model
  • 10.MiniCPM-V visual multimodal large model
  • 11.Multimodal visual understand application
  • 12.Multimodal text image application
  • 13.Multimodal video analysis application
  • 14.Multi module visual position application
  • 15.Multimodal table scanning application
  • 16.Multimodal autonomous agent application
Offline large model (Voice Interaction)
  • 0.Voice interaction hardware connection (ReadMe)
  • 1.Offline speech to text (ASR)
  • 2.Offline text to speech (TTS)
  • 3.AI large model voice interaction
  • 4.Multimodal visual understand speech interaction
  • 5.Multimodal text and graphics application
  • 6.Multimodal video analysis application
  • 7.Multi module visual position application
  • 8.Multimodal table scanning application
  • 9.Multimodal autonomous proxy application
  • 10.AI large model offline voice assistant
10.Online AI model course
Online large model (Text Interaction)
  • 1.OpenRouter large model API aggregation platform
  • 2.Multimodal Video Analysis Applications
  • 3.Multimodal visual localization application
  • 4.Multimodal table scanning application
  • 5.Multimodal autonomous proxy application
Online large model (Voice Interaction)
  • 0.Voice interaction hardware connection (ReadMe)
  • 1.Online speech to text (ASR)
  • 2.Online text to speech (TTS)
  • 3.AI large model voice interaction
  • 4.Multimodal visual understand speech interaction
  • 5.Multi module visual position application
  • 6.Multimodal table scanning application
  • 7.Multimodal autonomous proxy application
  • 8.AI large model offline voice assistant
11.Generative AI Applications
12.OpenClaw Advanced Development
  • 00.OpenClaw Quick Start on Jetson Platform
  • 01.OpenClaw Installation
  • 02.OpenClaw Online Platform Deployment
  • 03.OpenClaw Local Model Deployment
  • 04.OpenClaw TUI Interaction
  • 05.OpenClaw WebChat Interaction
  • 06.OpenClaw Tools Introduction
  • 07.OpenClawGate Gateway User Manual
  • 08.OpenClaw Features Overview
  • 09.OpenClawClawHub Introduction (Skill Installation)
  • 10. OpenClaw Switching Models
  • 11.OpenClaw Application - File Management
  • 12.OpenClaw Application - Camera
  • 13.OpenClaw Application - Browser Control
  • 14.OpenClaw Application - Script Execution
  • 15.OpenClaw Application - AI Programming
  • 16.OpenClaw Application - Dedicated AI Assistant
  • 17.OpenClaw WhatsApp Plugin Application
  • 18.OpenClaw Voice Assistant
Download
  • Code
  • SystemFile
  • VM_File
  • Tools
  • Jetson boot files
Download ZIP

Welcome to Jetson AGX Thor repository

02.Flashing a Pure Jetson System via SDK

Flashing a Pure Jetson System via SDK

Flashing a Pure Jetson System via SDK1. Hardware Connections1.1. Installing the SSD1.2. Motherboard Connections1.3. Entering Flash Mode2. Software Connection3. Using SDK Manager3.1. SDK Manager Download3.2. SDK Manager Installation3.3. Launching and Logging In3.4. Board Selection3.5. STEP 13.6. STEP 23.7. STEP 33.8. STEP 44. Booting the System4.1. Normal Mode4.2. Starting the System4.3. System SetupFrequently Asked Questions (FAQ)Device Not Recognized

Note: This tutorial will erase all data on the NVMe SSD and reallocate the disk space. The optional 2TB SSD available for purchase comes pre-installed with a factory image; this image contains the official NVIDIA operating system and the motherboard environment. Unless you specifically require a pure system installation, please do not proceed with this operation!

1. Hardware Connections

1.1. Installing the SSD

The M.2 NVMe SSD interface is located on the underside of the Jetson AGX Thor. By default, one SSD is already installed on the motherboard, as shown in the figure below.
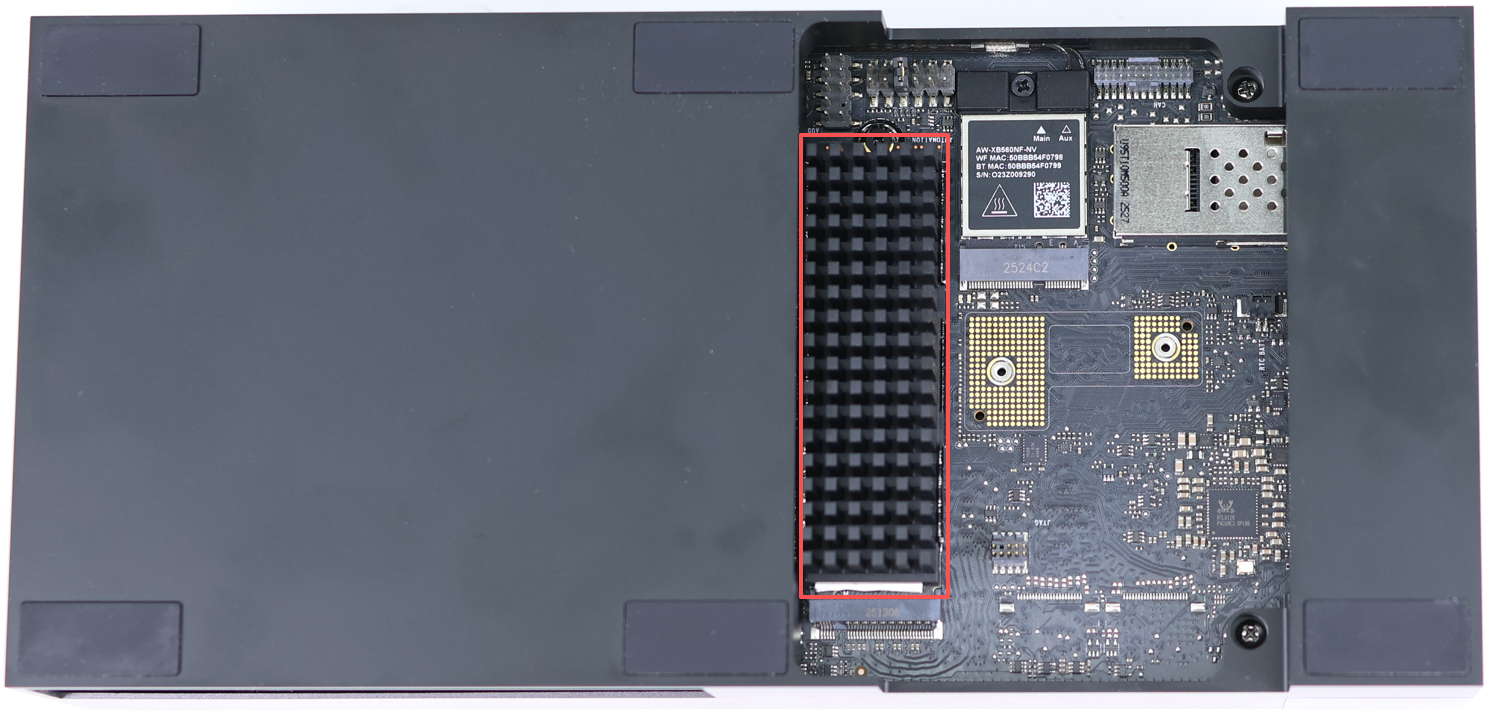
image-20260408194836578

1.2. Motherboard Connections

The Jetson AGX Thor motherboard requires connection to both a power adapter and a Type-C data cable. The Type-C cable serves as the data transmission link; one end should be connected to a USB port on your computer, while the other end must be connected to the specific Type-C port located right next to the HDMI port on the Jetson AGX Thor motherboard.
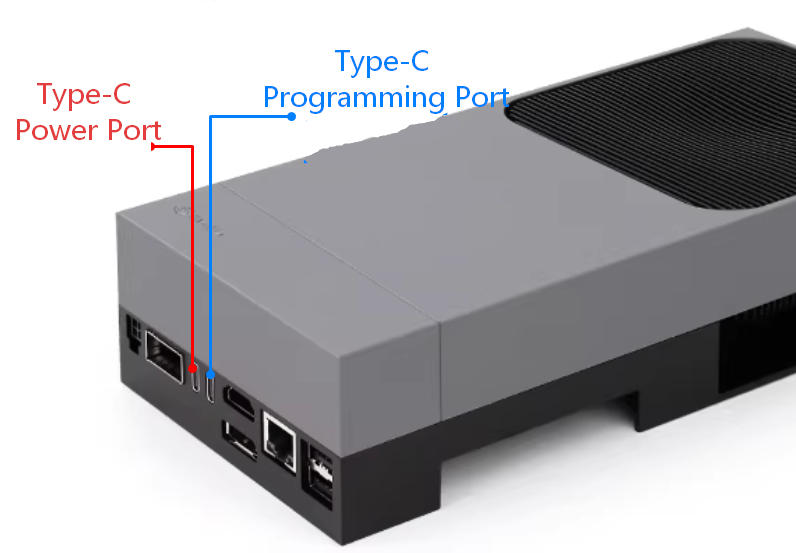
image-20260408204403152

1.3. Entering Flash Mode

Connect the power adapter to the Jetson AGX Thor motherboard. Locate the three buttons at the rear of the board: press and hold the "Flash" button, then briefly press the "Reset" button. Wait for 3 seconds before releasing the "Flash" button to enter Flash Mode.

As shown in the figure below, the three buttons—from left to right—are the Power button, the Flash button, and the Reset button.
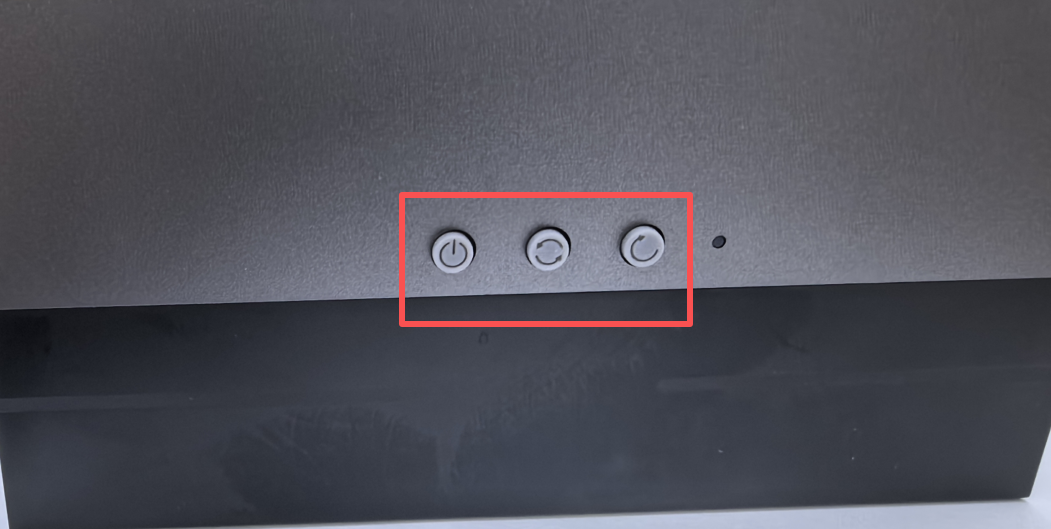
image-20260408195617792

Open a terminal window to check for connected USB devices. If the entry [ID 0955:7026 NVIDIA Corp. APX] appears, the connection has been successfully established.

lsusb
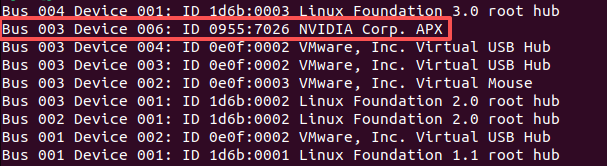
image-20260409201832941


2. Software Connection

This tutorial utilizes VMware Workstation 17 Pro for the system flashing process.

After launching the virtual machine, navigate to the menu bar and select: Virtual Machine → NVIDIA APX → Verify Connection Status.
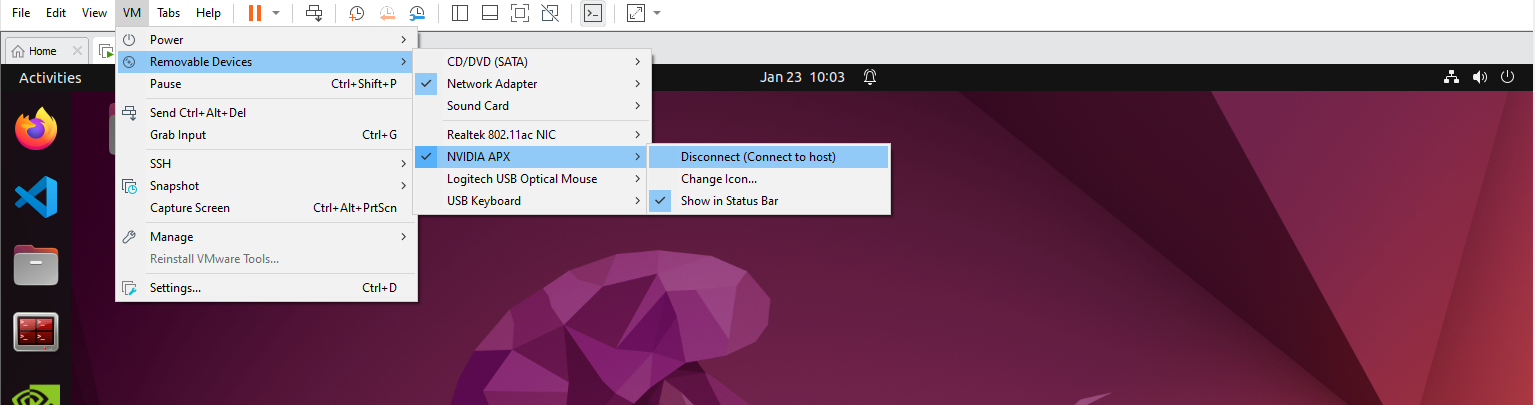
image-20250109183529848

3. Using SDK Manager

To use SDK Manager, you must register an account and log in beforehand. Please complete the account registration and login steps independently.

xxxxxxxxxx
When using our virtual machine images, installing the SDK Manager is not required; however, if you encounter issues updating the SDK Manager, you can follow the tutorial below to reinstall it.

3.1. SDK Manager Download

Official Website: https://developer.nvidia.com/sdk-manager
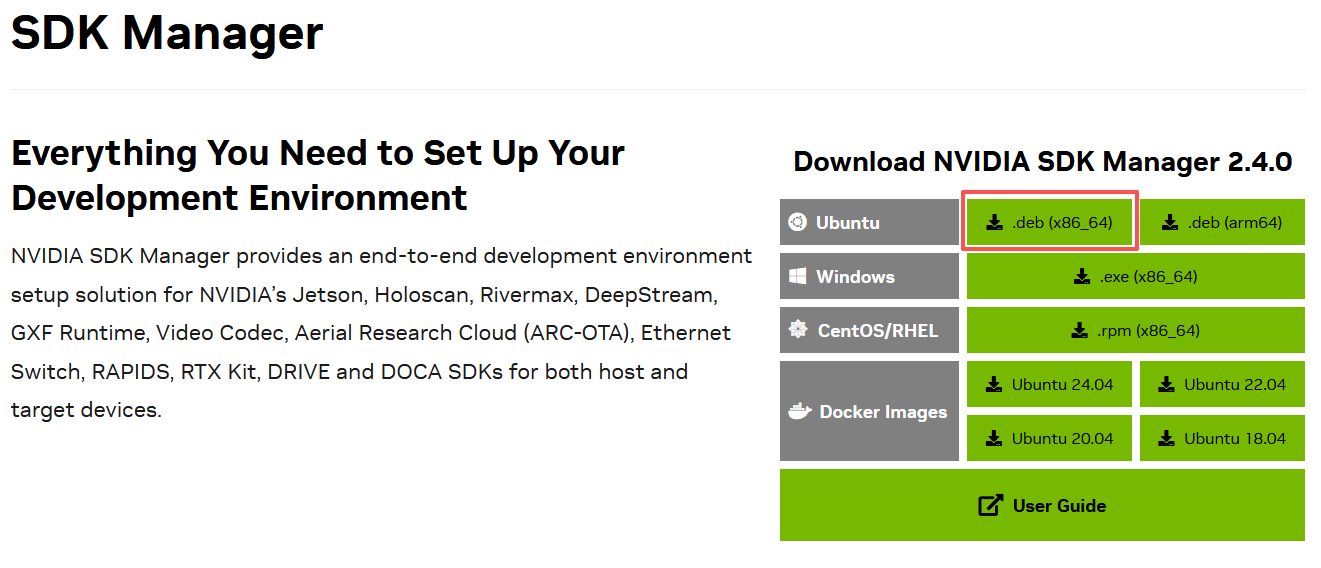
image-20260408204626343

3.2. SDK Manager Installation

Navigate to the folder containing the installation package and execute the following installation command:

xxxxxxxxxx
sudo dpkg -i sdkmanager_xxxxx_amd64.deb

Fixing Dependencies: On a pure system installation, you may encounter error messages when installing the SDK Manager. You can resolve this by running the command below, and then re-executing the installation command:

xxxxxxxxxx
sudo apt --fix-broken install -y

3.3. Launching and Logging In

Locate the SDK Manager application icon in the system's application menu, or launch the application by entering the following command in the terminal:

xxxxxxxxxx
sdkmanager
# To flash older versions of JetPack, use the command: sdkmanager --archived-versions

Clicking the "Log In" button will automatically open a login page in your web browser:
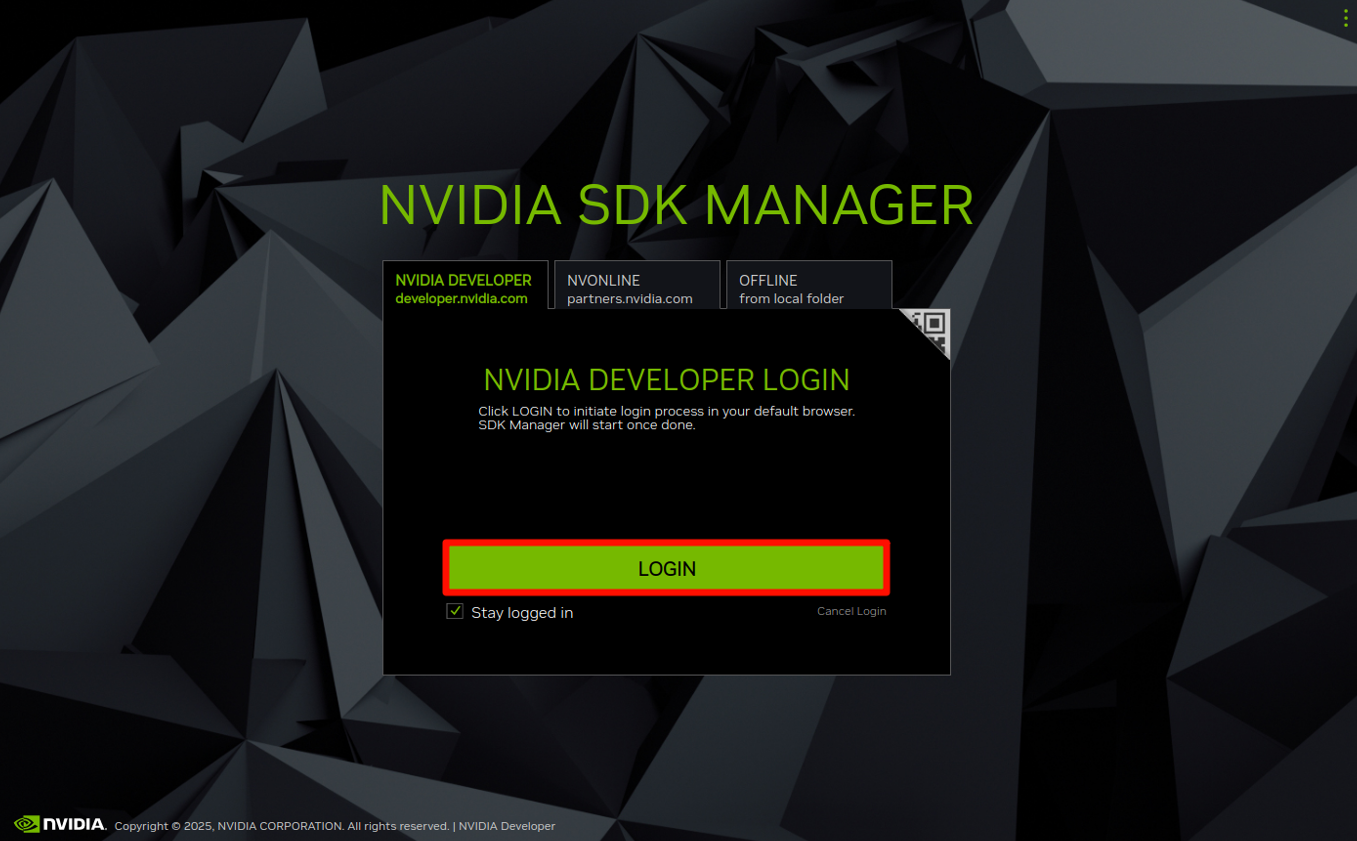
image-20260408205017700

Enter the email address and password you previously registered to access the software:
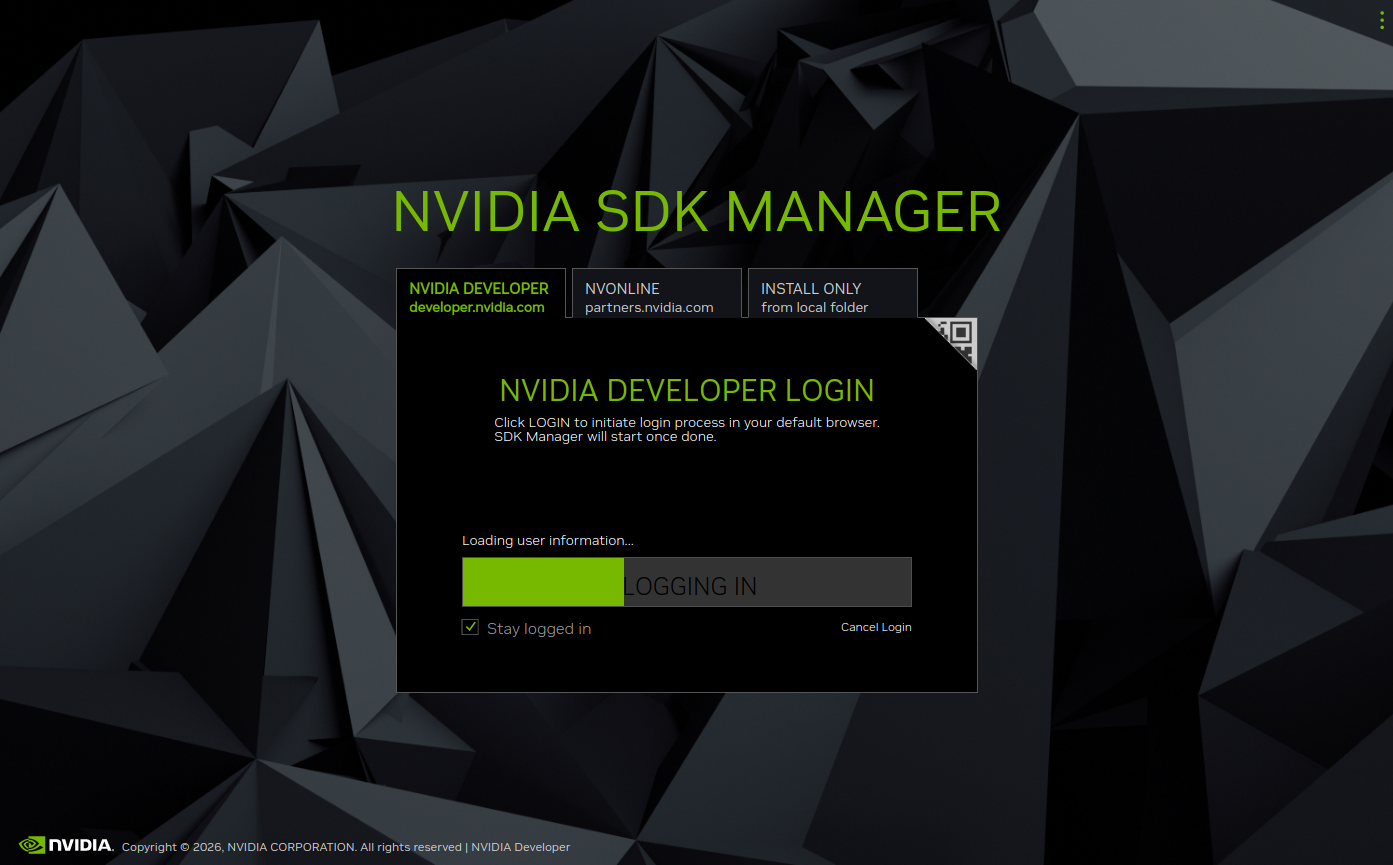
image-20260408205105395

3.4. Board Selection

Select the option corresponding to your specific board model. For official developer kits, select Jetson AGX Thor modules:
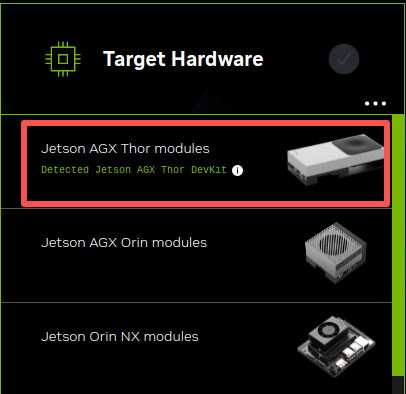
image-20260408200327479

3.5. STEP 1

Select the options as shown below; once you have confirmed that your selections match, click CONTINUE:
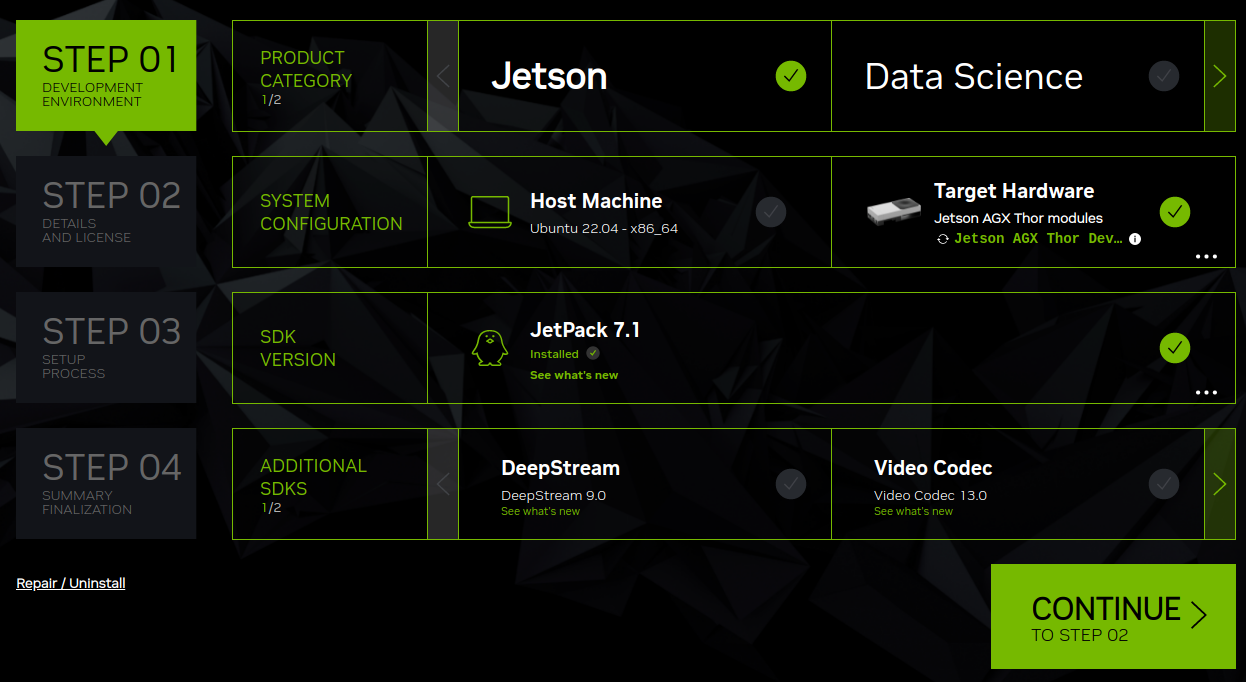
image-20260408200511188

3.6. STEP 2

Select the options as shown below; once you have confirmed that your selections match, click CONTINUE:
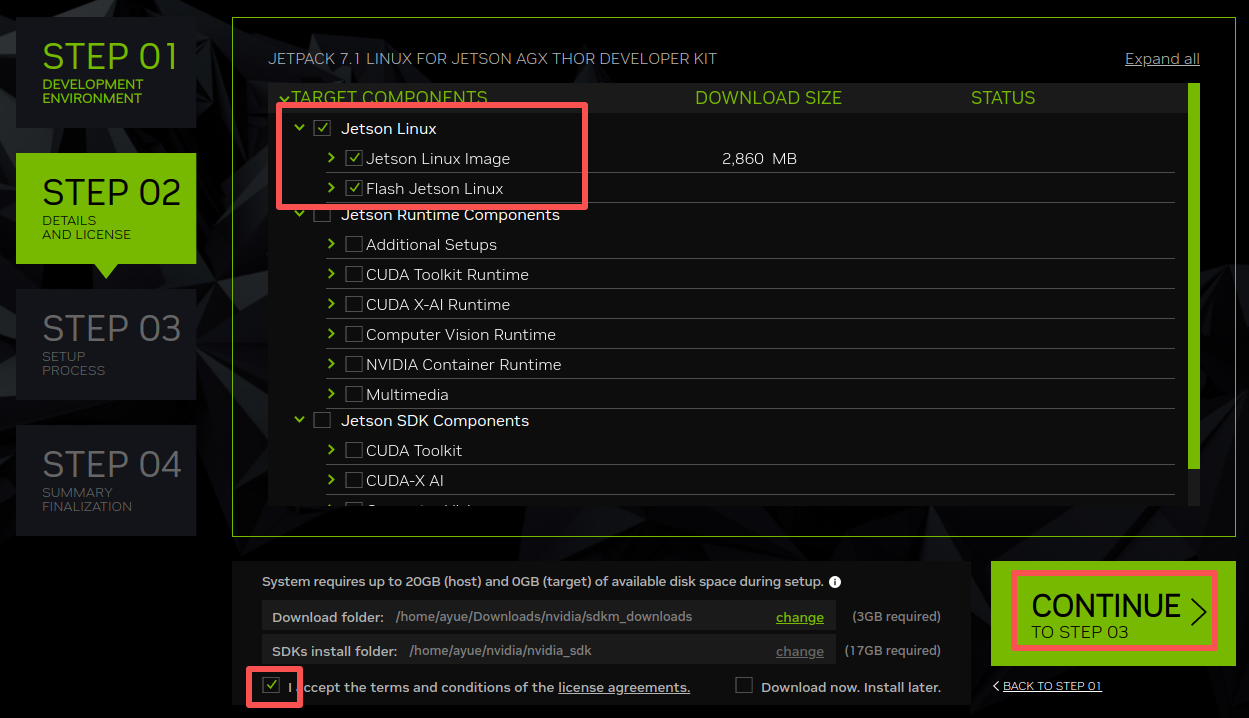
image-20260408200616072

If this is your first time flashing the device, you will need to click [Create] to create a folder. Then, click [Continue] again to proceed to the next step.
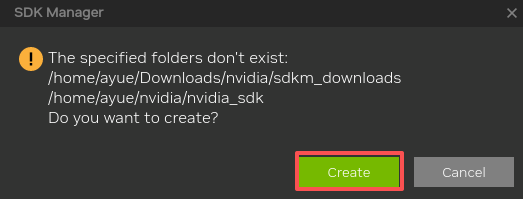
image-20260408200709298

3.7. STEP 3

Download the necessary flashing files.
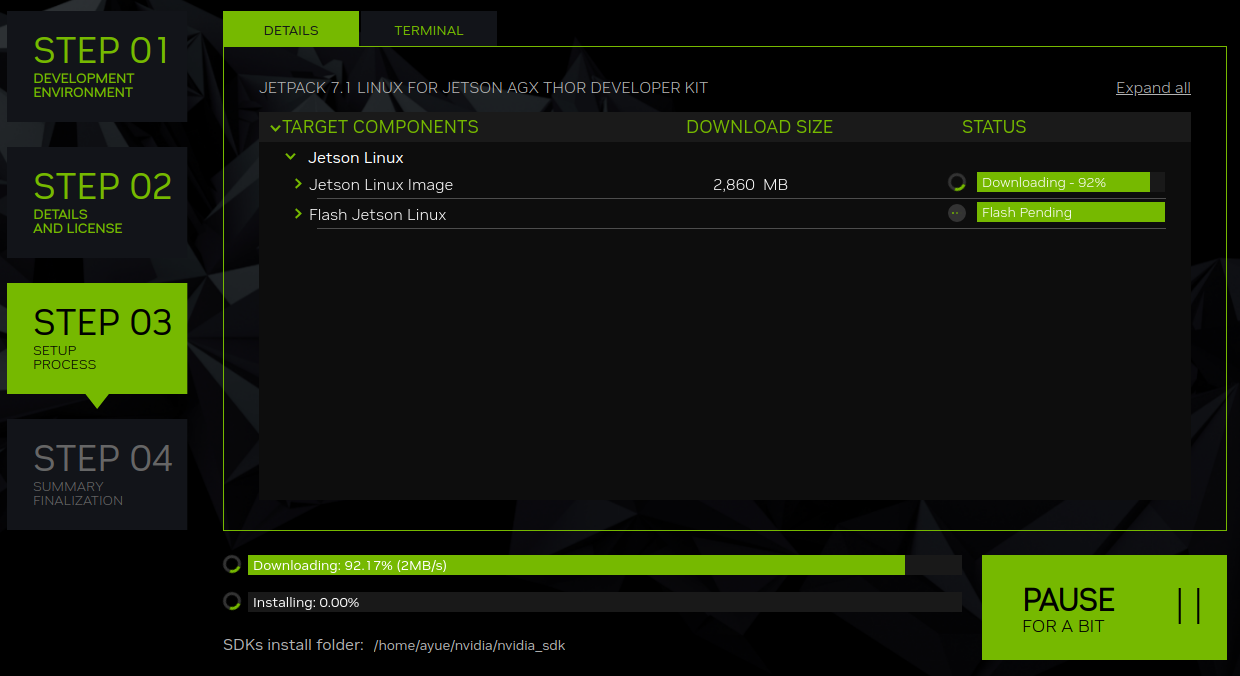
image-20260408201006102

Here, configure the username and password, select NVMe as the target storage for flashing, and then click [Flash] to begin the flashing process.
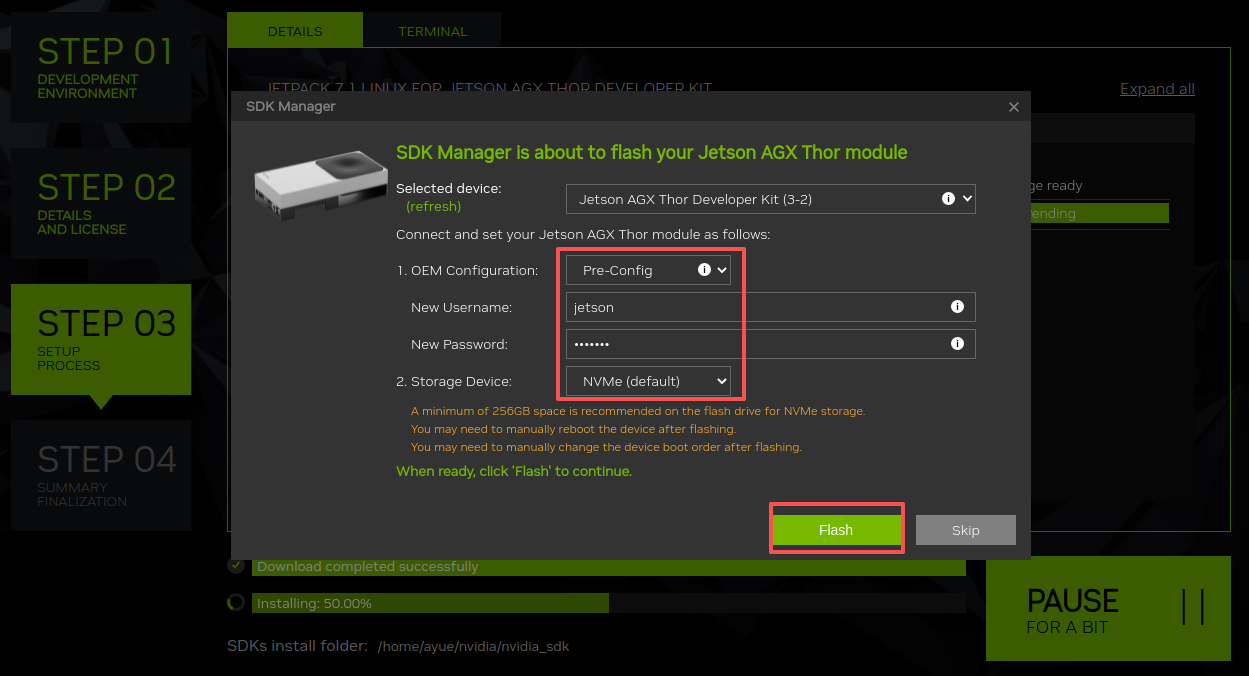
image-20260408201349616

Wait for the system compilation and flashing to complete. Throughout this entire process, the virtual machine automatically manages the connection and disconnection of the device; however, once the progress exceeds 95%, you should closely monitor the system flashing progress displayed in the SDK Manager. If the device disconnects and the virtual machine does not automatically re-establish the connection, you must manually reconnect the mainboard to the virtual machine immediately.
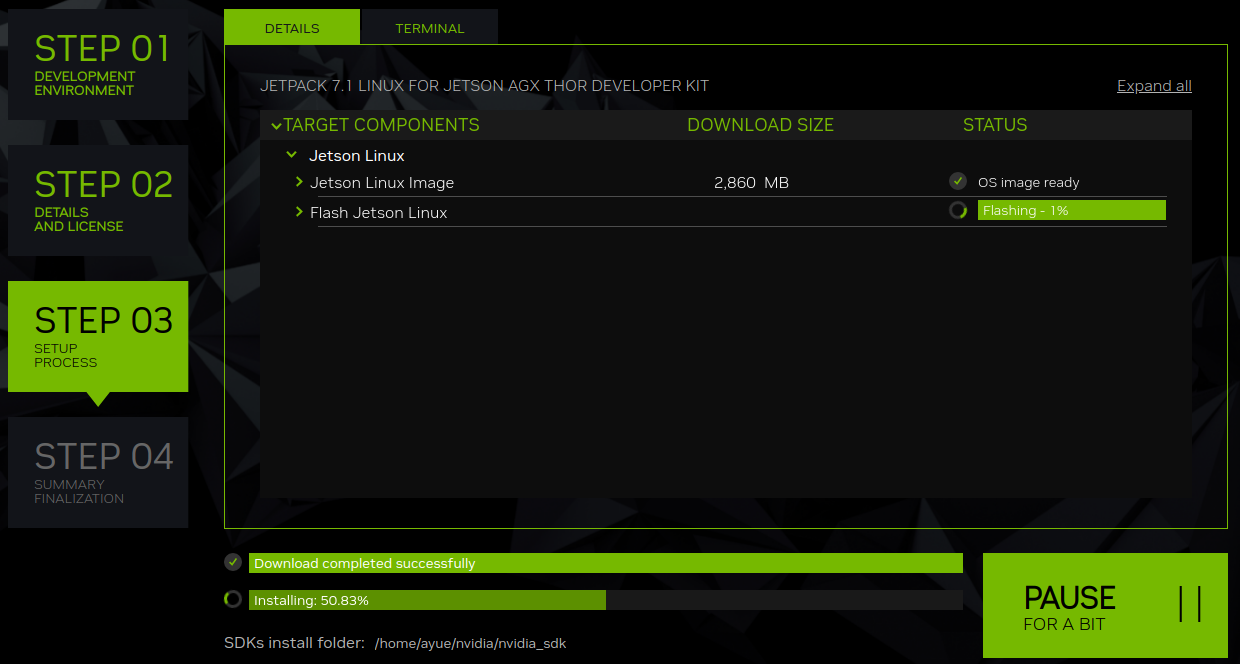
image-20260408201519050

Once the flashing is complete, click [OK]. image-20260408203250528
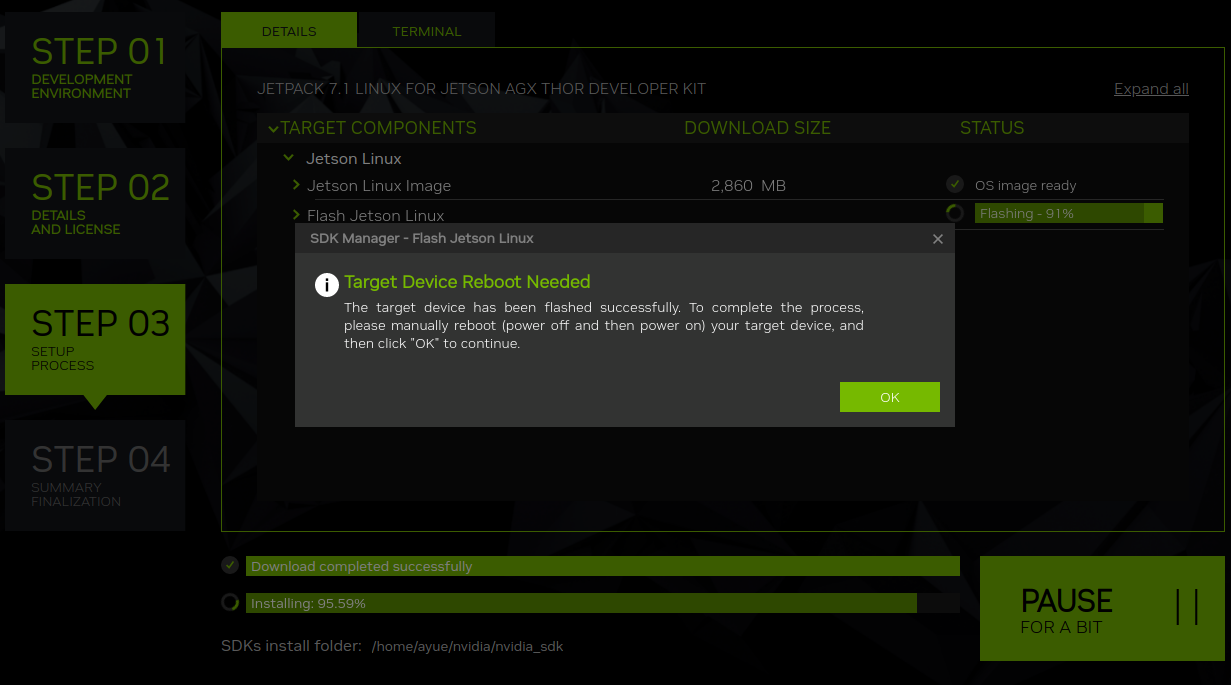
3.8. STEP 4

Once the flashing process is complete, click [FINISH] to exit the SDK Manager software.
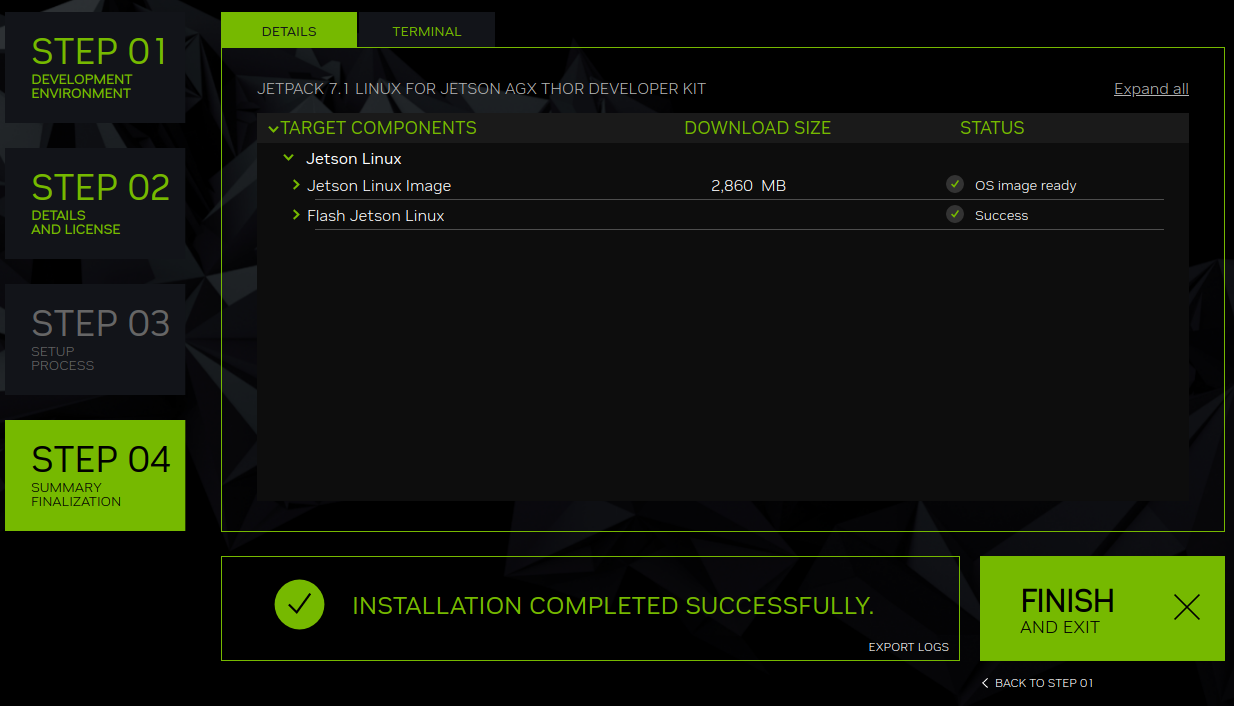
image-20260408203400902

4. Booting the System

After successfully flashing the system using SDK Manager, the system will boot up automatically. First, power off the device; then, connect a monitor, keyboard, and mouse to the mainboard before powering it back on.


4.1. Normal Mode

The Jetson AGX Thor mainboard operates in Normal Mode when powered on.

Note: Please keep the "AUTOMATION" pin header located at the bottom of the board in its default state, as shown in the figure below.
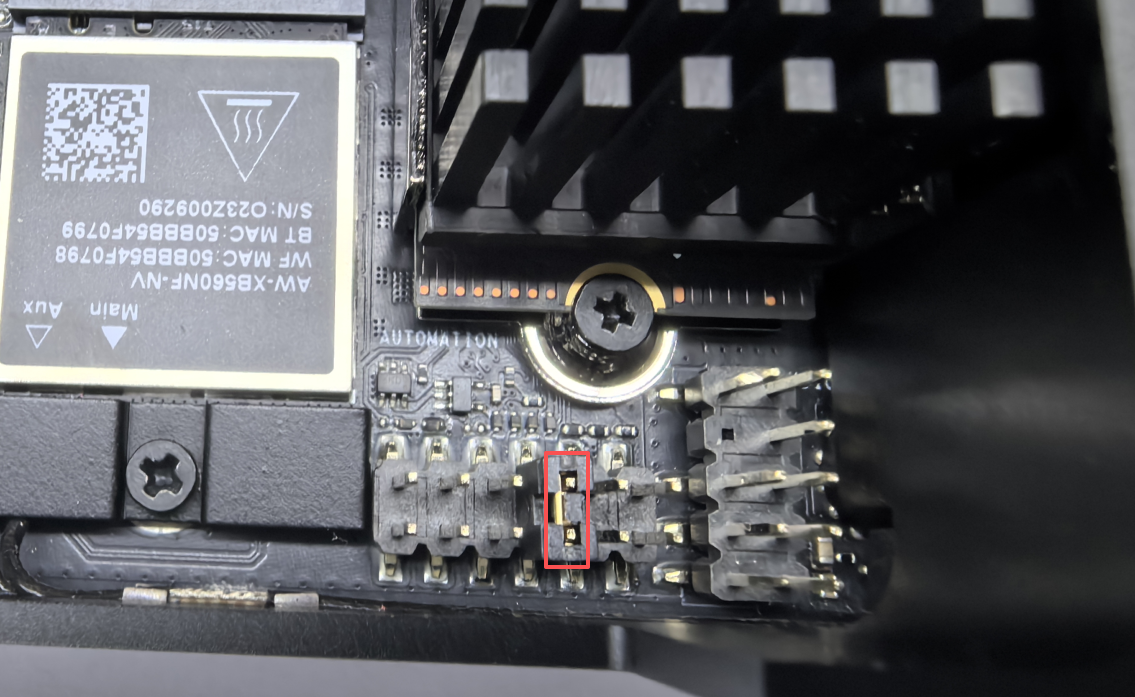
image-20260408205514995

4.2. Starting the System

Connect the DP cable, Ethernet cable, and Type-C cable to the Jetson mainboard; finally, use the power adapter to supply power to the board.

xxxxxxxxxx
The Jetson AGX Thor series mainboard requires a connected monitor to properly display video output and to enable VNC remote access.

4.3. System Setup

After the system boots up, users can configure the system options by following the on-screen prompts. This process is quite straightforward, so a detailed demonstration will not be provided here.
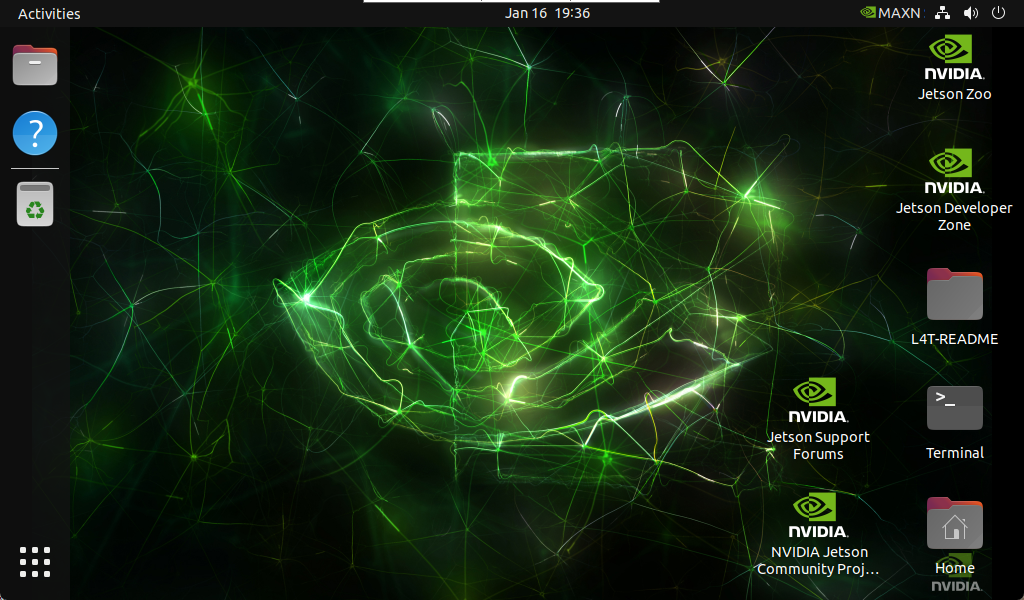
image-20250116193702212


Frequently Asked Questions (FAQ)

Device Not Recognized

  1. Check the virtual machine software's device settings to ensure that the USB device has been successfully connected to the virtual machine. 2. You may disconnect the motherboard's power adapter and Type-C data cable, then re-apply power. Press and hold the Flash button, briefly press the Reset button, and then release the Flash button to re-enter Flash Mode. Finally, reconnect the virtual machine using the Type-C data cable.

Jetson board introduction
Flashing a Pure Jetson System via USB Drive

COMPANY

  • About us
  • Team Style
  • Blog

LEARNING & EXPLORATION

  • Tutorials
  • Edge AI hardware
  • Educational robots
  • Embedded intelligent hardware

WHERE TO BUY

  • Yahboom Online Store
  • Amazon
  • Alibaba
  • AliExpress
  • Mercado

TECHNOLOGY SUPPORT

  • Email: support@yahboom.com

BE A DISTRIBUTOR

  • Email: sales@yahboom.com
QR Code
QR Code

Copyright © 2017-2026 Yahboom. All Rights Reserved.

EN/中文