yahboom
HomeLearn
Solution
Blog
Online Store
About Us
EN/中文
Jetson AGX Thor📖
1.Get started
  • 01.Learning Route
  • 02.Getting Started Quickly
2.Jetson basic course
  • 01.Jetson board introduction
  • 02.Flashing a Pure Jetson System via SDK
  • 03.Flashing a Pure Jetson System via USB Drive
  • 04.Flashing the Jetson Bootloader using L4T
  • 05.Replacing the SSD
  • 06.Install Jetpack environment
  • 07.Backup SSD system
  • 08.Restore factory image system
  • 09.SSD expansion
  • 10.SSD Speed Test
3.Basic setting course
  • 01.Basic knowledge
  • 02.Network configuration
  • 03.SSH remote login
  • 04.VNC remote control
  • 05.Remote file transfer
  • 06.Jtop tool
  • 07.Exchange space expansion
  • 08.Use VSCode
  • 09.Use VMware
  • 10.Change screen resolution
  • 11.Virtual Desktop
  • 12.Set root user password
  • 13.Configure sudo passwordless operation
  • 14.Managing custom services
  • 15.View system version information
4.OpenCV basic course
  • 01.Image reading
  • 02.Image saving
  • 03.Image modification
  • 04.Image scaling
  • 05.Image cropping
  • 06.Image translation
  • 07.Image mirroring
  • 08.Image grayscale conversion
  • 09.Image binarization
  • 10.Image edge detection
  • 11.Add line segments
  • 12.Add rectangles
  • 13.Add circular shape
  • 14.Add ellipses
  • 15.Add polygons
  • 16.Add Text
5.Vision basic course
  • 01.USB camera preview
  • 02.Use Jupyter Lab
  • 03.Use JetCam
6.Vision advanced course
01.Environment construction
  • 01.TensorFlow
  • 02.PyTorch
  • 03.Torchvision
  • 04.Torchaudio
02.DeepStream development
  • 01.DeepStream environment
  • 02.Four types of detection(traffic)
03.YOLO26 development
  • 01.YOLO Environment Setup
  • 02.CLI Usage
  • 03.Object Detection
  • 04.Instance Segmentation
  • 05.Pose Estimation
  • 06.Image Classification
  • 07.Oriented Bounding Boxes Object Detection
  • 08.Model Conversion
  • 09.Dataset Annotation
  • 10.Model Training_Conversion
  • 11.Model Prediction
04.Mediapipe development
  • 01.Mediapipe environment
  • 02.Hand detection
  • 03.Face detection
  • 04.Face effects
  • 05.3D object recognition
  • 06.Virtual brush
  • 07.Gesture recognition
  • 08.Finger control
  • 09.Posture estimation
  • 10.Face mask
  • 11.Overall detection
  • 12.Green scene removal(Human)
05.QR code recognition
  • 01.Barcode Recognition
  • 02.QR Code Recognition
  • 03.Machine Code Recognition
  • 04.Handwritten Digit Recognition
7.Docker basic course
  • 01.Docker introduction
  • 02.Docker installation
  • 03.Docker command
  • 04.Docker usage
  • 05.Docker interaction
8.ROS2-jazzy
1.ROS2 basic course
  • 1.Introduction to ROS2
  • 2.ROS2 install Jazzy
  • 3.ROS2 development environment
  • 4.ROS2 workspace
  • 5.ROS2 function package
  • 6.ROS2 node
  • 7.ROS2 topic communication
  • 8.ROS2 service communication
  • 9.ROS2 action communication
  • 10.ROS2 custom interface message
  • 11.ROS2 parameter service case
  • 12.ROS2 meta-function package
  • 13.ROS2 distributed communication
  • 14.ROS2 DDS
  • 15.ROS2 time related API
  • 16.ROS2 common command tools
  • 17.ROS2 rviz2 use
  • 18.ROS2 rqt toolbox
  • 19.ROS2 Launch startup file configuration
  • 20.ROS2 recording and playback tool
  • 21.ROS2 URDF model
  • 22.ROS2 Gazebo simulation platform
  • 23.ROS2 TF2 coordinate transformation
2.ROS2 vision course
  • 01.Camera preview (USB)
  • 02.Camera calibration (USB)
  • 03.AR vision (USB)
9.Offline AI model course
Offline large model (Text Interaction)
  • 1.Al large model environment deployment
  • 2.Install large model dialogue platform
  • 3.Meta Al Llama3.2 model
  • 4.Alibaba Cloud Qwen3 model
  • 5.Microsoft Phi-4-mini model
  • 6.DeepSeek DeepSeek-R1 model
  • 7.Alibaba Cloud Qwen2.5v visual multimodal large model
  • 8.Google Gemma3 visual multimodal large model
  • 9.Lava visual multimodal large model
  • 10.MiniCPM-V visual multimodal large model
  • 11.Multimodal visual understand application
  • 12.Multimodal text image application
  • 13.Multimodal video analysis application
  • 14.Multi module visual position application
  • 15.Multimodal table scanning application
  • 16.Multimodal autonomous agent application
Offline large model (Voice Interaction)
  • 0.Voice interaction hardware connection (ReadMe)
  • 1.Offline speech to text (ASR)
  • 2.Offline text to speech (TTS)
  • 3.AI large model voice interaction
  • 4.Multimodal visual understand speech interaction
  • 5.Multimodal text and graphics application
  • 6.Multimodal video analysis application
  • 7.Multi module visual position application
  • 8.Multimodal table scanning application
  • 9.Multimodal autonomous proxy application
  • 10.AI large model offline voice assistant
10.Online AI model course
Online large model (Text Interaction)
  • 1.OpenRouter large model API aggregation platform
  • 2.Multimodal Video Analysis Applications
  • 3.Multimodal visual localization application
  • 4.Multimodal table scanning application
  • 5.Multimodal autonomous proxy application
Online large model (Voice Interaction)
  • 0.Voice interaction hardware connection (ReadMe)
  • 1.Online speech to text (ASR)
  • 2.Online text to speech (TTS)
  • 3.AI large model voice interaction
  • 4.Multimodal visual understand speech interaction
  • 5.Multi module visual position application
  • 6.Multimodal table scanning application
  • 7.Multimodal autonomous proxy application
  • 8.AI large model offline voice assistant
11.Generative AI Applications
12.OpenClaw Advanced Development
  • 00.OpenClaw Quick Start on Jetson Platform
  • 01.OpenClaw Installation
  • 02.OpenClaw Online Platform Deployment
  • 03.OpenClaw Local Model Deployment
  • 04.OpenClaw TUI Interaction
  • 05.OpenClaw WebChat Interaction
  • 06.OpenClaw Tools Introduction
  • 07.OpenClawGate Gateway User Manual
  • 08.OpenClaw Features Overview
  • 09.OpenClawClawHub Introduction (Skill Installation)
  • 10. OpenClaw Switching Models
  • 11.OpenClaw Application - File Management
  • 12.OpenClaw Application - Camera
  • 13.OpenClaw Application - Browser Control
  • 14.OpenClaw Application - Script Execution
  • 15.OpenClaw Application - AI Programming
  • 16.OpenClaw Application - Dedicated AI Assistant
  • 17.OpenClaw WhatsApp Plugin Application
  • 18.OpenClaw Voice Assistant
Download
  • Code
  • SystemFile
  • VM_File
  • Tools
  • Jetson boot files
Download ZIP

Welcome to Jetson AGX Thor repository

02.OpenClaw Online Platform Deployment

OpenClaw Online Platform Deployment

OpenClaw Online Platform Deployment

OpenClaw Online Platform Deployment1. Registering on an Online Model Platform2. Configuring OpenClaw3. Enabling Tools

1. Registering on an Online Model Platform

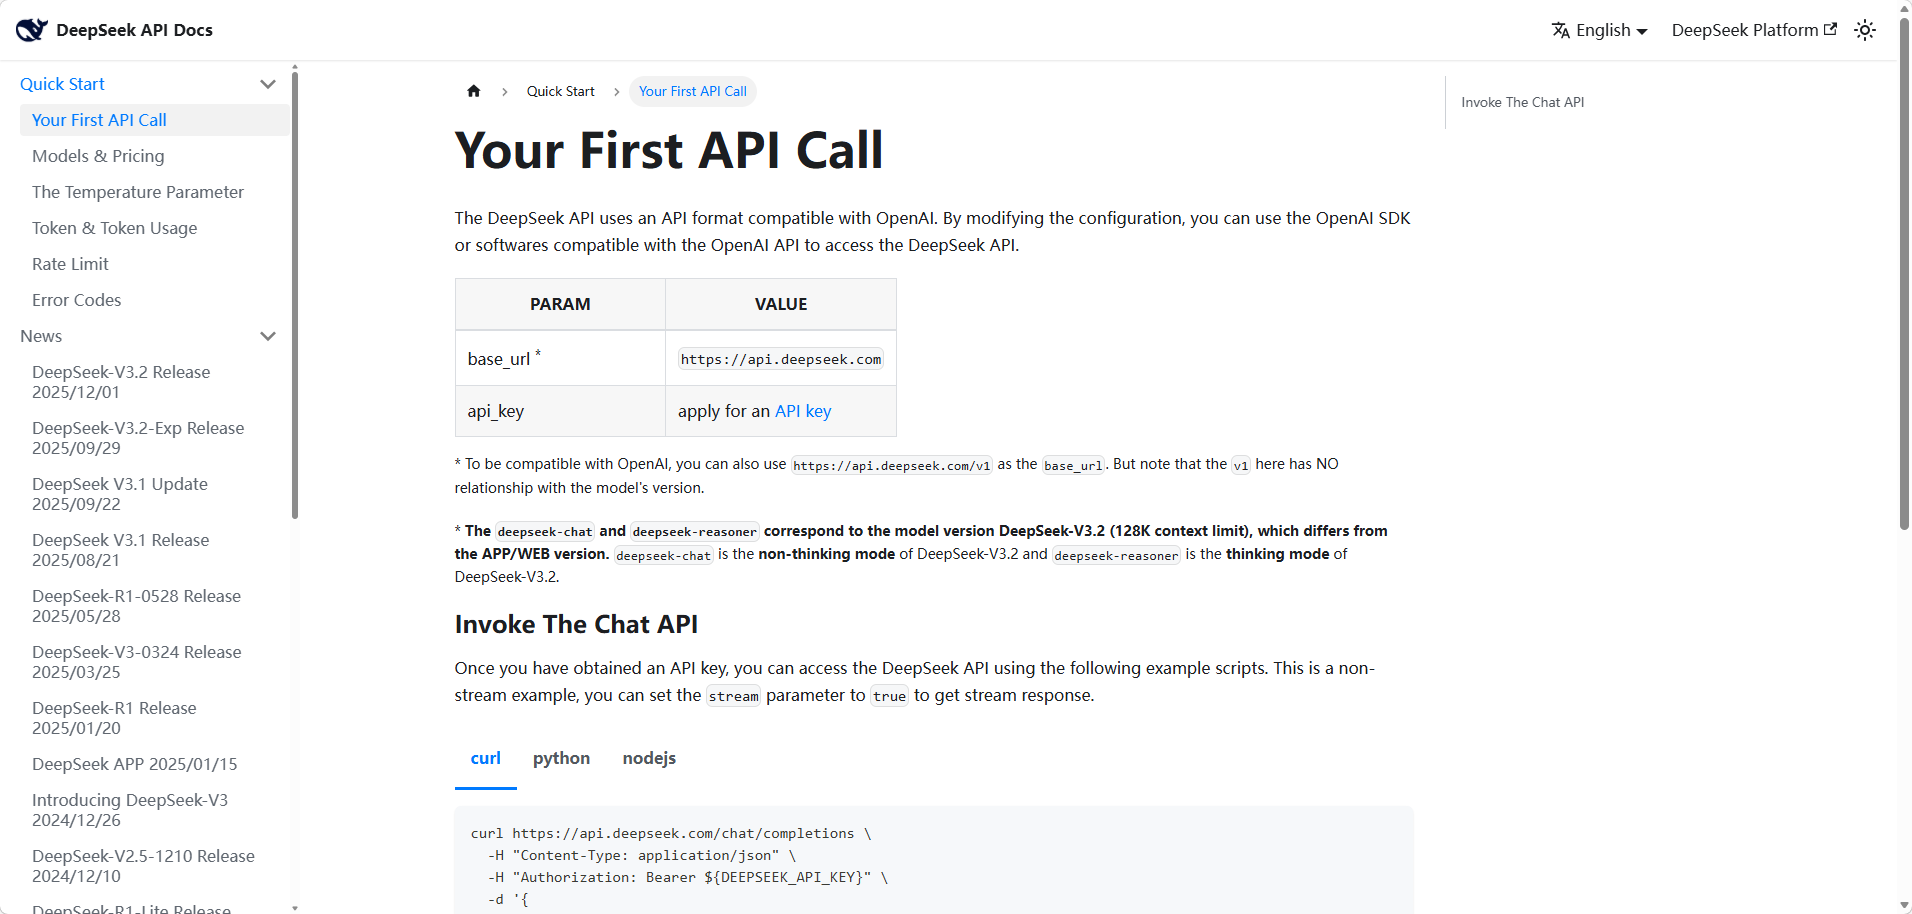
OpenClaw supports many online large language model platforms. The registration method varies depending on the model. Here, we take the Deepseek model as an example. Open your browser and visit DeepSeek Open Platform, register and log in to your account, and follow the instructions to authorize and obtain an API Key. Models require payment; please recharge before use.

https://platform.deepseek.com/sign_in

Click 【API keys】-> 【Create new API Key】.
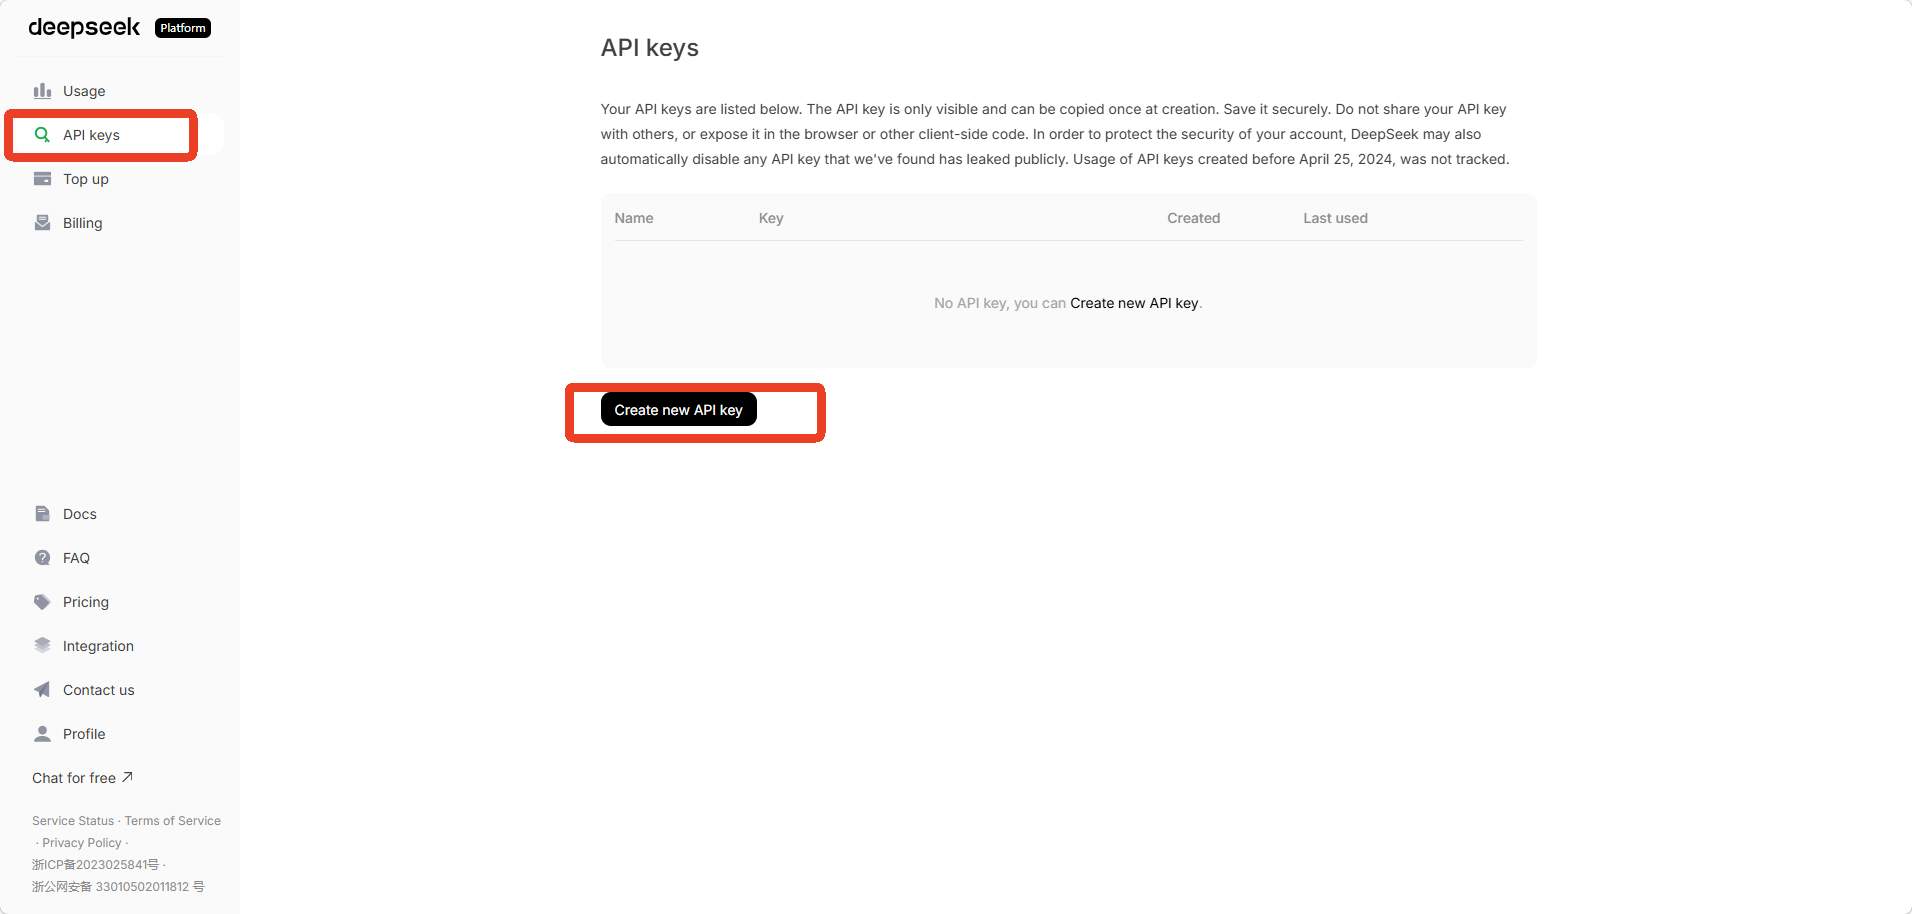
image-20260324142550896

Enter a name, and then click 【Create API key】.
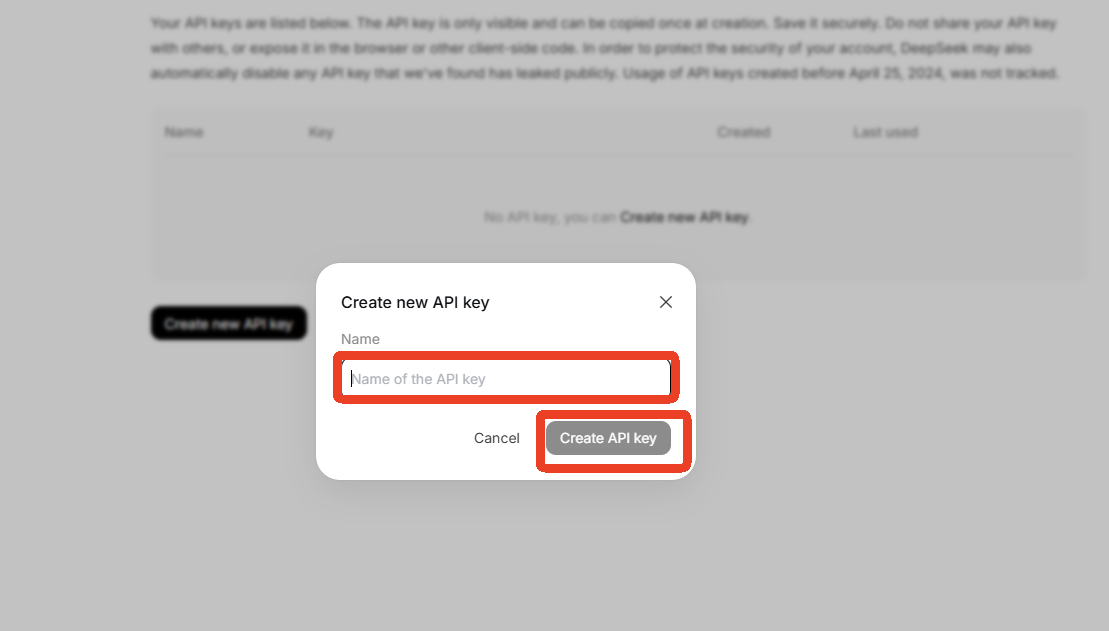
image-20260324143026781

After creation, you must copy the API key. It's best to save it in a notepad, as you'll need it when filling in the API key later.
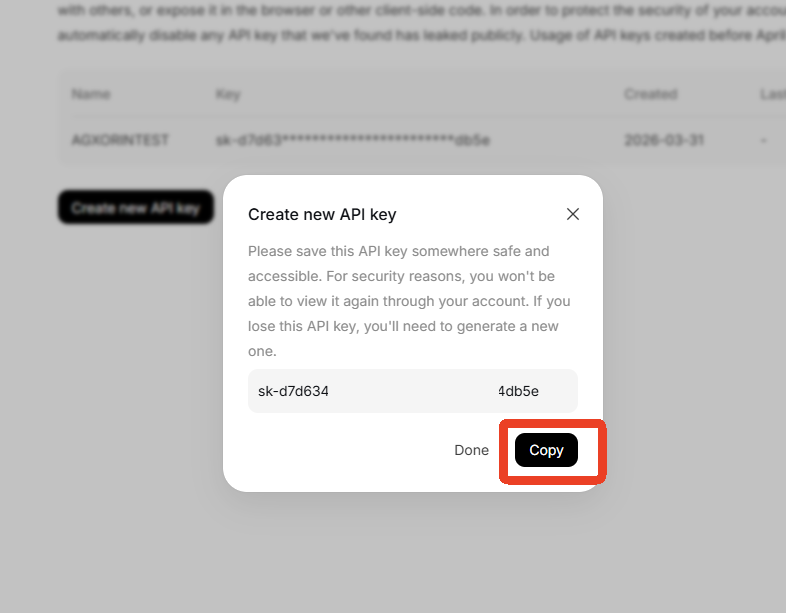
image-20260324142922311

Click "Top up". If you haven't completed real-name authentication yet, you need to authenticate first before topping up.
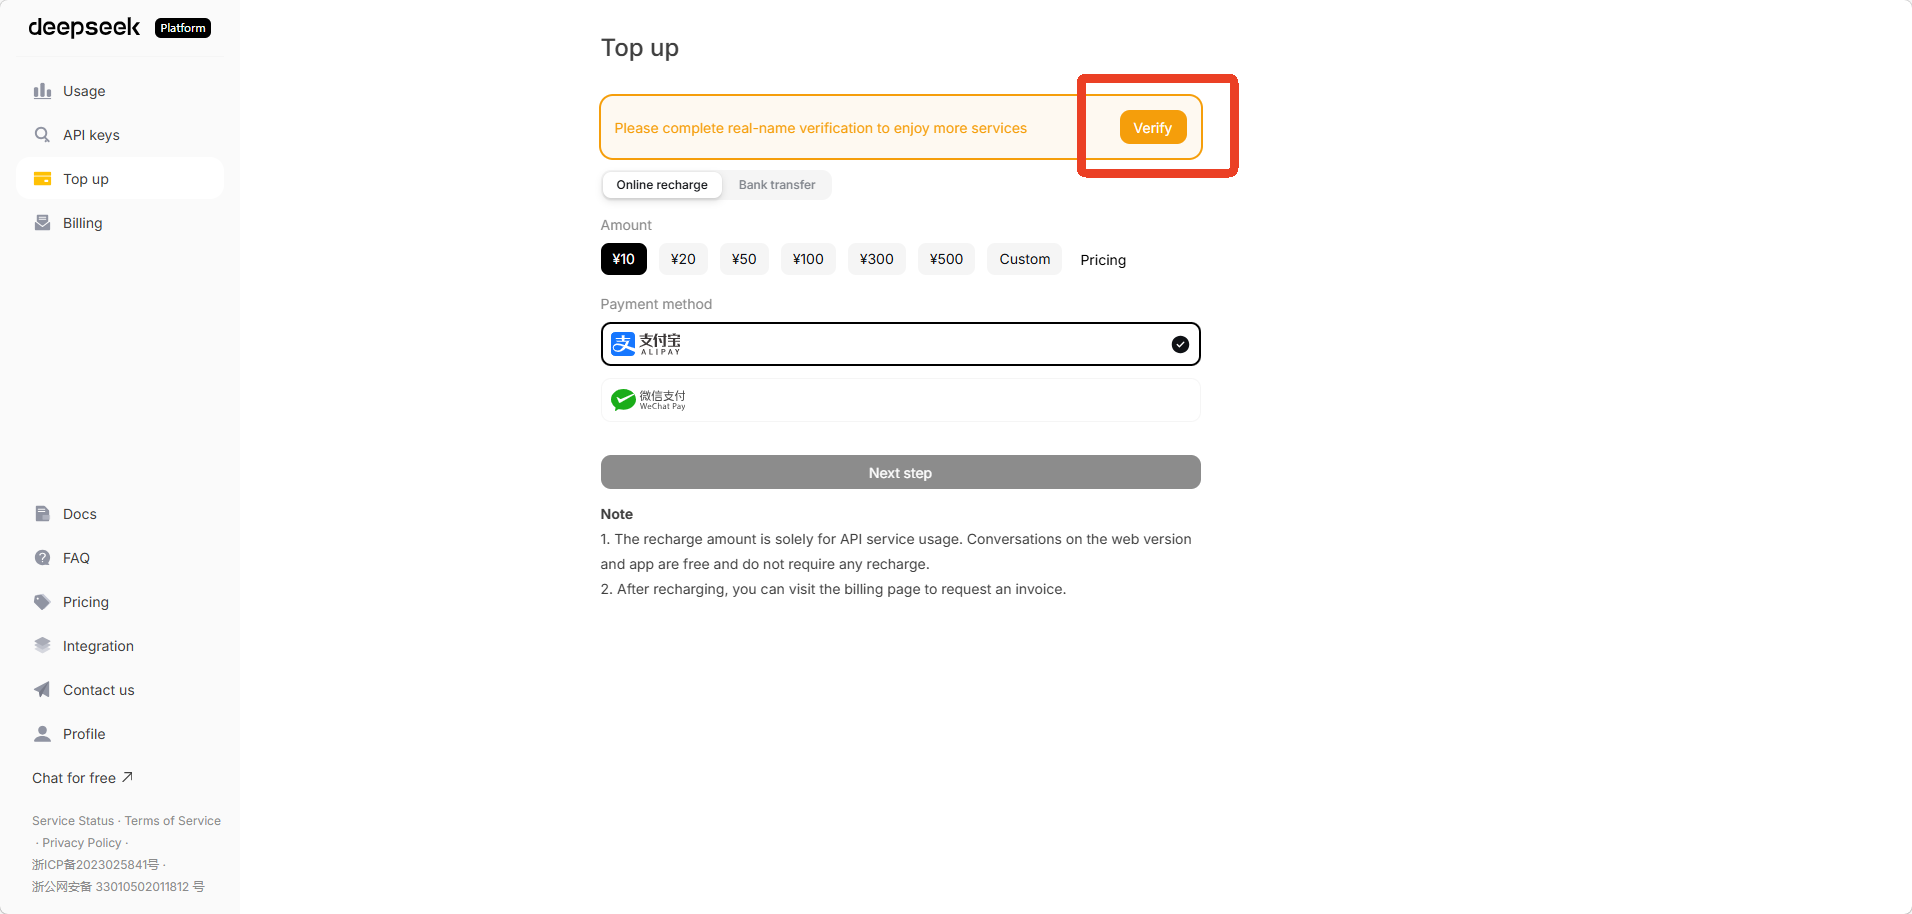
image-20260324143123294

Click [Docs] to navigate to the DeepSeek API documentation.
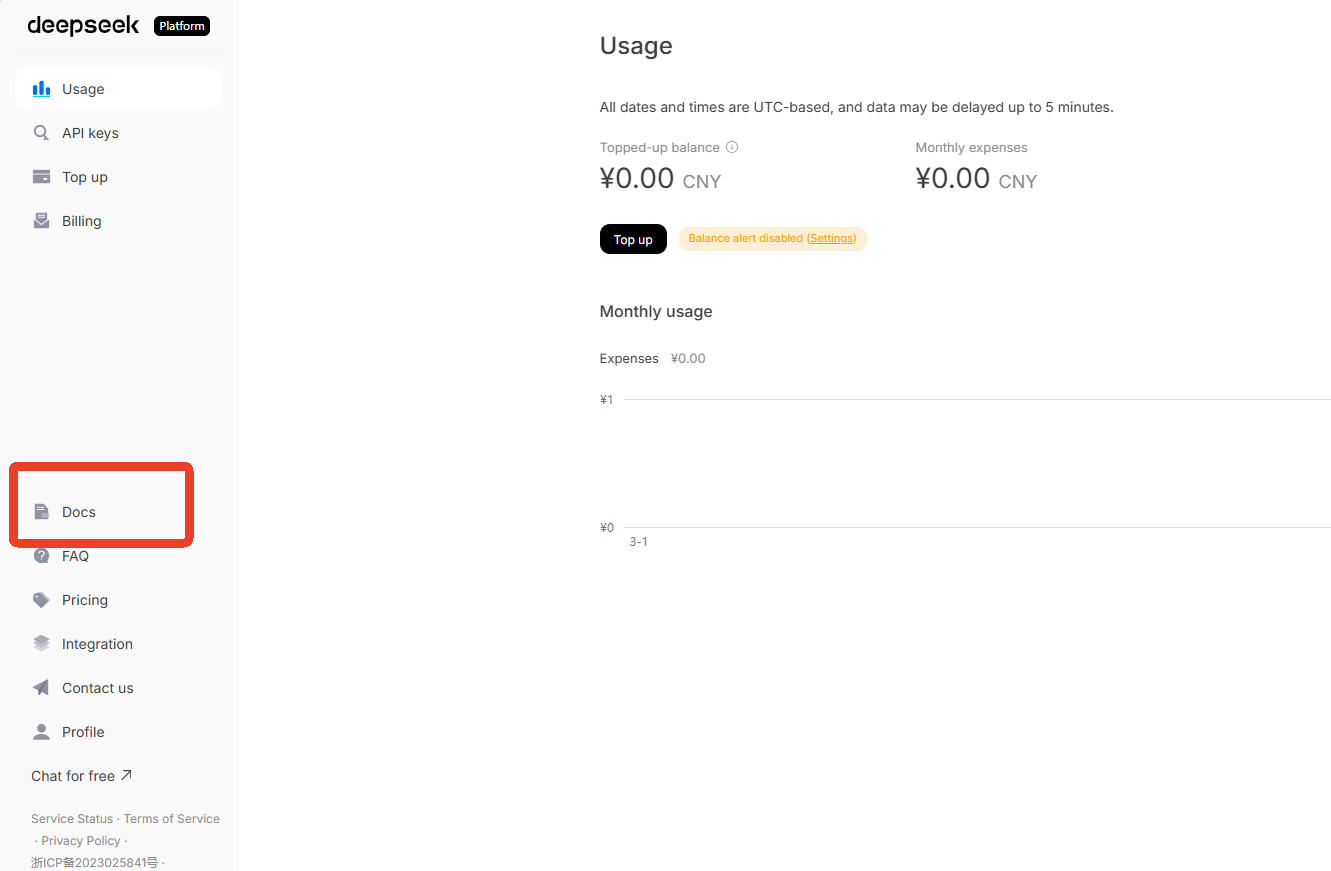
image-20260324144158244

image-20260324144505531


2. Configuring OpenClaw

Open your terminal and execute the OpenClaw configuration command:

xxxxxxxxxx
openclaw onboard  --install-daemon

You must select [Yes] to proceed with the configuration process. Press [Enter] to proceed to the next step.
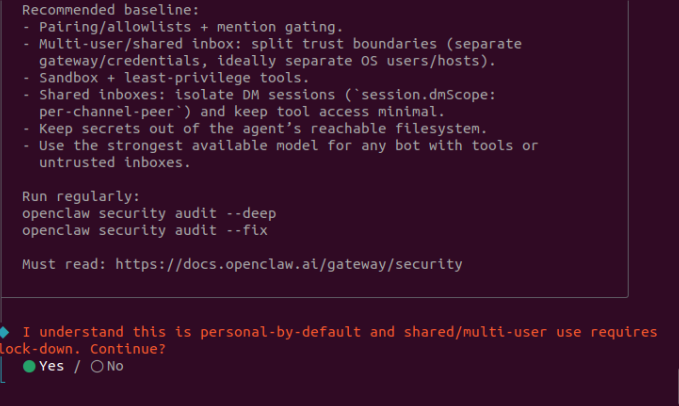
image-20260324104320651

Select [QuickStart] to begin the quick setup.
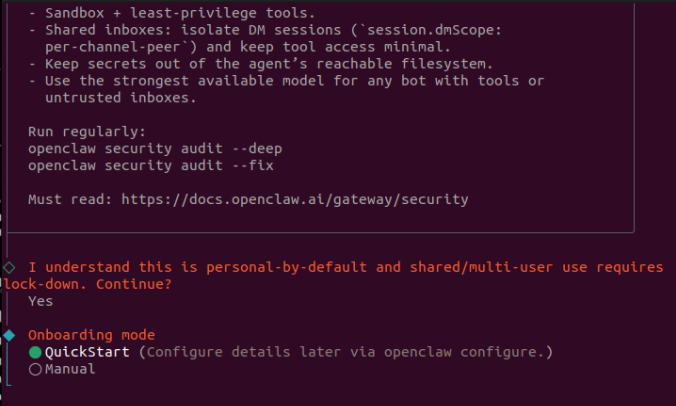
image-20260324104338392

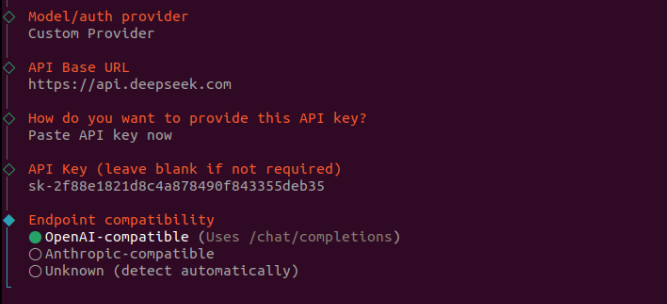
On the model selection screen, select the specific model platform you wish to use. This step is mandatory; otherwise, you will not be able to interact with the system properly. Taking the DeepSeek model as an example, you need to select [Custom Provider].
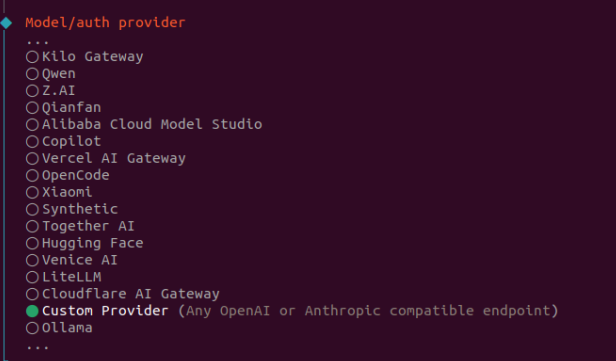
image-20260324143911294

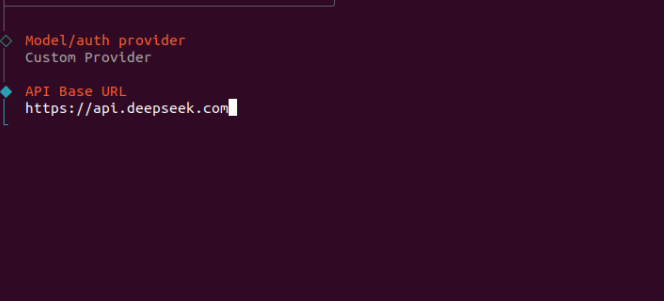
Set the API Base URL to:

xxxxxxxxxx
https://api.deepseek.com

image-20260324144705185

Select [Paste API Key now] and enter the API Key you generated on DeepSeek.
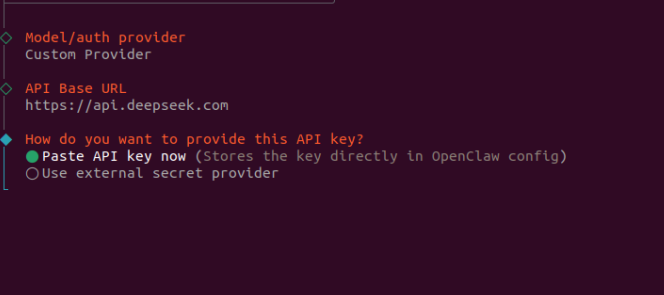
image-20260324144800229

Select [OpenAI-compatible].

image-20260324144903431

For the [Model ID], enter:

OpenClaw Installation
OpenClaw Local Model Deployment

COMPANY

  • About us
  • Team Style
  • Blog

LEARNING & EXPLORATION

  • Tutorials
  • Edge AI hardware
  • Educational robots
  • Embedded intelligent hardware

WHERE TO BUY

  • Yahboom Online Store
  • Amazon
  • Alibaba
  • AliExpress
  • Mercado

TECHNOLOGY SUPPORT

  • Email: support@yahboom.com

BE A DISTRIBUTOR

  • Email: sales@yahboom.com
QR Code
QR Code

Copyright © 2017-2026 Yahboom. All Rights Reserved.

EN/中文