yahboom
HomeLearn
Solution
Blog
Online Store
About Us
EN/中文
Jetson AGX Thor📖
1.Get started
  • 01.Learning Route
  • 02.Getting Started Quickly
2.Jetson basic course
  • 01.Jetson board introduction
  • 02.Flashing a Pure Jetson System via SDK
  • 03.Flashing a Pure Jetson System via USB Drive
  • 04.Flashing the Jetson Bootloader using L4T
  • 05.Replacing the SSD
  • 06.Install Jetpack environment
  • 07.Backup SSD system
  • 08.Restore factory image system
  • 09.SSD expansion
  • 10.SSD Speed Test
3.Basic setting course
  • 01.Basic knowledge
  • 02.Network configuration
  • 03.SSH remote login
  • 04.VNC remote control
  • 05.Remote file transfer
  • 06.Jtop tool
  • 07.Exchange space expansion
  • 08.Use VSCode
  • 09.Use VMware
  • 10.Change screen resolution
  • 11.Virtual Desktop
  • 12.Set root user password
  • 13.Configure sudo passwordless operation
  • 14.Managing custom services
  • 15.View system version information
4.OpenCV basic course
  • 01.Image reading
  • 02.Image saving
  • 03.Image modification
  • 04.Image scaling
  • 05.Image cropping
  • 06.Image translation
  • 07.Image mirroring
  • 08.Image grayscale conversion
  • 09.Image binarization
  • 10.Image edge detection
  • 11.Add line segments
  • 12.Add rectangles
  • 13.Add circular shape
  • 14.Add ellipses
  • 15.Add polygons
  • 16.Add Text
5.Vision basic course
  • 01.USB camera preview
  • 02.Use Jupyter Lab
  • 03.Use JetCam
6.Vision advanced course
01.Environment construction
  • 01.TensorFlow
  • 02.PyTorch
  • 03.Torchvision
  • 04.Torchaudio
02.DeepStream development
  • 01.DeepStream environment
  • 02.Four types of detection(traffic)
03.YOLO26 development
  • 01.YOLO Environment Setup
  • 02.CLI Usage
  • 03.Object Detection
  • 04.Instance Segmentation
  • 05.Pose Estimation
  • 06.Image Classification
  • 07.Oriented Bounding Boxes Object Detection
  • 08.Model Conversion
  • 09.Dataset Annotation
  • 10.Model Training_Conversion
  • 11.Model Prediction
04.Mediapipe development
  • 01.Mediapipe environment
  • 02.Hand detection
  • 03.Face detection
  • 04.Face effects
  • 05.3D object recognition
  • 06.Virtual brush
  • 07.Gesture recognition
  • 08.Finger control
  • 09.Posture estimation
  • 10.Face mask
  • 11.Overall detection
  • 12.Green scene removal(Human)
05.QR code recognition
  • 01.Barcode Recognition
  • 02.QR Code Recognition
  • 03.Machine Code Recognition
  • 04.Handwritten Digit Recognition
7.Docker basic course
  • 01.Docker introduction
  • 02.Docker installation
  • 03.Docker command
  • 04.Docker usage
  • 05.Docker interaction
8.ROS2-jazzy
1.ROS2 basic course
  • 1.Introduction to ROS2
  • 2.ROS2 install Jazzy
  • 3.ROS2 development environment
  • 4.ROS2 workspace
  • 5.ROS2 function package
  • 6.ROS2 node
  • 7.ROS2 topic communication
  • 8.ROS2 service communication
  • 9.ROS2 action communication
  • 10.ROS2 custom interface message
  • 11.ROS2 parameter service case
  • 12.ROS2 meta-function package
  • 13.ROS2 distributed communication
  • 14.ROS2 DDS
  • 15.ROS2 time related API
  • 16.ROS2 common command tools
  • 17.ROS2 rviz2 use
  • 18.ROS2 rqt toolbox
  • 19.ROS2 Launch startup file configuration
  • 20.ROS2 recording and playback tool
  • 21.ROS2 URDF model
  • 22.ROS2 Gazebo simulation platform
  • 23.ROS2 TF2 coordinate transformation
2.ROS2 vision course
  • 01.Camera preview (USB)
  • 02.Camera calibration (USB)
  • 03.AR vision (USB)
9.Offline AI model course
Offline large model (Text Interaction)
  • 1.Al large model environment deployment
  • 2.Install large model dialogue platform
  • 3.Meta Al Llama3.2 model
  • 4.Alibaba Cloud Qwen3 model
  • 5.Microsoft Phi-4-mini model
  • 6.DeepSeek DeepSeek-R1 model
  • 7.Alibaba Cloud Qwen2.5v visual multimodal large model
  • 8.Google Gemma3 visual multimodal large model
  • 9.Lava visual multimodal large model
  • 10.MiniCPM-V visual multimodal large model
  • 11.Multimodal visual understand application
  • 12.Multimodal text image application
  • 13.Multimodal video analysis application
  • 14.Multi module visual position application
  • 15.Multimodal table scanning application
  • 16.Multimodal autonomous agent application
Offline large model (Voice Interaction)
  • 0.Voice interaction hardware connection (ReadMe)
  • 1.Offline speech to text (ASR)
  • 2.Offline text to speech (TTS)
  • 3.AI large model voice interaction
  • 4.Multimodal visual understand speech interaction
  • 5.Multimodal text and graphics application
  • 6.Multimodal video analysis application
  • 7.Multi module visual position application
  • 8.Multimodal table scanning application
  • 9.Multimodal autonomous proxy application
  • 10.AI large model offline voice assistant
10.Online AI model course
Online large model (Text Interaction)
  • 1.OpenRouter large model API aggregation platform
  • 2.Multimodal Video Analysis Applications
  • 3.Multimodal visual localization application
  • 4.Multimodal table scanning application
  • 5.Multimodal autonomous proxy application
Online large model (Voice Interaction)
  • 0.Voice interaction hardware connection (ReadMe)
  • 1.Online speech to text (ASR)
  • 2.Online text to speech (TTS)
  • 3.AI large model voice interaction
  • 4.Multimodal visual understand speech interaction
  • 5.Multi module visual position application
  • 6.Multimodal table scanning application
  • 7.Multimodal autonomous proxy application
  • 8.AI large model offline voice assistant
11.Generative AI Applications
12.OpenClaw Advanced Development
  • 00.OpenClaw Quick Start on Jetson Platform
  • 01.OpenClaw Installation
  • 02.OpenClaw Online Platform Deployment
  • 03.OpenClaw Local Model Deployment
  • 04.OpenClaw TUI Interaction
  • 05.OpenClaw WebChat Interaction
  • 06.OpenClaw Tools Introduction
  • 07.OpenClawGate Gateway User Manual
  • 08.OpenClaw Features Overview
  • 09.OpenClawClawHub Introduction (Skill Installation)
  • 10. OpenClaw Switching Models
  • 11.OpenClaw Application - File Management
  • 12.OpenClaw Application - Camera
  • 13.OpenClaw Application - Browser Control
  • 14.OpenClaw Application - Script Execution
  • 15.OpenClaw Application - AI Programming
  • 16.OpenClaw Application - Dedicated AI Assistant
  • 17.OpenClaw WhatsApp Plugin Application
  • 18.OpenClaw Voice Assistant
Download
  • Code
  • SystemFile
  • VM_File
  • Tools
  • Jetson boot files
Download ZIP

Welcome to Jetson AGX Thor repository

18.OpenClaw Voice Assistant

Openclaw Voice Assistant

Openclaw Voice Assistant1. Function Overview2. Hardware Connection3. Environment Setup4. Modify Program Configuration5. Enabling HTTP Functionality in OpenClaw6. Running the Program and Demonstration

1. Function Overview

The Openclaw voice assistant uses a speech module to capture sound, converts the sound into text, sends it to Openclaw, receives Openclaw's responses, and finally converts the responses back into audio for playback.

The speech-to-text and text-to-speech functions use the qwen3-asr-flash and qwen3-tts-flash models from Tongyi Qianwen, so you need to fill in the Alibaba Cloud Bailian Platform API_KEY to use it.

Openclaw needs to be configured in advance, either online or offline.

2. Hardware Connection

This example requires connecting not only the power adapter but also the large language model module for language input and output, and a DP monitor, mouse, and keyboard for displaying the interface and performing operations, or logging into a remote desktop.
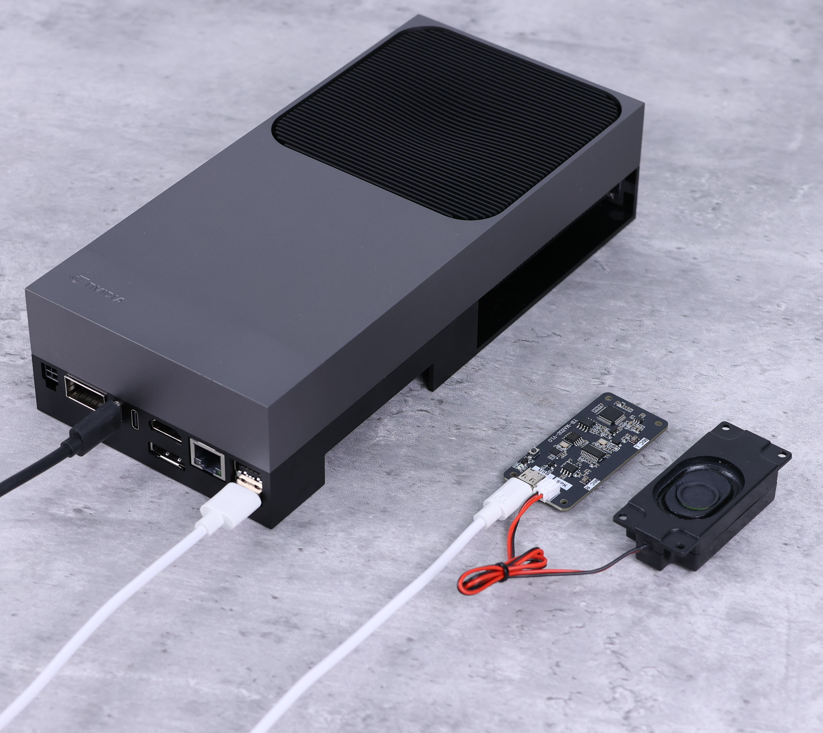
image-20260408202523869

3. Environment Setup

The factory image has been successfully set up.

Open the terminal, transfer the voice_to_openclaw.zip file from the program source code collection to the motherboard's user directory and extract it.

xxxxxxxxxx
Unzip voice_to_openclaw.zip

Run the following command to create a new Python virtual environment

xxxxxxxxxx
cd ~/voice_to_openclaw
python -m venv .venv
source .venv/bin/activate

image-20260422222807860

Install the relevant Python dependencies

xxxxxxxxxx
pip install -r requirements.txt

image-20260422222843141

4. Modify Program Configuration

Open the terminal, copy the example configuration as the valid configuration. The program will read the configuration parameters in the .env file when it runs.

xxxxxxxxxx
cd ~/voice_to_openclaw
cp env.example .env

Open the .env file:

xxxxxxxxxx
vim .env

You must fill in the value for DASHSCOPE_API_KEY; this value corresponds to your API Key for Tongyi Qianwen. For detailed instructions on how to obtain this key, please refer to the course section: [Online AI Large Model Development] -> [Online Large Models (Text Interaction)] -> [Tongyi Qianwen Large Model] to look up the information or register.

xxxxxxxxxx
DASHSCOPE_API_KEY=

image-20260423104125542


The following are optional configurations:

  1. If you wish to switch to English conversation, change the value of the DASHSCOPE_LANGUAGE parameter to en.
xxxxxxxxxx
DASHSCOPE_LANGUAGE=en
  1. If you wish to change the Speech-to-Text (ASR) model, modify the value of the DASHSCOPE_ASR_MODEL parameter.
xxxxxxxxxx
DASHSCOPE_ASR_MODEL=qwen3-asr-flash
  1. If you wish to change the Text-to-Speech (TTS) model, modify the value of the DASHSCOPE_TTS_MODEL parameter.
xxxxxxxxxx
DASHSCOPE_TTS_MODEL=qwen3-tts-flash
  1. If you wish to change the TTS speaker (voice timbre), modify the value of the DASHSCOPE_TTS_VOICE parameter.
xxxxxxxxxx
DASHSCOPE_TTS_VOICE=Cherry

The available voice options on the Tongyi Qianwen platform can be found and previewed at the following link:

xxxxxxxxxx
https://help.aliyun.com/zh/model-studio/qwen-tts?mode=pure#bac280ddf5a1u
  1. If you wish to change the acknowledgment phrase spoken after the voice wake-up command is detected, modify the value of the WAKE_ACK_TEXT parameter. Additionally, delete the ack_tts.wav file; a new ack_tts.wav file will be automatically generated the next time you run the program. If you do not require a spoken response after the wake-up command, simply leave the WAKE_ACK_TEXT parameter blank.
xxxxxxxxxx
WAKE_ACK_TEXT=I'm here.
xxxxxxxxxx
rm ~/voice_to_openclaw/ack_tts.wav
  1. If you need to adjust the ambient noise filtering level, please modify the value of the AGGRESSIVENESS parameter. The valid range is [0, 1, 2, 3]; a higher value is suitable for environments with higher noise levels.
xxxxxxxxxx
AGGRESSIVENESS=2
  1. If you need to adjust the silence timeout duration that triggers the end of recording, please modify the value of the MAX_SILENCE_MS parameter. The unit is milliseconds; by default, 2 seconds of silence signals the end of the recording.
xxxxxxxxxx
MAX_SILENCE_MS=2000
  1. If you need to adjust the maximum recording duration (recording timeout), please modify the value of the MAX_UTTERANCE_MS parameter. The unit is milliseconds; by default, recording automatically ends 5 seconds after the wake-up command is detected.
xxxxxxxxxx
MAX_UTTERANCE_MS=5000
  1. If you need to adjust the timeout duration for OpenClaw, please modify the value of the OPENCLAW_TIMEOUT parameter. The unit is seconds; the default timeout is 3 minutes.
xxxxxxxxxx
OPENCLAW_TIMEOUT=180
  1. If you are not using the factory-provided system image, the system may not have the voice module port bound to /dev/myserial. In this case, please modify the MIC_SERIAL_PORT parameter to reflect the actual USB port name (e.g., /dev/ttyUSB0).
xxxxxxxxxx
MIC_SERIAL_PORT=/dev/ttyUSB0


5. Enabling HTTP Functionality in OpenClaw

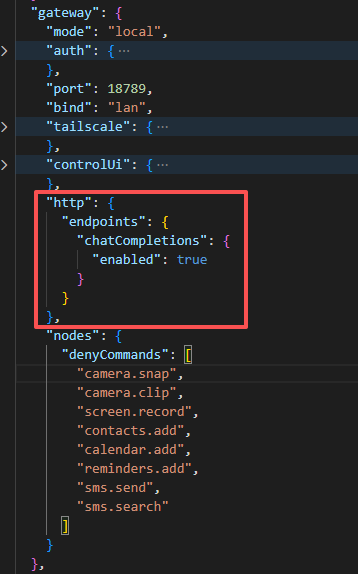
Since OpenClaw's HTTP functionality is disabled by default, you must add an HTTP enablement configuration to the OpenClaw settings to use it. If you have already added the HTTP enablement configuration, you may skip this step.

Open a terminal and run the following command to edit the openclaw.json file:

xxxxxxxxxx
vim ~/.openclaw/openclaw.json

Search for [gateway]. If the gateway object does not contain an HTTP enablement configuration, add the necessary configuration settings within the gateway object. Then, save the configuration file.

xxxxxxxxxx
    "http": {
      "endpoints": {
        "chatCompletions": {
          "enabled": true
        }
      }
    },

image-20260422190713175

Restart the OpenClaw gateway to apply the configuration changes.

xxxxxxxxxx
openclaw gateway restart


6. Running the Program and Demonstration

Open a terminal and activate the virtual environment:

xxxxxxxxxx
cd ~/voice_to_openclaw
source .venv/bin/activate

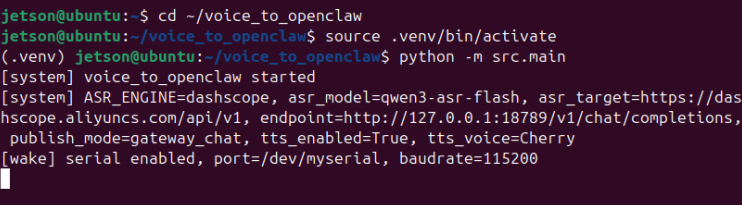
Run the program:

xxxxxxxxxx
python -m src.main

image-20260422223143705

Say "Hi,yahboom" to wake up the device. Once awakened, the device will respond, "I'm here." At this point, the device begins recording. (The terminal will print "1" to indicate an active speaking state, or "-" to indicate a silent state. By default, recording automatically ends after 2 seconds of silence, or if the total recording duration exceeds the default maximum limit of 6 seconds.)

Then, state the command you want OpenClaw to execute—for example: "Tell me a joke."

Once the recording is complete, the ASR (Automatic Speech Recognition) module converts the audio into text and sends it to OpenClaw. After receiving a response from OpenClaw, the TTS (Text-to-Speech) module converts the content back into audio and plays it aloud.

Note: While audio content is being played back, you can interrupt the playback and issue a new command by saying "Hi,yahboom" to wake the device again.


OpenClaw WhatsApp Plugin Application

COMPANY

  • About us
  • Team Style
  • Blog

LEARNING & EXPLORATION

  • Tutorials
  • Edge AI hardware
  • Educational robots
  • Embedded intelligent hardware

WHERE TO BUY

  • Yahboom Online Store
  • Amazon
  • Alibaba
  • AliExpress
  • Mercado

TECHNOLOGY SUPPORT

  • Email: support@yahboom.com

BE A DISTRIBUTOR

  • Email: sales@yahboom.com
QR Code

Copyright © 2017-2026 Yahboom. All Rights Reserved.

EN/中文