Welcome to Jetson AGX Thor repository
04.Handwritten Digit Recognition
Handwritten Digit Recognition
1. Introduction to KNN (K-Nearest Neighbors) for Handwritten Digit Recognition
1) KNN (K-Nearest Neighbor) is a supervised learning method. Its working mechanism is very simple, requiring no training set, and it is one of the simpler classic machine learning algorithms. It can handle regression and classification problems.
2) Methodology
In the feature space, if the majority of the k nearest neighbors (i.e., the closest neighbors in the feature space) of a sample belong to a certain class, then the sample also belongs to that class.
In official terms, the K-Nearest Neighbors algorithm is, given a training dataset, for a new input instance, finding the K nearest neighbors (the K neighbors mentioned above) in the training dataset. If the majority of these K neighbors belong to a certain class, the input instance is classified into that class.
3) Working Principle
There exists a set of sample data, also called the training sample set, and each data point in the sample set has a label, meaning we know the relationship between each data point in the sample set and its corresponding class. After inputting unlabeled data, each feature in the new data is compared with the corresponding features in the sample set, extracting the classification label of the most similar data (nearest neighbor) in the sample set. Generally, we only select the top K most similar data in the sample dataset; this is the origin of K in the K-nearest neighbor algorithm, and K is usually an integer no greater than 20. Finally, the classification of the new data is selected based on the most frequent occurrence among the K most similar data.
4) Advantages and Disadvantages of KNN
- Advantages
Flexible usage, convenient for small sample prediction, high accuracy, insensitive to outliers, no data input assumptions
- Disadvantages
Lacks a training phase, cannot handle multiple samples, high computational and space complexity
5) KNN Implementation Steps:
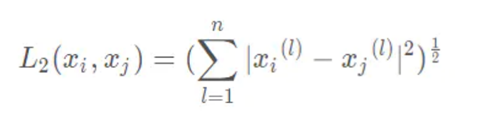
- Calculate distance
Euclidean distance, i.e.
- Sort points according to increasing distance
- Select the K points with the smallest distance (generally no more than 20)
- Determine the frequency of occurrence of the class of the top K points, frequency = class / k
- Return the class with the highest frequency among the top K points as the predicted classification for the test data
2. Introducing the KNN algorithm implementation using handwritten digit recognition as an example
1) Dataset
- Training Set
The training set is pre-classified data. You can refer to ~/content_recognition/KNN/knn-digits/trainingDigits in the directory.
Note: The training set is already trained. If you want to train it yourself, you need to back up the original training set first, as it is quite large.
- Test Set
The test set is used to test the algorithm. You can refer to ~/content_recognition/KNN/knn-digits/testDigits in the directory.
2) Creating handwritten digit images using Windows Paint
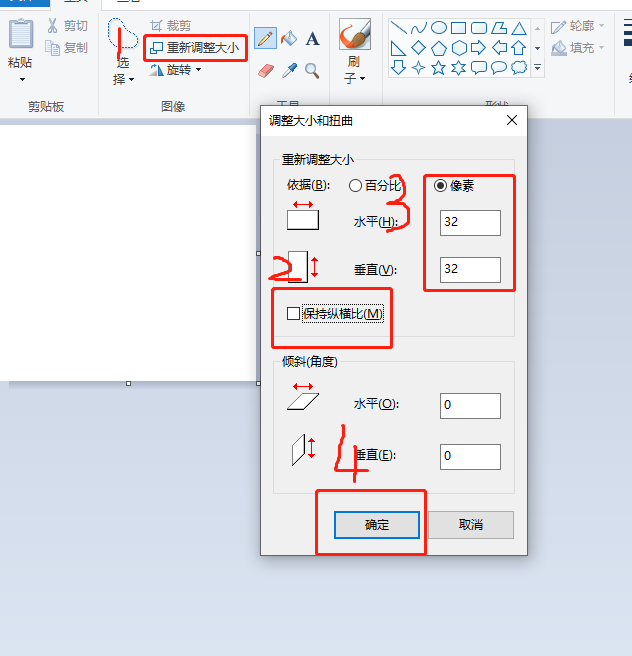
- Open Paint and adjust the resolution to 32*32. Other resolutions are also possible, but it's best to fill the entire area with the drawing; otherwise, the error rate will be high.
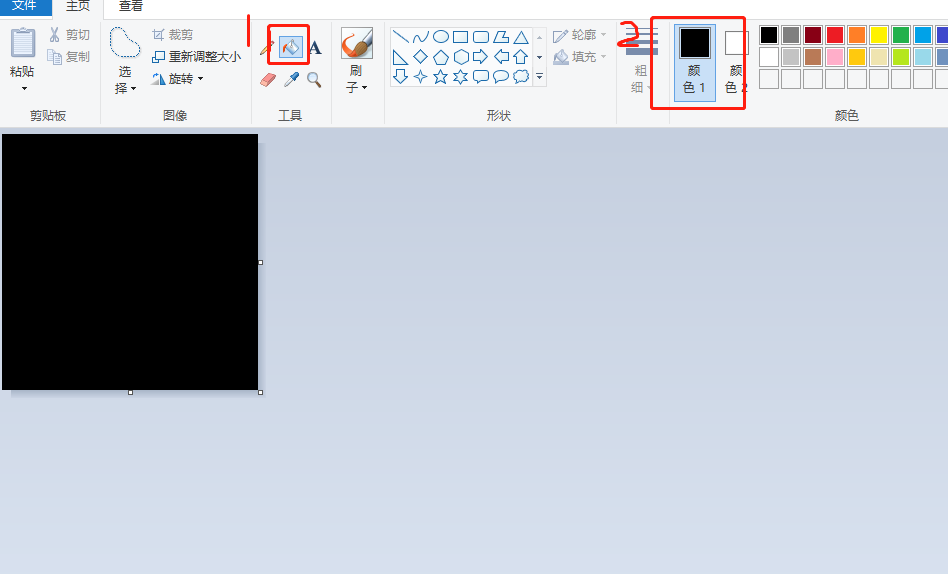
- Hold down Ctrl and scroll the mouse wheel upwards to zoom in on the image to its maximum. Select the Paint Bucket tool and choose black to fill the entire image.
- Select the Pencil tool, choose white as the color, and select the maximum line width. As shown in the image below:
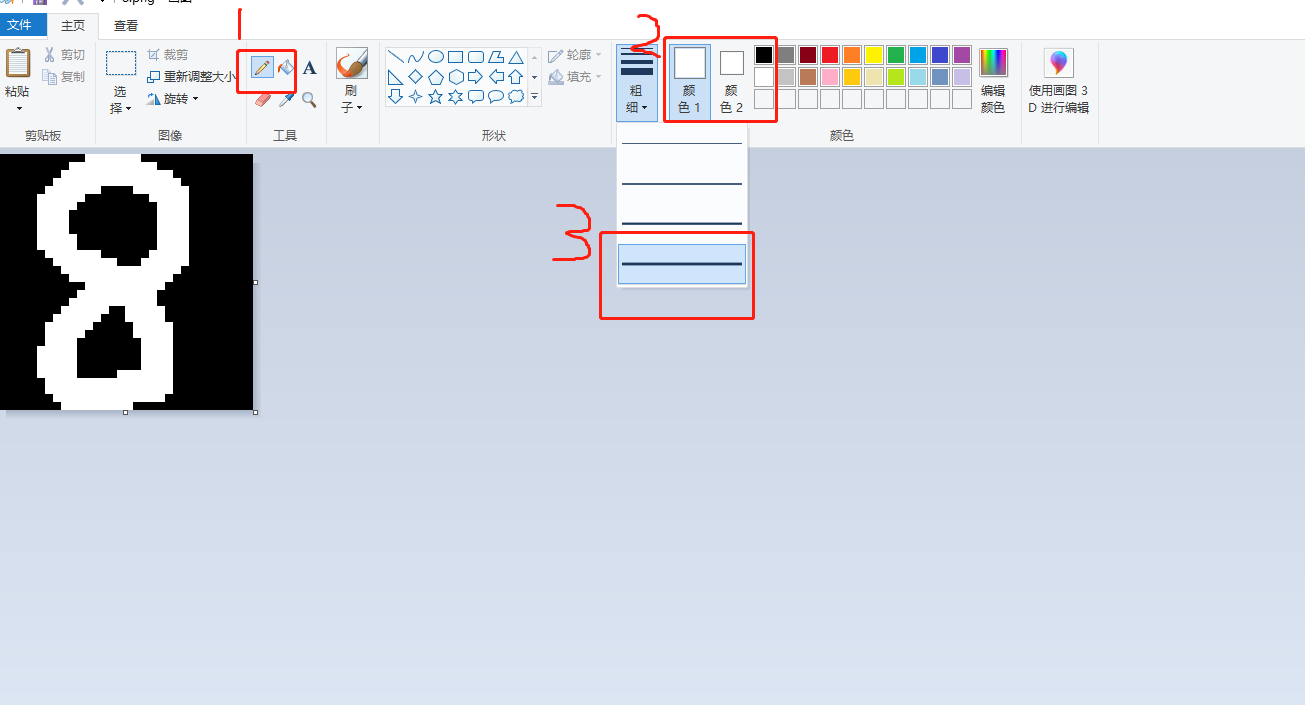
After drawing, save it as a PNG image (using 8.png as an example), and copy it to the project directory using WinSCP.
3) Convert the image (.img) to text (.txt)
- Code
Code location: ~/content_recognition/KNN/img2file.py
xfrom PIL import Imageimport numpy as npdef img2txt(img_path, txt_name): im = Image.open(img_path).convert('1').resize((32, 32)) # type:Image.Image data = np.asarray(im) np.savetxt(txt_name, data, fmt='%d', delimiter='')img2txt("8.png","./knn-digits/testDigits/8_1.txt")img_path: Image filename
txt_name: The converted file will be saved in the ~/content_recognition/KNN/knn-digits/testDigits directory, named 8_1.txt
- Run the program
xxxxxxxxxxcd ~/content_recognition/KNNpython img2file.py
After the program runs, a file named 8_1.txt will be generated in the KNN directory. Double-clicking it will show something like this:
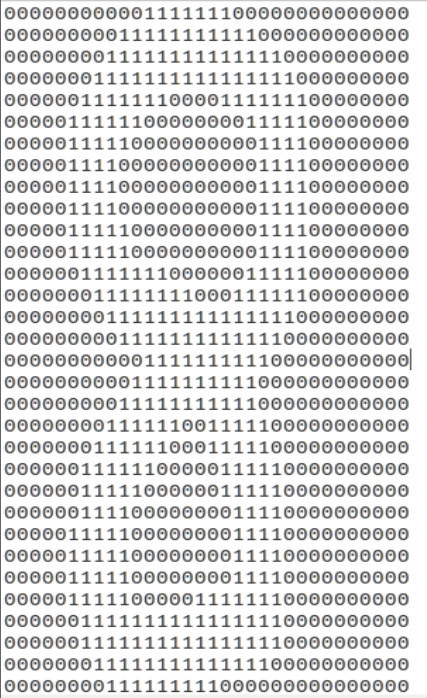
You can see that the part containing the number 8 roughly encloses the number 8.
4) Run the KNN recognition algorithm program
Open the terminal and run the following command:
xxxxxxxxxxcd ~/content_recognition/KNNpython knn.py
- Code
Code location: ~/content_recognition/KNN/knn.py
xxxxxxxxxx#!/usr/bin/env python3# -*- coding: utf-8 -*-"""Created on Sun Apr 16 14:53:46 2017@author: jiangkang"""import numpyimport operatorimport osimport matplotlib.pyplot as pltdef img2vector(filename): returnVect = numpy.zeros((1, 1024)) file = open(filename) for i in range(32): lineStr = file.readline() for j in range(32): returnVect[0, 32 * i + j] = int(lineStr[j]) return returnVectdef classifier(inX, dataSet, labels, k): dataSetSize = dataSet.shape[0] diffMat = numpy.tile(inX, (dataSetSize, 1)) - dataSet sqDiffMat = diffMat ** 2 sqDistances = sqDiffMat.sum(axis=1) distances = sqDistances ** 0.5 sortedDistIndicies = distances.argsort() classCount = {} for i in range(k): voteIlabel = labels[sortedDistIndicies[i]] classCount[voteIlabel] = classCount.get(voteIlabel, 0) + 1 sortedClassCount = sorted(classCount.items(), key=operator.itemgetter(1), reverse=True) return sortedClassCount[0][0]#Train first, then test for recognition. k represents the k-value in the algorithm - selecting the K most similar data points from the sample dataset. The k-value is generally an integer not greater than 20. def handWritingClassTest(k): hwLabels = [] trainingFileList = os.listdir('knn-digits/trainingDigits') #Read training set data m = len(trainingFileList) trainingMat = numpy.zeros((m, 1024)) for i in range(m): fileNameStr = trainingFileList[i] fileStr = fileNameStr.split('.')[0] classNumStr = int(fileStr.split('_')[0]) hwLabels.append(classNumStr) trainingMat[i, :] = img2vector("knn-digits/trainingDigits/%s" % fileNameStr) testFileList = os.listdir('knn-digits/testDigits') #Read test set data errorCount = 0.0 mTest = len(testFileList) for i in range(mTest): fileNameStr = testFileList[i] fileStr = fileNameStr.split('.')[0] classNumStr = int(fileStr.split('_')[0]) vectorTest = img2vector("knn-digits/testDigits/%s" % fileNameStr) result = classifier(vectorTest, trainingMat, hwLabels, k) print("分类结果是:%d, 真实结果是:%d" % (result, classNumStr)) if result != classNumStr: errorCount += 1.0 '''fileStr = "2.txt" classNumStr = int(fileStr.split('.')[0]) vectorTest = img2vector("./2.txt") result = classifier(vectorTest, trainingMat, hwLabels, 3)''' print("错误总数:%d" % errorCount) print("错误率:%f" % (errorCount / mTest)) return errorCounthandWritingClassTest(1)- Screenshot of the running process
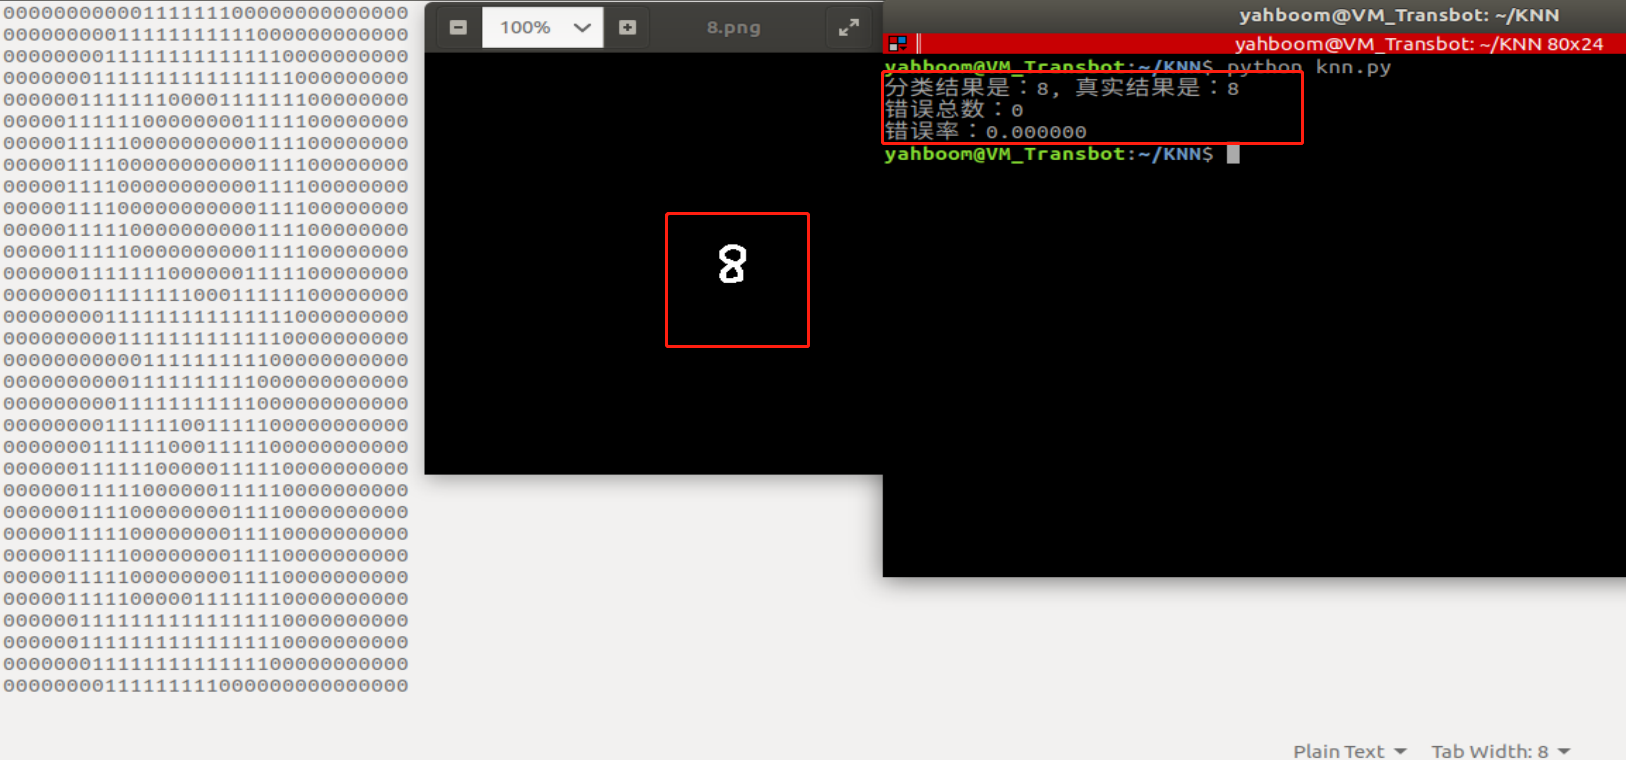
As shown in the figure, the recognized number is 8, which is correct. If the recognition result is different from the actual result, please copy the converted txt document to knn-digits/trainingDigits/ and name it as follows: 8_801.txt, and then retrain and recognize it normally.
- Program description
The text file converted from the image is named as follows, taking 8_1 as an example. knn.py will parse this file name in the program. The underscore is used as the boundary. The 8 at the beginning represents the actual number, and the part after can be customized. See the code.
xxxxxxxxxxclassNumStr = int(fileStr.split('_')[0])
Train first, then recognize.