yahboom
HomeLearn
Solution
Blog
Online Store
About Us
EN/中文
Jetson AGX Thor📖
1.Get started
  • 01.Learning Route
  • 02.Getting Started Quickly
2.Jetson basic course
  • 01.Jetson board introduction
  • 02.Flashing a Pure Jetson System via SDK
  • 03.Flashing a Pure Jetson System via USB Drive
  • 04.Flashing the Jetson Bootloader using L4T
  • 05.Replacing the SSD
  • 06.Install Jetpack environment
  • 07.Backup SSD system
  • 08.Restore factory image system
  • 09.SSD expansion
  • 10.SSD Speed Test
3.Basic setting course
  • 01.Basic knowledge
  • 02.Network configuration
  • 03.SSH remote login
  • 04.VNC remote control
  • 05.Remote file transfer
  • 06.Jtop tool
  • 07.Exchange space expansion
  • 08.Use VSCode
  • 09.Use VMware
  • 10.Change screen resolution
  • 11.Virtual Desktop
  • 12.Set root user password
  • 13.Configure sudo passwordless operation
  • 14.Managing custom services
  • 15.View system version information
4.OpenCV basic course
  • 01.Image reading
  • 02.Image saving
  • 03.Image modification
  • 04.Image scaling
  • 05.Image cropping
  • 06.Image translation
  • 07.Image mirroring
  • 08.Image grayscale conversion
  • 09.Image binarization
  • 10.Image edge detection
  • 11.Add line segments
  • 12.Add rectangles
  • 13.Add circular shape
  • 14.Add ellipses
  • 15.Add polygons
  • 16.Add Text
5.Vision basic course
  • 01.USB camera preview
  • 02.Use Jupyter Lab
  • 03.Use JetCam
6.Vision advanced course
01.Environment construction
  • 01.TensorFlow
  • 02.PyTorch
  • 03.Torchvision
  • 04.Torchaudio
02.DeepStream development
  • 01.DeepStream environment
  • 02.Four types of detection(traffic)
03.YOLO26 development
  • 01.YOLO Environment Setup
  • 02.CLI Usage
  • 03.Object Detection
  • 04.Instance Segmentation
  • 05.Pose Estimation
  • 06.Image Classification
  • 07.Oriented Bounding Boxes Object Detection
  • 08.Model Conversion
  • 09.Dataset Annotation
  • 10.Model Training_Conversion
  • 11.Model Prediction
04.Mediapipe development
  • 01.Mediapipe environment
  • 02.Hand detection
  • 03.Face detection
  • 04.Face effects
  • 05.3D object recognition
  • 06.Virtual brush
  • 07.Gesture recognition
  • 08.Finger control
  • 09.Posture estimation
  • 10.Face mask
  • 11.Overall detection
  • 12.Green scene removal(Human)
05.QR code recognition
  • 01.Barcode Recognition
  • 02.QR Code Recognition
  • 03.Machine Code Recognition
  • 04.Handwritten Digit Recognition
7.Docker basic course
  • 01.Docker introduction
  • 02.Docker installation
  • 03.Docker command
  • 04.Docker usage
  • 05.Docker interaction
8.ROS2-jazzy
1.ROS2 basic course
  • 1.Introduction to ROS2
  • 2.ROS2 install Jazzy
  • 3.ROS2 development environment
  • 4.ROS2 workspace
  • 5.ROS2 function package
  • 6.ROS2 node
  • 7.ROS2 topic communication
  • 8.ROS2 service communication
  • 9.ROS2 action communication
  • 10.ROS2 custom interface message
  • 11.ROS2 parameter service case
  • 12.ROS2 meta-function package
  • 13.ROS2 distributed communication
  • 14.ROS2 DDS
  • 15.ROS2 time related API
  • 16.ROS2 common command tools
  • 17.ROS2 rviz2 use
  • 18.ROS2 rqt toolbox
  • 19.ROS2 Launch startup file configuration
  • 20.ROS2 recording and playback tool
  • 21.ROS2 URDF model
  • 22.ROS2 Gazebo simulation platform
  • 23.ROS2 TF2 coordinate transformation
2.ROS2 vision course
  • 01.Camera preview (USB)
  • 02.Camera calibration (USB)
  • 03.AR vision (USB)
9.Offline AI model course
Offline large model (Text Interaction)
  • 1.Al large model environment deployment
  • 2.Install large model dialogue platform
  • 3.Meta Al Llama3.2 model
  • 4.Alibaba Cloud Qwen3 model
  • 5.Microsoft Phi-4-mini model
  • 6.DeepSeek DeepSeek-R1 model
  • 7.Alibaba Cloud Qwen2.5v visual multimodal large model
  • 8.Google Gemma3 visual multimodal large model
  • 9.Lava visual multimodal large model
  • 10.MiniCPM-V visual multimodal large model
  • 11.Multimodal visual understand application
  • 12.Multimodal text image application
  • 13.Multimodal video analysis application
  • 14.Multi module visual position application
  • 15.Multimodal table scanning application
  • 16.Multimodal autonomous agent application
Offline large model (Voice Interaction)
  • 0.Voice interaction hardware connection (ReadMe)
  • 1.Offline speech to text (ASR)
  • 2.Offline text to speech (TTS)
  • 3.AI large model voice interaction
  • 4.Multimodal visual understand speech interaction
  • 5.Multimodal text and graphics application
  • 6.Multimodal video analysis application
  • 7.Multi module visual position application
  • 8.Multimodal table scanning application
  • 9.Multimodal autonomous proxy application
  • 10.AI large model offline voice assistant
10.Online AI model course
Online large model (Text Interaction)
  • 1.OpenRouter large model API aggregation platform
  • 2.Multimodal Video Analysis Applications
  • 3.Multimodal visual localization application
  • 4.Multimodal table scanning application
  • 5.Multimodal autonomous proxy application
Online large model (Voice Interaction)
  • 0.Voice interaction hardware connection (ReadMe)
  • 1.Online speech to text (ASR)
  • 2.Online text to speech (TTS)
  • 3.AI large model voice interaction
  • 4.Multimodal visual understand speech interaction
  • 5.Multi module visual position application
  • 6.Multimodal table scanning application
  • 7.Multimodal autonomous proxy application
  • 8.AI large model offline voice assistant
11.Generative AI Applications
12.OpenClaw Advanced Development
  • 00.OpenClaw Quick Start on Jetson Platform
  • 01.OpenClaw Installation
  • 02.OpenClaw Online Platform Deployment
  • 03.OpenClaw Local Model Deployment
  • 04.OpenClaw TUI Interaction
  • 05.OpenClaw WebChat Interaction
  • 06.OpenClaw Tools Introduction
  • 07.OpenClawGate Gateway User Manual
  • 08.OpenClaw Features Overview
  • 09.OpenClawClawHub Introduction (Skill Installation)
  • 10. OpenClaw Switching Models
  • 11.OpenClaw Application - File Management
  • 12.OpenClaw Application - Camera
  • 13.OpenClaw Application - Browser Control
  • 14.OpenClaw Application - Script Execution
  • 15.OpenClaw Application - AI Programming
  • 16.OpenClaw Application - Dedicated AI Assistant
  • 17.OpenClaw WhatsApp Plugin Application
  • 18.OpenClaw Voice Assistant
Download
  • Code
  • SystemFile
  • VM_File
  • Tools
  • Jetson boot files
Download ZIP

Welcome to Jetson AGX Thor repository

01.Barcode Recognition

Barcode Recognition

Barcode RecognitionHardware ConnectionInstall Driver LibrariesExample CodeRunning the ProgramProgram OutputOptional: Generating Barcodes

Hardware Connection

Plug the USB camera into the motherboard's USB port. Open the system terminal and enter the following command to check the camera's device number. If /dev/video0 appears, it's working correctly.

ls /dev/video*

image-20260206175611081

Install Driver Libraries

xxxxxxxxxx
sudo apt install libzbar-dev
sudo pip3 install pyzbar --break-system-packages
sudo pip3 install python-barcode --break-system-packages

Example Code

​x
import cv2 as cv
from pyzbar.pyzbar import decode
import time
import numpy as np
from PIL import Image, ImageDraw, ImageFont
​
​
def decodeDisplay(image):
    gray = cv.cvtColor(image, cv.COLOR_BGR2GRAY)
    barcodes = decode(gray)
    for barcode in barcodes:
        # 提取条形码的边界框的位置
        # Extract the position of the boundary box of the barcode
        (x, y, w, h) = barcode.rect
        cv.rectangle(image, (x, y), (x + w, y + h), (225, 0, 0), 5)
        encoding = 'UTF-8'
        # 画出来,就需要先将它转换成字符串
        # to draw it, you need to convert it to a string
        barcodeData = barcode.data.decode(encoding)
        barcodeType = barcode.type
        # 绘出图像上数据和类型
        # Draw the data and type on the image
        pilimg = Image.fromarray(image)
        # 创建画笔
        # create brush
        draw = ImageDraw.Draw(pilimg)  # 图片上打印  Print on picture
        # # 参数1:打印坐标,参数2:文本,参数3:字体颜色
        # Parameter 1: print coordinates, parameter 2: text, parameter 3: font color
        draw.text((x, y - 25), str(barcode.data, encoding), fill=(255, 0, 0))
        # # PIL图片转cv2 图片
        # PIL picture to CV2 picture
        image = cv.cvtColor(np.array(pilimg), cv.COLOR_RGB2BGR)
        # 向终端打印条形码数据和条形码类型
        # Print barcode data and barcode type to terminal
        print("[INFO] Found {} barcode: {}".format(barcodeType, barcodeData))
    return image
​
​
if __name__ == '__main__':
    capture = cv.VideoCapture(0)
    cv_edition = cv.__version__
    if cv_edition[0] == '3': capture.set(cv.CAP_PROP_FOURCC, cv.VideoWriter_fourcc(*'XVID'))
    else: capture.set(cv.CAP_PROP_FOURCC, cv.VideoWriter.fourcc('M', 'J', 'P', 'G'))
    capture.set(cv.CAP_PROP_FRAME_WIDTH, 640)
    capture.set(cv.CAP_PROP_FRAME_HEIGHT, 480)
    print ("capture get FPS : ",capture.get(cv.CAP_PROP_FPS))
    while capture.isOpened():
        start = time.time()
        ret, frame = capture.read()
        action = cv.waitKey(10) & 0xFF
        frame = decodeDisplay(frame)
        end = time.time()
        fps = 1 / (end - start)
        text = "FPS : " + str(int(fps))
        cv.putText(frame, text, (30, 30), cv.FONT_HERSHEY_SIMPLEX, 0.6, (100, 200, 200), 1)
        cv.imshow('frame', frame)
        if action == ord('q') or action == 113: break
    capture.release()
    cv.destroyAllWindows()


Running the Program

Open the desktop terminal and execute the program:

xxxxxxxxxx
cd ~/content_recognition/barcode
python3 barcode_parsing_usb.py

Note: Since the program requires a display window to show the video feed, do not run it via a remote SSH terminal. Please run the program using the native desktop environment or a VNC remote desktop session.


Program Output

Upon execution, the program automatically activates the USB camera. Simply point the camera at a barcode; the program will then automatically frame the barcode and print its information to the terminal.

image-20260206182251329


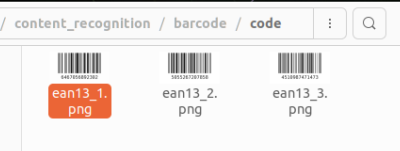
Barcode Example:

image-20260126115600668


Optional: Generating Barcodes

Open the terminal and run the following command to regenerate barcodes within the code directory.

xxxxxxxxxx
cd ~/content_recognition/barcode
python3 barcode_create.py

image-20260126115501056

Green scene removal(Human)
QR Code Recognition

COMPANY

  • About us
  • Team Style
  • Blog

LEARNING & EXPLORATION

  • Tutorials
  • Edge AI hardware
  • Educational robots
  • Embedded intelligent hardware

WHERE TO BUY

  • Yahboom Online Store
  • Amazon
  • Alibaba
  • AliExpress
  • Mercado

TECHNOLOGY SUPPORT

  • Email: support@yahboom.com

BE A DISTRIBUTOR

  • Email: sales@yahboom.com
QR Code

Copyright © 2017-2026 Yahboom. All Rights Reserved.

EN/中文