Welcome to RDK X3 Robot repository
2. Install the Python driver library
2. Install the Python driver library
2. Install the Python driver library2.1. Declaration before installing driver libraries2.2. Download the Python driver library2.3 Transfer files to the motherboard2.4. Start the installation2.5 Import the library file2.6, Driver library use example2.7. Introduction to API
2.1. Declaration before installing driver libraries
The factory image system of the car has been installed with the latest driver library, so there is no need to repeat the installation. You need to install the driver library only if you use a different image from the factory or if the driver library has updated content.
The drive system at factory inventory put path: / root/sunriseRobot/SunriseRobotLib
For details about how to install the driver library, see the following steps.
2.2. Download the Python driver library
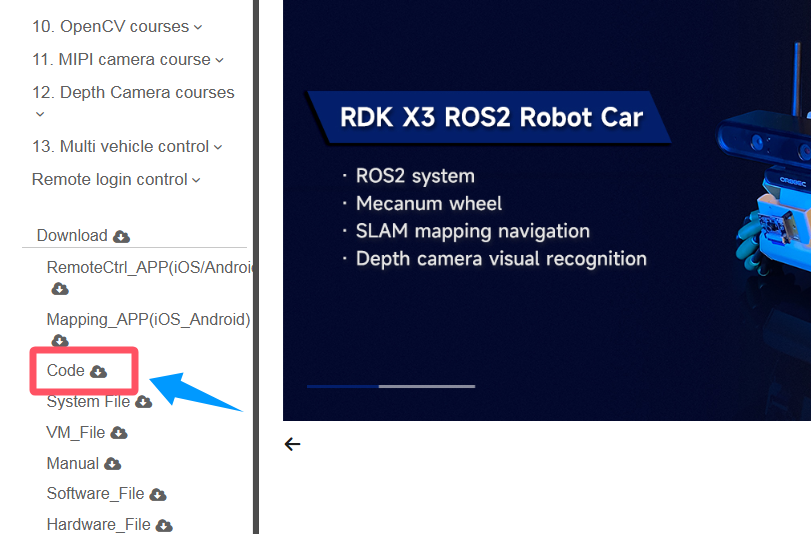
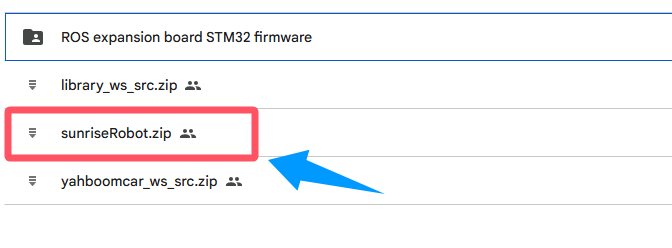
Visit the Yahboom official website and click [python Driver Library Download] in the RDK-X3-Robot data download area to download the latest version of SunriseRobotLib.zip file.
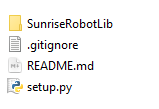
The zip pack contains the following files.
2.3 Transfer files to the motherboard
If you use the system browser to download the file, please download the file to the user's operable path, such as the desktop.
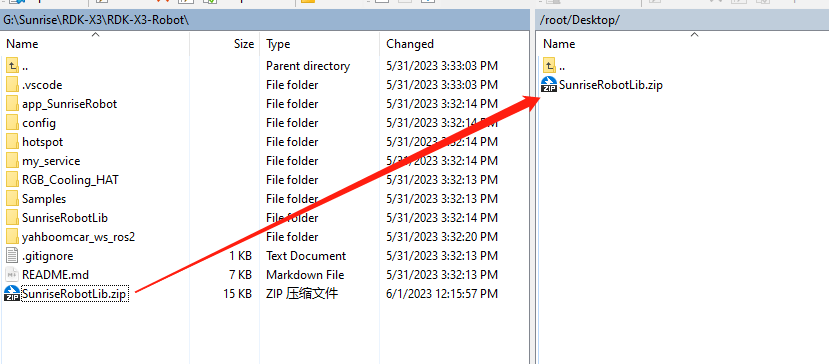
If you want to use the driver library compressed package file in the documents or download the driver library file using the computer browser, you can use the WinSCP software to drag the driver library compressed package file to the system desktop.
The driver library file can be deleted after the installation.
2.4. Start the installation
Open the terminal of the system and enter the following command to decompress.
Go to your desktop and check to see if the file exists. The red box is the target file
cd ~/Desktop && lsUnzip the file
xxxxxxxxxxunzip SunriseRobotLib.zip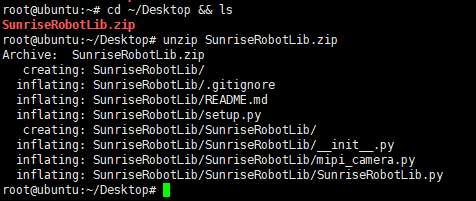
Note: The entire documentation routine is based on the example of the SunriseRobotLib.zip package on the system desktop. If you save the compressed package in different paths, go to the corresponding directory based on the actual path.
Enter the drive library folder
xxxxxxxxxxcd SunriseRobotLibRun the installation command. If the installation version number is displayed, the installation is successful.This command will cover has been installed before SunriseRobotLib drive library.
xxxxxxxxxxsudo python3 setup.py install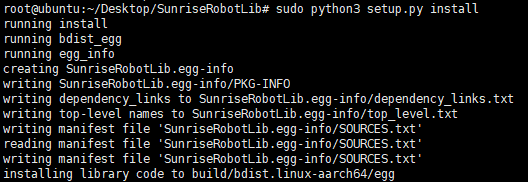
Run the query command. If the version number of SunriseRobotLib is displayed, the installation is complete
xxxxxxxxxxpip3 list | grep SunriseRobotLib

2.5 Import the library file
RDK-X3-Robot The name of the robot driver library is SunriseRobotLib, and SunriseRobotLib is used in the program to import the library
xxxxxxxxxx# Car chassis drivefrom SunriseRobotLib import SunriseRobot
2.6, Driver library use example
Source path: / root/sunriseRobot _basic/Samples / 1/1 _test_sunriserobot. Ipynb
Open jupyterlab, find and run the program to see the results.
Create the SunriseRobot object bot.
xxxxxxxxxxfrom SunriseRobotLib import SunriseRobotbot = SunriseRobot()
Displays the API interface for the SunriseRobotLib library.
xxxxxxxxxxhelp(bot)
Start to receive data, can only start once, all read data function is based on this function. All function interfaces that start with get depend on this function, and no get function can read data without running this function.
xxxxxxxxxxbot.create_receive_threading()
Read the version number.
xxxxxxxxxxversion = bot.get_version()print(version)
Read the battery voltage value.
xxxxxxxxxxvoltage = bot.get_battery_voltage()print(voltage)
Delete the object after the program ends to avoid conflicts caused by using the SunriseRobot library in other programs.
xxxxxxxxxxdel bot
2.7. Introduction to API
The following driver library API introduction, in the later control course to introduce the function usage and parameter content.
xclass SunriseRobot(builtins.object)| SunriseRobot(com='/dev/myserial', delay=0.002, debug=False)|| # V2.0.1|| Methods defined here:|| __del__(self)|| __init__(self, com='/dev/myserial', delay=0.002, debug=False)| Initialize self. See help(type(self)) for accurate signature.|| clear_auto_report_data(self)| # 清除单片机自动发送过来的缓存数据| # Clear the cache data automatically sent by the MCU|| create_receive_threading(self)| # 开启接收和处理数据的线程| # Start the thread that receives and processes data|| get_accelerometer_data(self)| # 获取加速度计三轴数据,返回a_x, a_y, a_z| # Get accelerometer triaxial data, return a_x, a_y, a_z|| get_akm_default_angle(self)| # 读取阿克曼类型(R2)小车前轮舵机默认角度。| # Read Ackerman type (R2) car front wheel steering default Angle.| get_battery_voltage(self)| # 获取电池电压值| # Get the battery voltage|| get_car_type_from_machine(self)| # 获取当前底层小车类型。| # Gets the current car type from machine|| get_gyroscope_data(self)| # 获取陀螺仪三轴数据,返回g_x, g_y, g_z| # Get the gyro triaxial data, return g_x, g_y, g_z|| get_imu_attitude_data(self, ToAngle=True)| # 获取板子姿态角,返回yaw, roll, pitch| # ToAngle=True返回角度,ToAngle=False返回弧度。| # Get the board attitude Angle, return yaw, roll, pitch| # ToAngle=True returns Angle, ToAngle=False returns radians.| get_magnetometer_data(self)| # 获取磁力计三轴数据,返回m_x, m_y, m_z| # Get the magnetometer three-axis data, return m_x, m_y, m_z| get_motion_data(self)| # 获取小车速度,val_vx, val_vy, val_vz| # Get the car speed, val_vx, val_vy, val_vz|| get_motion_pid(self)| # 获取小车的运动PID参数, 返回[kp, ki, kd]| # Get the motion PID parameters of the dolly and return [kp, ki, kd]|| get_motor_encoder(self)| # 获取四路电机编码器数据| # Obtain data of four-channel motor encoder|| get_uart_servo_angle(self, s_id)| # 读取总线舵机的角度,s_id表示要读取的舵机的ID号,s_id=[1-6]| # Read the Angle of the bus steering gear, s_id indicates the ID number of the steering gear to be read, s_id=[1-6]|| get_uart_servo_angle_array(self)| # 一次性读取六个舵机的角度[xx, xx, xx, xx, xx, xx],如果某个舵机错误则那一位为-1| # Read the angles of three steering gear [xx, xx, xx, xx, xx, xx] at one time. If one steering gear is wrong, that one is -1|| get_uart_servo_value(self, servo_id)| # 读取总线舵机位置参数, servo_id=[1-250], 返回:读到的ID,当前位置参数| # Read bus servo position parameters, servo_id=[1-250], return: read ID, current position parameters|| get_version(self)| # 获取底层单片机版本号,如1.1| # Get the underlying microcontroller version number, such as 1.1|| reset_car_state(self)| # 重置小车状态,包括停车,关灯,关蜂鸣器| # Reset car status, including parking, lights off, buzzer off|| reset_flash_value(self)| # 重置小车flash保存的数据,恢复出厂默认值。| # Reset the car flash saved data, restore the factory default value|| set_akm_default_angle(self, angle, forever=False)| # 设置阿克曼类型(R2)小车前轮的默认角度,angle=[60, 120]| # forever=True永久保存,=False临时作用。| # 由于永久保存需要写入芯片flash中,操作时间较长,所以加入delay延迟时间,避免导致单片机丢包的问题。| # 临时作用反应快,单次有效,重启单片后数据不再保持。| # Set the default Angle of akerman type (R2) car front wheel, Angle =[60, 120]| # forever=True for permanent, =False for temporary.| # Since permanent storage needs to be written into the chip flash, which takes a long time to operate, delay is added to avoid packet loss caused by MCU.| # Temporary effect fast response, single effective, data will not be maintained after restarting the single chip|| set_akm_steering_angle(self, angle, ctrl_car=False)| # 控制阿克曼类型(R2)小车相对于默认角度的转向角,向左为负数,向右为正数,angle=[-45, 45]| # ctrl_car=False,只控制舵机角度,=True,控制舵机角度同时修改左右电机的速度。| # Control the steering Angle of ackman type (R2) car relative to the default Angle, negative for left and positive for right, Angle =[-45, 45]| # ctrl_car=False, only control the steering gear Angle, =True, control the steering gear Angle and modify the speed of the left and right motors.|| set_auto_report_state(self, enable, forever=False)| # 单片机自动返回数据状态位,默认为开启,如果设置关闭会影响部分读取数据功能。| # enable=True,底层扩展板会每隔10毫秒发送一包数据,总共四包不同数据,所以每包数据每40毫秒刷新一次。enable=False,则不发送。| # forever=True永久保存,=False临时作用。| # The MCU automatically returns the data status bit, which is enabled by default. If the switch is closed, the data reading function will be affected.| # enable=True, The underlying expansion board sends four different packets of data every 10 milliseconds, so each packet is refreshed every 40 milliseconds.| # If enable=False, the report is not sent.| # forever=True for permanent, =False for temporary|| set_beep(self, on_time)| # 蜂鸣器开关,on_time=0:关闭,on_time=1:一直响,| # on_time>=10:响xx毫秒后自动关闭(on_time是10的倍数)。| # Buzzer switch. On_time =0: the buzzer is off. On_time =1: the buzzer keeps ringing| # On_time >=10: automatically closes after xx milliseconds (on_time is a multiple of 10)|| set_car_motion(self, v_x, v_y, v_z)| 输入范围 input range:| X3: v_x=[-1.0, 1.0], v_y=[-1.0, 1.0], v_z=[-5, 5]| X3PLUS: v_x=[-0.7, 0.7], v_y=[-0.7, 0.7], v_z=[-3.2, 3.2]| R2/R2L: v_x=[-1.8, 1.8], v_y=[-0.045, 0.045], v_z=[-3, 3]|| set_car_run(self, state, speed, adjust=False)| # 控制小车向前、向后、向左、向右等运动。| # state=[0, 7],=0停止,=1前进,=2后退,=3向左,=4向右,=5左旋,=6右旋,=7停车| # speed=[-100, 100],=0停止。| # adjust=True开启陀螺仪辅助运动方向。=False则不开启。(此功能未开通)| # Control the car forward, backward, left, right and other movements.| # State =[0~6],=0 stop,=1 forward,=2 backward,=3 left,=4 right,=5 spin left,=6 spin right| # Speed =[-100, 100], =0 Stop.| # Adjust =True Activate the gyroscope auxiliary motion direction. If =False, the function is disabled.(This function is not enabled)|| set_car_type(self, car_type)| # 设置小车类型| # Set car Type|| set_colorful_effect(self, effect, speed=255, parm=255)| # RGB可编程灯带特效展示。| # effect=[0, 6],0:停止灯效,1:流水灯,2:跑马灯,3:呼吸灯,4:渐变灯,5:星光点点,6:电量显示| # speed=[1, 10],数值越小速度变化越快。| # parm,可不填,作为附加参数。用法1:呼吸灯效果传入[0, 6]可修改呼吸灯颜色。| # RGB programmable light band special effects display.| # Effect =[0, 6], 0: stop light effect, 1: running light, 2: running horse light, 3: breathing light, 4: gradient light, 5: starlight, 6: power display| # Speed =[1, 10], the smaller the value, the faster the speed changes| # Parm, left blank, as an additional argument. Usage 1: The color of breathing lamp can be modified by the effect of breathing lamp [0, 6]|| set_colorful_lamps(self, led_id, red, green, blue)| # RGB可编程灯带控制,可单独控制或全体控制,控制前需要先停止RGB灯特效。| # led_id=[0, 13],控制对应编号的RGB灯;led_id=0xFF, 控制所有灯。| # red,green,blue=[0, 255],表示颜色RGB值。| # RGB programmable light belt control, can be controlled individually or collectively, before control need to stop THE RGB light effect.| # Led_id =[0, 13], control the CORRESPONDING numbered RGB lights; Led_id =0xFF, controls all lights.| # Red,green,blue=[0, 255], indicating the RGB value of the color.|| set_motor(self, speed_1, speed_2, speed_3, speed_4)| # 控制电机PWM脉冲,从而控制速度(未使用编码器测速)。speed_X=[-100, 100]| # Control PWM pulse of motor to control speed (speed measurement without encoder). speed_X=[-100, 100]|| set_pid_param(self, kp, ki, kd, forever=False)| # PID 参数控制,会影响set_car_motion函数控制小车的运动速度变化情况。默认情况下可不调整。| # kp ki kd = [0, 10.00], 可输入小数。| # forever=True永久保存,=False临时作用。| # 由于永久保存需要写入芯片flash中,操作时间较长,所以加入delay延迟时间,避免导致单片机丢包的问题。| # 临时作用反应快,单次有效,重启单片后数据不再保持。| # PID parameter control will affect the set_CAR_motion function to control the speed change of the car. This parameter is optional by default.| # KP ki kd = [0, 10.00]| # forever=True for permanent, =False for temporary.| # Since permanent storage needs to be written into the chip flash, which takes a long time to operate, delay is added to avoid packet loss caused by MCU.| # Temporary effect fast response, single effective, data will not be maintained after restarting the single chip|| set_pwm_servo(self, servo_id, angle)| # 舵机控制,servo_id:对应ID编号,angle:对应舵机角度值| # servo_id=[1, 4], angle=[0, 180]| # Servo control, servo_id: corresponding, Angle: corresponding servo Angle value|| set_pwm_servo_all(self, angle_s1, angle_s2, angle_s3, angle_s4)| # 同时控制四路PWM的角度,angle_sX=[0, 180]| # At the same time control four PWM Angle, angle_sX=[0, 180]|| set_uart_servo(self, servo_id, pulse_value, run_time=500)| # 控制总线舵机。servo_id:[1-255],表示要控制的舵机的ID号, id=254时, 控制所有已连接舵机。| # pulse_value=[96,4000]表示舵机要运行到的位置。| # run_time表示运行的时间(ms),时间越短,舵机转动越快。最小为0,最大为2000| # Control bus steering gear. Servo_id :[1-255], indicating the ID of the steering gear to be controlled. If ID =254, control all connected steering gear.| # pulse_value=[96,4000] indicates the position to which the steering gear will run.| # run_time indicates the running time (ms). The shorter the time, the faster the steering gear rotates. The minimum value is 0 and the maximum value is 2000|| set_uart_servo_angle(self, s_id, s_angle, run_time=500)| # 设置总线舵机角度接口:s_id:[1,6], s_angle: 1-4:[0, 180], 5:[0, 270], 6:[0, 180], 设置舵机要运动到的角度。| # run_time表示运行的时间(ms),时间越短,舵机转动越快。最小为0,最大为2000| # Set bus steering gear Angle interface: s_id:[1,6], s_angle: 1-4:[0, 180], 5:[0, 270], 6:[0, 180], set steering gear to move to the Angle.| # run_time indicates the running time (ms). The shorter the time, the faster the steering gear rotates. The minimum value is 0 and the maximum value is 2000|| set_uart_servo_angle_array(self, angle_s=[90, 90, 90, 90, 90, 180], run_time=500)| # 同时控制机械臂所有舵机的角度。| # Meanwhile, the Angle of all steering gear of the manipulator is controlled|| set_uart_servo_ctrl_enable(self, enable)| # 设置机械臂控制开关,enable=True正常发送控制协议,=False不发送控制协议| # Set the control switch of the manipulator. Enable =True Indicates that the control protocol is normally sent; False indicates that the control protocol is not sent|| set_uart_servo_id(self, servo_id)| # 设置总线舵机的ID号(谨慎使用),servo_id=[1-250]。| # 运行此函数前请确认只连接一个总线舵机,否则会把所有已连接的总线舵机都设置成同一个ID,造成控制混乱。| # Set the bus servo ID(Use with caution), servo_id=[1-250].| # Before running this function, please confirm that only one bus actuator is connected. Otherwise, all connected bus actuators will be set to the same ID, resulting in confusion of control|| set_uart_servo_offset(self, servo_id)| # 设置机械臂的中位偏差,servo_id=0~6, =0全部恢复出厂默认值| # Run the following command to set the mid-bit deviation of the manipulator: servo_id=0 to 6, =0 Restore the factory default values|| set_uart_servo_torque(self, enable)| # 关闭/打开总线舵机扭矩力, enable=[0, 1]。| # enable=0:关闭舵机扭矩力,可以用手转动舵机,但命令无法控制转动;| # enable=1:打开扭矩力,命令可以控制转动,不可以用手转动舵机。| # Turn off/on the bus steering gear torque force, enable=[0, 1].| # enable=0: Turn off the torque force of the steering gear, the steering gear can be turned by hand, but the command cannot control the rotation;| # enable=1: Turn on torque force, command can control rotation, can not turn steering gear by hand|