Welcome to RDK X3 Robot repository
5. Color tracking
5. Color tracking
5. Color tracking5.1. Description of program functions5.2. Program Code Reference Path5.3.1. Application Startup and Web page Display5.3.2. Color Recognition and tracking5.3.3 Dynamic parameter tuning5.3.4. View the node topic communication graph5.4. Core Source Code Parsing5.4.1. color_identify. Py5.4.2. color_track.py
5.1. Description of program functions
After the program starts, the image published by the camera is displayed on the web page. Select the color through the mouse box, the car will lock this color, press the [space] key to enter the tracking mode. The car will maintain a distance of 1 meter from the tracked object, and always ensure that the tracked object remains in the center of the picture.
In addition, the [L1] button on the handle locks/turns on the car's motion controls. When motion control is enabled, the function is locked; This function can be turned on when the motion control is locked.
5.2. Program Code Reference Path
xxxxxxxxxx#launch文件#launch file/userdata/yahboomcar_ws/src/yahboomcar_colortrack/launch/colortrack_launch.xmlThe node or launch file is explained as follows:
- color_identify: performs image processing and calculates the center coordinates of the tracked object. The code path is,
xxxxxxxxxx/userdata/yahboomcar_ws/src/yahboomcar_colortrack/yahboomcar_colortrack/color_identify.py
color_track: calculates the speed mainly according to the center coordinates and depth information of the tracked object, and releases the speed data to the chassis. The code path is,
xxxxxxxxxx/userdata/yahboomcar_ws/src/yahboomcar_colortrack/yahboomcar_colortrack/color_track.pyastra.launch.xml: starts the Astra camera
yahboomcar_bringup_launch.py:starts the chassis
rosbridge_websocket_launch.xml:Start websocket to enable ROS to interact with the Web
rosboard_node:starts the ROSboard
5.3.1. Application Startup and Web page Display
After SSH connects to the car, terminal input,
xxxxxxxxxxros2 launch yahboomcar_colortrack colortrack_launch.xmlOpen the browser on the PC side (note that the computer and the Rising Sun network must be in the same LAN), enter the URL: car IP:9999, for example, my car IP is 192.168.2.67, enter the URL in the browser on the virtual machine side to open the ROSboard webpage:
xxxxxxxxxx192.168.2.67:9999
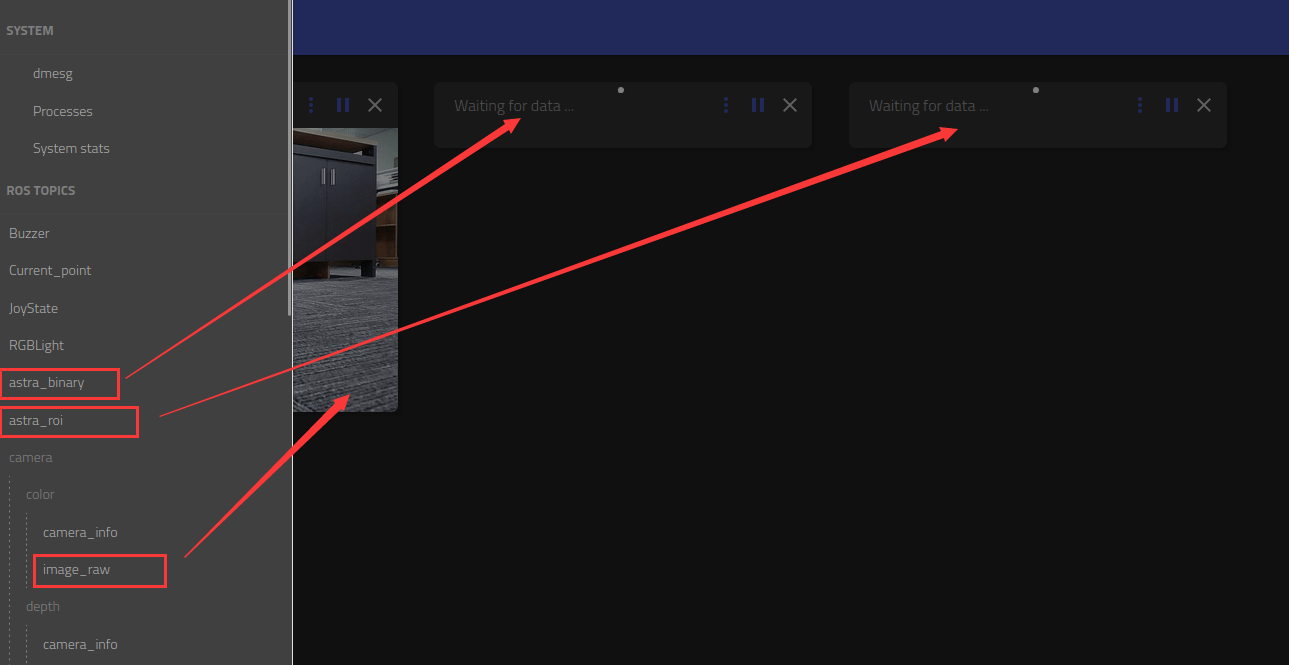
Select three topics: /camera/color/image_raw, /astra_binary, and /astra_roi. Only the RGB images published by the camera are displayed at this time, and no data is published for /astra_binary and /astra_roi topics.
5.3.2. Color Recognition and tracking
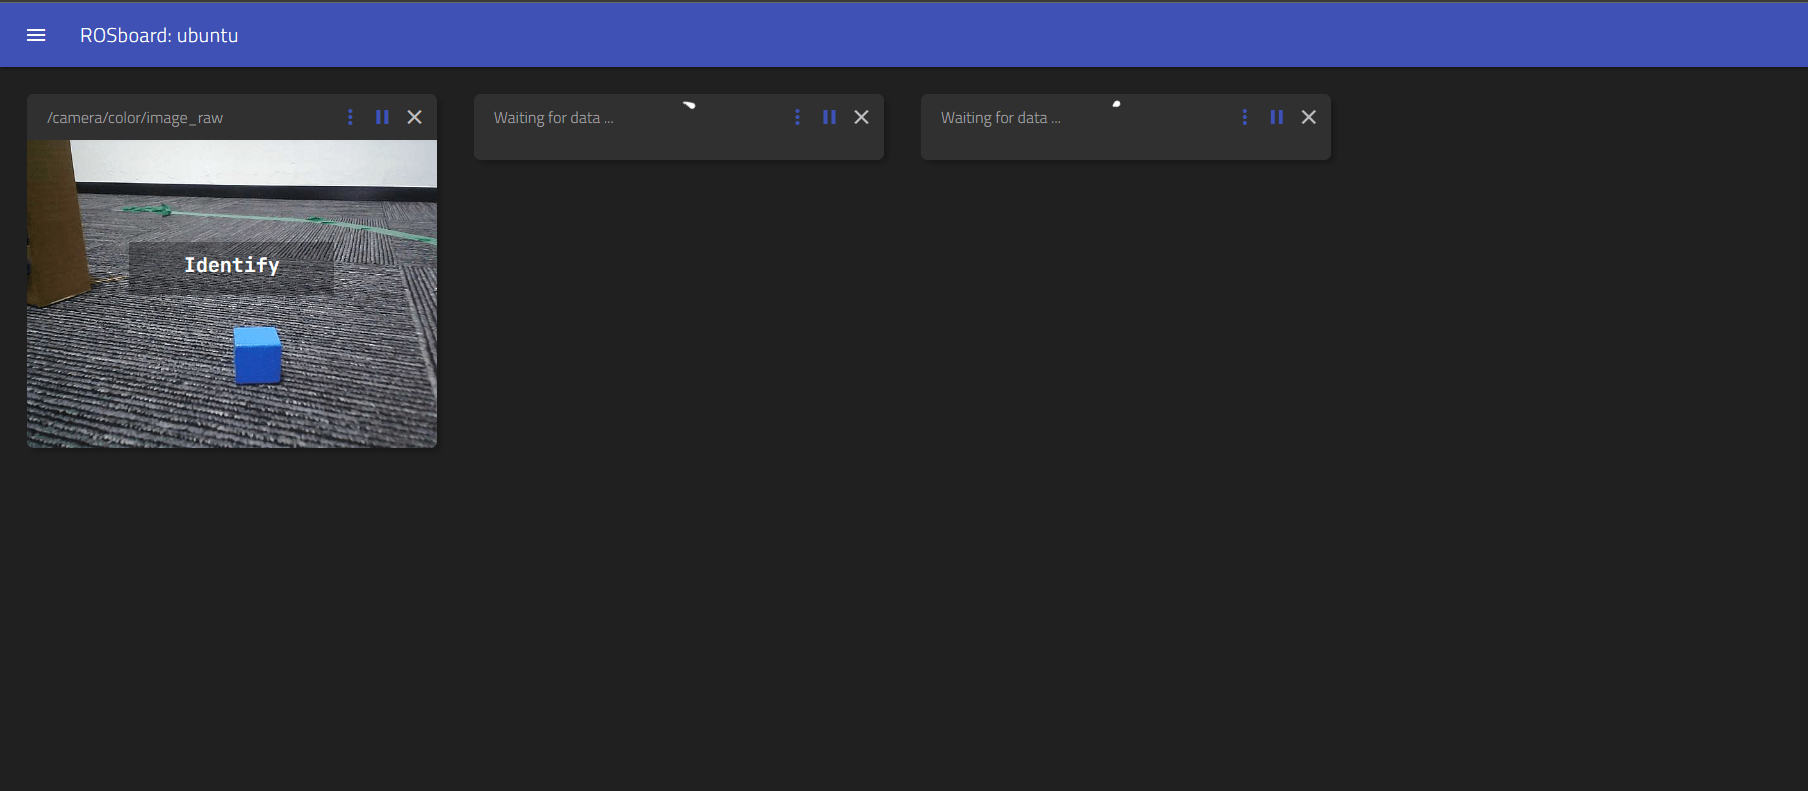
Press [i] or [I] on the page to enter the Identify mode, click the mouse frame twice in the RGB image to select a region (this region can only have one color).
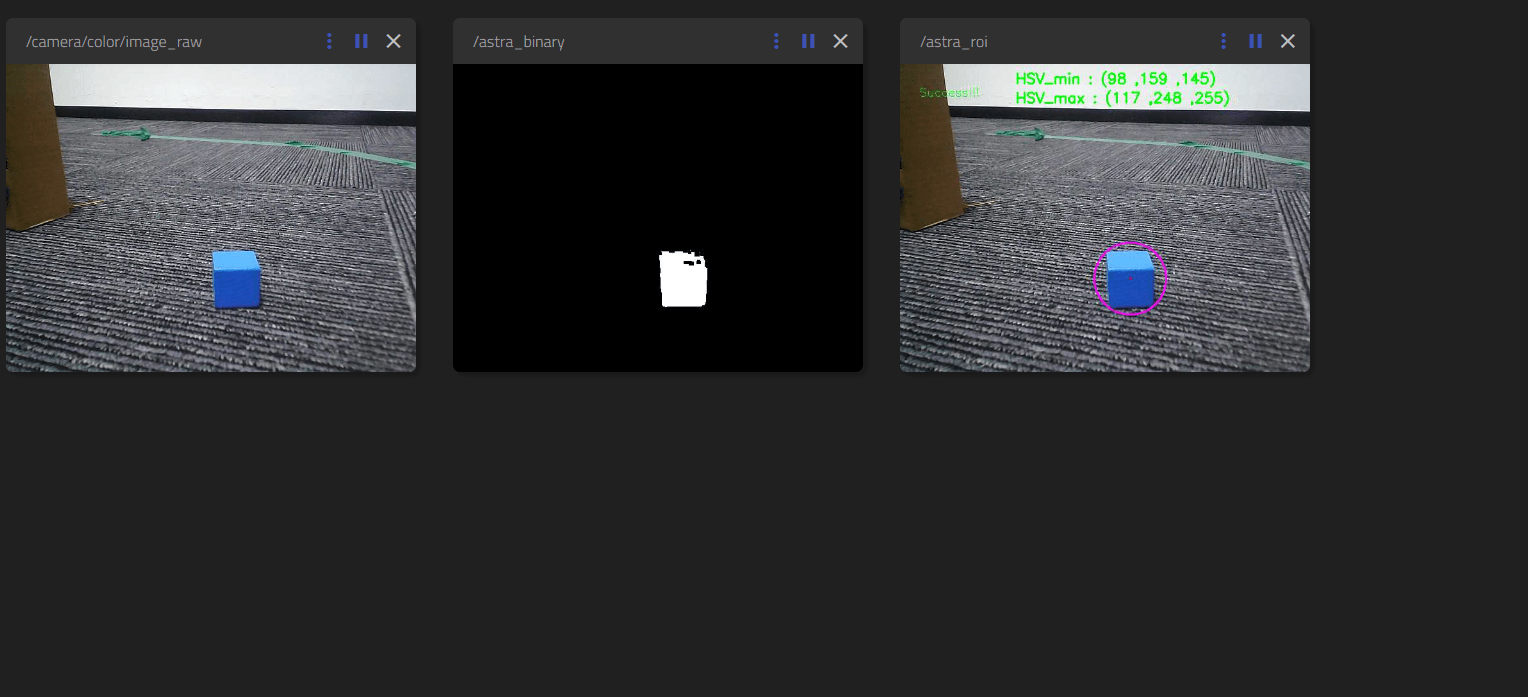
After the box is selected, the following screen will appear: /astra_binary displays the binary image after color selection; /astra_roi displays the HSV value range of the color and the center point of the color area.
Press the [space] key in the page to enter the tracking mode, and the car will move to the position of 1 meter away from the target; Press the [q] key in the page to cancel the tracking; Press [r] in the page to clear the color selection, then press [i] to re-select the color.
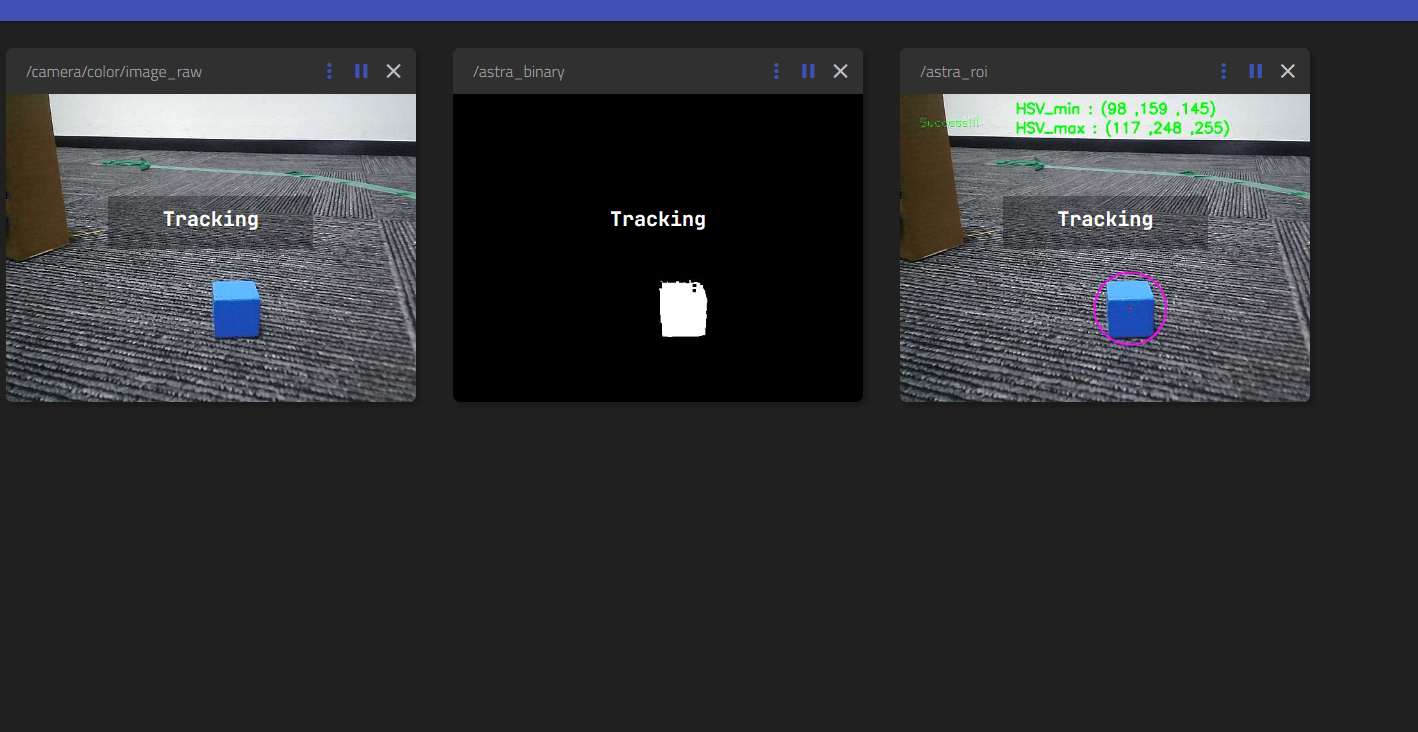
Move the object slowly, the car will follow, and keep a distance of 1 meter.
The interaction between this function and the keyboard is as follows:
| button | function | Remarks |
|---|---|---|
| 【r】or【R】 | color recognition | color selection mode, the program starts to enter the default mode |
| 【space】 | Color tracking | the car is tracked to the position |, 1 meter away from the target |
| 【q】or【Q】 | Stop the motion | stop the motion and keep the HSV range of colors |
| 【i】or【I】 | Reset | stops motion while clearing the HSV range of color |
5.3.3 Dynamic parameter tuning
Virtual machine terminal input,
xxxxxxxxxxros2 run rqt_reconfigure rqt_reconfigure
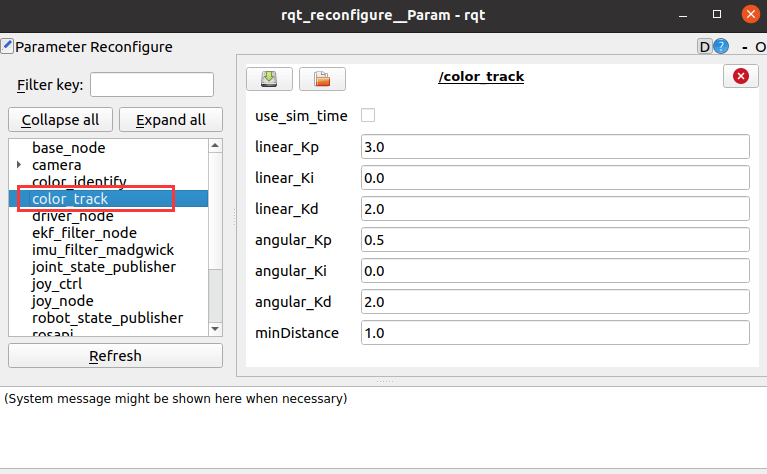
The adjustable parameters are the PID of the linear speed of the car, the angular speed, and the tracking distance.
After modifying the parameters, press Enter or click the blank area of the GUI to write the parameter values.
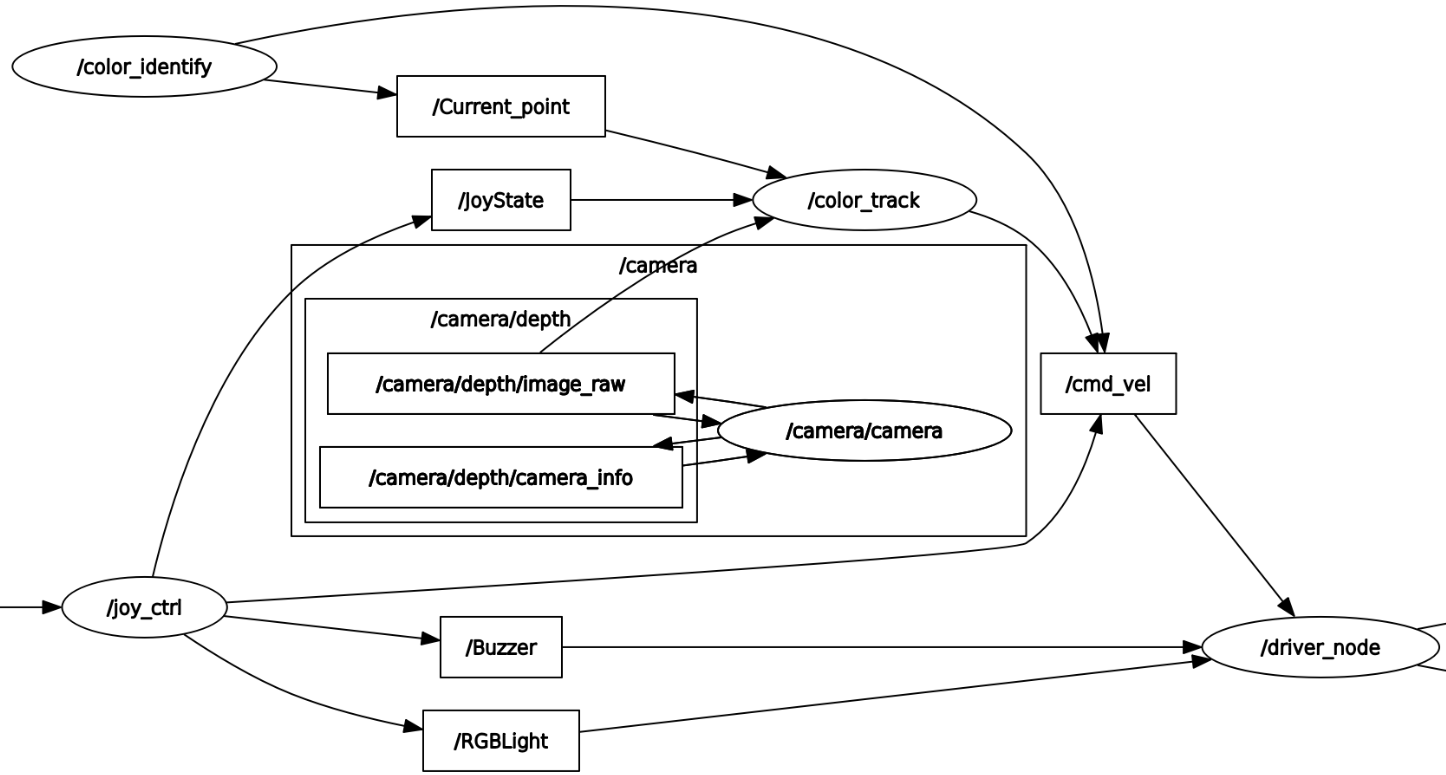
5.3.4. View the node topic communication graph
Open the VM terminal and run the following command to view topic communication between nodes:
xxxxxxxxxxros2 run rqt_graph rqt_graph
5.4. Core Source Code Parsing
5.4.1. color_identify. Py
This program mainly has the following functions:
- Open the camera and get RGB images; Here, in order to ensure speed, opencv is used to read the camera (note that the device number is video8) , rather than receiving data through the topic. However, after reading, the image data will be published through the topic web side visualization.
- Receive keyboard and mouse topic data for mode switching and color fetching.
- Process the image to calculate the central coordinates of the tracking target and publish it.
Part of the core code is as follows,
xxxxxxxxxx#创建发布者,发布追踪物体的中心坐标# Create a publisher that publishes the center coordinates of the tracking objectself.pub_position = self.create_publisher(Position,"/Current_point", 10)#创建发布者,发布图像数据# Create a publisher to publish image dataself.pub_binary = self.create_publisher(Image, '/astra_binary', 10)self.pub_roi = self.create_publisher(Image, '/astra_roi', 10)self.pub_image = self.create_publisher(Image, '/camera/color/image_raw', 10)#创建订阅者,接收鼠标和键盘数据# Create subscribers and receive mouse and keyboard dataself.sub_mouse = self.create_subscription(Polygon, '/mouse_pos', self.MouseCallback, 1)self.sub_keyboard = self.create_subscription(Char, '/key_value', self.KeyCallback, 1)#鼠标事件回调函数,确定框选位置# Mouse event callback function to determine the box selection positiondef MouseCallback(self, msg): start_cols = min(int(msg.points[0].x), int(msg.points[1].x)) start_rows = min(int(msg.points[0].y), int(msg.points[1].y)) end_cols = max(int(msg.points[0].x), int(msg.points[1].x)) end_rows = max(int(msg.points[0].y), int(msg.points[1].y)) self.Roi_init = (start_cols, start_rows, end_cols, end_rows)#键盘事件回调函数,切换模式# Keyboard event callback function, switch modedef KeyCallback(self, key): data = key.data if data == 32: self.Track_state = 'tracking' elif data == ord('i') or data == ord('I'): self.Track_state = 'identify' elif data == ord('r') or data == ord('R'): self.Track_state = 'reset' elif data == ord('q') or data == ord('Q'): self.Track_state = 'cancle'#计算中心坐标的值,self.circle存放xy值# Calculate the value of the center coordinate, self.circle stores the xy valuergbFrame, binary, self.circle = self.color.object_follow(rgbFrame, self.hsv_range)#发布中心坐标的消息# Post the message of the center coordinatesdef execute(self, x, y, z): position = Position() position.anglex = x * 1.0 position.angley = y * 1.0 position.distance = z * 1.0 self.pub_position.publish(position)5.4.2. color_track.py
This program mainly has the following functions: receive /Current_point and depth image topic data, calculate the speed size, and then publish the speed data.
Part of the code is as follows,
xxxxxxxxxx#定义订阅者接收需要的话题数据# Define the topic data that subscribers need to receiveself.sub_depth = self.create_subscription(Image,"/camera/depth/image_raw",self.depth_img_Callback, 1)self.sub_position =self.create_subscription(Position,"/Current_point",self.positionCallback,1)#定义速度发布者# Define the speed publisherself.pub_cmdVel = self.create_publisher(Twist,'/cmd_vel',10)#两个重要的回调函数,获取到point_x值和dist值# Two important callback functions that get the point_x value and dist valuedef PositionCallback(self, msg):def DepthCallback(self, msg):#根据point_x和dist计算线速度和角速度并发布Calculate and publish linear and angular velocities based on point_x and distlinear_x = self.linear_pid.compute(dist, self.minDist) / 1000.0angular_z = self.angular_pid.compute(320, point_x) / 1000.0if abs(dist - self.minDist) < 30: linear_x = 0if abs(point_x - 320.0) < 30: angular_z = 0twist = Twist()twist.linear.x = linear_x * 1.0twist.angular.z = angular_z * 1.0self.pub_cmdVel.publish(twist)