Welcome to RDK X3 Robot repository
3. Color recognition
3. Color recognition
3.1 Gameplay introduction
This course mainly uses the CSI camera of the RDK X3 board to obtain the picture of the camera, and analyzes the image through the OPENCV library, which can frame red, green, blue and yellow objects, and display the names of the corresponding colors.
3.2 Core Content analysis
The HSV_Config file is a library file used to process the color recognition of incoming images.
Color_HSV defines the HSV value of the color. Due to the color difference and light influence of the object color, if the recognition of a certain color effect is inaccurate, you can adjust the course according to the color HSV value. After adjusting the best effect, record the data and update the HSV value of the corresponding color.
xupdate_hsv = HSV_Config.update_hsv()Color_HSV = {"Red" : ((0, 70, 72), (7, 255, 255)),"Green" : ((54, 109, 78), (77, 255, 255)),"Blue" : ((92, 100, 62), (121, 251, 255)),"Yellow": ((26, 100, 91), (32, 255, 255))}
The program function of processing the camera picture will read the camera image to the update_hsv object for processing and output the color existing in the current picture, frame the corresponding color and display the color name, and finally transmit it to display through the image control.
xxxxxxxxxxdef task_processing():global g_stop_programt_start = time.time()m_fps = 0while g_camera.isOpened():if g_stop_program:breakret, frame = g_camera.read()frame, binary = update_hsv.get_contours(frame,Color_HSV)m_fps = m_fps + 1fps = m_fps / (time.time() - t_start)if (time.time() - t_start) >= 2:m_fps = fpst_start = time.time() - 1cv2.putText(frame, "FPS " + str(int(fps)), (10,20), cv2.FONT_HERSHEY_SIMPLEX, 0.5, (0,255,255), 1)# 图像传输给显示组件 The image is transmitted to the display componentimage_widget.value = bgr8_to_jpeg(frame)# time.sleep(.01)
3.3 Gameplay operation
Open the jupyterLab client and find the code path:
x/root/sunriseRobot/Samples/2_AI/03_color_recogniton/color_recognition.ipynb
Click Run All Cells, and then drag to the bottom to see the generated controls.

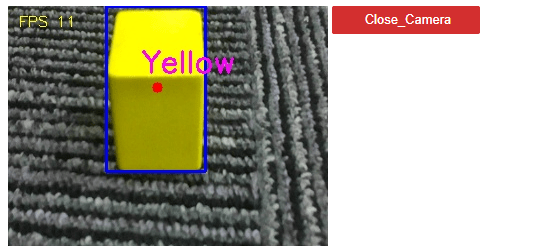
The left side shows the footage captured by the camera, and the right side Close_Camera is used to close the camera and program process. Put a red, green, blue, or yellow object in front of the camera, and the image will automatically frame the corresponding color block and display the name of the color.
Finally click the Close_Camera button to close the camera.