yahboom
HomeLearn
Solution
Blog
Online Store
About Us
EN/中文
RDK X3 Robot📖
01. About RDK-X3-Robot
1. Instructions
  • 1. Introduction
  • 2. FAQ
  • 3. Battery and charger use precautions
  • 4.TF card expand capacity
2. Common problem analysis
02. Assembly video
  • Part1-Install Motor
  • Part2-Install Battert Fixing Column
  • Part3-Install Motor Coupling
  • Part4-Install Mecanum wheel
  • Part5-Install Expansion Board
  • Part6-Wiring Show
  • Part7-Install Main Control Board
  • Part8-Install Car Top Plate and Antenna
  • Part9-Install OLED Screen
  • Part10-Install Depth Camera(Optional)
  • Part11-Install OLED Screen
  • Part12-Install HD Camera
  • Part13-Install Top Plate
  • Part14-Install Right Side Plate
  • Part15-Motor Wiring Show
  • Part16-lnstall Car Body
  • Part17-Install Battery
  • Part18-Install Lidar
03. Remote control tutorial
  • 1. The phone APP remote tutorial
  • 2. USB wireless controller remote tutorial
04. ROS functional tutorial
  • 1. Introduction of extension board
  • 2. Set up STM32 development environment
  • 3. Key control buzzer sound
  • 4. FreeRTOS application
  • 5. Serial communication
  • 6. SBUS model remote control
  • 7. CAN bus communication
  • 8. RGB color light strip
  • 9. Timer interrupt control PWM servo
  • 10. Control serial steering gear
  • 11. Nine-axis attitude sensor to obtain data
  • 12. Control motor forward and reverse
  • 13. The timer captures encoder data
  • 14. Theory of robot kinematics analysis
  • 15. PID control robot motion
05. Basic control tutorial
  • 1. Update the firmware of the expansion module
  • 2. Install the Python driver library
  • 3. Set the type of bottom car
  • 4. Open and close the APP program control
  • 5. Turn hotspot mode on and off
  • 6. The buzzer blows
  • 7. Control the motor forward and reverse
  • 8. Control robot movement
  • 9. OLED display
  • 10. Control fan and lamp effect
06. Development environment setup
  • 1. Virtual Machine
  • 2. Linux Basics
  • 3. Remote connection
  • 4. Multi-computer communication configuration
  • 5. Bind the device ID
  • 6. Image installation and backup
07. ROS2 Basic Course
  • 1. Introduction to ROS2
  • 2. ROS2 install Humble
  • 3. ROS2 development environment
  • 4. ROS2 workspace
  • 5. ROS2 function package
  • 6. ROS2 node
  • 7. ROS2 topic communication
  • 8. ROS2 service communication
  • 9. ROS2 action communication
  • 10. ROS2 custom interface message
  • 11. ROS2 parameter service case
  • 12. ROS2 meta-function package
  • 13. ROS2 distributed communication
  • 14. ROS2 DDS
  • 15. ROS2 time related API
  • 16. ROS2 common command tools
  • 17. ROS2 rviz2 use
  • 18. ROS2 rqt toolbox
  • 19. ROS2 Launch startup file configuration
  • 20. ROS2 recording and playback tool
  • 21. ROS2 URDF model
  • 22. ROS2 Gazebo simulation platform
  • 23. ROS2 TF2 coordinate transformation
08. Robot chassis control
  • 1. PID algorithm theory
  • 2. Robot information release
  • 3. Robot control
  • 4. Robot state estimation
  • 5. Robot calibration
  • 6. Robot trajectory tracking
  • 7. URDF model
09. Lidar courses
  • 1. Introduction and use of lidar
  • 2. Lidar obstacle avoidance
  • 3. Lidar following
  • 4. Lidar guard
  • 5. Patrol
  • 6. gmapping algorithm
  • 7. cartographer algorithm
  • 8. Navigation and obstacle avoidance
  • 9. App mapping and navigation
10. OpenCV courses
  • 1. Introduction to OpenCV
  • 2. OpenCV geometric transformation
  • 3. OpenCV image processing
  • 4. OpenCV image beautification
  • 5. Qr code creation and identification
11. MIPI camera course
  • 1. Camera driver
  • 2. Adjust the color HSV value
  • 3. Color recognition
  • 4. Color tracking
  • 5. Color follow
  • 6. Qr code command
  • 7. Face detection
  • 8. Object detection
  • 9. Visual Inspection -OpenCV
  • 10. Visual inspection - Deep learning
  • 11. Human tracking
  • 12. Gesture control
12. Depth Camera courses
  • 1. Use depth camera
  • 2. Calibration of camera internal reference
  • 3. ROS+OpenCV Foundation
  • 4. AR vision
  • 5. Color tracking
  • 6. Object tracking
13. Multi vehicle control
  • 1. Multi-vehicle synchronous control
  • 2. Multi-vehicle navigation
Remote login control
  • 1. VNC and SSH remote login
  • 2. Jupyter lab login and case code running
Download
  • RemoteCtrl_APP(iOS/Android))
  • Mapping_APP(iOS_Android)
  • Code
  • System File
  • VM_File
  • Manual
  • Software_File
  • Hardware_File
  • ROS2_Basic_VM
Download ZIP

Welcome to RDK X3 Robot repository

5. Bind the device ID

5. Bind the device ID

5. Bind the device ID5.1 Device view5.2. Device Binding5.2.1 Astra Camera Binding5.2.2 PCB and radar binding5.3 Introduction to Rule file syntax

When the robot uses two or more USB serial port devices, the corresponding relationship between the device name and the device is not fixed, but is assigned according to the order in which the device is connected to the system. Inserting a device and then another device can determine the relationship between the device and the device name, but each time the system starts, you need to insert and remove the device, which is very troublesome. The serial port can be mapped to a fixed device name, regardless of the insertion order, the device will be mapped to the new device name, we only need to use the new device name to read and write operations on the device.

Note: The ID of the matching device has been bound to the system image. The following steps can be used for binding new devices.

5.1 Device view

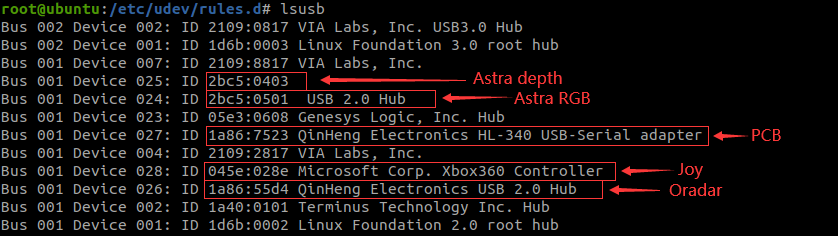
After SSH connects to the car, terminal input,

xxxxxxxxxx
lsusb

Astra has an official binding of the ID number of each device file, the handle generally does not need to be bound, the main binding PCB and radar can be.
1685347660010

Device number view

xxxxxxxxxx
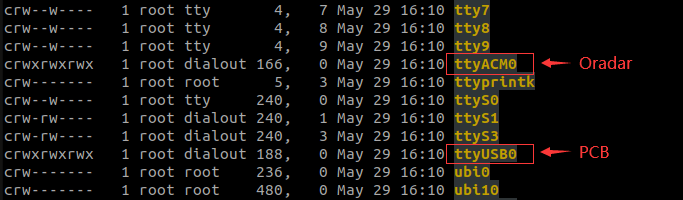
ll /dev/

1685348405441

1685348504224

5.2. Device Binding

5.2.1 Astra Camera Binding

The binding rules file for the Astra camera is [56-orbbec-usb.rules], provided by the Astra manufacturer and demonstrated here with Astra Pro.

Place the [56-orbbec-usb.rules] file in the following directory in the cart:

xxxxxxxxxx
/etc/udev/rules.d/56-orbbec-usb.rules

Run the following command on the terminal to refresh the USB rules to bind Astra camera.

xxxxxxxxxx
sudo udevadm control --reload-rules && sudo udevadm trigger

After the binding is complete, enter the following command,

xxxxxxxxxx
ll /dev/astra*

1685344640447

If the output is as follows, the binding is successful.

5.2.2 PCB and radar binding

The car terminal executes the following command,

xxxxxxxxxx
#进入rules.d目录
# Go to the rules.d directory
cd /etc/udev/rules.d/
#新建rules文件并编辑
# Create new rules file and edit it
sudo vim yahboomcar.rules

Write the following (see tutorial [Linux Basics] for vim command usage)

xxxxxxxxxx
KERNEL=="ttyUSB*", ATTRS{idVendor}=="1a86", ATTRS{idProduct}=="7523", MODE:="0777", SYMLINK+="myserial"
KERNEL=="ttyACM*", ATTRS{idVendor}=="1a86", ATTRS{idProduct}=="55d4", MODE:="0777", SYMLINK+="oradar"

Save and exit to make the rule take effect. Perform the following operations:

xxxxxxxxxx
sudo udevadm control --reload-rules && sudo udevadm trigger

After the binding is complete, enter the following command,

xxxxxxxxxx
ll /dev/myserial #PCB
ll /dev/oradar #雷达  # Radar

1685351624469

If the output is as follows, the binding is successful.

5.3 Introduction to Rule file syntax

xxxxxxxxxx
KERNEL=="ttyUSB*", ATTRS{idVendor}=="1a86", ATTRS{idProduct}=="7523", MODE:="0777", SYMLINK+="myserial"
KERNEL=="ttyACM*", ATTRS{idVendor}=="1a86", ATTRS{idProduct}=="55d4", MODE:="0777", SYMLINK+="oradar"

Parsing

xxxxxxxxxx
KERNEL          # 匹配事件的设备名
                # Name of the device that matches the event
ATTR{filename}  # 匹配事件设备的sysfs属性。
                # Matches the sysfs attribute of the event device.
idVendor        # 生产商编号
                # Manufacturer ID
idProduct       # 产品号
                # Product number
SYMLINK         # 为/dev/下的设备文件产生符号链接。就是给这个设备取一个别名。
                # Generate symbolic links for device files in /dev/. Just give the device an alias.
MODE            # 为设备设定权限。
                # Sets permissions for the device.

From [6.1], it can be seen that the device number of the PCB is [ttyUSB0], which is easy to jump, and the ID number is [1a86, 7523], which is fixed. [ttyUSB*] means that no matter the device number becomes [ttyUSB] in the future, it is followed by [0, 1, 2, 3, 4,...]. Both are bound to [myserial]; Radar equipment [ttyACM0] the same; The same applies to binding other devices.

Note: When using an alias, do not use some device names that already exist in the system. Otherwise, it will fail.


Multi-computer communication configuration
Image installation and backup

COMPANY

  • About us
  • Team Style
  • Blog

LEARNING & EXPLORATION

  • Tutorials
  • Edge AI hardware
  • Educational robots
  • Embedded intelligent hardware

WHERE TO BUY

  • Yahboom Online Store
  • Amazon
  • Alibaba
  • AliExpress
  • Mercado

TECHNOLOGY SUPPORT

  • Email: support@yahboom.com

BE A DISTRIBUTOR

  • Email: sales@yahboom.com
QR Code

Copyright © 2017-2026 Yahboom. All Rights Reserved.

EN/中文