Welcome to RDK X3 Robot repository
5. Qr code creation and identification
QR code creation and identification
QR code creation and identification5.1、QR code5.1.1、Introduction of QR code5.1.2、Structure of QR codes5.1.3. Features of QR codes5.2. Description of program function5.3. Program Code Reference paths5.4. Program Startup5.4.1. Create QR codes5.4.2. Identify QR code5.5 Core source code parsing5.5.1. QRcode_Create.py5.5.2、QRcode_Parsing.py
5.1、QR code
5.1.1、Introduction of QR code
QR code is a two-dimensional bar code, QR from the English "Quick Response" abbreviation, that is, rapid response meaning, from the inventor hopes that the QR code can make its content quickly decoded. QR code not only has large information capacity, high reliability and low cost, but also can represent a variety of text information such as Chinese characters and images, and its security is strong and it is very convenient to use. What's more, the QR code technology is open source.
5.1.2、Structure of QR codes
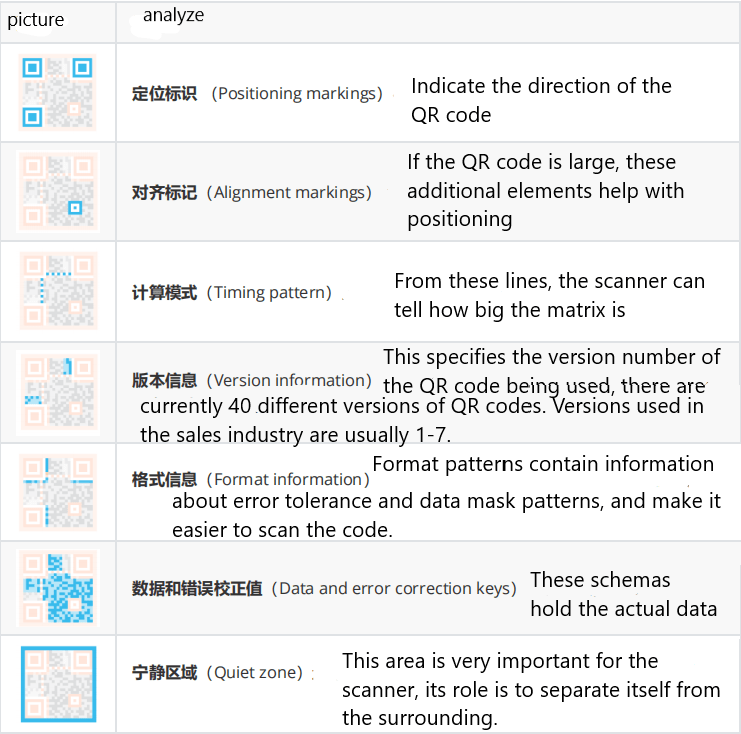
5.1.3. Features of QR codes
The data values in the QR code contain duplicate information (redundant values). Therefore, even if up to 30% of the structure of the QR code is destroyed, the readability of the QR code is not affected. The QR code has a storage space of up to 7089 bits or 4296 characters, including punctuation and special characters, which can be written into the QR code. In addition to numbers and characters, you can encode words and phrases, such as web addresses. As more data is added to the QR code, the code size increases and the code structure becomes more complex.
5.2. Description of program function
After running the QR code creation program, input the contents of the QR code, you can generate a QR code picture and save it locally.
After running the QR code recognition program, the QR code image created will be read and recognized, the recognition result will be output and the image will be saved to the local.
After VSCode is configured to connect with the car, the image can be visualized.
5.3. Program Code Reference paths
After SSH connection car, the location of the function source code is located at.
~/yahboomcar_ws/src/yahboomcar_astra/qrcode_examples
The commands to install the required packages, as following.
xxxxxxxxxxpython3 -m pip install qrcode pyzbarsudo apt-get install libzbar-dev
The factory system image has been installed.
5.4. Program Startup
5.4.1. Create QR codes
After SSH connects to the car, open the terminal input.
x
#切换至代码所在目录# Switch to the directory where the code is locatedcd ~/yahboomcar_ws/src/yahboomcar_astra/qrcode_examples#运行二维码创建程序# Run the QR code creatorpython3 QRcode_Create.pyAfter the program is run, it will prompt you to enter the generated content. Enter to confirm the content. As an example of creating a "yahboom" string.

The saved path of the created QR code.
xxxxxxxxxx~/yahboomcar_ws/src/yahboomcar_astra/qrcode_examples/figures/myQRcode.jpg
Remotely connect the car in VSCode, enter the directory /userdata/yahboomcar_ws/src/yahboomcar_astra/qrcode_examples/figures, you can click the image to view the QR code.
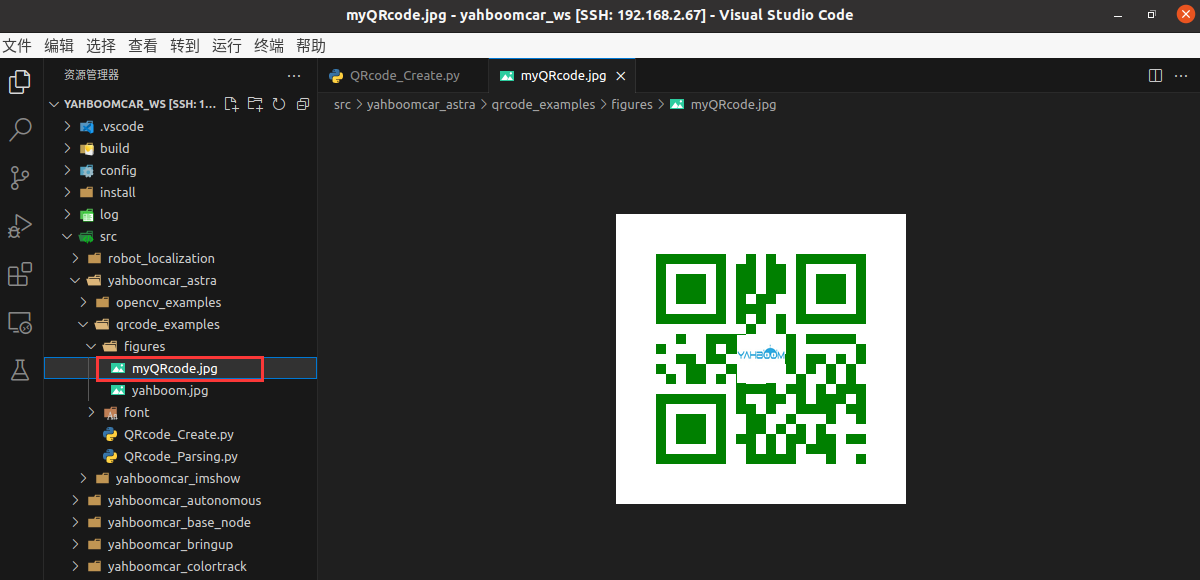
Take out your phone and try to scan the QR code displayed. The scan results in the characters yahboom.
5.4.2. Identify QR code
After SSH connects to the car, open the terminal input,
x
#切换至代码所在目录# Switch to the directory where the code iscd ~/yahboomcar_ws/src/yahboomcar_astra/qrcode_examples#运行二维码识别程序# Run QR code recognition programpython3 QRcode_Parsing.py
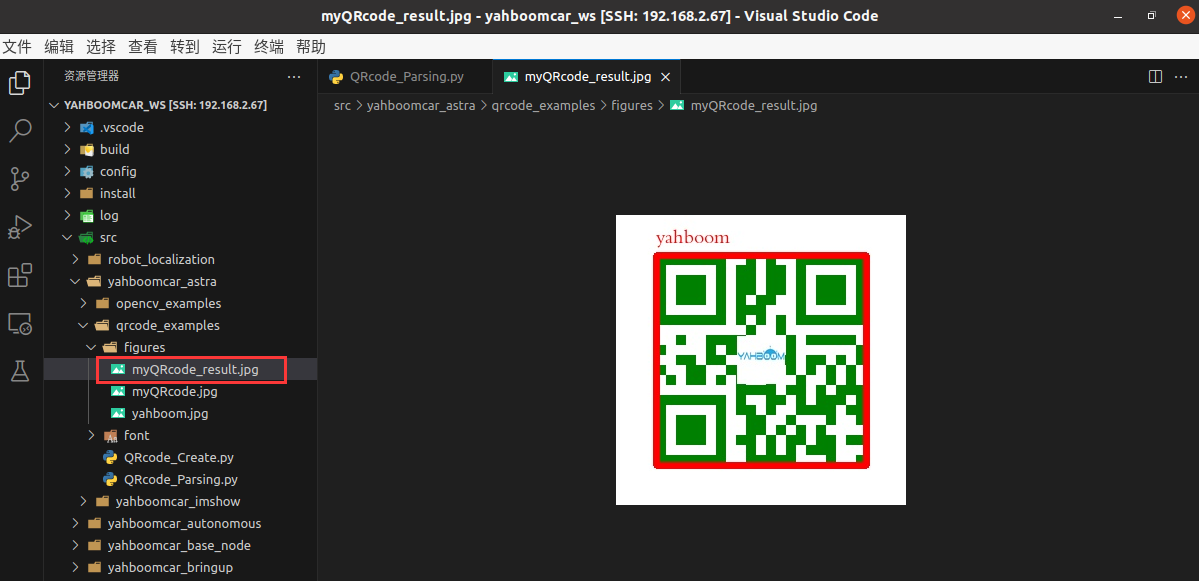
The program will print out the identified content in the terminal, and save the identification result picture to the path.
xxxxxxxxxx~/yahboomcar_ws/src/yahboomcar_astra/qrcode_examples/figures/myQRcode_result.jpg
The program will print out the identified content in the terminal, and save the identification result picture to the path.
5.5 Core source code parsing
5.5.1. QRcode_Create.py
x
#创建qrcode对象# Create a qrcode objectqr = qrcode.QRCode( version=1, error_correction=qrcode.constants.ERROR_CORRECT_H, box_size=10, border=4,)#各参数含义# Meaning of each parameter'''version:值为1~40的整数,控制二维码的大小(最小值是1,是个12×12的矩阵)。 如果想让程序自动确定,将值设置为 None 并使用 fit 参数即可。error_correction:控制二维码的错误纠正功能。可取值下列4个常量。 ERROR_CORRECT_L:大约7%或更少的错误能被纠正。 ERROR_CORRECT_M(默认):大约15%或更少的错误能被纠正。 ROR_CORRECT_H:大约30%或更少的错误能被纠正。box_size:控制二维码中每个小格子包含的像素数。border:控制边框(二维码与图片边界的距离)包含的格子数(默认为4,是相关标准规定的最小值)version: The value is an integer ranging from 1 to 40, which controls the size of the two-dimensional code (the minimum value is 1, which is a 12×12 matrix). If you want the program to determine this automatically, set the value to None and use the fit argument.error_correction: Controls the error correction function of the two-dimensional code. It can take the following four constants. ERROR_CORRECT_L: Approximately 7% or less of errors can be corrected. ERROR_CORRECT_M (default) : Approximately 15% or less of errors can be corrected. ROR_CORRECT_H: About 30% or less of errors can be corrected.box_size: Controls the number of pixels contained in each small box in the QR code.border: Control the number of squares included in the border (the distance between the QR code and the image border) (default is 4, which is the minimum specified by the relevant standard)'''
# 生成图片# Generate picturesimg = qr.make_image(fill_color="green", back_color="white")# 添加数据# Add dataqr.add_data(data)# 填充数据# Fill dataqr.make(fit=True)# 添加logo# Add logomy_file = Path(logo_path)if my_file.is_file(): img = add_logo(img, logo_path)5.5.2、QRcode_Parsing.py
x
def decodeDisplay(image, font_path): gray = cv.cvtColor(image, cv.COLOR_BGR2GRAY) # 需要先把输出的中文字符转换成Unicode编码形式 # Need to first convert the output Chinese characters to Unicode encoding form barcodes = pyzbar.decode(gray) for barcode in barcodes: # 提取二维码的边界框的位置 # Extract the position of the boundary box of the QR code (x, y, w, h) = barcode.rect # 画出图像中条形码的边界框 # Draw the bounding box of the barcode in the image cv.rectangle(image, (x, y), (x + w, y + h), (225, 0, 0), 5) encoding = 'UTF-8' # 画出来,就需要先将它转换成字符串 # To draw it, you need to convert it to a string first barcodeData = barcode.data.decode(encoding) barcodeType = barcode.type # 绘出图像上数据和类型 # Draw the data and type on the image pilimg = Image.fromarray(image) # 创建画笔 # Create a brush draw = ImageDraw.Draw(pilimg) # 参数1:字体文件路径,参数2:字体大小 # Parameter 1: font file path, parameter 2: font size fontStyle = ImageFont.truetype(font_path, size=20, encoding=encoding) # 参数1:打印坐标,参数2:文本,参数3:字体颜色,参数4:字体 # Parameter 1: print coordinates, parameter 2: text, parameter 3: font color, parameter 4: font draw.text((x, y - 30), str(barcode.data, encoding), fill=(0, 0, 255),font=fontStyle) # PIL图片转cv2 图片 # PIL turn cv2 pictures image = np.array(pilimg) # 向终端打印条形码数据和条形码类型 # Print barcode data and barcode type to the terminal print("[INFO] Found {} barcode: {}".format(barcodeType, barcodeData)) return image