yahboom
HomeLearn
Solution
Blog
Online Store
About Us
EN/中文
RDK X3 Robot📖
01. About RDK-X3-Robot
1. Instructions
  • 1. Introduction
  • 2. FAQ
  • 3. Battery and charger use precautions
  • 4.TF card expand capacity
2. Common problem analysis
02. Assembly video
  • Part1-Install Motor
  • Part2-Install Battert Fixing Column
  • Part3-Install Motor Coupling
  • Part4-Install Mecanum wheel
  • Part5-Install Expansion Board
  • Part6-Wiring Show
  • Part7-Install Main Control Board
  • Part8-Install Car Top Plate and Antenna
  • Part9-Install OLED Screen
  • Part10-Install Depth Camera(Optional)
  • Part11-Install OLED Screen
  • Part12-Install HD Camera
  • Part13-Install Top Plate
  • Part14-Install Right Side Plate
  • Part15-Motor Wiring Show
  • Part16-lnstall Car Body
  • Part17-Install Battery
  • Part18-Install Lidar
03. Remote control tutorial
  • 1. The phone APP remote tutorial
  • 2. USB wireless controller remote tutorial
04. ROS functional tutorial
  • 1. Introduction of extension board
  • 2. Set up STM32 development environment
  • 3. Key control buzzer sound
  • 4. FreeRTOS application
  • 5. Serial communication
  • 6. SBUS model remote control
  • 7. CAN bus communication
  • 8. RGB color light strip
  • 9. Timer interrupt control PWM servo
  • 10. Control serial steering gear
  • 11. Nine-axis attitude sensor to obtain data
  • 12. Control motor forward and reverse
  • 13. The timer captures encoder data
  • 14. Theory of robot kinematics analysis
  • 15. PID control robot motion
05. Basic control tutorial
  • 1. Update the firmware of the expansion module
  • 2. Install the Python driver library
  • 3. Set the type of bottom car
  • 4. Open and close the APP program control
  • 5. Turn hotspot mode on and off
  • 6. The buzzer blows
  • 7. Control the motor forward and reverse
  • 8. Control robot movement
  • 9. OLED display
  • 10. Control fan and lamp effect
06. Development environment setup
  • 1. Virtual Machine
  • 2. Linux Basics
  • 3. Remote connection
  • 4. Multi-computer communication configuration
  • 5. Bind the device ID
  • 6. Image installation and backup
07. ROS2 Basic Course
  • 1. Introduction to ROS2
  • 2. ROS2 install Humble
  • 3. ROS2 development environment
  • 4. ROS2 workspace
  • 5. ROS2 function package
  • 6. ROS2 node
  • 7. ROS2 topic communication
  • 8. ROS2 service communication
  • 9. ROS2 action communication
  • 10. ROS2 custom interface message
  • 11. ROS2 parameter service case
  • 12. ROS2 meta-function package
  • 13. ROS2 distributed communication
  • 14. ROS2 DDS
  • 15. ROS2 time related API
  • 16. ROS2 common command tools
  • 17. ROS2 rviz2 use
  • 18. ROS2 rqt toolbox
  • 19. ROS2 Launch startup file configuration
  • 20. ROS2 recording and playback tool
  • 21. ROS2 URDF model
  • 22. ROS2 Gazebo simulation platform
  • 23. ROS2 TF2 coordinate transformation
08. Robot chassis control
  • 1. PID algorithm theory
  • 2. Robot information release
  • 3. Robot control
  • 4. Robot state estimation
  • 5. Robot calibration
  • 6. Robot trajectory tracking
  • 7. URDF model
09. Lidar courses
  • 1. Introduction and use of lidar
  • 2. Lidar obstacle avoidance
  • 3. Lidar following
  • 4. Lidar guard
  • 5. Patrol
  • 6. gmapping algorithm
  • 7. cartographer algorithm
  • 8. Navigation and obstacle avoidance
  • 9. App mapping and navigation
10. OpenCV courses
  • 1. Introduction to OpenCV
  • 2. OpenCV geometric transformation
  • 3. OpenCV image processing
  • 4. OpenCV image beautification
  • 5. Qr code creation and identification
11. MIPI camera course
  • 1. Camera driver
  • 2. Adjust the color HSV value
  • 3. Color recognition
  • 4. Color tracking
  • 5. Color follow
  • 6. Qr code command
  • 7. Face detection
  • 8. Object detection
  • 9. Visual Inspection -OpenCV
  • 10. Visual inspection - Deep learning
  • 11. Human tracking
  • 12. Gesture control
12. Depth Camera courses
  • 1. Use depth camera
  • 2. Calibration of camera internal reference
  • 3. ROS+OpenCV Foundation
  • 4. AR vision
  • 5. Color tracking
  • 6. Object tracking
13. Multi vehicle control
  • 1. Multi-vehicle synchronous control
  • 2. Multi-vehicle navigation
Remote login control
  • 1. VNC and SSH remote login
  • 2. Jupyter lab login and case code running
Download
  • RemoteCtrl_APP(iOS/Android))
  • Mapping_APP(iOS_Android)
  • Code
  • System File
  • VM_File
  • Manual
  • Software_File
  • Hardware_File
  • ROS2_Basic_VM
Download ZIP

Welcome to RDK X3 Robot repository

2. Adjust the color HSV value

2. Color HSV value adjustment

2. Color HSV value adjustment2.1 Introduction2.2 Core Content analysis2.3 Operation steps

2.1 Introduction

This course mainly uses the CSI camera of the RDK-X3 board to obtain the picture of the camera, select the corresponding color, and then adjust its HSV value to achieve the best recognition effect.

This course focuses on modifying image HSV values, optimizing the recognition effect, and then providing more accurate HSV values to color recognition routines.


2.2 Core Content analysis

g_ENABLE_CHINESE Specifies whether to enable Chinese characters. By default, the value of g_enable_Chinese is False. If Chinese characters need to be displayed, set the value to True.

xxxxxxxxxx
g_ENABLE_CHINESE = False
Name_widgets = {
    'Red': ("Red", "红色"),
    'Green': ("Green", "绿色"),
    'Blue': ("Blue", "蓝色"),
    'Yellow': ("Yellow", "黄色"),
    'Custom': ("Custom", "自定义"),
    'Close_Camera': ("Close_Camera", "关闭摄像头")
}

The range of color HSV values is shown below:
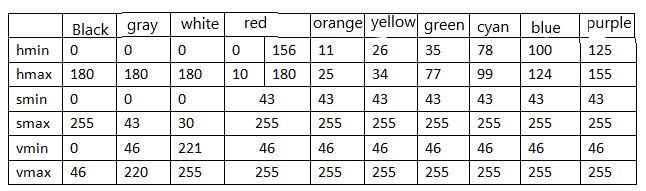
image-20220811205508445

When you click the color button for the first time, you will first use the initial HSV value, and then fine-tune the value of the slider according to the HSV value of the color to make the color effect more accurate. The final effect is that the color can be accurately identified without confusing the recognition of other colors.


2.3 Operation steps

Open the jupyterLab client and find the code path:

xxxxxxxxxx
/root/sunriseRobot/Samples/2_AI/02_color_hsv/color_hsv.ipynb

Click Run All Cells, and then drag to the bottom to see the generated controls.

image-20220810163917767

The control displays three color boxes, the image control on the left shows the original image, the image control in the middle has the function of: the recognized color is displayed as white, and the other is displayed as black, the image control on the right has the function of: the recognized color is displayed normally, and the other colors are displayed as black.

A single color can be put into the camera picture, but in order to get the HSV value more accurately, four colors can be put into the camera picture. Select a color among red, green, blue, and yellow, and a √ will appear to the left of the selected color. Please adjust the six sliders slightly to modify the value of the color HSV, so that the selected color is displayed intact and does not mix with other color blocks, and then click the corresponding color again to save the color HSV value to the local file. Each time a color is selected, the local file is read first, and if the local file cannot be read, the default HSV value is used. If you want to restore the default HSV value, delete the HSV_VALUE.TXT file of the corresponding color.

For example, if the color recognition is incomplete or wrong, please slightly adjust the six sliders to modify the value of the color HSV. When the color effect reaches the appropriate effect, click the red button again to save the value of the current color HSV to the local file.
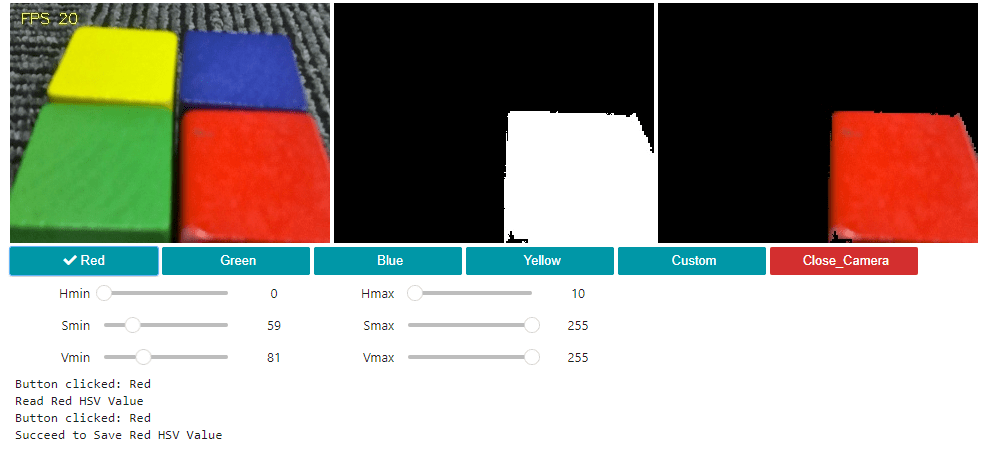
image-20230602111116332

For example, in the preceding figure, the red color is saved in the RED_HSV_VALUE.TXT file, where the HSV value is 0,59,81,10,255,255. Numerical mean: Hmin, Smin, Vmin and Hmax, Smax, Vmax. This value can be copied and updated to the HSV value of other routines.
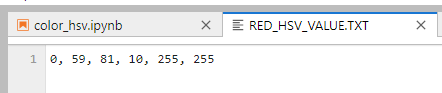
image-20230602111533983

The green HSV calibration effect is as follows. After calibration, please click the green button again and save the value to GREEN_HSV_VALUE.TXT file.
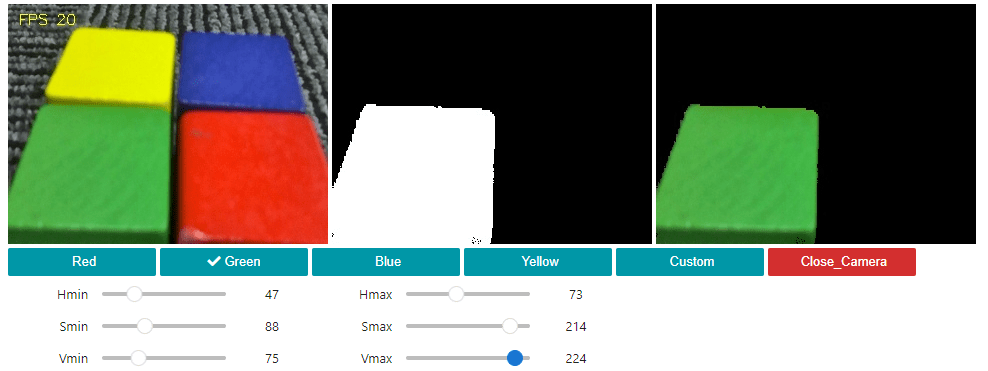
image-20230602111243095

The blue HSV calibration effect is as follows. After calibration, please click the blue button again and save the value to BLUE_HSV_VALUE.TXT file.
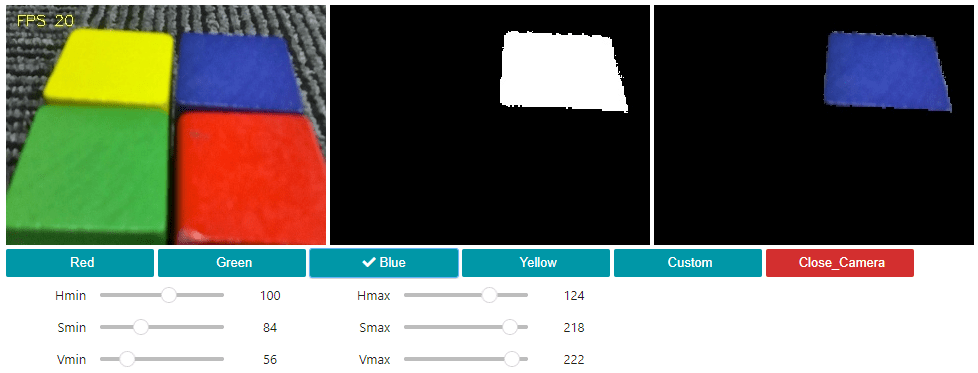
image-20230602111349656

The yellow HSV calibration effect is as follows. After calibration, please click the yellow button again and save the value to YELLOW_HSV_VALUE.TXT file.
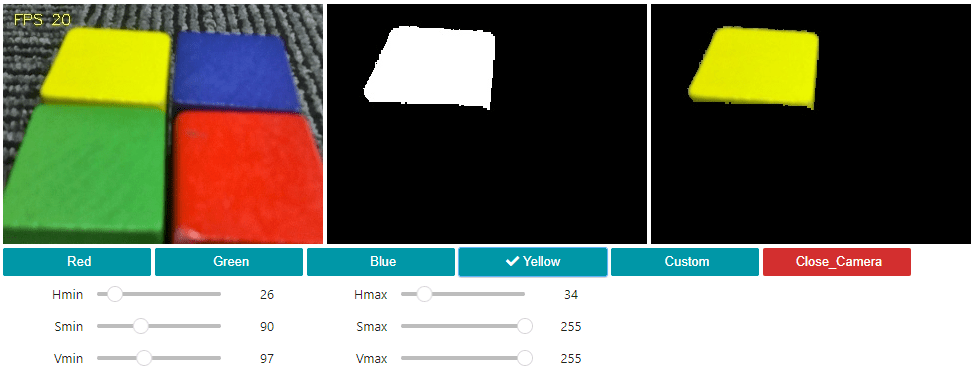
image-20230602111436078

After calibration, click the custom button again and save the value to the CUSTOM_HSV_VALUE.TXT file.

Finally click the Close_Camera button to close the camera.

Camera driver
Color recognition

COMPANY

  • About us
  • Team Style
  • Blog

LEARNING & EXPLORATION

  • Tutorials
  • Edge AI hardware
  • Educational robots
  • Embedded intelligent hardware

WHERE TO BUY

  • Yahboom Online Store
  • Amazon
  • Alibaba
  • AliExpress
  • Mercado

TECHNOLOGY SUPPORT

  • Email: support@yahboom.com

BE A DISTRIBUTOR

  • Email: sales@yahboom.com
QR Code
QR Code

Copyright © 2017-2026 Yahboom. All Rights Reserved.

EN/中文