yahboom
HomeLearn
Solution
Blog
Online Store
About Us
EN/中文
RDK X3 Robot📖
01. About RDK-X3-Robot
1. Instructions
  • 1. Introduction
  • 2. FAQ
  • 3. Battery and charger use precautions
  • 4.TF card expand capacity
2. Common problem analysis
02. Assembly video
  • Part1-Install Motor
  • Part2-Install Battert Fixing Column
  • Part3-Install Motor Coupling
  • Part4-Install Mecanum wheel
  • Part5-Install Expansion Board
  • Part6-Wiring Show
  • Part7-Install Main Control Board
  • Part8-Install Car Top Plate and Antenna
  • Part9-Install OLED Screen
  • Part10-Install Depth Camera(Optional)
  • Part11-Install OLED Screen
  • Part12-Install HD Camera
  • Part13-Install Top Plate
  • Part14-Install Right Side Plate
  • Part15-Motor Wiring Show
  • Part16-lnstall Car Body
  • Part17-Install Battery
  • Part18-Install Lidar
03. Remote control tutorial
  • 1. The phone APP remote tutorial
  • 2. USB wireless controller remote tutorial
04. ROS functional tutorial
  • 1. Introduction of extension board
  • 2. Set up STM32 development environment
  • 3. Key control buzzer sound
  • 4. FreeRTOS application
  • 5. Serial communication
  • 6. SBUS model remote control
  • 7. CAN bus communication
  • 8. RGB color light strip
  • 9. Timer interrupt control PWM servo
  • 10. Control serial steering gear
  • 11. Nine-axis attitude sensor to obtain data
  • 12. Control motor forward and reverse
  • 13. The timer captures encoder data
  • 14. Theory of robot kinematics analysis
  • 15. PID control robot motion
05. Basic control tutorial
  • 1. Update the firmware of the expansion module
  • 2. Install the Python driver library
  • 3. Set the type of bottom car
  • 4. Open and close the APP program control
  • 5. Turn hotspot mode on and off
  • 6. The buzzer blows
  • 7. Control the motor forward and reverse
  • 8. Control robot movement
  • 9. OLED display
  • 10. Control fan and lamp effect
06. Development environment setup
  • 1. Virtual Machine
  • 2. Linux Basics
  • 3. Remote connection
  • 4. Multi-computer communication configuration
  • 5. Bind the device ID
  • 6. Image installation and backup
07. ROS2 Basic Course
  • 1. Introduction to ROS2
  • 2. ROS2 install Humble
  • 3. ROS2 development environment
  • 4. ROS2 workspace
  • 5. ROS2 function package
  • 6. ROS2 node
  • 7. ROS2 topic communication
  • 8. ROS2 service communication
  • 9. ROS2 action communication
  • 10. ROS2 custom interface message
  • 11. ROS2 parameter service case
  • 12. ROS2 meta-function package
  • 13. ROS2 distributed communication
  • 14. ROS2 DDS
  • 15. ROS2 time related API
  • 16. ROS2 common command tools
  • 17. ROS2 rviz2 use
  • 18. ROS2 rqt toolbox
  • 19. ROS2 Launch startup file configuration
  • 20. ROS2 recording and playback tool
  • 21. ROS2 URDF model
  • 22. ROS2 Gazebo simulation platform
  • 23. ROS2 TF2 coordinate transformation
08. Robot chassis control
  • 1. PID algorithm theory
  • 2. Robot information release
  • 3. Robot control
  • 4. Robot state estimation
  • 5. Robot calibration
  • 6. Robot trajectory tracking
  • 7. URDF model
09. Lidar courses
  • 1. Introduction and use of lidar
  • 2. Lidar obstacle avoidance
  • 3. Lidar following
  • 4. Lidar guard
  • 5. Patrol
  • 6. gmapping algorithm
  • 7. cartographer algorithm
  • 8. Navigation and obstacle avoidance
  • 9. App mapping and navigation
10. OpenCV courses
  • 1. Introduction to OpenCV
  • 2. OpenCV geometric transformation
  • 3. OpenCV image processing
  • 4. OpenCV image beautification
  • 5. Qr code creation and identification
11. MIPI camera course
  • 1. Camera driver
  • 2. Adjust the color HSV value
  • 3. Color recognition
  • 4. Color tracking
  • 5. Color follow
  • 6. Qr code command
  • 7. Face detection
  • 8. Object detection
  • 9. Visual Inspection -OpenCV
  • 10. Visual inspection - Deep learning
  • 11. Human tracking
  • 12. Gesture control
12. Depth Camera courses
  • 1. Use depth camera
  • 2. Calibration of camera internal reference
  • 3. ROS+OpenCV Foundation
  • 4. AR vision
  • 5. Color tracking
  • 6. Object tracking
13. Multi vehicle control
  • 1. Multi-vehicle synchronous control
  • 2. Multi-vehicle navigation
Remote login control
  • 1. VNC and SSH remote login
  • 2. Jupyter lab login and case code running
Download
  • RemoteCtrl_APP(iOS/Android))
  • Mapping_APP(iOS_Android)
  • Code
  • System File
  • VM_File
  • Manual
  • Software_File
  • Hardware_File
  • ROS2_Basic_VM
Download ZIP

Welcome to RDK X3 Robot repository

8. Control robot movement

8. Control robot movement

8. Control robot movement8.1. Experimental objectives8.2. Experimental Preparation8.3. Program source code8.4. Experimental effect

8.1. Experimental objectives

Control the robot forward and backward, left and right, and set the relevant parameters of the car.


8.2. Experimental Preparation

MOTOR 1 is connected to the left front MOTOR of the car, MOTOR 2 is connected to the left rear MOTOR of the car, motor 3 is connected to the right front motor of the car, and MOTOR 4 is connected to the right rear motor of the car.

SunriseRobotLib library functions needed to control the robot motor:

set_car_motion(v_x, v_y, v_z)

Parameter Description: car motion control, this function will read the pulse data of the encoder, so as to calculate the speed of the car movement. v_x represents the longitudinal speed of the car, the unit is m/s, positive number forward, negative backward; v_y control represents the transverse speed of the car, in m/s, positive numbers are left, negative numbers are right; v_z represents the rotation speed of the car in rad/s, positive numbers are left spin, negative numbers are right spin.

v_x=[-1.0, 1.0], v_y=[-1.0, 1.0], v_z=[-5.0, 5.0]

Returned value: None.

xxxxxxxxxx
set_pid_param(kp, ki, kd, forever=False)

Parameter description: PID parameter control, will affect the set_car_motion function control car movement speed changes. It is not adjustable by default.

kp ki kd = [0, 10.00], decimals can be entered.

forever=True for permanence, =False For temporary purposes. Permanent saving means that data is written to the Flash of the MCU chip. After the restart, the data is not lost, and the writing time is long. Therefore, the delay time is added to avoid packet loss of the MCU. The temporary action is quick and effective once, and the data is no longer maintained after restarting the single chip.

Returned value: None.


xxxxxxxxxx
set_auto_report_state(enable, forever=False)

Parameter Description: The single chip microcomputer automatically returns the data status bit, the default is on, if set off will affect the data reading function.

If enable=True, the underlying expansion module sends data every 40 milliseconds. If enable=False, no data is sent.

forever=True for permanence, =False For temporary purposes. Returned value: None.


xxxxxxxxxx
clear_auto_report_data()

Parameter Description: Clear the cache data automatically sent by the MCU.

Returned value: None.


xxxxxxxxxx
reset_flash_value()

Parameter Description: Reset the data saved by the car flash and restore the factory default value. You can also perform this function by holding down the K2 button on the expansion board for about 10 seconds.

Returned value: None.


The following functions return data and can only be read if create_receive_threading() starts normally:

xxxxxxxxxx
get_accelerometer_data()

Parameter interpretation: Obtain accelerometer triaxial data

Return value: a_x, a_y, a_z

xxxxxxxxxx
get_gyroscope_data()

Parameter interpretation: Obtain gyroscope triaxial data

Return value: g_x, g_y, g_z

xxxxxxxxxx
get_motion_data()

Parameter Description: Get car speed, return val_vx, val_vy, val_vz

Return value: val_vx, val_vy, val_vz


xxxxxxxxxx
get_motion_pid()

Parameter description: Get the motion PID parameter of the car, read error return [-1, -1, -1]

Return value: kp, ki, kd

8.3. Program source code

Turn on the robot power switch and open the browser of the robot system or remote computer to enter the Jupyter lab editor.

Reference code path: / root/sunriseRobot _basic/Samples / 1/5 _car_motion. Ipynb


8.4. Experimental effect

When running to control the motor movement, three sliding bars will be generated, and changing the value of the sliding bar can change the speed of the robot. Before modifying the value, please lift the car to avoid running. V_x controls the speed of forward and backward movement, V_y controls the speed of left and right translation, and V_z controls the speed of left and right rotation.

The stopping cell can also be run to stop the car.
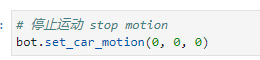
image-20230601171842122

For other content, please refer to the comments in the program.

Note: If you modify part of the configuration in this course and set the permanent save, the subsequent abnormal situation will occur (for example, set the automatic return data status enable=False, and permanently save the data to True, resulting in the failure to read the data normally). Call the reset_flash_value() function, or hold down the KEY1 key on the expansion board for about 10 seconds to restore factory Settings, restart the car and set the car type to 6.


Control the motor forward and reverse
OLED display

COMPANY

  • About us
  • Team Style
  • Blog

LEARNING & EXPLORATION

  • Tutorials
  • Edge AI hardware
  • Educational robots
  • Embedded intelligent hardware

WHERE TO BUY

  • Yahboom Online Store
  • Amazon
  • Alibaba
  • AliExpress
  • Mercado

TECHNOLOGY SUPPORT

  • Email: support@yahboom.com

BE A DISTRIBUTOR

  • Email: sales@yahboom.com
QR Code

Copyright © 2017-2026 Yahboom. All Rights Reserved.

EN/中文