yahboom
HomeLearn
Solution
Blog
Online Store
About Us
EN/中文
RDK X3 Robot📖
01. About RDK-X3-Robot
1. Instructions
  • 1. Introduction
  • 2. FAQ
  • 3. Battery and charger use precautions
  • 4.TF card expand capacity
2. Common problem analysis
02. Assembly video
  • Part1-Install Motor
  • Part2-Install Battert Fixing Column
  • Part3-Install Motor Coupling
  • Part4-Install Mecanum wheel
  • Part5-Install Expansion Board
  • Part6-Wiring Show
  • Part7-Install Main Control Board
  • Part8-Install Car Top Plate and Antenna
  • Part9-Install OLED Screen
  • Part10-Install Depth Camera(Optional)
  • Part11-Install OLED Screen
  • Part12-Install HD Camera
  • Part13-Install Top Plate
  • Part14-Install Right Side Plate
  • Part15-Motor Wiring Show
  • Part16-lnstall Car Body
  • Part17-Install Battery
  • Part18-Install Lidar
03. Remote control tutorial
  • 1. The phone APP remote tutorial
  • 2. USB wireless controller remote tutorial
04. ROS functional tutorial
  • 1. Introduction of extension board
  • 2. Set up STM32 development environment
  • 3. Key control buzzer sound
  • 4. FreeRTOS application
  • 5. Serial communication
  • 6. SBUS model remote control
  • 7. CAN bus communication
  • 8. RGB color light strip
  • 9. Timer interrupt control PWM servo
  • 10. Control serial steering gear
  • 11. Nine-axis attitude sensor to obtain data
  • 12. Control motor forward and reverse
  • 13. The timer captures encoder data
  • 14. Theory of robot kinematics analysis
  • 15. PID control robot motion
05. Basic control tutorial
  • 1. Update the firmware of the expansion module
  • 2. Install the Python driver library
  • 3. Set the type of bottom car
  • 4. Open and close the APP program control
  • 5. Turn hotspot mode on and off
  • 6. The buzzer blows
  • 7. Control the motor forward and reverse
  • 8. Control robot movement
  • 9. OLED display
  • 10. Control fan and lamp effect
06. Development environment setup
  • 1. Virtual Machine
  • 2. Linux Basics
  • 3. Remote connection
  • 4. Multi-computer communication configuration
  • 5. Bind the device ID
  • 6. Image installation and backup
07. ROS2 Basic Course
  • 1. Introduction to ROS2
  • 2. ROS2 install Humble
  • 3. ROS2 development environment
  • 4. ROS2 workspace
  • 5. ROS2 function package
  • 6. ROS2 node
  • 7. ROS2 topic communication
  • 8. ROS2 service communication
  • 9. ROS2 action communication
  • 10. ROS2 custom interface message
  • 11. ROS2 parameter service case
  • 12. ROS2 meta-function package
  • 13. ROS2 distributed communication
  • 14. ROS2 DDS
  • 15. ROS2 time related API
  • 16. ROS2 common command tools
  • 17. ROS2 rviz2 use
  • 18. ROS2 rqt toolbox
  • 19. ROS2 Launch startup file configuration
  • 20. ROS2 recording and playback tool
  • 21. ROS2 URDF model
  • 22. ROS2 Gazebo simulation platform
  • 23. ROS2 TF2 coordinate transformation
08. Robot chassis control
  • 1. PID algorithm theory
  • 2. Robot information release
  • 3. Robot control
  • 4. Robot state estimation
  • 5. Robot calibration
  • 6. Robot trajectory tracking
  • 7. URDF model
09. Lidar courses
  • 1. Introduction and use of lidar
  • 2. Lidar obstacle avoidance
  • 3. Lidar following
  • 4. Lidar guard
  • 5. Patrol
  • 6. gmapping algorithm
  • 7. cartographer algorithm
  • 8. Navigation and obstacle avoidance
  • 9. App mapping and navigation
10. OpenCV courses
  • 1. Introduction to OpenCV
  • 2. OpenCV geometric transformation
  • 3. OpenCV image processing
  • 4. OpenCV image beautification
  • 5. Qr code creation and identification
11. MIPI camera course
  • 1. Camera driver
  • 2. Adjust the color HSV value
  • 3. Color recognition
  • 4. Color tracking
  • 5. Color follow
  • 6. Qr code command
  • 7. Face detection
  • 8. Object detection
  • 9. Visual Inspection -OpenCV
  • 10. Visual inspection - Deep learning
  • 11. Human tracking
  • 12. Gesture control
12. Depth Camera courses
  • 1. Use depth camera
  • 2. Calibration of camera internal reference
  • 3. ROS+OpenCV Foundation
  • 4. AR vision
  • 5. Color tracking
  • 6. Object tracking
13. Multi vehicle control
  • 1. Multi-vehicle synchronous control
  • 2. Multi-vehicle navigation
Remote login control
  • 1. VNC and SSH remote login
  • 2. Jupyter lab login and case code running
Download
  • RemoteCtrl_APP(iOS/Android))
  • Mapping_APP(iOS_Android)
  • Code
  • System File
  • VM_File
  • Manual
  • Software_File
  • Hardware_File
  • ROS2_Basic_VM
Download ZIP

Welcome to RDK X3 Robot repository

7. cartographer algorithm

7. cartographer Mapping algorithm


7. cartographer Mapping algorithm7.1 Description of program functionality7.2 Introduction to the Cartographer7.3 Application Code Reference path7.4. Program Startup7.4.1. Build the diagram7.4.2. Map saving7.4.3. View the topic communication graph7.4.4 View the TF tree

7.1 Description of program functionality

After the programs on the VM and the car are started, the car is controlled by the controller or keyboard. The car uses the radar scan data to build a map and saves the map after the map is built. This process is visualized in rviz.

7.2 Introduction to the Cartographer

Cartographer:https://google-cartographer.readthedocs.io/en/latest/

Cartographer ROS2:https://github.com/ros2/cartographer_ros

  • Cartographer

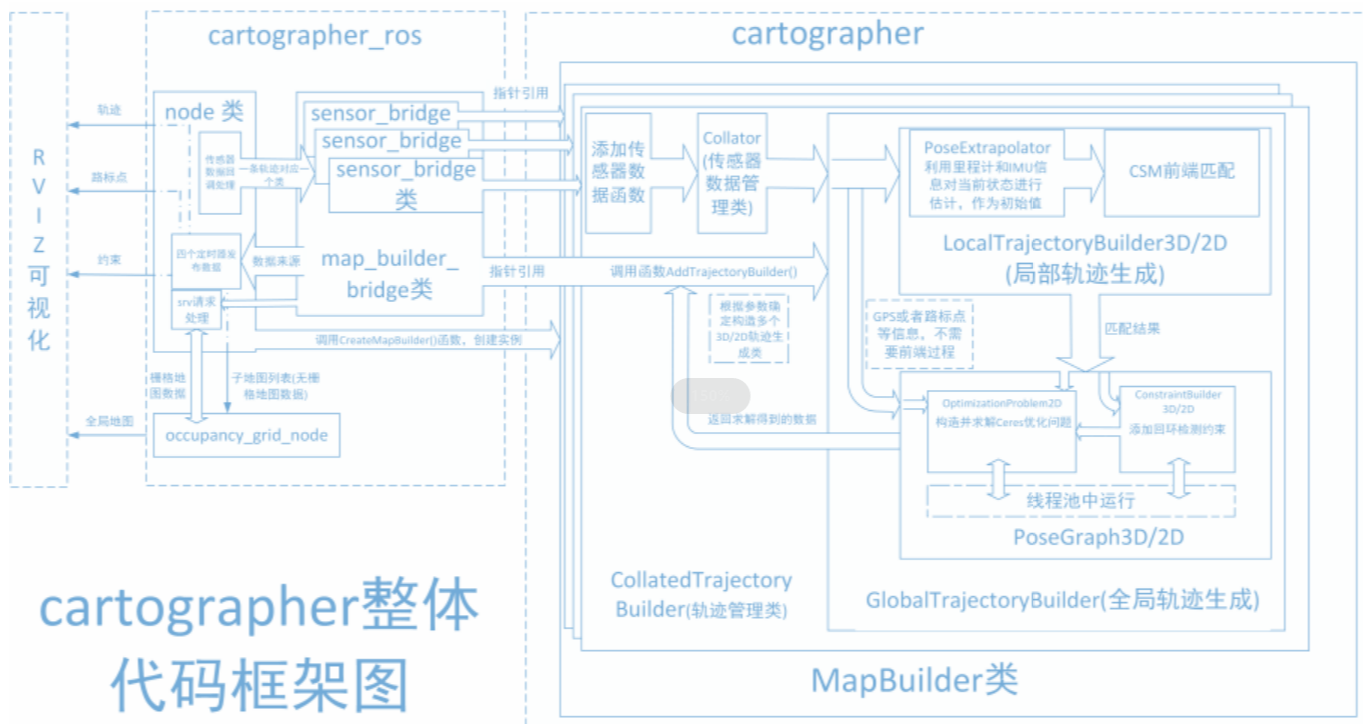
Cartographer is an open-source 2D and 3D SLAM (simultaneous localization and mapping) library supported by ROS systems. Method building algorithm based on graph optimization (multi-threaded backend optimization, cere constructed problem optimization). Data from multiple sensors (e.g., LIDAR, IMU, and camera) can be combined to simultaneously calculate the position of the sensor and map the environment around the sensor.

The cartographer source code consists of three main parts: cartographer, cartographer_ros, and ceres-solver (back-end optimization).
1684831668232

cartographer采用的是主流的SLAM框架,也就是特征提取、闭环检测、后端优化的三段式。由一定数量的LaserScan组成一个submap子图,一系列的submap子图构成了全局地图。用LaserScan构建submap的短时间过程累计误差不大,但是用submap构建全局地图的长时间过程就会存在很大的累计误差,所以需要利用闭环检测来修正这些submap的位置,闭环检测的基本单元是submap,闭环检测采用scan_match策略。cartographer的重点内容就是融合多传感器数据(odometry、IMU、LaserScan等)的submap子图创建以及用于闭环检测的scan_match策略的实现。


  • cartographer_ros

cartographer_ros is run under ROS and can accept various sensor data in the form of ROS messages

After processing, it is published as a message for debugging and visualization.

7.3 Application Code Reference path

After SSH connection car, the location of the function source code is located at,

xxxxxxxxxx
/userdata/yahboomcar_ws/src/yahboomcar_nav/launch/map_gmapping_launch.py

The virtual machine side source code is located at,

xxxxxxxxxx
/home/yahboom/dev_ws/src/yahboomcar_rviz/launch/yahboomcar_mapping_launch.py

7.4. Program Startup

7.4.1. Build the diagram

Open the virtual machine terminal and type,

xxxxxxxxxx
ros2 launch yahboomcar_rviz yahboomcar_mapping_launch.py

After SSH connects to the car, terminal input,

xxxxxxxxxx
ros2 launch yahboomcar_nav map_cartographer_launch.py
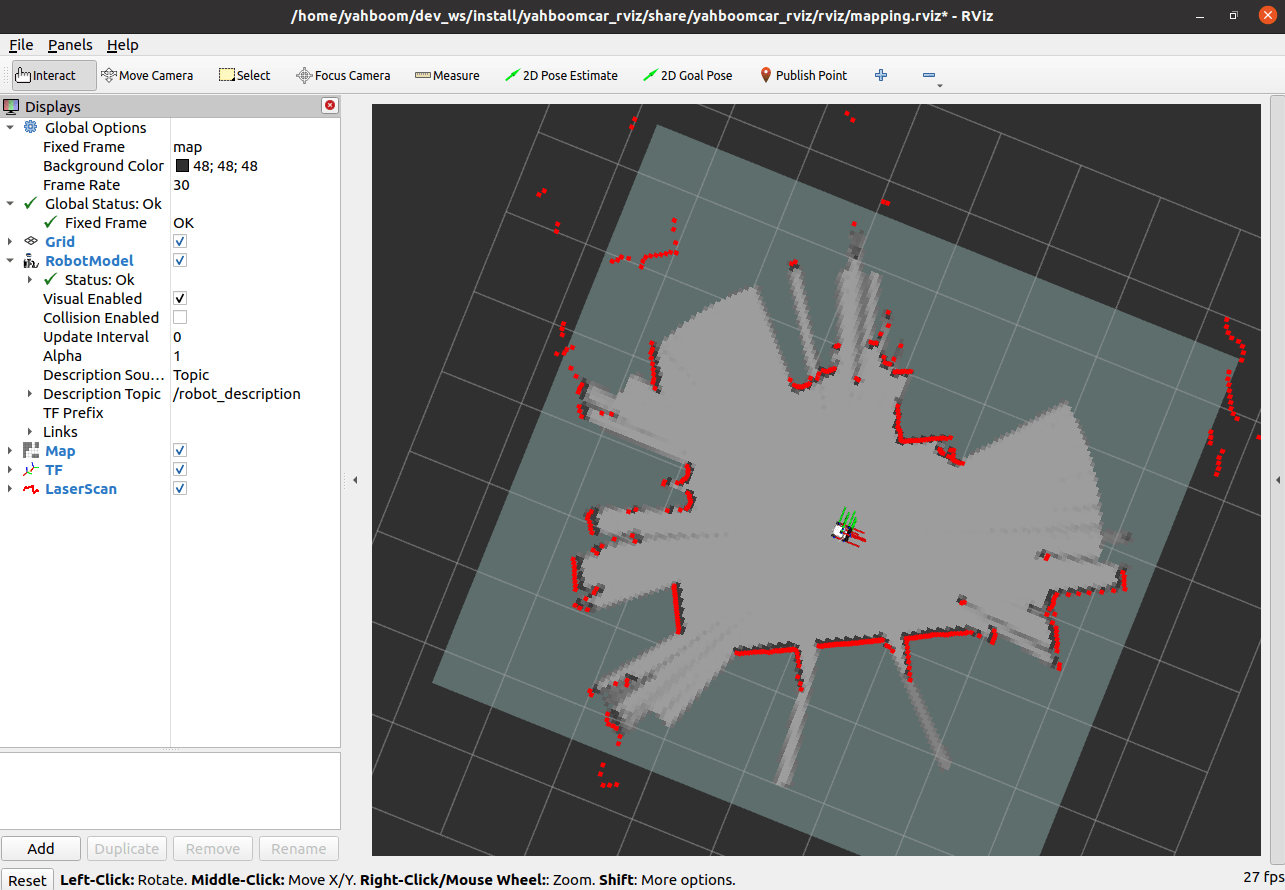
1685524303444

Handle [L1] key unlock, control car movement. If you do not use the handle, you can use the keyboard control, the car terminal input,

xxxxxxxxxx
ros2 run yahboomcar_ctrl yahboom_keyboard

【 Slowly move the cart 】 Start to build the map until the complete map is built.

Note: When building the drawing, the slower the better the effect (especially the rotation speed should be slower), the faster the speed, the effect will be very poor.

In addition, the path of cartographer configuration parameters is,

xxxxxxxxxx
/userdata/yahboomcar_ws/src/yahboomcar_nav/params/cartographer_config.lua

You can modify it according to your needs, compile and run it.

7.4.2. Map saving

Car terminal input:

xxxxxxxxxx
ros2 launch yahboomcar_nav save_map_launch.py

The map can be saved as follows:

xxxxxxxxxx
/userdata/yahboomcar_ws/src/yahboomcar_nav/maps
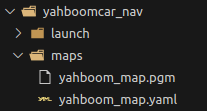
1684831343375

Includes a.pGM image and a.YAML file. The.yaml file contains the following contents::

xxxxxxxxxx
image: /userdata/yahboomcar_ws/src/yahboomcar_nav/maps/yahboom_map.pgm
mode: trinary
resolution: 0.05
origin: [-5.95, -3.26, 0]
negate: 0
occupied_thresh: 0.65
free_thresh: 0.25

Parameter analysis:

  • image: indicates the path of the map file. The path can be absolute or relative
  • mode: This property can be one of trinary, scale, or raw, depending on the mode selected. trinary is the default mode
  • resolution: Map resolution in meters per pixel
  • origin: 2D pose (x,y,yaw) in the lower left corner of the map, where yaw is rotated counterclockwise (yaw=0 indicates no rotation). yaw values are currently ignored in many parts of the system.
  • negate: Whether to reverse the meanings of white/black, free/occupied (the interpretation of the threshold is not affected)
  • occupied_thresh: The occupied_thresh pixel whose occupied_probability is greater than this threshold will be considered as fully occupied.
  • free_thresh: Pixels whose occupancy probability is less than this threshold are considered completely free.

7.4.3. View the topic communication graph

Virtual machine terminal input,

xxxxxxxxxx
ros2 run rqt_graph rqt_graph

1685092744116

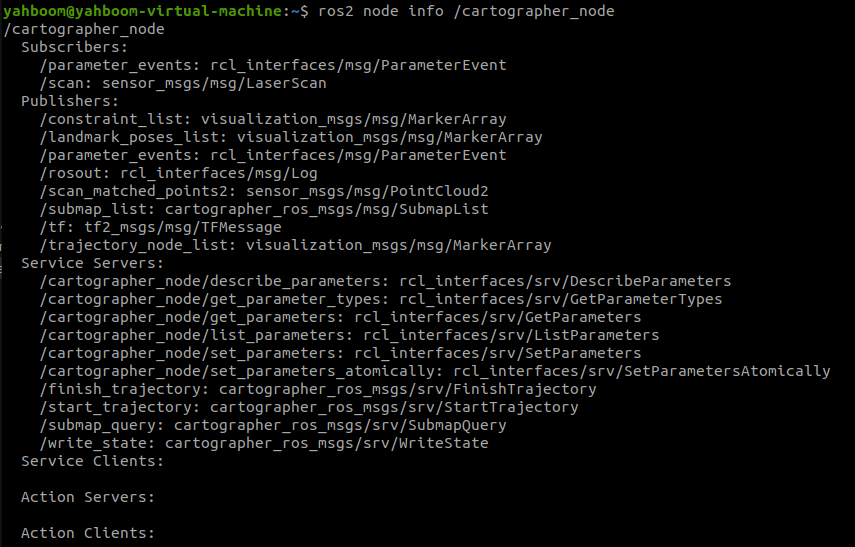
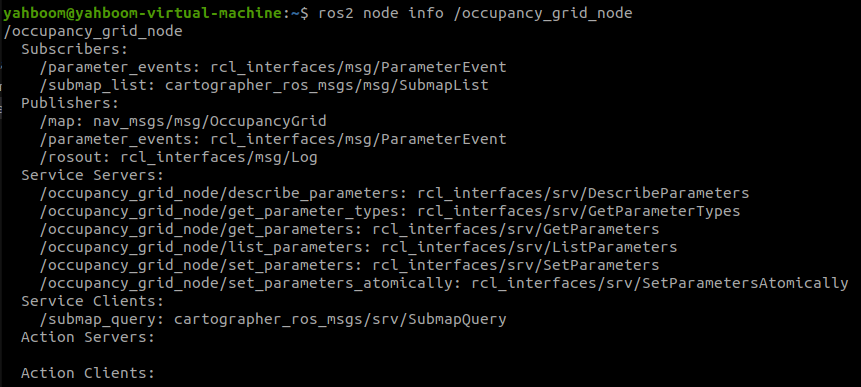
To view the cartographer node details, enter,

xxxxxxxxxx
ros2 node info /cartographer_node
ros2 node info /occupancy_grid_node

1685092862078

1685092894177

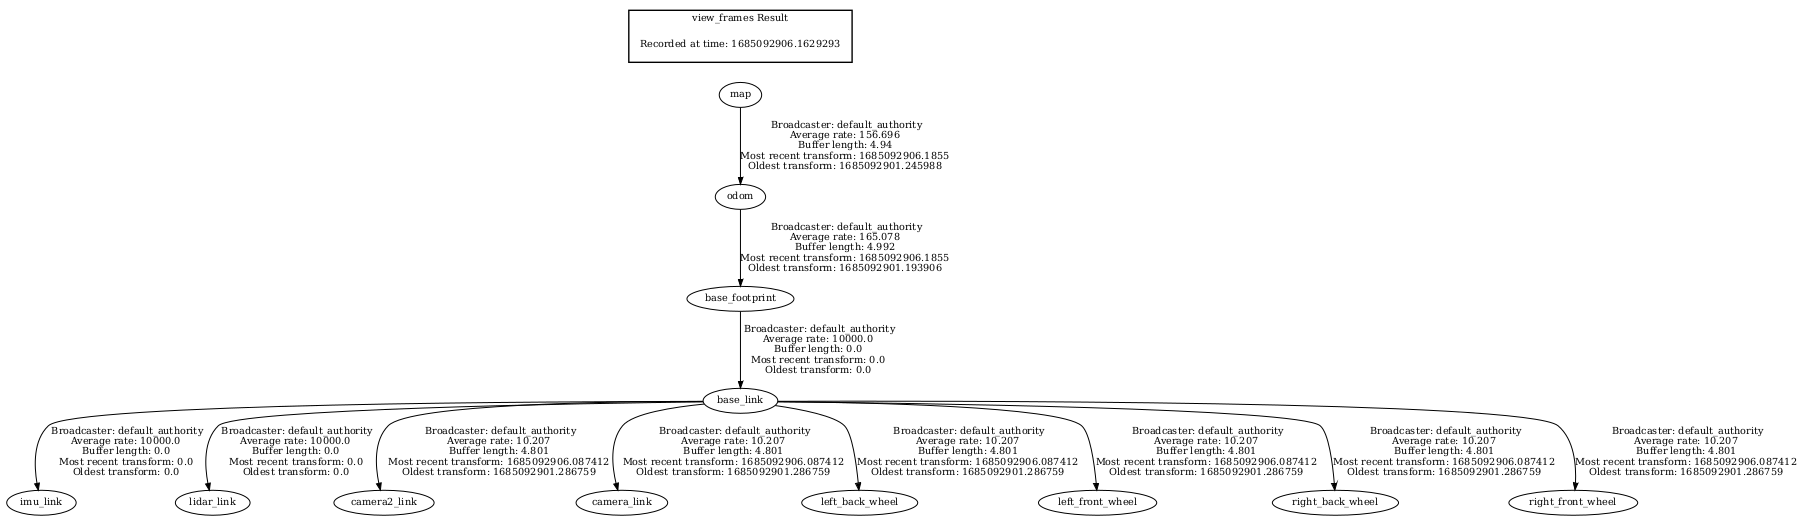
7.4.4 View the TF tree

Open the virtual machine terminal and type,

xxxxxxxxxx
#保存tf树# Save tf tree
ros2 run tf2_tools view_frames.py
#查看tf树#View  tf tree
evince frames.pdf

1685092942688


gmapping algorithm
Navigation and obstacle avoidance

COMPANY

  • About us
  • Team Style
  • Blog

LEARNING & EXPLORATION

  • Tutorials
  • Edge AI hardware
  • Educational robots
  • Embedded intelligent hardware

WHERE TO BUY

  • Yahboom Online Store
  • Amazon
  • Alibaba
  • AliExpress
  • Mercado

TECHNOLOGY SUPPORT

  • Email: support@yahboom.com

BE A DISTRIBUTOR

  • Email: sales@yahboom.com
QR Code

Copyright © 2017-2026 Yahboom. All Rights Reserved.

EN/中文