Welcome to Transbot SE repository
5. Opencv application
5. Opencv application
5. Opencv application5.1. Overview5.2, QR code5.2.1. Introduction to QR code5.2.2. Structure of QR code5.2.3. Characteristics of QR code5.2.4. QR code creation and recognitionjetson motherboard/Raspberry Pi 4BRaspberry Pi 55.3. Human posture estimation5.3.1. Overview5.3.2. Principle5.3.3. Startjetson motherboard/Raspberry Pi 4BRaspberry Pi 55.4. Target detection5.4.1. Model structure5.4.2. Code analysis5.4.3. Startjetson motherboard/Raspberry Pi 4BRaspberry Pi 5
5.1. Overview
OpenCV is a cross-platform computer vision and machine learning software library released under the BSD license (open source) and can run on Linux, Windows, Android and MacOS operating systems. [1] It is lightweight and efficient - it consists of a series of C functions and a small number of C++ classes. It also provides interfaces in Python, Ruby, MATLAB and other languages, and implements many common algorithms in image processing and computer vision.
5.2, QR code
5.2.1. Introduction to QR code
QR code is a type of two-dimensional barcode. QR comes from the abbreviation of "Quick Response" in English, which means quick response. It comes from the inventor's hope that the content of QR code can be decoded quickly. QR code not only has large information capacity, high reliability, and low cost, but can also represent various text information such as Chinese characters and images. It has strong confidentiality and anti-counterfeiting and is very convenient to use. What's more important is that the QR code technology is open source.
5.2.2. Structure of QR code
| Pictures | Analysis |
|---|---|
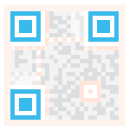 | Positioning markings indicate the direction of the QR code. |
 | Alignment markings If the QR code is large, these additional elements help with positioning. |
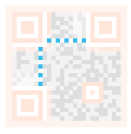 | Timing pattern Through these lines, the scanner can identify how big the matrix is. |
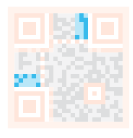 | Version information (Version information) Here you specify the version number of the QR code being used. Currently, there are 40 different version numbers of QR codes. Version numbers used in the sales industry are usually 1-7. |
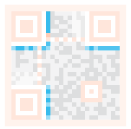 | Format information (Format information) Format patterns contain information about fault tolerance and data masking patterns, and make scanning code easier. |
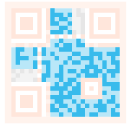 | Data and error correction keys (Data and error correction keys) These modes save the actual data. |
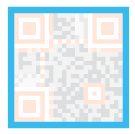 | Quiet zone (Quiet zone) This area is very important for the scanner. Its function is to separate itself from the surroundings. |
5.2.3. Characteristics of QR code
The data values in the QR code contain repeated information (redundant values). Therefore, even if up to 30% of the QR code structure is destroyed, the readability of the QR code is not affected. The storage space of the QR code is up to 7089 bits or 4296 characters, including punctuation marks and special characters, which can be written into the QR code. In addition to numbers and characters, words and phrases (such as web addresses) can also be encoded. As more data is added to the QR code, the code size increases and the code structure becomes more complex.
5.2.4. QR code creation and recognition
Source code path: ~/transbot_ws/src/transbot_visual/simple_qrcode
Install
The factory image of the car has already been installed, no need to reinstall it.
python3 -m pip install qrcode pyzbarsudo apt-get install libzbar-dev
- create
Create qrcode object
xxxxxxxxxx''' Parameter meaning: version: an integer with a value from 1 to 40, controlling the size of the QR code (the minimum value is 1, which is a 12×12 matrix). If you want the program to determine this automatically, set the value to None and use the fit argument. error_correction: Controls the error correction function of the QR code. Possible values are the following 4 constants. ERROR_CORRECT_L: About 7% or less of errors can be corrected. ERROR_CORRECT_M (default): About 15% or less of errors can be corrected. ROR_CORRECT_H: About 30% or less of errors can be corrected. box_size: Controls the number of pixels contained in each small grid in the QR code. border: Control the number of cells included in the border (the distance between the QR code and the image border) (the default is 4, which is the minimum value specified by relevant standards) ''' qr = qrcode.QRCode( version=1, error_correction=qrcode.constants.ERROR_CORRECT_H, box_size=5, border=4,)Add logo to qrcode QR code
xxxxxxxxxx # If the logo address exists, add the logo image my_file = Path(logo_path) if my_file.is_file(): img = add_logo(img, logo_path)Note: When using Chinese, Chinese characters need to be added
jetson motherboard/Raspberry Pi 4B
xxxxxxxxxxcd ~/transbot_ws/src/transbot_visual/simple_qrcodepython3 QRcode_Create.py
Raspberry Pi 5
Before running, please confirm that the large program has been permanently closed
Enter docker
Note: If there is a terminal that automatically starts docker, or there is already an open docker terminal, you can directly enter the docker terminal to run the command, and there is no need to manually start docker
Start docker manually
xxxxxxxxxx./run_docker.sh
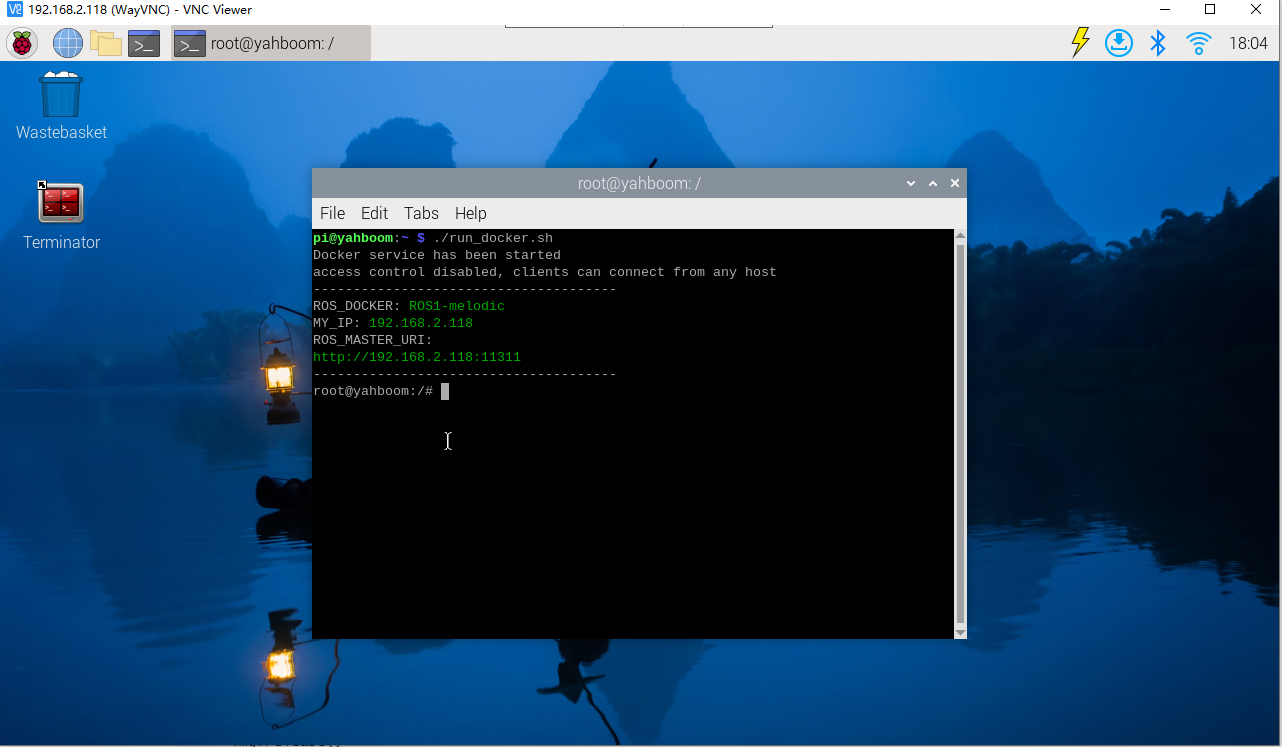
xxxxxxxxxxcd ~/transbot_ws/src/transbot_visual/simple_qrcodepython3 QRcode_Create.py
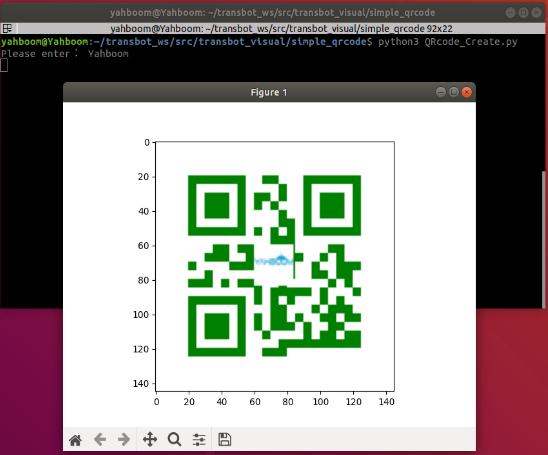
- Identify
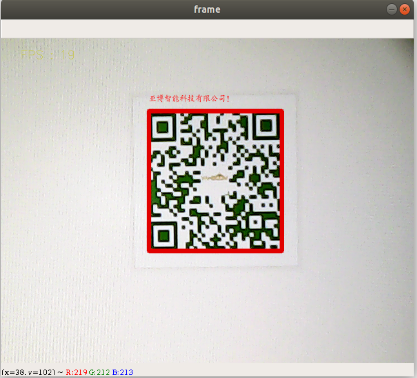
xxxxxxxxxxdef decodeDisplay(image, font_path): gray = cv.cvtColor(image, cv.COLOR_BGR2GRAY) #You need to convert the output Chinese characters into Unicode encoding form first. barcodes = pyzbar.decode(gray) for barcode in barcodes: #Extract the position of the bounding box of the QR code (x, y, w, h) = barcode.rect # Draw the bounding box of the barcode in the image cv.rectangle(image, (x, y), (x + w, y + h), (225, 0, 0), 5) encoding = 'UTF-8' # To draw it, you need to convert it into a string first barcodeData = barcode.data.decode(encoding) barcodeType = barcode.type # Draw the data and types on the image pilimg = Image.fromarray(image) #Create brush draw = ImageDraw.Draw(pilimg) # Parameter 1: font file path, parameter 2: font size fontStyle = ImageFont.truetype(font_path, size=12, encoding=encoding) # Parameter 1: Print coordinates, Parameter 2: Text, Parameter 3: Font color, Parameter 4: Font draw.text((x, y - 25), str(barcode.data, encoding), fill=(255, 0, 0), font=fontStyle) # PIL image to cv2 image image = cv.cvtColor(np.array(pilimg), cv.COLOR_RGB2BGR) # Print barcode data and barcode type to the terminal print("[INFO] Found {} barcode: {}".format(barcodeType, barcodeData)) return imageEffect demonstration
jetson motherboard/Raspberry Pi 4B
xxxxxxxxxxcd ~/transbot_ws/src/transbot_visual/simple_qrcodepython3 QRcode_Parsing.pyRaspberry Pi 5
Before running, please confirm that the large program has been permanently closed
Enter docker
Note: If there is a terminal that automatically starts docker, or there is already an open docker terminal, you can directly enter the docker terminal to run the command, and there is no need to manually start docker
Start docker manually
xxxxxxxxxx./run_docker.sh
xxxxxxxxxxcd ~/transbot_ws/src/transbot_visual/simple_qrcodepython3 QRcode_Parsing.py
5.3. Human posture estimation
Source code path: ~/transbot_ws/src/transbot_visual/detection
5.3.1. Overview
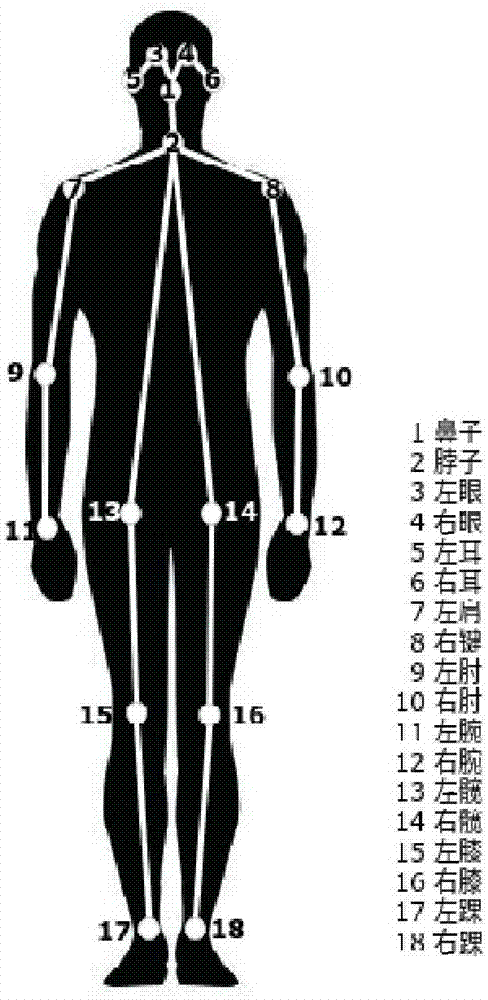
Human Posture Estimation estimates human posture by correctly connecting the detected key points of the human body in the picture. Key points of the human body usually correspond to joints with a certain degree of freedom on the human body, such as the neck, shoulders, elbows, wrists, waist, knees, ankles, etc., as shown in the figure below.
5.3.2. Principle
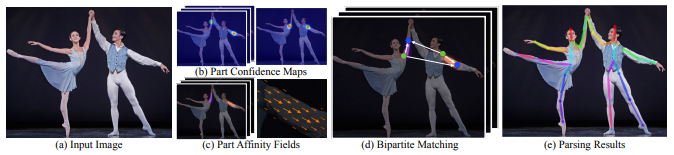
Input an image, extract features through the convolutional network, and obtain a set of feature maps, which are then divided into two branches, and the CNN network is used to extract Part Confidence Maps and Part Affinity Fields respectively; After obtaining these two pieces of information, we use Bipartite Matching in graph theory to find the Part Association and connect the joint points of the same person. Due to the vector nature of PAF itself, the generated even matching is very correct and is finally merged. For the overall skeleton of a person; Finally, find Multi-Person Parsing based on PAFs—>convert the Multi-person parsing problem into a graphs problem—>Hungarian Algorithm (Hungarian algorithm) (The Hungarian algorithm is the most common algorithm for partial graph matching. The core of the algorithm is to find the augmenting path. It is an algorithm that uses the augmenting path to find the maximum matching of a bipartite graph.)
5.3.3. Start
jetson motherboard/Raspberry Pi 4B
xxxxxxxxxxcd ~/transbot_ws/src/transbot_visual/detectionpython target_detection.py
Raspberry Pi 5
Before running, please confirm that the large program has been permanently closed
Enter docker
Note: If there is a terminal that automatically starts docker, or there is already an open docker terminal, you can directly enter the docker terminal to run the command, and there is no need to manually start docker
Start docker manually
xxxxxxxxxx./run_docker.sh
xxxxxxxxxxcd ~/transbot_ws/src/transbot_visual/detectionpython target_detection.py
After clicking on the image box, use the keyboard [f] key to switch target detection.
xxxxxxxxxxif action == ord('f'):state = not state # Function switchingEnter image

Output picture

5.4. Target detection
The main problem solved in this section is how to use the dnn module in OpenCV to import a trained target detection network. But there are requirements for the version of opencv.
Currently, there are three main methods for using deep learning for target detection:
- Faster R-CNNs
- You Only Look Once(YOLO) -Single Shot Detectors(SSDs)
Faster R-CNNs is the most commonly heard neural network based on deep learning. However, this approach is technically difficult to understand (especially for deep learning newbies), difficult to implement, and difficult to train.
In addition, even if the "Faster" method is used to implement R-CNNs (where R represents the region proposal), the algorithm is still relatively slow, about 7FPS.
If we are pursuing speed, we can turn to YOLO because it is very fast and can reach 40-90 FPS on TianXGPU, and the fastest version may reach 155 FPS. But the problem with YOLO is that its accuracy needs to be improved.
SSDs were originally developed by Google and can be said to be a balance between the above two. Compared with Faster R-CNNs, its algorithm is more straightforward. Compared with YOLO, it is more accurate.
5.4.1. Model structure
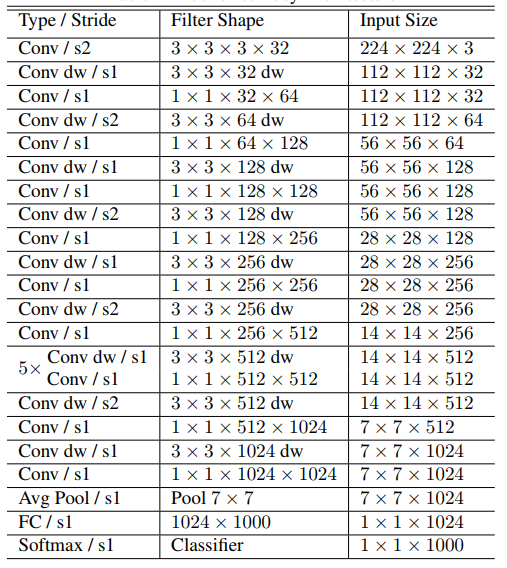
The main work of MobileNet is to use depthwise sparable convolutions (depth-level separable convolutions) to replace the past standard convolutions (standard convolutions) to solve the problems of computational efficiency and parameter quantity of convolutional networks. The MobileNets model is based on depthwise sparable convolutions (depth-level separable convolutions), which can decompose standard convolutions into a depth convolution and a point convolution (1 × 1 convolution kernel). Depthwise convolution applies each convolution kernel to each channel, while 1 × 1 convolution is used to combine the outputs of channel convolutions.
Batch Normalization (BN) will be added to the basic components of MobileNet, that is, in each SGD (stochastic gradient descent), standardization processing will be performed so that the mean of the result (all dimensions of the output signal) is 0 and the variance is 1. Generally, when you encounter problems such as slow convergence or gradient explosion during neural network training, you can try BN to solve the problem. In addition, in general use cases, BN can also be added to speed up training and improve model accuracy.
In addition, the model also uses the ReLU activation function, so the basic structure of depthwise separable convolution is as shown below:
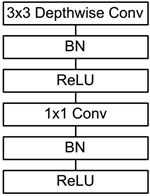
The MobileNets network is composed of many depthwise separable convolutions shown in the figure above. Its specific network structure is shown in the figure below:
5.4.2. Code analysis
List of recognized objects
xxxxxxxxxx[person, bicycle, car, motorcycle, airplane, bus, train, truck, boat, traffic light, fire hydrant, street sign, stop sign, parking meter, bench, bird, cat, dog, horse, sheep, cow, elephant, bear, zebra, giraffe, hat, backpack, umbrella, shoe, eye glasses, handbag, tie, suitcase, frisbee, skis, snowboard, sports ball, kite, baseball bat, baseball glove, skateboard, surfboard, tennis racket, bottle, plate, wine glass, cup, fork, knife, spoon, bowl, banana, apple, sandwich, orange, broccoli, carrot, hot dog, pizza, donut, cake, chair, couch, potted plant, bed, mirror, dining table, window, desk, toilet, door, tv, laptop, mouse, remote, keyboard, cell phone, microwave, oven, toaster, sink, refrigerator, blender, book, clock, vase, scissors, teddy bear, hair drier, toothbrush]Load the category [object_detection_coco.txt], import the model [frozen_inference_graph.pb], and specify the deep learning framework [TensorFlow]
xxxxxxxxxx#Load COCO class namewith open('object_detection_coco.txt', 'r') as f: class_names = f.read().split('\n')# Display different colors for different targetsCOLORS = np.random.uniform(0, 255, size=(len(class_names), 3))#Load DNN image modelmodel = cv.dnn.readNet(model='frozen_inference_graph.pb', config='ssd_mobilenet_v2_coco.txt', framework='TensorFlow')Import the image, extract the height and width, calculate a 300x300 pixel blob, and pass this blob into the neural network
xxxxxxxxxxdef Target_Detection(image): image_height, image_width, _ = image.shape #Create blob from image blob = cv.dnn.blobFromImage(image=image, size=(300, 300), mean=(104, 117, 123), swapRB=True) model.setInput(blob) output = model.forward() # Iterate through each test for detection in output[0, 0, :, :]: # Extract the confidence of the detection confidence = detection[2] # Only draw bounding boxes when the detection confidence is higher than a certain threshold, otherwise skip if confidence > .4: # Get the ID of the class class_id = detection[1] # Map class id to class class_name = class_names[int(class_id) - 1] color = COLORS[int(class_id)] # Get bounding box coordinates box_x = detection[3] * image_width box_y = detection[4] * image_height # Get the width and height of the bounding box box_width = detection[5] * image_width box_height = detection[6] * image_height # Draw a rectangle around each detected object cv.rectangle(image, (int(box_x), int(box_y)), (int(box_width), int(box_height)), color, thickness=2) #Write the class name text on the detected object cv.putText(image, class_name, (int(box_x), int(box_y - 5)), cv.FONT_HERSHEY_SIMPLEX, 1, color, 2) return image5.4.3. Start
jetson motherboard/Raspberry Pi 4B
xxxxxxxxxxcd ~/transbot_ws/src/transbot_visual/detectionpython target_detection.py
Raspberry Pi 5
Before running, please confirm that the large program has been permanently closed
Enter docker
Note: If there is a terminal that automatically starts docker, or there is already an open docker terminal, you can directly enter the docker terminal to run the command, and there is no need to manually start docker
Start docker manually
xxxxxxxxxx./run_docker.sh
xxxxxxxxxxcd ~/transbot_ws/src/transbot_visual/detectionpython target_detection.py
After clicking on the image box, use the [f] key on the keyboard to switch to human pose estimation.
xxxxxxxxxxif action == ord('f'):state = not state # Function switching