Welcome to Transbot SE repository
4.Handle control(Optional)
4.Handle control(Optional)
4.Handle control(Optional)1. Operating environment2. Install the driver3. Usage steps4. Control the little turtle with the handle4.1. Start the little turtle4.2. Node View4.3. View the node information4.4. Control the little turtle with the handle5. Handle control Transbot SE5.1. Handle control node5.2. Related nodes5.3. Operation process5.4. Source code analysis5.5. Handle effect5.6. Precautions when using the handleAppendixjetson nanoRaspberry Pi
1. Operating environment
Operating system: Ubuntu 18.04 LTS
ROS version: melodic
Equipment: jetson nano, Raspberry Pi, PC, wireless controller (USB receiver)
Controller control function package path: ~/transbot_ws/src/transbot_ctrl
2. Install the driver
ROS driver for universal Linux controllers. The Joy package contains Joy_node, a node that connects a generic Linux controller to ROS. This node publishes a "/Joy" message containing the current state of each button and axis of the controller. Note: The factory image of the car has already been installed, no need to reinstall it
sudo apt install ros-melodic-joy ros-melodic-joystick-drivers
3. Usage steps
- Device connection
First, connect the USB end of the wireless controller to the device (jetson nano, Raspberry Pi, PC). This lesson takes connecting the USB end of the wireless controller to the jetson nano as an example. Connect the mouse, keyboard, and monitor; or you can also connect remotely through VNC.
- View devices
Open the terminal and enter the following command. [js0] is displayed. This is the wireless controller. In special cases, you can also view the changes in the device list through the two states of connecting and not connecting to the USB side of the wireless handle. If there is a change, the changed device will be the one; otherwise, the connection will be unsuccessful or cannot be recognized.
xxxxxxxxxxls /dev/input

- Test handle
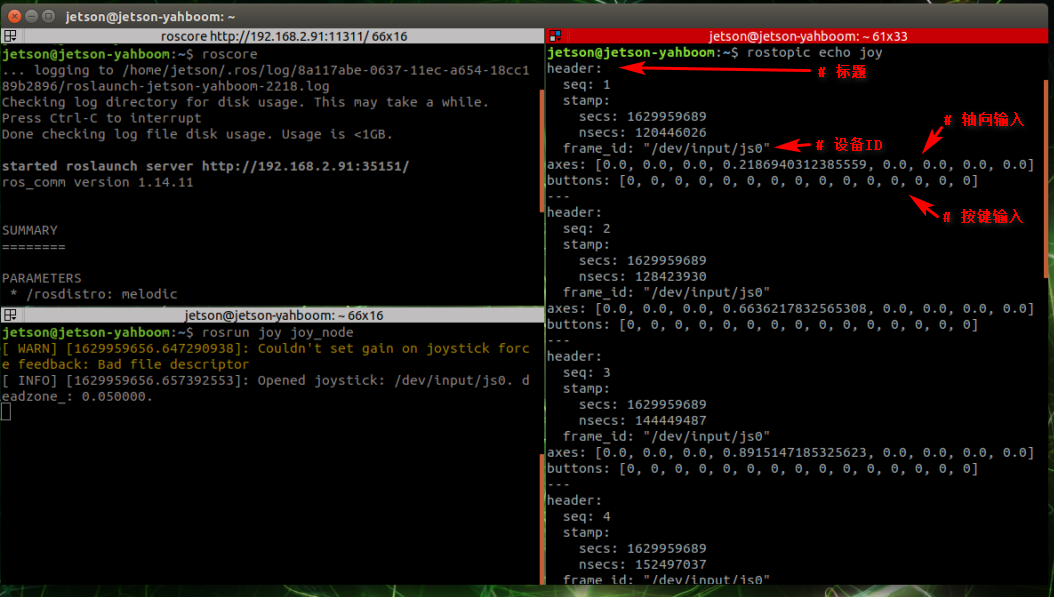
Open the terminal and enter the following command. As shown in the picture, the wireless handle has 8 axial inputs and 15 key inputs. You can press the keys individually to test the numbers corresponding to the keys.
xxxxxxxxxxsudo jstest /dev/input/js0

If jstest is not installed, run the following command:
xxxxxxxxxxsudo apt-get install joystick
- Run the handle node
Open three terminals and enter the following commands in order to view detailed information, which is the same as [Test Controller]. Depending on the device (Raspberry Pi, Jetson Nano, PC) and the system, the controller status will be different.
jetson motherboard/Raspberry Pi 4B
xxxxxxxxxxroscore first steprosrun joy joy_node second steprostopic echo joy step threeRaspberry Pi 5
Before running, please confirm that the large program has been permanently closed
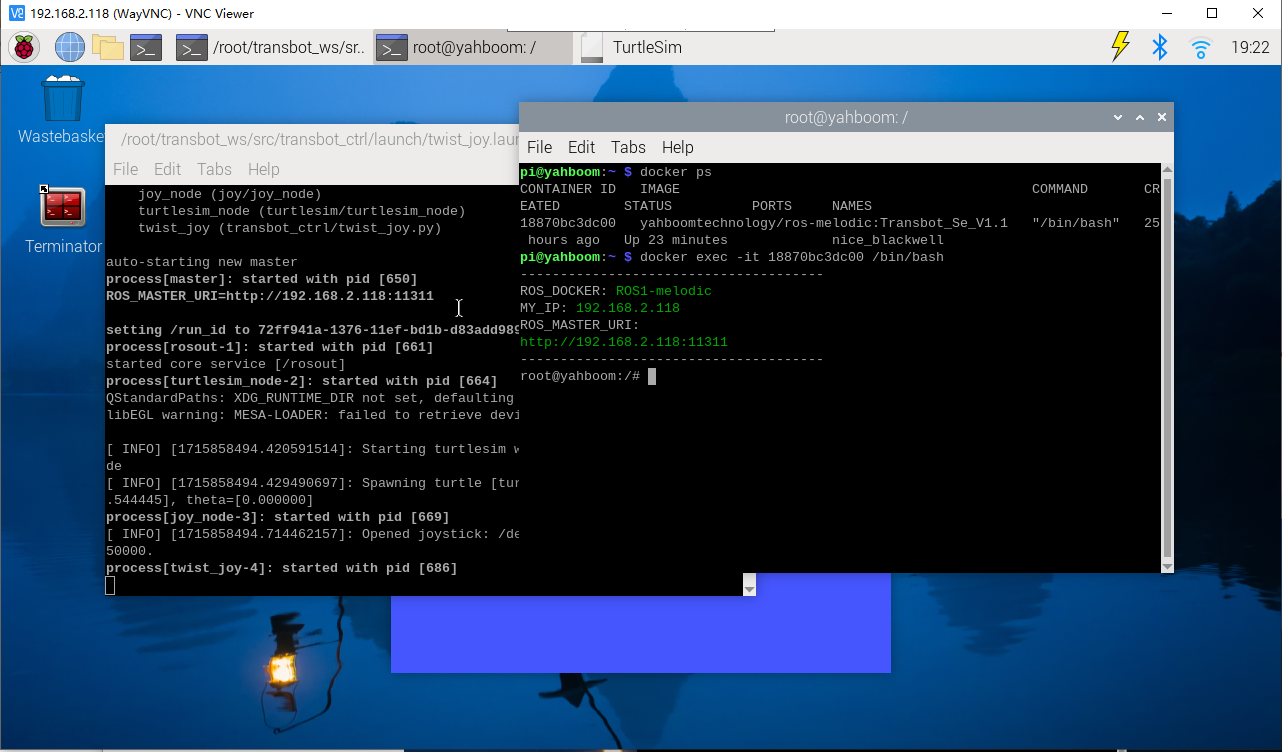
Enter docker
Note: If there is a terminal that automatically starts docker, or there is a docker terminal that has been opened, you can directly enter the docker terminal to run the command, and there is no need to manually start docker
Start docker manually
xxxxxxxxxx./run_docker.sh
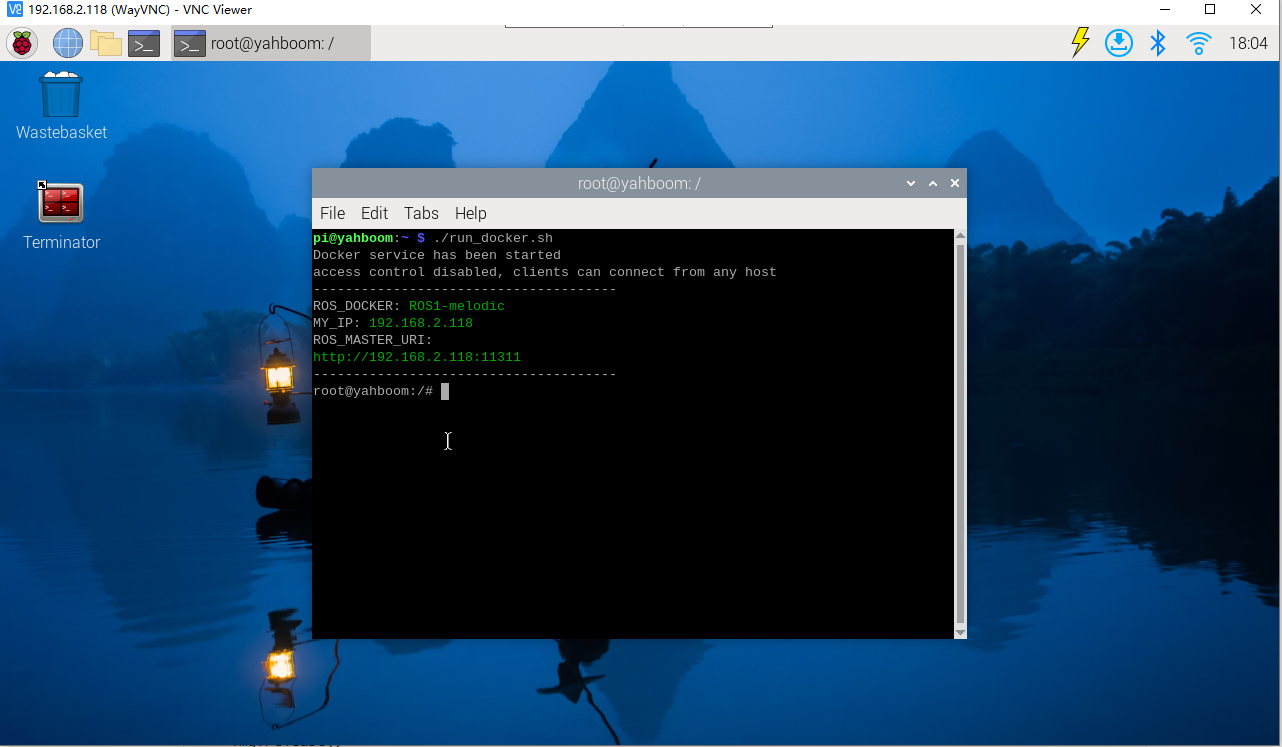
xxxxxxxxxxroscore
Enter the same docker from multiple terminals
Keep the program of the previous docker terminal running and open a new terminal
Enter the following command
xxxxxxxxxxdocker ps
Enter the same docker and use the following 18870bc3dc00 to modify the ID displayed on the actual terminal.
xxxxxxxxxxdocker exec -it 18870bc3dc00 /bin/bash

xxxxxxxxxxrosrun joy joy_node
Enter the same docker from multiple terminals
Keep the program of the previous docker terminal running and open a new terminal
Enter the following command
xxxxxxxxxxdocker ps
Enter the same docker and use the following 18870bc3dc00 to modify the ID displayed on the actual terminal.
xxxxxxxxxxdocker exec -it 18870bc3dc00 /bin/bash
xxxxxxxxxxrostopic echo joy
4. Control the little turtle with the handle
4.1. Start the little turtle
jetson motherboard/Raspberry Pi 4B
xxxxxxxxxxroscorerosrun turtlesim turtlesim_node
Raspberry Pi 5
Before running, please confirm that the large program has been permanently closed
Enter docker
Note: If there is a terminal that automatically starts docker, or there is a docker terminal that has been opened, you can directly enter the docker terminal to run the command, and there is no need to manually start docker
Start docker manually
xxxxxxxxxx./run_docker.sh
xxxxxxxxxxroscore
Enter the same docker from multiple terminals
Keep the program of the previous docker terminal running and open a new terminal
Enter the following command
xxxxxxxxxxdocker ps
Enter the same docker and use the following 18870bc3dc00 to modify the ID displayed on the actual terminal.
xxxxxxxxxxdocker exec -it 18870bc3dc00 /bin/bash
xxxxxxxxxxrosrun turtlesim turtlesim_node
If you want to drive the little turtle, you only need to give the little turtle a certain speed. Next, check out the ROS speed control node.
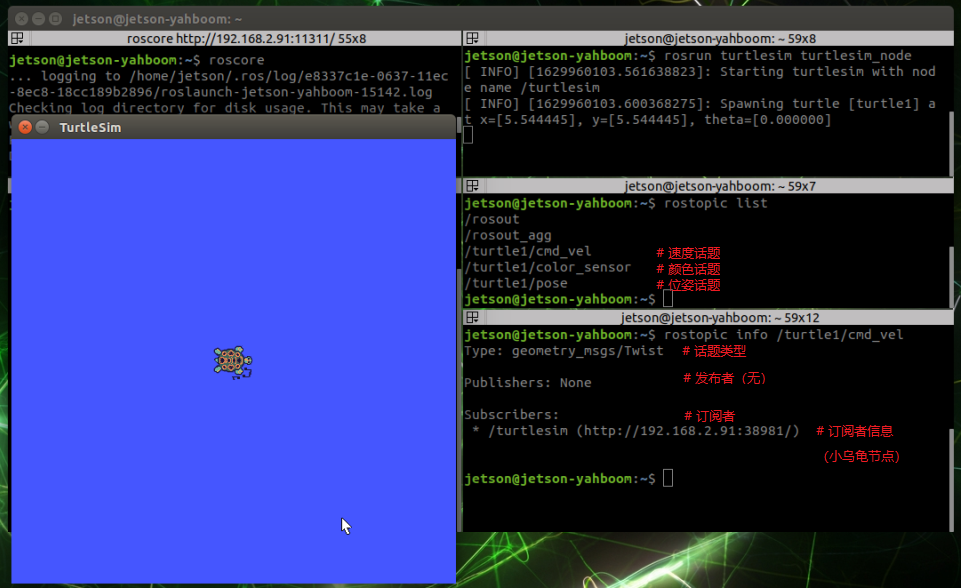
4.2. Node View
jetson motherboard/Raspberry Pi 4B
xxxxxxxxxxrostopic listRaspberry Pi 5
Enter the same docker from multiple terminals
Keep the program of the previous docker terminal running and open a new terminal
Enter the following command
xxxxxxxxxxdocker ps
Enter the same docker and use the following 18870bc3dc00 to modify the ID displayed on the actual terminal.
xxxxxxxxxxdocker exec -it 18870bc3dc00 /bin/bash
xxxxxxxxxxrostopic list
4.3. View the node information
jetson motherboard/Raspberry Pi 4B
xxxxxxxxxxrostopic info /turtle1/cmd_velRaspberry Pi 5
Enter the same docker from multiple terminals
Keep the program of the previous docker terminal running and open a new terminal
Enter the following command
xxxxxxxxxxdocker ps
Enter the same docker and use the following 18870bc3dc00 to modify the ID displayed on the actual terminal.
xxxxxxxxxxdocker exec -it 18870bc3dc00 /bin/bash
xxxxxxxxxxrostopic info /turtle1/cmd_vel
If you want to control the movement of the little turtle, you only need to post a message to the topic [/turtle1/cmd_vel] with the type [geometry_msgs/Twist].
4.4. Control the little turtle with the handle
Receive the current status information of the handle, and send instructions to the little turtle by pressing the buttons or shaking the joystick to receive different information fed back by the wireless handle.
Start command
jetson motherboard/Raspberry Pi 4B
xxxxxxxxxxroslaunch transbot_ctrl twist_joy.launch
Raspberry Pi 5
Before running, please confirm that the large program has been permanently closed
Enter docker
Note: If there is a terminal that automatically starts docker, or there is a docker terminal that has been opened, you can directly enter the docker terminal to run the command, and there is no need to manually start docker
Start docker manually
xxxxxxxxxx./run_docker.sh
xxxxxxxxxxroslaunch transbot_ctrl twist_joy.launch
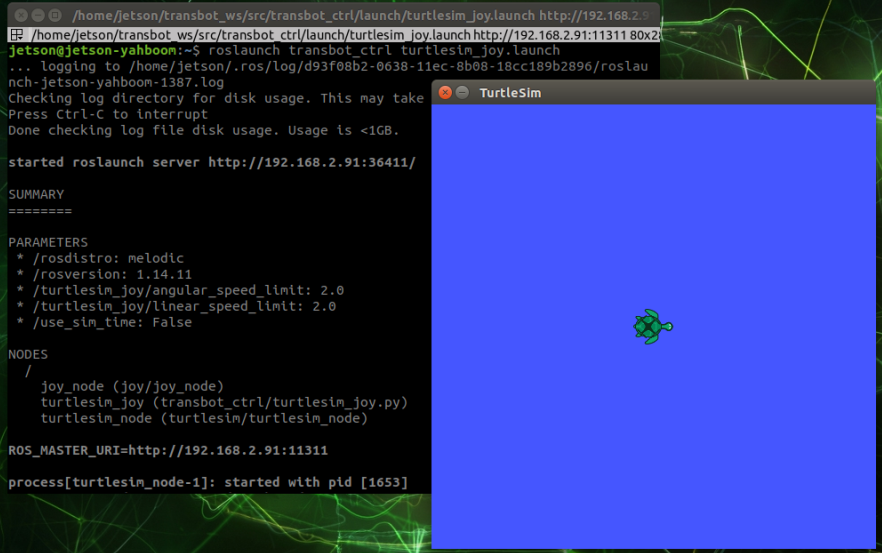
At this time, you can use the handle to control the operation of the little turtle.
- Corresponding relationship between the handle and the operation of the little turtle
| handle | little turtle |
|---|---|
| On the left joystick | Forward |
| Left joystick down | Backward |
| Right joystick left | Turn left |
| Right joystick right | Turn right |
- View node graph
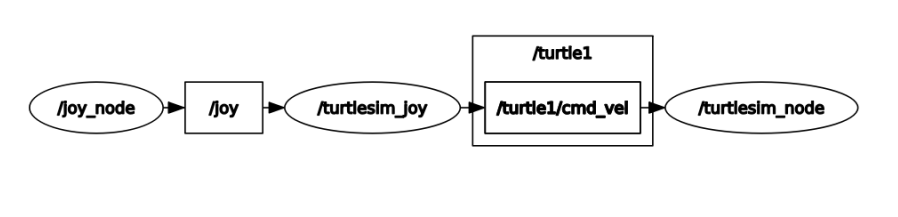
【/joy_node】:Node of controller information
【/turtlesim_joy】:Nodes controlled by the handle
【/turtlesim_node】:The node of the little turtle
The node [/joy_node] publishes the topic [/joy] so that the node [/turtlesim_joy] subscribes. After processing, it publishes the topic [/turtle1/cmd_vel] so that the node [/turtlesim_node] subscribes to drive the movement of the little turtle.
jetson motherboard/Raspberry Pi 4B
xxxxxxxxxxrqt_graph
Raspberry Pi 5
Enter the same docker from multiple terminals
Keep the program of the previous docker terminal running and open a new terminal
Enter the following command
xxxxxxxxxxdocker ps
Enter the same docker and use the following 18870bc3dc00 to modify the ID displayed on the actual terminal.
xxxxxxxxxxdocker exec -it 18870bc3dc00 /bin/bash
xxxxxxxxxxrqt_graph
5. Handle control Transbot SE
Controlling Transbot SE with a handle is similar to controlling a little turtle with a handle; let the handle control node establish contact with the underlying drive node of Transbot SE, change the current state of the handle, send different information to Transbot SE, and drive Transbot SE to make different reactions. What we need to control are the buzzer, pan/tilt, robotic arm, and car movement (linear speed, angular speed).
The topic requires continuous communication, but the service does not need continuous communication. The following settings are made according to the characteristics and business needs of the topic and service:
5.1. Handle control node
Corresponds to Transbot SE underlying driver
Topics
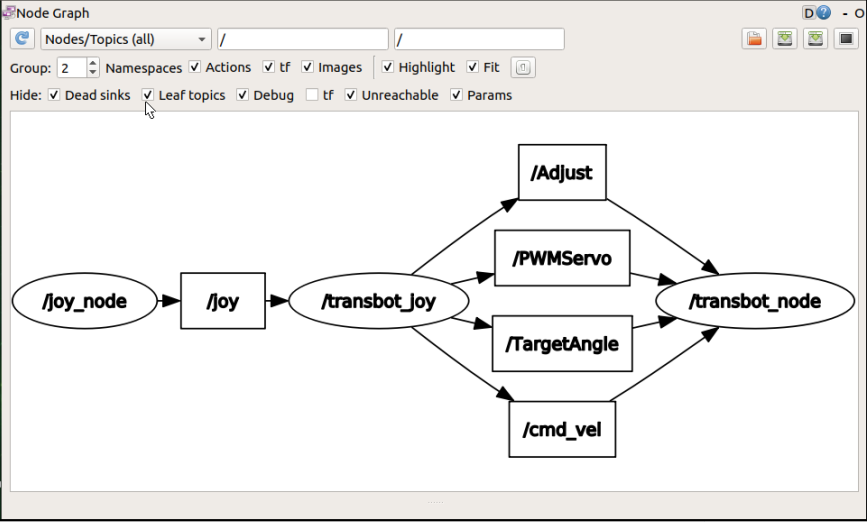
Publish car movement news【/cmd_vel】
Publish robotic arm control message【/TargetAngle】
Publish gimbal servo control message【/PWMServo】
Service (client)
Publish buzzer control message【/Buzzer】
Publish the message to get the current angle of the robot arm【/CurrentAngle】
Other topics
Corresponding to Joy_node
Subscribe to wireless controller news【/joy】
corresponding to move_base
Publish motion planning cancellation message【/move_base/cancel】
Pause/start all functional gameplay
Publish current Joy status (custom) message [/JoyState]
5.2. Related nodes
Low-level driver
Topics
Subscribe to car sports news【/cmd_vel】
Subscribe to robotic arm control messages【/TargetAngle】
Subscribe to gimbal servo control messages【/PWMServo】
Service (server)
Turn on buzzer control【/Buzzer】
Enable getting the current angle message of the robotic arm【/CurrentAngle】
Joy_node
Topics
Release news about wireless controller【/joy】
5.3. Operation process
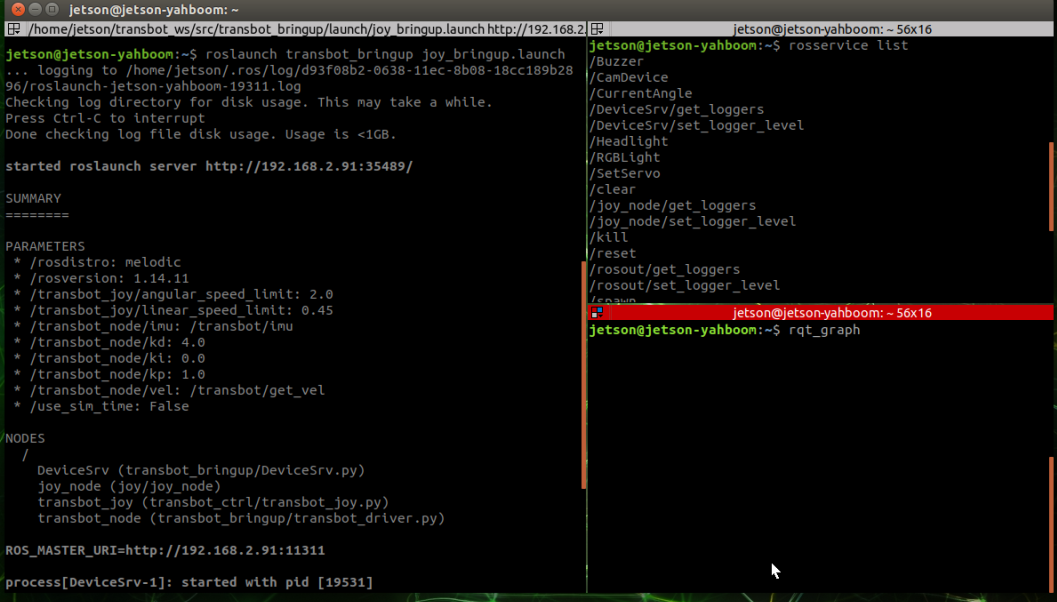
Start command
jetson motherboard/Raspberry Pi 4B
xxxxxxxxxxroslaunch transbot_bringup joy_bringup.launch
Raspberry Pi 5
Before running, please confirm that the large program has been permanently closed
Enter docker
Note: If there is a terminal that automatically starts docker, or there is a docker terminal that has been opened, you can directly enter the docker terminal to run the command, and there is no need to manually start docker
Start docker manually
xxxxxxxxxx./run_docker.sh
xxxxxxxxxxroslaunch transbot_bringup joy_bringup.launch
View node graph
jetson motherboard/Raspberry Pi 4B
xxxxxxxxxxrqt_graph
Raspberry Pi 5
Enter the same docker from multiple terminals
Keep the program of the previous docker terminal running and open a new terminal
Enter the following command
xxxxxxxxxxdocker ps
Enter the same docker and use the following 18870bc3dc00 to modify the ID displayed on the actual terminal.
xxxxxxxxxxdocker exec -it 18870bc3dc00 /bin/bash

xxxxxxxxxxrqt_graph
Only the connections between topics can be seen
View service list
jetson motherboard/Raspberry Pi 4B
xxxxxxxxxxrosservice list
Raspberry Pi 5
Enter the same docker from multiple terminals
Keep the program of the previous docker terminal running and open a new terminal
Enter the following command
xxxxxxxxxxdocker ps
Enter the same docker and use the following 18870bc3dc00 to modify the ID displayed on the actual terminal.
xxxxxxxxxxdocker exec -it 18870bc3dc00 /bin/bash
xxxxxxxxxxrosservice list
Print as follows:
xxxxxxxxxx/Buzzer/joy_node/get_loggers/joy_node/set_logger_level/rosout/get_loggers/rosout/set_logger_level/transbot_joy/get_loggers/transbot_joy/set_logger_level/transbot_node/get_loggers/transbot_node/set_logger_level/transbot_node/set_parameters... ...5.4. Source code analysis
- launch file
File path: ~/transbot_ws/src/transbot_bringup/launch/joy_bringup.launch
xxxxxxxxxx<launch><!-- Start Transbot underlying node--><node pkg="transbot_bringup" type="transbot_driver.py" name="transbot_node" required="true" output="screen"><param name="imu" value="/transbot/imu"/><param name="vel" value="/transbot/get_vel"/><param name="kp" value="1.0"/><param name="ki" value="0.0"/><param name="kd" value="4.0"/></node><!-- Start the handle control node--><include file="$(find transbot_ctrl)/launch/transbot_joy.launch"/></launch>
-py file
File path: ~/transbot_ws/src/transbot_ctrl/scripts/transbot_joy.py
xxxxxxxxxx arm_thread = threading.Thread(target=self.analyse_PWM()) arm_thread.setDaemon(True) arm_thread.start()Start the thread, obtain the currently connected camera device in the [self.analyse_PWM()] function, and start loop control of the gimbal servo and robotic arm.
xxxxxxxxxx def buttonCallback(self, joy_data): ''' Get wireless controller reception signal [1: Clamp, 2: Release, upper left: joint2+, lower left: joint2-, left left: joint1 upper, left and right joint1: lower] ''' if not isinstance(joy_data, Joy): return #rospy.loginfo("joy_data.buttons:", joy_data.buttons) # rospy.loginfo("joy_data.axes:", joy_data.axes) if self.user_name == "pi": self.user_pi(joy_data) else: self.user_jetson(joy_data) # rospy.loginfo("linear_Gear: {},angular_Gear: {}".format(self.linear_Gear,self.angular_Gear)) #rospy.loginfo("linear_speed: {},angular_speed: {}".format(linear_speed,angular_speed))Subscribe to the data published by the node [joy_node] and obtain the current status of the wireless controller. Different master controls are distinguished here.
5.5. Handle effect
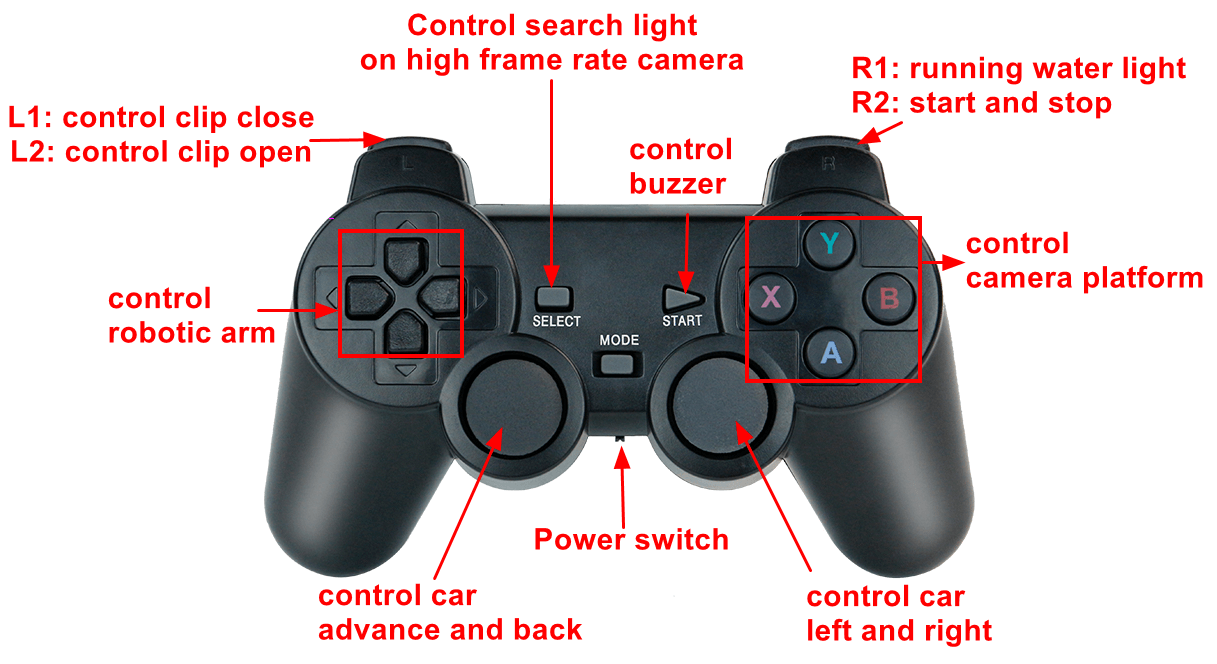
5.6. Precautions when using the handle
After plugging and unplugging the handle receiver, you need to restart the handle program, otherwise you will not be able to control the car.
After starting the handle control program, if the handle cannot control the car, it may be caused by the wrong handle control mode. You can press and hold the handle mode button for about 15 seconds to switch modes. After the green indicator light stays on, press the start button again, such as If a buzzer sounds, the switch is successful. If there is no response, you can press and hold the mode button on the handle again for 15 seconds.
Jetson series support mode: PC/PCS mode (in X-BOX mode, it can only control the forward and backward movement of the car)
Raspberry Pi series support mode: X-BOX mode
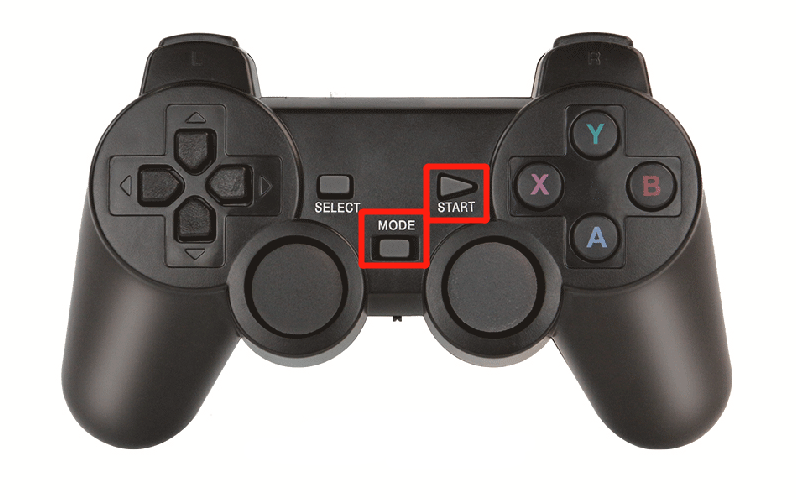
After re-plugging or unplugging the handle receiver or restarting the motherboard, the handle will be reset to factory mode. If it cannot be controlled, the mode will need to be switched again every time it is plugged, unplugged or restarted.
Appendix
jetson nano
xxxxxxxxxxjoy_data.buttons:header:seq: 335stamp:secs: 1628324636nsecs: 962988952frame_id: "/dev/input/js0"axes: [0.0, 0.0, 0.0, 0.0, 0.0, 0.0, 0.0, 0.0]buttons: [0, 0, 0, 0, 0, 0, 0, 0, 0, 0, 0, 0, 0, 0, 0]
axes(8)
| Code analysis | Handle button | Car control |
|---|---|---|
| axes[0] | Left rocker | |
| axes[1] | Left rocker | advance and back |
| axes[2] | Right rocker | left and right |
| axes[3] | Right rocker | |
| axes[4] | ||
| axes[5] | ||
| axes[6] | Left button | Arm-1 |
| axes[7] | Left button | Arm-2 |
buttons(15)
| Code analysis | Handle button | Car control |
|---|---|---|
| buttons[0] | A | camera platform move down |
| buttons[1] | B | camera platform move right |
| buttons[2] | ||
| buttons[3] | X | camera platform move left |
| buttons[4] | Y | camera platform move up |
| buttons[5] | ||
| buttons[6] | L1 | Arm-clip close |
| buttons[7] | R1 | running water light |
| buttons[8] | L2 | Arm-clip open |
| buttons[9] | R2 | control switch |
| buttons[10] | SELECT | search light on high frame rate camera |
| buttons[11] | START | buzzer |
| buttons[12] | ||
| buttons[13] | Press left rocker | Linear speed [ 0.15 , 0.3 , 0.45 ] |
| buttons[14] | Press right rocker | Angular speed [ 0.5 , 1 , 1.5 , 2 ] |
Raspberry Pi
xxxxxxxxxxjoy_data.buttons: header:seq: 264stamp:secs: 1628326479nsecs: 848359307frame_id: "/dev/input/js0"axes: [-0.0, -0.0, 0.0, -0.0, -0.0, 0.0, 0.0, 0.0]buttons: [0, 0, 0, 0, 0, 0, 0, 0, 0, 0, 0]
axes(8)
| Code analysis | Handle button | Car control |
|---|---|---|
| axes[0] | Left rocker | |
| axes[1] | Left rocker | advance and back |
| axes[2] | L2(press:-1,release:1) | Arm clip |
| axes[3] | Right rocker | left and right |
| axes[4] | Right rocker | |
| axes[5] | R2(press:-1,release:1) | control switch |
| axes[6] | Left button | Arm-1 |
| axes[7] | Left button | Arm-2 |
buttons(11)
| Code analysis | Handle button | Car control |
|---|---|---|
| buttons[0] | A | camera platform move down |
| buttons[1] | B | camera platform move right |
| buttons[2] | X | camera platform move left |
| buttons[3] | Y | camera platform move up |
| buttons[4] | L1 | Arm clip |
| buttons[5] | R1 | running water light |
| buttons[6] | SELECT | search light on high frame rate camera |
| buttons[7] | START | buzzer |
| buttons[8] | MODE | |
| buttons[9] | Press left rocker | Linear speed [ 0.15 , 0.3 , 0.45 ] |
| buttons[10] | Press right rocker | Angular speed [ 0.5 , 1 , 1.5 , 2 ] |