Welcome to Transbot SE repository
5.yolov5+tensorrt acceleration(jetson)
5 Yolov5+tensorrt acceleration(jetson)
5 Yolov5+tensorrt acceleration(jetson) 5.1 Introduction 5.2 tensorrt deployment process 5.2.1 Generate .wts file 5.2.2 Generate .engine file 5.2.3 Test 5.3 ROS deployment 5.4 Use
tensorrt source code: https://github.com/wang-xinyu/tensorrtx
Official installation tutorial: https://docs.nvidia.com/deeplearning/tensorrt/install-guide/index.html
Official tutorial: https://docs.nvidia.com/deeplearning/tensorrt/developer-guide/index.html
5.1 Introduction
TensorRT is a high-performance deep learning inference(Inference) optimizer that provides low-latency, high-throughput deployment inference for deep learning applications. TensorRT can be used to accelerate inference in hyperscale data centers, embedded platforms, or autonomous driving platforms. TensorRT can now support almost all deep learning frameworks such as TensorFlow, Caffe, Mxnet, Pytorch, etc. The combination of TensorRT and NVIDIA GPU can perform fast and efficient deployment inference in almost all frameworks.
Can TensorRT accelerate the model?
can!According to official documents, using TensorRT, it can provide 10X or even 100X acceleration in CPU or GPU mode. TensorRT provides 20X speedup.
TensorRT is only responsible for the inference process of the model and optimizes the trained model. Generally, TensorRT is not used to train the model. tensorRT is just an inference optimizer. After your network is trained, you can directly drop the training model file into tensorRT without relying on the deep learning framework(Caffe, TensorFlow, etc.), as follows:
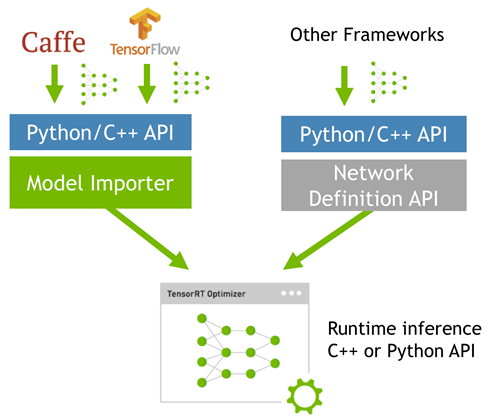
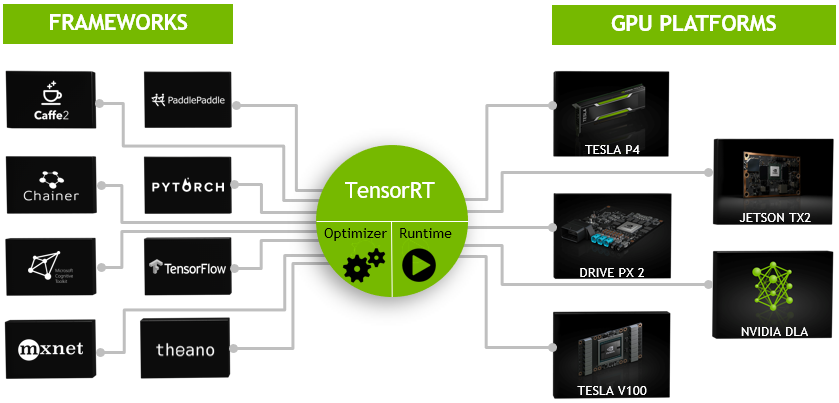
It can be considered that tensorRT is a deep learning framework with only forward propagation. This framework can parse the network models of Caffe and TensorFlow, and then map them one by one with the corresponding layers in tensorRT, and convert all the models of other frameworks into tensorRT. Then in tensorRT, you can implement optimization strategies for NVIDIA's own GPUs and accelerate deployment.
5.2 tensorrt deployment process
5.2.1 Generate .wts file
For example: yolov5s.wts
Copy tensorrtx_yolov5_jetson/gen_wts.py and [yolov5-5.0/weights/yolov5s.pt] weight file(or the weight file downloaded by Baidu, take [yolov5s.pt] as an example)) to [~/software/yolov5-5.0 ] folder, and execute gen_wts.py in this directory to generate the .wts file.
python3 gen_wts.py -w yolov5s.pt
Copy the generated [yolov5s.wts] file to the tensorrtx_yolov5_jetson directory, and compile tensorrtx in this directory
xxxxxxxxxxmkdir build && cd build && cmake ..
Change CLASS_NUM in yololayer.h to yours. Because the official data set is coco, the default is 80.
Execute makeFile. (make once every time it is modified to CLASS_NUM)
xxxxxxxxxxmake -j4
5.2.2 Generate .engine file
Generate .engine file(I use yolov5s, so end with s)
xxxxxxxxxxsudo ./yolov5 -s ../yolov5s.wts yolov5s.engine s
If you customize depth_multiple and width_multiple during training, just write:
xxxxxxxxxxsudo ./yolov5 -s ../yolov5.wts yolov5.engine c 0.33 0.5
The P6 model of yolov5 was also updated in tensorrtx 5.0
xxxxxxxxxxsudo ./yolov5 -s ../yolov5.wts yolov5.engine s6
5.2.3 Test
Test it with the pictures that come with it(there are two pictures in the samples)
xxxxxxxxxxsudo ./yolov5 -d yolov5s.engine ../samples
You can test it with a python file, you need to create a yaml file.
For example: coco.yaml
xxxxxxxxxxPLUGIN_LIBRARY libmyplugins.so # plugin library engine_file_path yolov5s.engine # engine file path CONF_THRESH 0.5 # CONF threshold IOU_THRESHOLD 0.4 # IOU threshold categories "person" "bicycle" ... ... # Identify categories test
xxxxxxxxxxcd ..python3 yolov5.py
5.3 ROS deployment
Copy the generated [yolov5s.engine] and [libmyplugins.so] files to the [yahboomcar_yolov5] function package [param/nano4G] folder, for example:
xxxxxxxxxxyahboomcar_yolov5├── CMakeLists.txt├── launch│ └── yolodetect.launch├── package.xml├── param│ ├── coco.yaml│ ├── nano4G│ │ ├── libmyplugins.so│ │ └── yolov5s.engine│ └── nx│ ├── libmyplugins.so│ └── yolov5s.engine└── scripts└── yolov5.py
When using, follow the operation steps of [5.4].
write yaml file
For example: coco.yaml
xxxxxxxxxxPLUGIN_LIBRARY libmyplugins.so # plugin library engine_file_path yolov5s.engine # engine file path CONF_THRESH 0.5 # CONF threshold IOU_THRESHOLD 0.4 # IOU threshold categories "person" "bicycle" ... ... # Identify categories If the file name changes, you need to modify the [yolov5.py] file and open it in the file path
xxxxxxxxxxsudo vim ~/yahboomcar_ws/src/yahboomcar_yolov5/scripts/yolov5.py
As follows
xxxxxxxxxxclass YoloDetect : def __init__(self): rospy.on_shutdown(self.cancel) rospy.init_node("YoloDetect", anonymous = False) self.pTime = self.cTime = 0 device = rospy.get_param("~device", "nano4G") param_ = rospkg.RosPack(). get_path("yahboomcar_yolov5") + '/param/' file_yaml = param_ + 'coco.yaml' PLUGIN_LIBRARY = param_ + device + "/libmyplugins.so" engine_file_path = param_ + device + "/yolov5s.engine" self.yolov5_wrapper = YoLov5TRT(file_yaml, PLUGIN_LIBRARY, engine_file_path) self.pub_image = rospy.Publisher('Detect/image_msg', Image_Msg, queue_size = 10) self.pub_msg = rospy.Publisher('DetectMsg', TargetArray, queue_size = 10) The parameters of [file_yaml], [PLUGIN_LIBRARY], and [engine_file_path] should correspond one-to-one with the used names.
5.4 Use
xxxxxxxxxxroslaunch yahboomcar_yolov5 yolodetect.launch device:=nano4G display:=true
- [device] parameter: the main control device of the robot, for example: nano4G, nx, etc.
- [display] parameter: whether to enable the visual interface.
Support real-time monitoring of web pages, such as:
xxxxxxxxxx# Query the webpage IP and port based on the information prompted after running the ROS node# It is usually the local IP, and the default is 0.0.0.0:8080 if the IP is not found192.168.2.89:8080
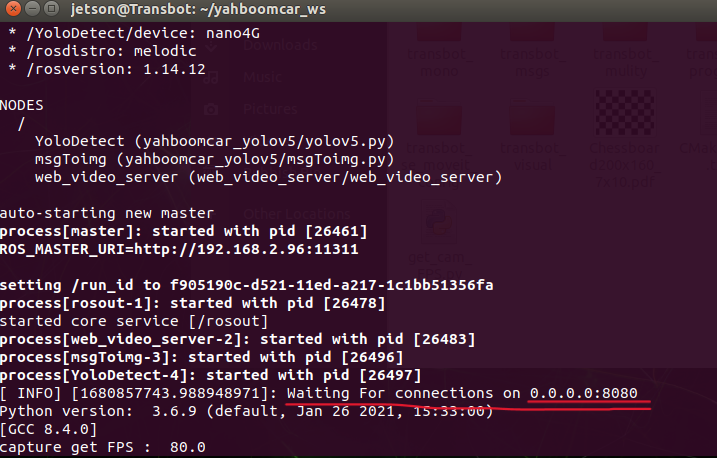
View node information
xxxxxxxxxxrqt_graph

Print detection information
xxxxxxxxxxrostopic echo/DetectMsg
print as follows
xxxxxxxxxxdata :-frame_id : "tv"stamp :secs : 1646123012nsecs : 116803169scores : 0.754247903824ptx : 106.302101135pty : 121.952651978distw : 144.548706055disth : 90.0989227295centerx : 72.2743530273centery : 45.0494613647
- frame_id: Identifying name.
- scores: Identify scores.
- ptx, pty: the coordinates of the upper left corner of the recognition box.
- distw, disth: The width and height of the recognition box.
- centerx, centery: Identify the center.