Welcome to Transbot SE repository
1.KNN recognizes handwritten digits
1 KNN recognizes handwritten digits
1 KNN recognizes handwritten digits 1.1 KNN(K-nearest neighbor algorithm) to recognize handwritten digits 1.1.1 Introduction to KNN 1.1.2 Taking the recognition of handwritten digits as an example to introduce the implementation of the KNN algorithm
1.1 KNN(K-nearest neighbor algorithm) to recognize handwritten digits
1.1.1 Introduction to KNN
- KNN(K-Nearest Neighbor) is a supervised learning method. Its working mechanism is very simple, and it does not need to train a training set. It is one of the simpler classical machine learning algorithms. Can handle regression and classification problems.
- method ideas
In the feature space, if most of the k nearest(that is, the nearest neighbors in the feature space) samples near a sample belong to a certain category, the sample also belongs to this category.
In official words, the so-called K-nearest neighbor algorithm is to give a training data set, for a new input instance, find the K instances closest to the instance in the training data set(that is, the K neighbors mentioned above).), the majority of these K instances belong to a certain class, and the input instance is classified into this class.
- working principle
There is a sample data set, also known as a training sample set, and each data in the sample set has a label, that is, we know the relationship between each data in the sample set and the category to which it belongs. After inputting data without labels, compare each feature in the new data with the features corresponding to the data in the sample set, and extract the classification labels of the most similar data(nearest neighbors) in the sample set. Generally speaking, we only select the top K most similar data in the sample data set, which is the origin of K in the K nearest neighbor algorithm, usually K is an integer not greater than 20. Finally, the classification with the most occurrences in the K most similar data is selected as the classification of the new data.
- KNN advantages and disadvantages
advantage
Flexible usage, convenient for small sample prediction, high precision, insensitive to outliers, no data input assumptions
shortcoming
Lack of training phase, unable to cope with multiple samples, high computational complexity and high space complexity
- KNN implementation steps:
Calculate distance
Euclidean distance, that is
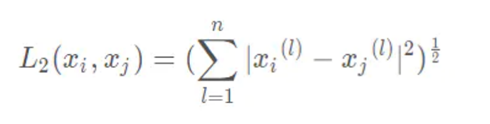
Sort by increasing distance
Select the K points with the smallest distance(generally no more than 20)
Determine the frequency of occurrence of the category in which the first K points belong, frequency = a category/k
Returns the category with the highest frequency in the top K points as the predicted classification of the test data
1.1.2 Taking the recognition of handwritten digits as an example to introduce the implementation of the KNN algorithm
- data set
Training set
The training set is already classified data, you can refer to the directory ~/KNN/knn-digits/trainingDigits
Note: The training set has been trained. If the user wants to train by himself, he needs to back up the original training set first. The number of training sets is large.
test set
The test set is used to test the algorithm, you can refer to the directory ~/KNN/knn-digits/testDigits
- use the drawing function under windows to make handwritten digital pictures
- Open the drawing software, adjust the resolution to 32*32, or other resolutions, but it is best to draw to fill the entire interval, otherwise the error rate is very high.
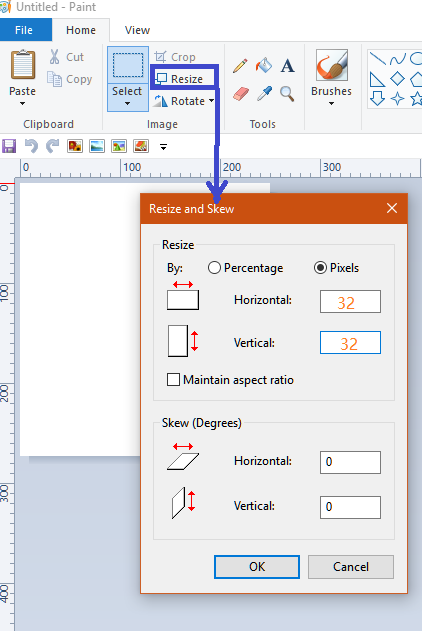
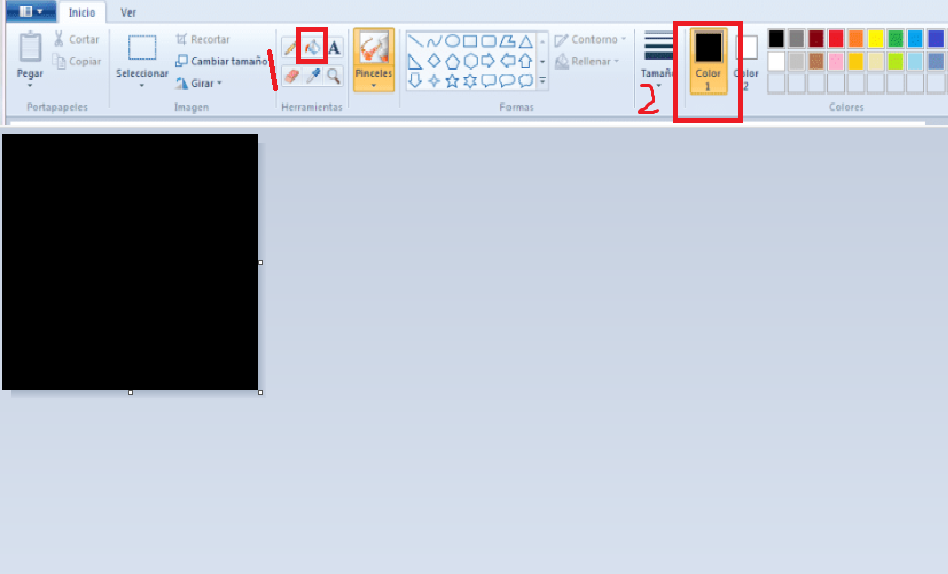
Hold down ctrl and slide the mouse wheel up to enlarge the picture to the maximum. Pick the Paint Bucket Tool and choose a black color to fill the entire screen.
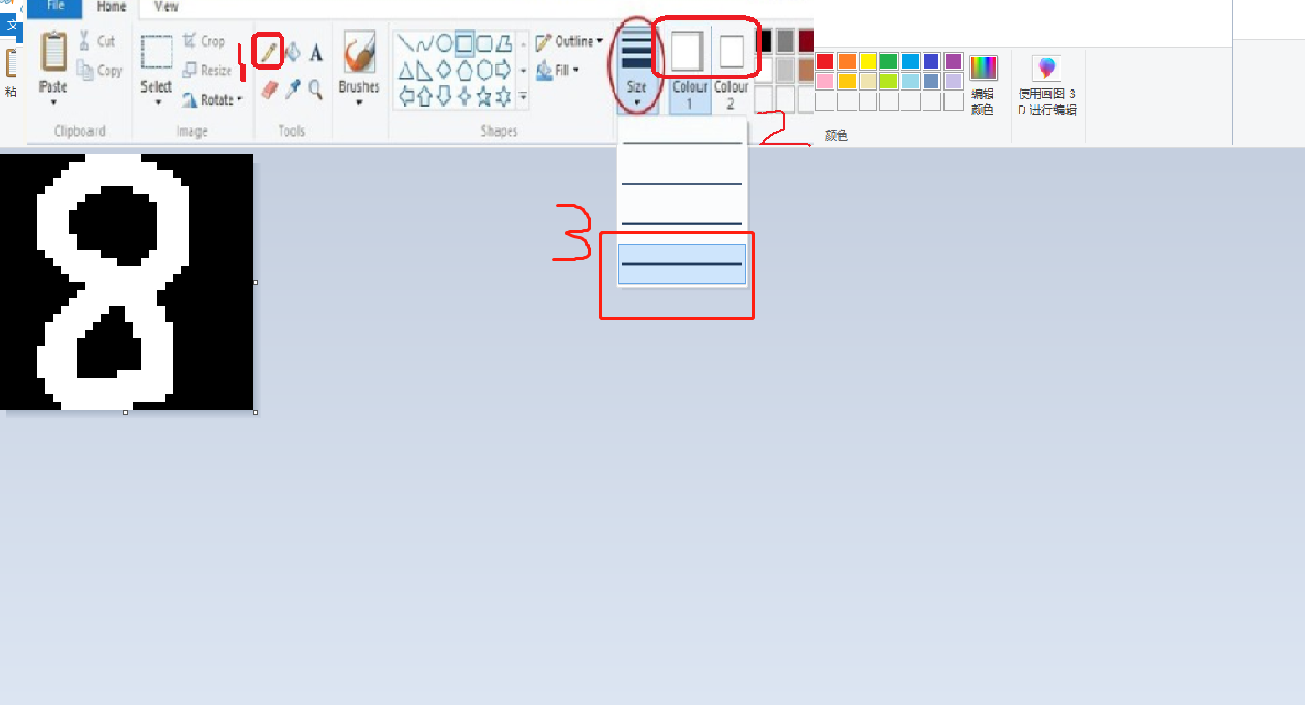
Pick the Pencil Tool, choose White for the Color, and the Maximum Width for the Line Thickness. As shown below:
After drawing, save it as a png image(this example takes 8.png as an example), and copy it to the project directory through the WinSCP tool
- Convert the image(.img) to text(.txt)
- code
Code location: ~/KNN/img2file.py
xfrom PIL import Image import numpy as np
def img2txt(img_path, txt_name):
im = Image.open(img_path). convert('1'). resize((32, 32)) # type:Image.Image
data = np.asarray(im)
np.savetxt(txt_name, data, fmt = '%d', delimiter = '') img2txt("8.png", "./knn-digits/testDigits/8_1.txt") img_path: image file name
txt_name: After conversion, save it in the ~/KNN/knn-digits/testDigits directory, the name is 8_1.txt
- run the program
jetson motherboard/Raspberry Pi 4B
xxxxxxxxxxcdKNNpython3 img2file.py
Raspberry Pi 5
Note: Open the Raspberry Pi 5 terminal directly without entering docker
xxxxxxxxxxcdKNNpython3 img2file.py
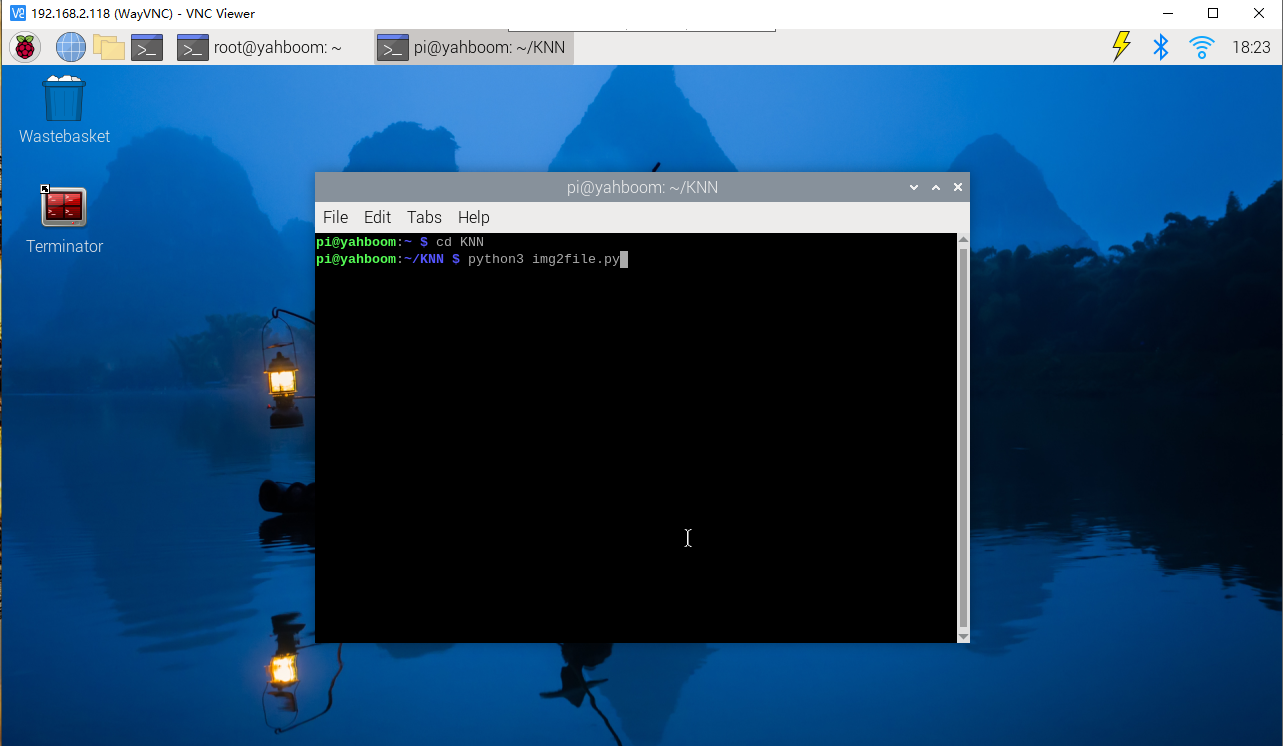
After the program is run, a file named 8_1.txt will be generated in the KNN directory. Double-click it and you will see something like this: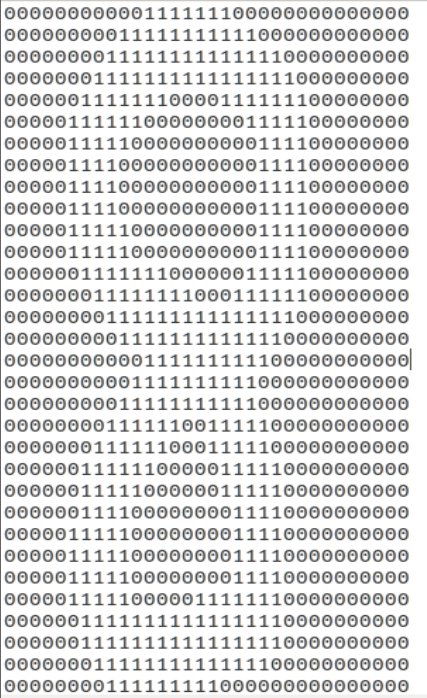
It can be seen that the part with the number 8 is roughly surrounded by a number 8.
- run the KNN recognition algorithm program
jetson motherboard/Raspberry Pi 4B
xxxxxxxxxxIn the ~/KNN directory, open the terminal and runpython3knn.py
Raspberry Pi 5
Note: Open the Raspberry Pi 5 terminal directly without entering docker
xxxxxxxxxxcdKNNpython3knn.py
- code
Code location: ~/KNN/knn.py
xxxxxxxxxx#!/usr/bin/env python3 # -*- coding: utf-8 -*- """ Created on Sun Apr 16 14:53:46 2017
@author: jiangkang """
import  numpy import  operator import  os import  matplotlib.pyplot  as  plt
 def img2vector(filename):     returnVect  =  numpy.zeros((1, 1024))     file  =  open(filename)     for  i  in  range(32):         lineStr  =  file.readline()         for  j  in  range(32):             returnVect [ 0, 32  *  i  +  j ] =  int(lineStr [ j ])     return  returnVect
 def classifier(inX, dataSet, labels, k):     dataSetSize  =  dataSet.shape [ 0 ]     diffMat = numpy.tile(inX,(dataSetSize, 1)) -  dataSet     sqDiffMat = diffMat  **  2     sqDistances  =  sqDiffMat.sum(axis = 1)     distances  =  sqDistances  **  0.5     sortedDistIndicies  =  distances.argsort()     classCount  = {}     for  i  in  range(k):         voteIlabel  =  labels [ sortedDistIndicies [ i ]]         classCount [ voteIlabel ] =  classCount.get(voteIlabel, 0)  +  1     sortedClassCount  =  sorted(classCount.items(), key = operator.itemgetter(1), reverse = True)     return  sortedClassCount [ 0 ][ 0 ] #Train first, then test recognition, k represents the k value in the algorithm - select the top K most similar data in the sample data set, the k value is generally an integer not greater than 20  def handWritingClassTest(k):     hwLabels  = []     trainingFileList = os.listdir('knn-digits/trainingDigits') training set data     m  =  len(trainingFileList)     trainingMat  =  numpy.zeros((m, 1024))     for  i  in  range(m):         fileNameStr  =  trainingFileList [ i ]         fileStr  =  fileNameStr.split('.')[ 0 ]         classNumStr  =  int(fileStr.split('_')[ 0 ])         hwLabels.append(classNumStr)         trainingMat [ i, :] =  img2vector("knn-digits/trainingDigits/%s"  %  fileNameStr)     testFileList = os.listdir('knn-digits/testDigits') test set data     errorCount  =  0.0     mTest  =  len(testFileList)     for  i  in  range(mTest):         fileNameStr  =  testFileList [ i ]         fileStr  =  fileNameStr.split('.')[ 0 ]         classNumStr  =  int(fileStr.split('_')[ 0 ])         vectorTest  =  img2vector("knn-digits/testDigits/%s"  %  fileNameStr)         result  =  classifier(vectorTest, trainingMat, hwLabels, k)         print("The classification result is: %d, the real result is: %d"  %(result, classNumStr))         if  result  !=  classNumStr :             errorCount  +=  1.0     '''fileStr = "2.txt"     classNumStr = int(fileStr.split('.')[0])     vectorTest = img2vector("./2.txt")     result = classifier(vectorTest, trainingMat, hwLabels, 3)'''     print("Total number of errors: %d"  %  errorCount)     print("Error rate: %f"  %(errorCount / mTest))     return  errorCount
handWritingClassTest(1)
- run screenshot

As shown in the figure, the identification is 8, and the identification is correct. If the recognition result is different from the real result, please copy the converted txt file to knn-digits/trainingDigits/ and name it as follows: 8_801.txt, and then retrain it to recognize it normally.
Program Description
The name of the text file converted from the picture, taking 8_1 as an example, knn.py will parse the file name in the program, the underscore is the limit, the front 8 represents the real number, and the latter part can be customized, see the code,
xxxxxxxxxxclassNumStr = int(fileStr.split('_')[0])
Train first, then identify.