Welcome to Transbot SE repository
3.HD camera color tracking (robotic arm)
3.HD camera color tracking (robotic arm)
3.HD camera color tracking (robotic arm)3.1、Introduction3.2. Operation steps3.2.1. Start3.2.2. Identification3.2.3. Dynamic parameter debugging3.2.3.1. Following distance setting3.2.3.2. Color calibration3.2.4. Color following
3.1、Introduction
The monocular color tracking (chassis) of the Transbot se robot can recognize multiple colors at any time and independently store the currently recognized color. The robot arm tracks the color up and down, and the car rotates left and right to track the color. When the color is far away from the car, it will actively follow.
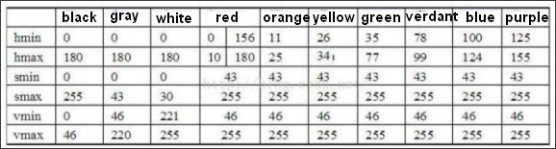
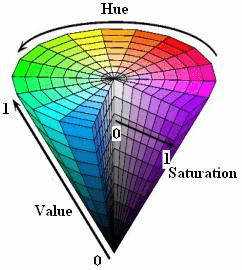
The color tracking of the Transbot se robot can also realize the function of real-time HSV regulation. By adjusting the high and low thresholds of HSV, the interfering colors can be filtered out, so that the square can be identified ideally in a complex environment. If the color picking effect is not ideal At this time, we need to move the car to a different environment to calibrate it, so that we can recognize the color we need in a complex environment.
- HSV
H: 0 — 180
S: 0 — 255
V: 0 — 255
Part of the red is classified as the purple range here:
HSV
Lightness V
- Saturation S
Hue H
3.2. Operation steps
Note: [R2] on the remote control handle has the [pause/start] function for all gameplays. Because an ordinary camera is used. The effect is affected by light.
3.2.1. Start
Start chassis drive control (robot side)
jetson motherboard/Raspberry Pi 4B
roslaunch transbot_track TrackSrv.launch
Raspberry Pi 5
Before running, please confirm that the large program has been permanently closed
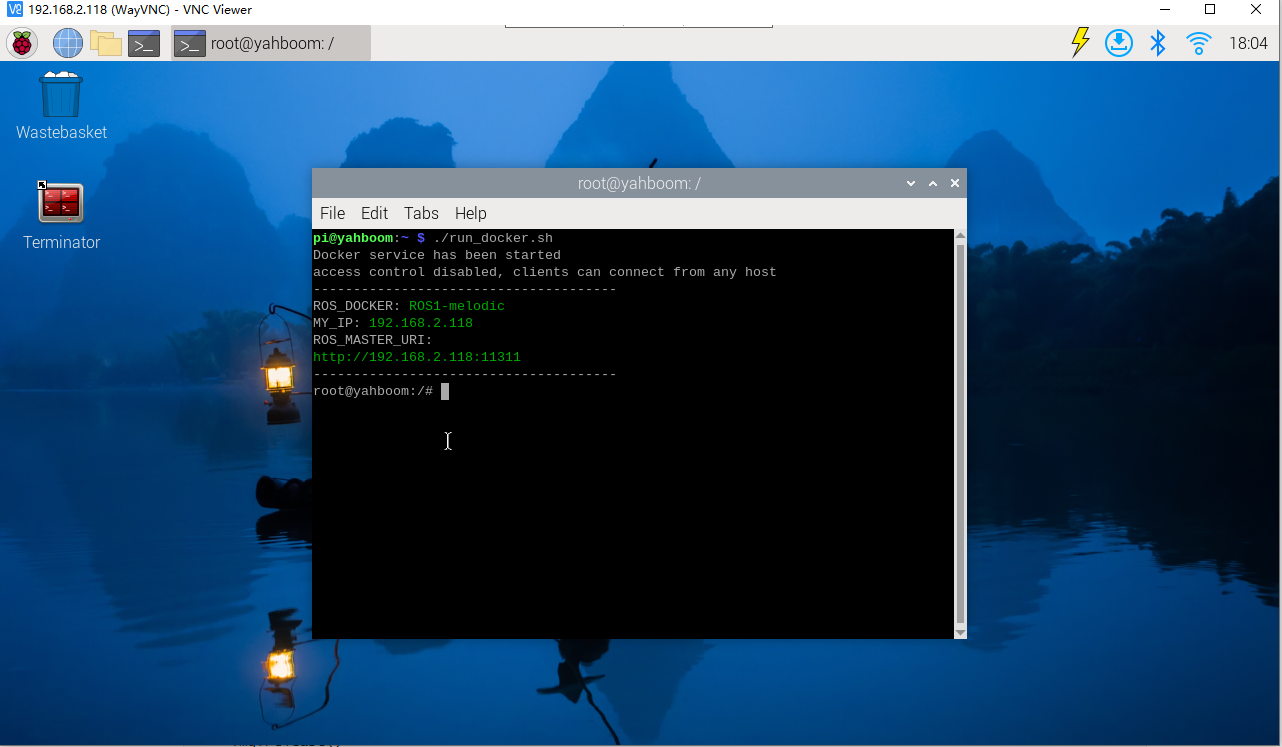
Enter docker
Note: If there is a terminal that automatically starts docker, or there is a docker terminal that has been opened, you can directly enter the docker terminal to run the command, and there is no need to manually start docker
Start docker manually
xxxxxxxxxx./run_docker.sh
Start chassis drive control (robot side)
xxxxxxxxxxroslaunch transbot_track TrackSrv.launch
method one
jetson motherboard/Raspberry Pi 4B
Start the monocular camera (robnot side)
xxxxxxxxxxroslaunch usb_cam usb_cam-test.launch
Start monocular color tracking control (virtual machine)
xxxxxxxxxxroslaunch transbot_track Tracker.launch VideoSwitch:=false tracker_type:=color
Raspberry Pi 5
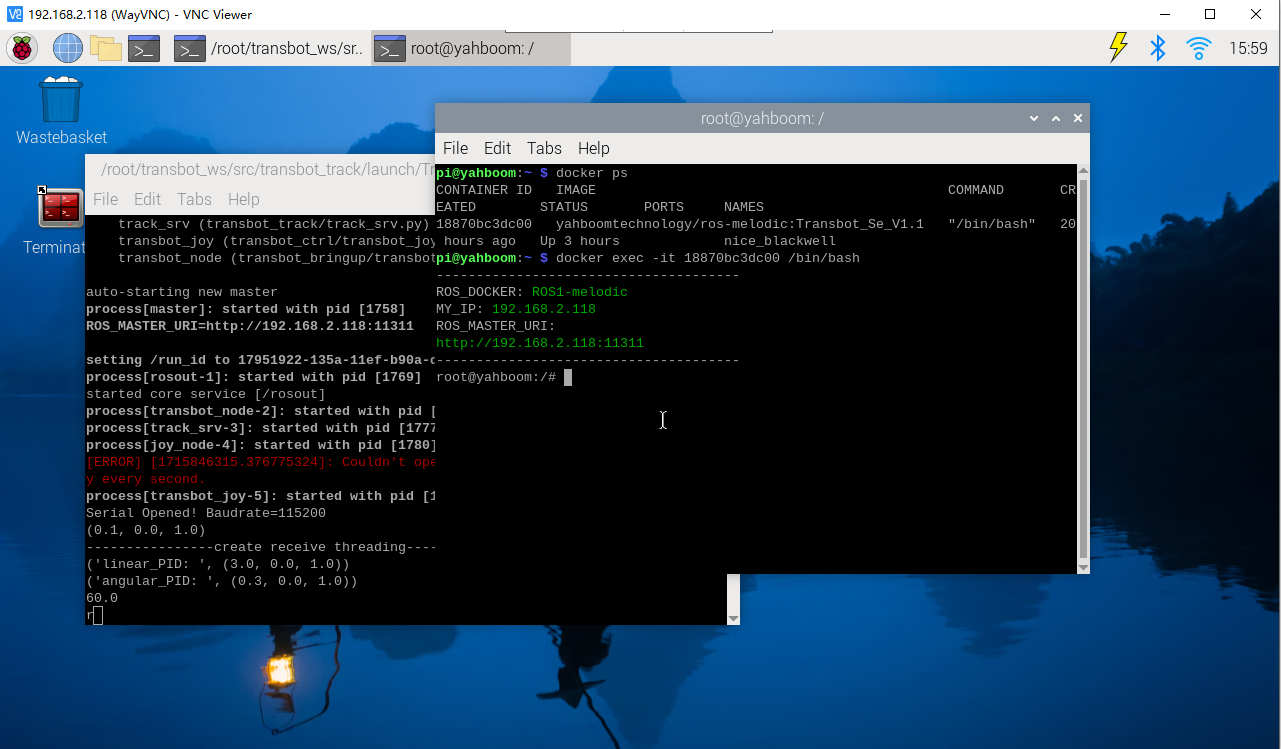
Enter the same docker from multiple terminals
Keep the program of the previous docker terminal running and open a new terminal
Enter the following command
xxxxxxxxxxdocker ps
Enter the same docker and use the following 18870bc3dc00 to modify the ID displayed on the actual terminal.
xxxxxxxxxxdocker exec -it 18870bc3dc00 /bin/bash
Start the monocular camera (robnot side)
xxxxxxxxxxroslaunch usb_cam usb_cam-test.launch
Start monocular color tracking control (virtual machine)
xxxxxxxxxxroslaunch transbot_track Tracker.launch VideoSwitch:=false tracker_type:=color
Method 2
Note: [q] key to exit.
jetson motherboard/Raspberry Pi 4B
(robot side)
xxxxxxxxxxroslaunch transbot_track Tracker.launch VideoSwitch:=true tracker_type:=color
Raspberry Pi 5
Enter the same docker from multiple terminals
Keep the program of the previous docker terminal running and open a new terminal
Enter the following command
xxxxxxxxxxdocker ps
Enter the same docker and use the following 18870bc3dc00 to modify the ID displayed on the actual terminal.
xxxxxxxxxxdocker exec -it 18870bc3dc00 /bin/bash
(robot side)
xxxxxxxxxxroslaunch transbot_track Tracker.launch VideoSwitch:=true tracker_type:=color
This method can only be started in the main control connected to the camera
- VideoSwitch parameter: whether to use the camera function package to launch; for example: to launch usb_cam-test.launch, this parameter must be set to true; otherwise, it is false.
- tracker_type parameter: Functional gameplay, select color tracking.
3.2.2. Identification
After startup, the system defaults to [Target Detection Mode], and you need to press [r] to enter the color selection mode. In the color selection mode, use the mouse to select the location of the color block, as shown in the figure below, and release it to start recognition. As shown below:
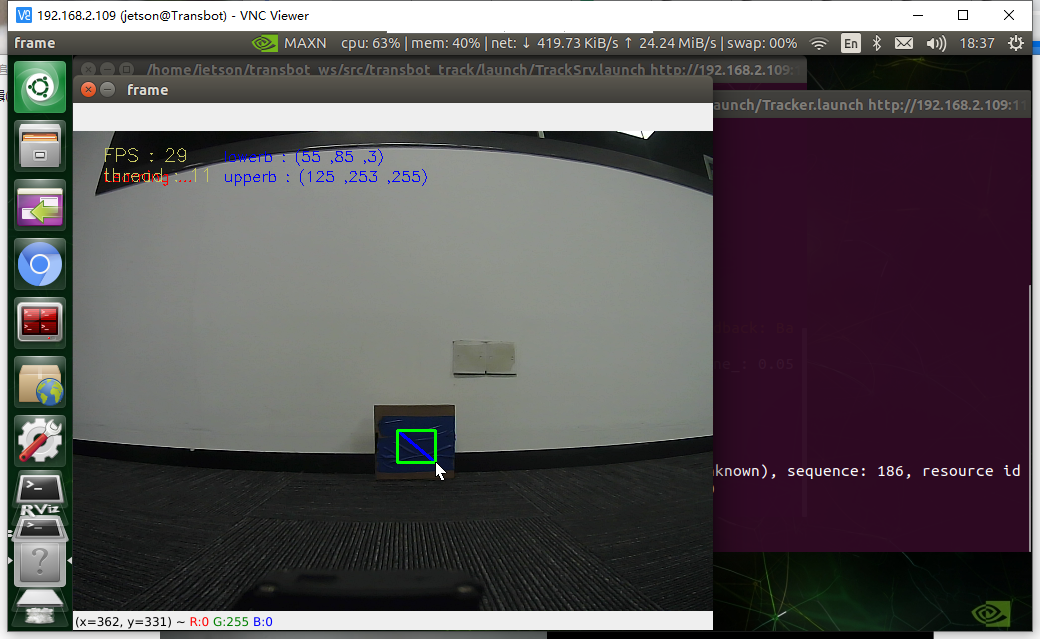
Keyboard key control:
[r]: Color selection mode, you can use the mouse to select the area of the color to be recognized (cannot exceed the area range). If the robotic arm blocks the camera, you can press the [r] key to reset the robotic arm.
【i】: Target detection mode. The color image on the left (Color) and the binary image on the right (Binary).
[q]: Exit the program.
[Spacebar]: Color follow.
3.2.3. Dynamic parameter debugging
Dynamic parameter debugging
jetson motherboard/Raspberry Pi 4B
xxxxxxxxxxrosrun rqt_reconfigure rqt_reconfigure
Raspberry Pi 5
Enter the same docker from multiple terminals
Keep the program of the previous docker terminal running and open a new terminal
Enter the following command
xxxxxxxxxxdocker ps
Enter the same docker and use the following 18870bc3dc00 to modify the ID displayed on the actual terminal.
xxxxxxxxxxdocker exec -it 18870bc3dc00 /bin/bash
xxxxxxxxxxrosrun rqt_reconfigure rqt_reconfigure
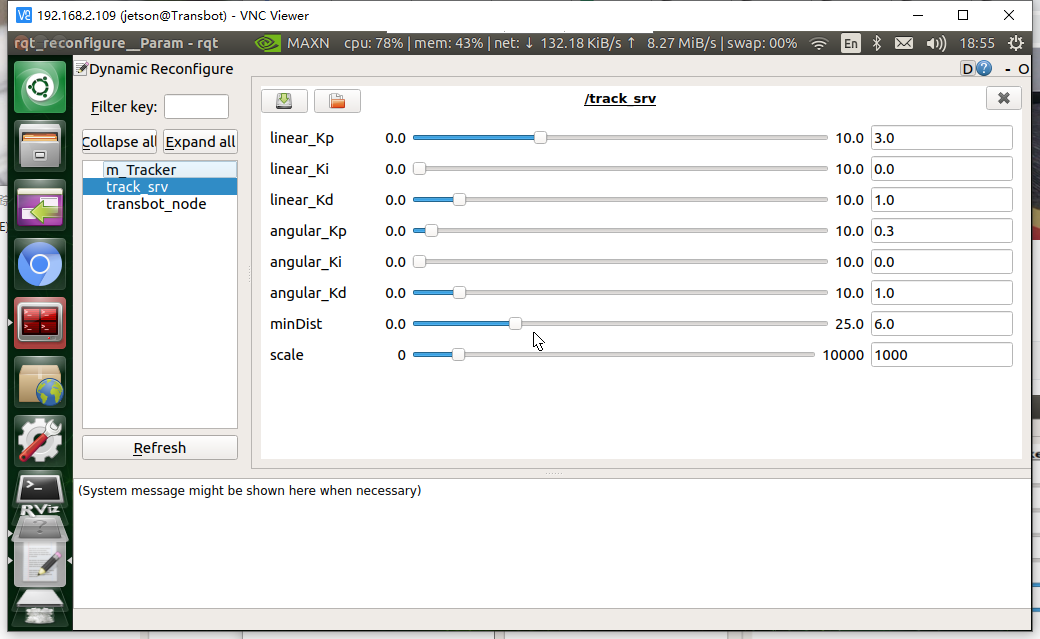
3.2.3.1. Following distance setting
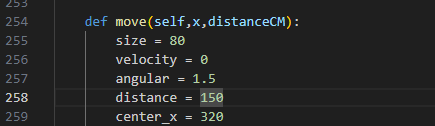
The distance value defaults to 150. If you want to modify the following distance, you can change the distance value in line 258 of the ~/transbot_ws/src/transbot_track/scripts/Tracker.py file.
3.2.3.2. Color calibration
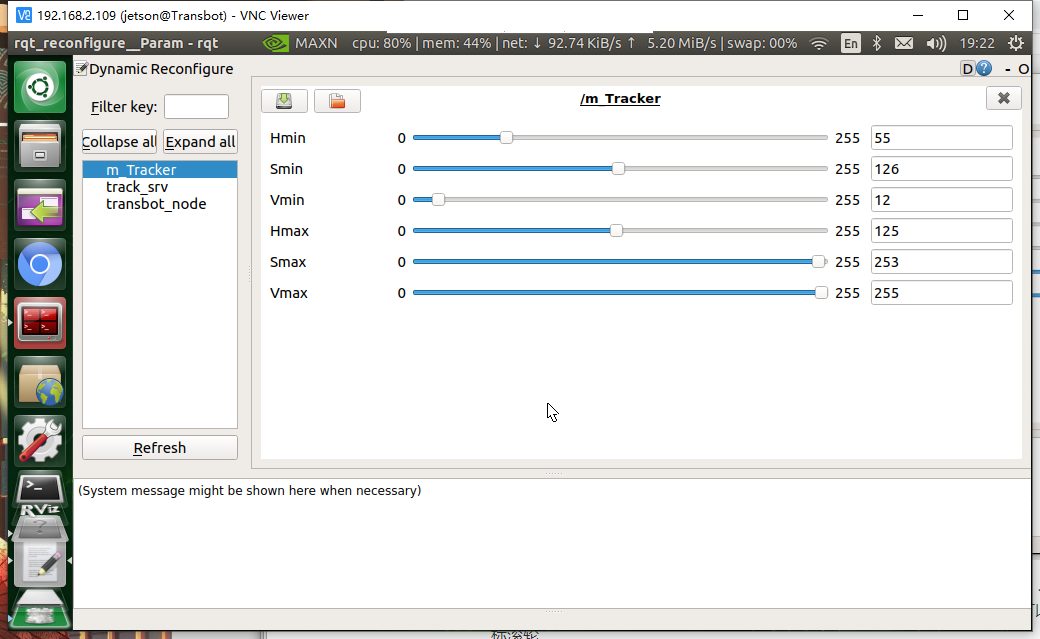
Select the [m_Tracker] node. Generally, you only need to adjust [Hmin], [Smin], [Vmin], and [Hmax]. These four parameters can be easily identified. The slide bar is always in a dragging state and data will not be transferred to the system until it is released; you can also select a row and then slide the mouse wheel.
3.2.4. Color following
After identifying that there is no problem, click the [space bar] on the keyboard to execute the color following program.
- Node view
jetson motherboard/Raspberry Pi 4B
xxxxxxxxxxrqt_graph
Raspberry Pi 5
Enter the same docker from multiple terminals
Keep the program of the previous docker terminal running and open a new terminal
Enter the following command
xxxxxxxxxxdocker ps
Enter the same docker and use the following 18870bc3dc00 to modify the ID displayed on the actual terminal.
xxxxxxxxxxdocker exec -it 18870bc3dc00 /bin/bash
xxxxxxxxxxrqt_graph
- When starting method 1, node [m_Tracker]
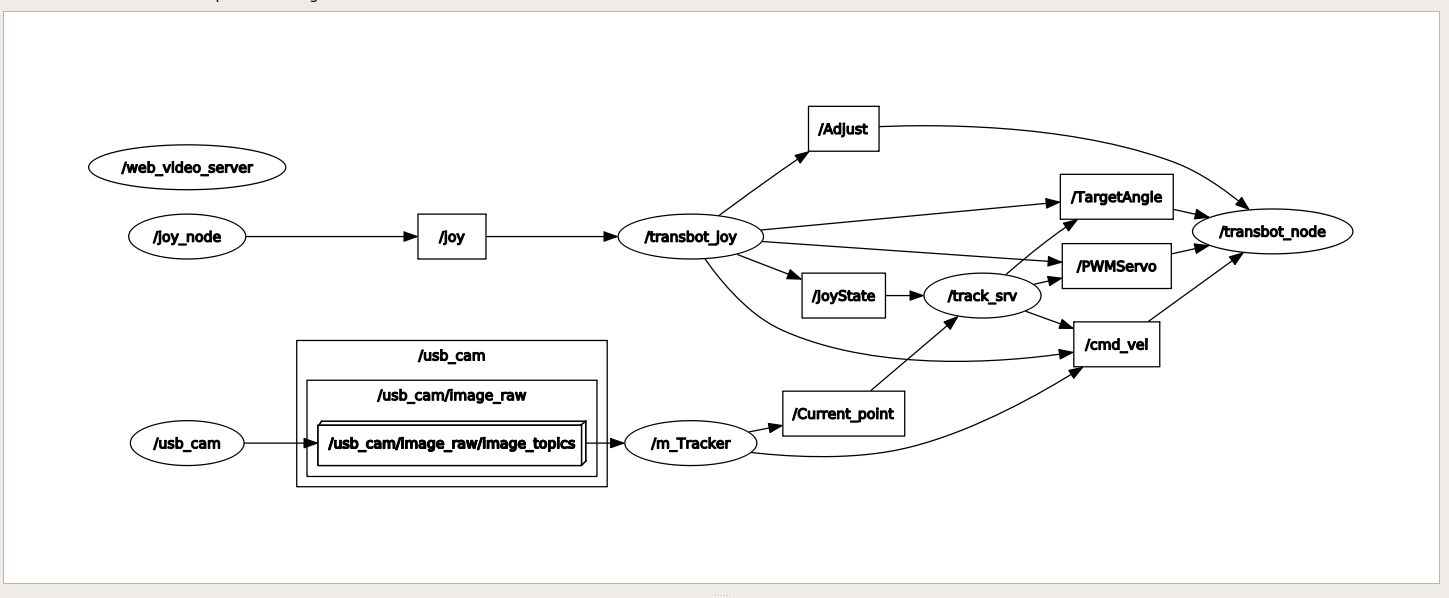
Subscribe to image topics; publish topics on gimbal servo, robotic arm, and chassis drive
- When starting method 2, node [m_Tracker]
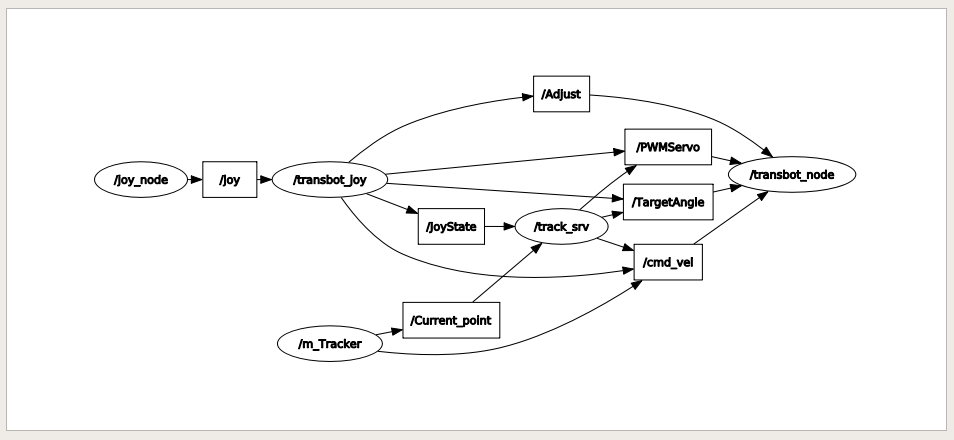
Publish topics on gimbal servos, robotic arms, and chassis drives.