yahboom
HomeLearn
Solution
Blog
Online Store
About Us
EN/中文
Transbot SE📖
01.Introduction to Transbot SE
  • 01. Introduction to Transbot SE
  • 02. Precautions for use and battery safety
  • 03. First Trial
02.First Trial
  • 2.1.APP control
  • 2.2.USB wireless handle control(Optional)
  • 2.3.Handle video control Transbot(Optional)
  • 2.4.Network configuration tutorial in hotspot mode
03.Hardware control course
  • 3.1About expansion board and update firmware
  • 3.2.Close self-starting process
  • 3.3.Install Transbot library
  • 3.4.Control buzzer and button
  • 3.5.Control PWM servo
  • 3.6.Control bus servo
  • 3.7.Control motor
  • 3.8.Control robot movement
04.Linux operating system
  • 1. Virtual machine installation and use
  • 2. Linux basics
  • 3. Remote control
  • 4. Multi-machine communication configuration
  • 5. Static IP and hotspot mode
  • 6. Web page real-time monitoring
  • 7. Expansion tutorial
  • 8. Write system images
05.Docker couse(For Pi5)
  • 1.Docker overview and docker installation
  • 2.Common commands for docker image containers
  • 3.Docker images deeply understand and publish images
  • 4.Docker hardware interaction and data processing
  • 5.Start the transbot se container
06.ROS basic course
  • 1.ROS introduction
  • 2.Project file structure
  • 3.Common commands and tools
  • 4.Publisher
  • 5.Subscribers
  • 6.Customize topic messages and use
  • 7.Client
  • 8.Server
  • 9.Custom service messages and usage
  • 10.TF release and monitoring
07.OpenCV courses
  • 1. Getting started with Open Source CV
  • 2. Open Source CV geometric transformation
  • 3. Open Source CV image processing and drawing text line segments
  • 4. Open Source CV image beautification
  • 5. Opencv application
  • 6. AR vision
  • 7. AR QR code
  • 8. ROS+Opencv foundation
  • 9. ROS+Opencv application
  • 10. MediaPipe development
08.ROS robot course
  • 1.PID algorithm
  • 2.Basic communication
  • 3.Keyboard control
  • 4.Handle control(Optional)
  • 5.Robot state estimation
  • 6.Data calibration
09.ROS simple camera course
  • 1.HD camera calibration
  • 2.HD camera color tracking
  • 3.HD camera color tracking (robotic arm)
  • 4.HD camera object tracking
  • 5. KCF target tracking
  • 6.HD camera face tracking
  • 7.HD camera robotic arm carrying
  • 8.HD camera Autopilot
10.ROS robotic arm control tutorial
  • 1.MoveIt configuration
  • 2.MoveIt control the real machine
  • 3.MoveIt moves randomly
  • 4.MoveIt kinematics design
  • 5.MoveIt cartesian path
  • 6.MoveIt avoiding
  • 7.MoveIt scene design
  • 8.MoveIt trajectory planning
  • 9.Mediapipe palm control car
  • 10.Mediapipe gesture control robotic arm
  • 11.Mediapipe gesture control car
  • 12.Mediapipe arm attitude control robotic arm
11.ROS multi-robot control(Optional)
  • 1. Multi-robot control(Optional)
  • 2. Multi-robot queue performance(Optional)
  • 3. Multi-robot robot arm dancing(Optional)
12.Deep learning courses
  • 1.KNN recognizes handwritten digits
  • 2.Basic use of TensorFlow
  • 3.Basic use of PyTorch(jetson)
  • 4.yolov5 model training(jetson)
  • 5.yolov5+tensorrt acceleration(jetson)
  • 6.yolov4-tiny
13.Installation Video
  • Part18
  • Part1-6
  • Part7-12
  • Part13.1-13.3.3
  • Part13.4.1-17
14.FAQnew
  • 1.Using your own Jetson board,Transbot-SE cannot start normally
Download
  • APP(iOS/Android)
  • System_File-Pi5
  • System_File-Pi4
  • System_File-Jetson
  • VM_File
  • Appendix
  • Code
  • InstructionManual
  • Jetson_Boot_USB.tar.gz
  • Hardware_Info
Download ZIP

Welcome to Transbot SE repository

8.MoveIt trajectory planning

8. MoveIt trajectory planning

8. MoveIt trajectory planning8.1. Start8.2. Source code analysis

This lesson takes the MoveIT simulation as an example. If you need to set the synchronization between the real machine and the simulation, please refer to the lesson [02, MoveIt Precautions and Controlling the Real Machine]. ! ! ! be careful! ! !

The effect demonstration is a virtual machine, and other masters are running (related to the performance of the master, depending on the actual situation).

8.1. Start

Start the MoveIT

 roslaunch transbot_se_moveit_config demo.launch 

Start trajectory planning node

xxxxxxxxxx
rosrun transbot_se_moveit_config 06_multi_track_motion

Effect drawing

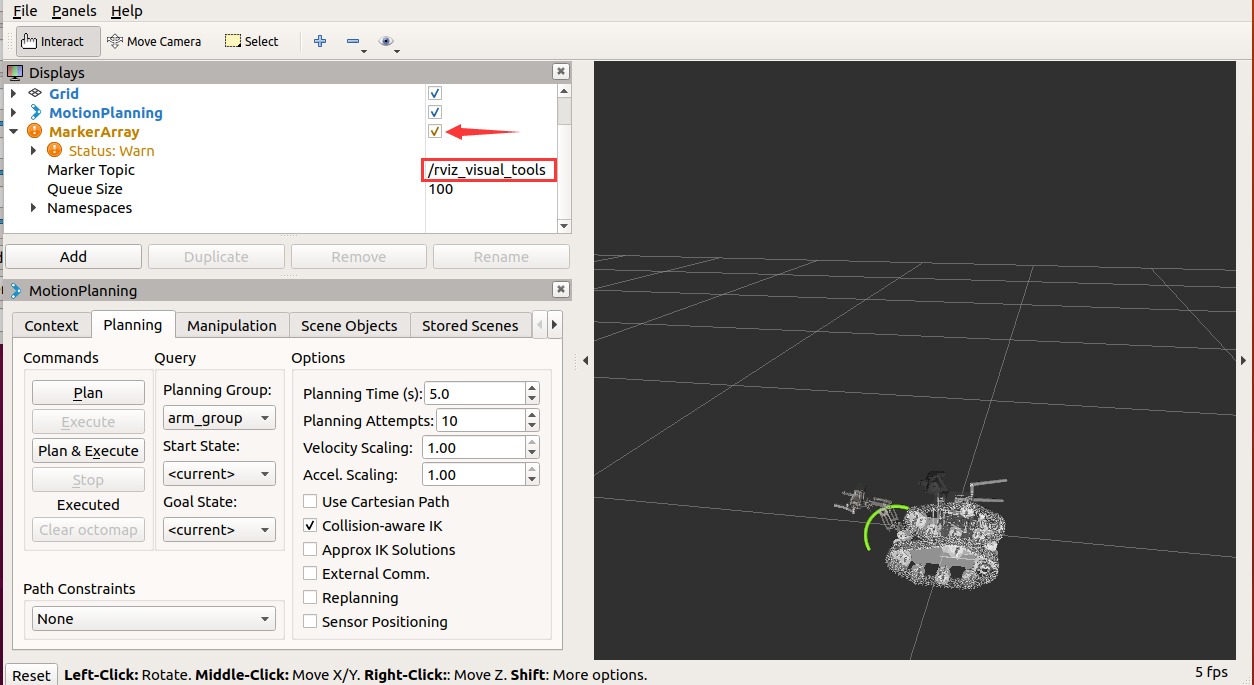
To view the track, you need to add the [MarkerArray] plugin and select the [/rviz_visual_tools] topic.
0801

Given three reachable target points of the robotic arm, MoveIT will plan three feasible trajectories according to the target points, and then combine the three trajectories into a continuous trajectory.

8.2. Source code analysis

Set three reachable target points (any target point can be reached, it must be reachable)

xxxxxxxxxx
    vector<vector<double>> poses{
            {0.15,  1.62},
            {0,0},
            {2.22, 3.26}
    };
    for (int i = 0; i < poses.size(); ++i) {
        multi_trajectory(transbot, poses.at(i), trajectory);
    }

Plan each trajectory

xxxxxxxxxx
void multi_trajectory(
        moveit::planning_interface::MoveGroupInterface &transbot,
        const vector<double> &pose,
        moveit_msgs::RobotTrajectory &trajectory) {
    moveit::planning_interface::MoveGroupInterface::Plan plan;
    const robot_state::JointModelGroup *joint_model_group;
    //Get the robot's starting position
    moveit::core::RobotStatePtr start_state(transbot.getCurrentState());
    joint_model_group = start_state->getJointModelGroup(transbot.getName());
    transbot.setJointValueTarget(pose);
    transbot.plan(plan);
    start_state->setJointGroupPositions(joint_model_group, pose);
    transbot.setStartState(*start_state);
    trajectory.joint_trajectory.joint_names = plan.trajectory_.joint_trajectory.joint_names;
    for (size_t j = 0; j < plan.trajectory_.joint_trajectory.points.size(); j++) {
        trajectory.joint_trajectory.points.push_back(plan.trajectory_.joint_trajectory.points[j]);
    }
}

Trajectory merge

xxxxxxxxxx
   moveit::planning_interface::MoveGroupInterface::Plan joinedPlan;
    robot_trajectory::RobotTrajectory rt(transbot.getCurrentState()->getRobotModel(), "arm_group");
    rt.setRobotTrajectoryMsg(*transbot.getCurrentState(), trajectory);
    trajectory_processing::IterativeParabolicTimeParameterization iptp;
    iptp.computeTimeStamps(rt, 1, 1);
    rt.getRobotTrajectoryMsg(trajectory);
    joinedPlan.trajectory_ = trajectory;

Track display

xxxxxxxxxx
//Show trace
     tool.publishTrajectoryLine(joinedPlan.trajectory_, transbot.getCurrentState()->getJointModelGroup("arm_group"));
    tool.trigger();

Perform trajectory planning

xxxxxxxxxx
if (!transbot.execute(joinedPlan)) {
        ROS_ERROR("Failed to execute plan");
        return false;
    }


MoveIt scene design
Mediapipe palm control car

COMPANY

  • About us
  • Team Style
  • Blog

LEARNING & EXPLORATION

  • Tutorials
  • Edge AI hardware
  • Educational robots
  • Embedded intelligent hardware

WHERE TO BUY

  • Yahboom Online Store
  • Amazon
  • Alibaba
  • AliExpress
  • Mercado

TECHNOLOGY SUPPORT

  • Email: support@yahboom.com

BE A DISTRIBUTOR

  • Email: sales@yahboom.com
QR Code
QR Code

Copyright © 2017-2026 Yahboom. All Rights Reserved.

EN/中文