Welcome to Transbot SE repository
2.4. Network configuration tutorial in hotspot mode
Network configuration tutorial in hotspot mode
Transbot_SE's Raspberry Pi 5 and Jetson nano/Raspberry Pi 4B versions are shipped from the factory in hotspot mode. To experience APP control, you only need to connect the device to Transbot's hotspot!
If you need to connect to your own WiFi, you need to turn off the hotspot mode and switch to WiFi mode. The following are the operations to switch to your own WiFi. Different motherboards correspond to different tutorials. Please confirm your own motherboard before reading the corresponding tutorials.
Network configuration tutorial in hotspot modeJetson 1. VNC remote accessPrerequisitesVNC connectionRemote login successful2. Connect to WiFiFill in wifi informationSet priorityRestart to take effectRaspberry Pi 5 1. VNC remote accessPrerequisitesVNC connectionRemote login successful2. Connect to WiFiCreate WiFiFill in WiFi informationSet priorityRestart to take effect
Jetson
Note: Before connecting, make sure the computer is connected to the Transbot hotspot
1. VNC remote access
Users need to install RealVNC® Viewer or VNC Viewer software in advance, and then connect according to the IP displayed by Transbot_SE's OLED.
xxxxxxxxxxThe prerequisite for remote access is that the system's VNC service is turned on. This function is turned on by default when using our factory image.
Prerequisites
Same LAN
It is necessary to ensure that the remote device is in the same LAN. Generally, the computer/mobile phone is connected to the Raspberry Pi hotspot or the Raspberry Pi and the computer/mobile phone are connected to the same WiFi.
Remote Information
Transbot_SE's factory hotspot information: (The default IP address is 192.168.1.11, you can confirm the IP information by viewing the OLED display)
Hotspot name: Transbot
Password: 12345678
System user information:
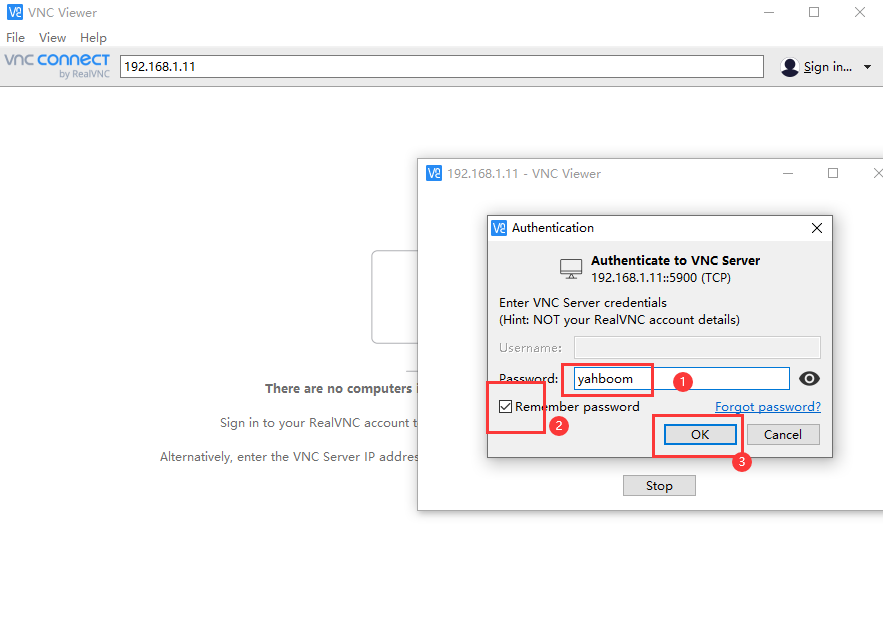
Username: jetson
Password:yahboom
xxxxxxxxxxRemote control needs to be on the same LAN: When connecting the computer to the Raspberry Pi hotspot, please select "Connect using a security key instead" and then enter the password!
VNC connection
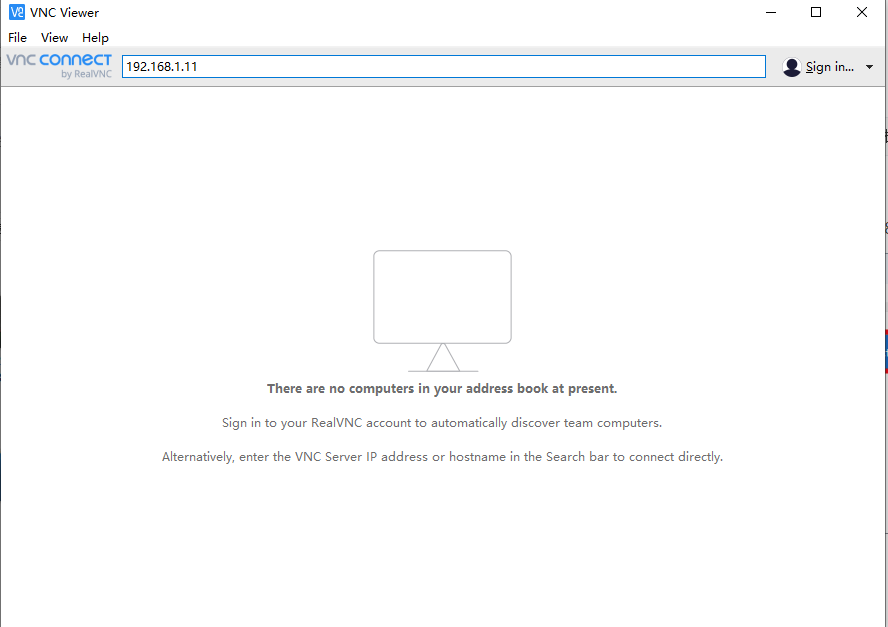
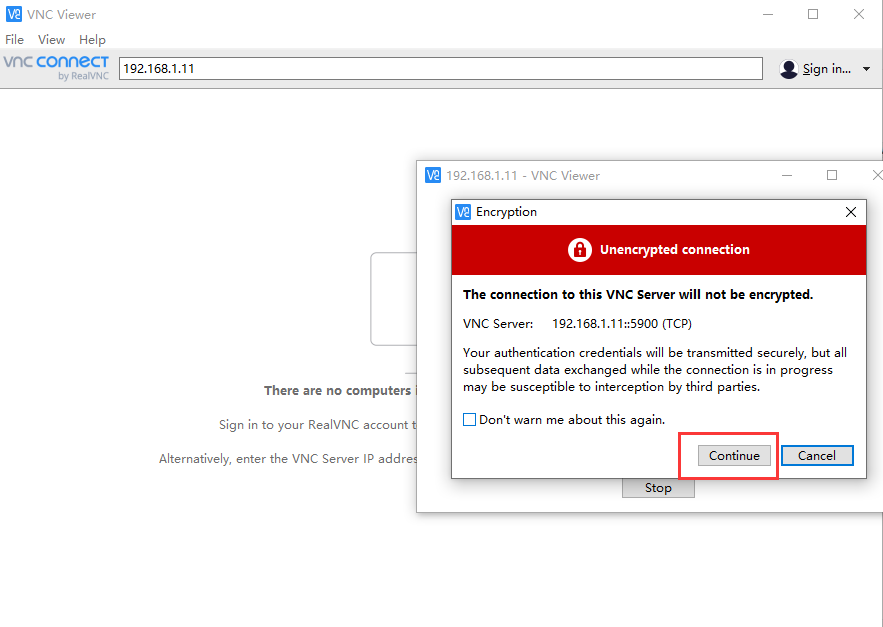
Enter the IP address of Transbot_SE: 192.168.1.11
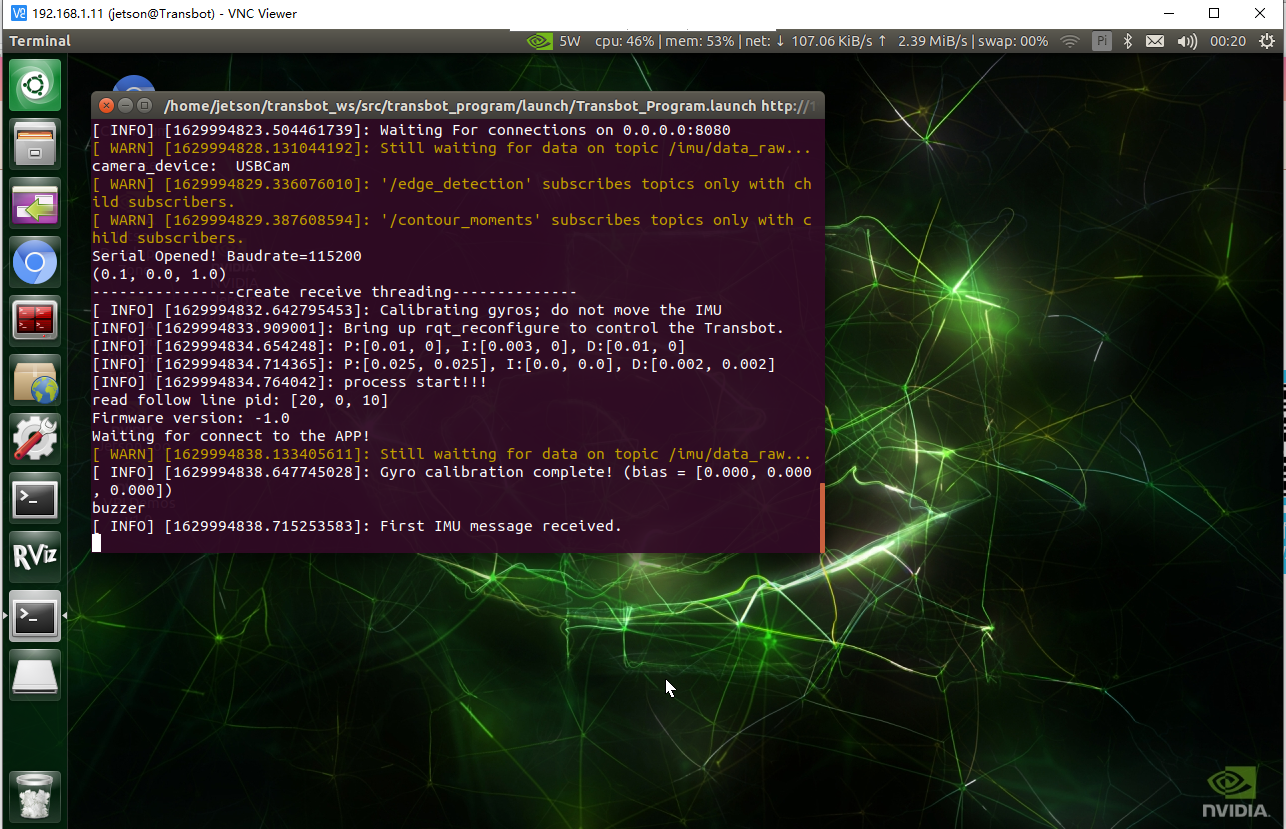
Remote login successful
The terminal you see after logging in is the startup program terminal of Transbot_SE. We can judge whether the startup program is running normally by observing this terminal!
2. Connect to WiFi
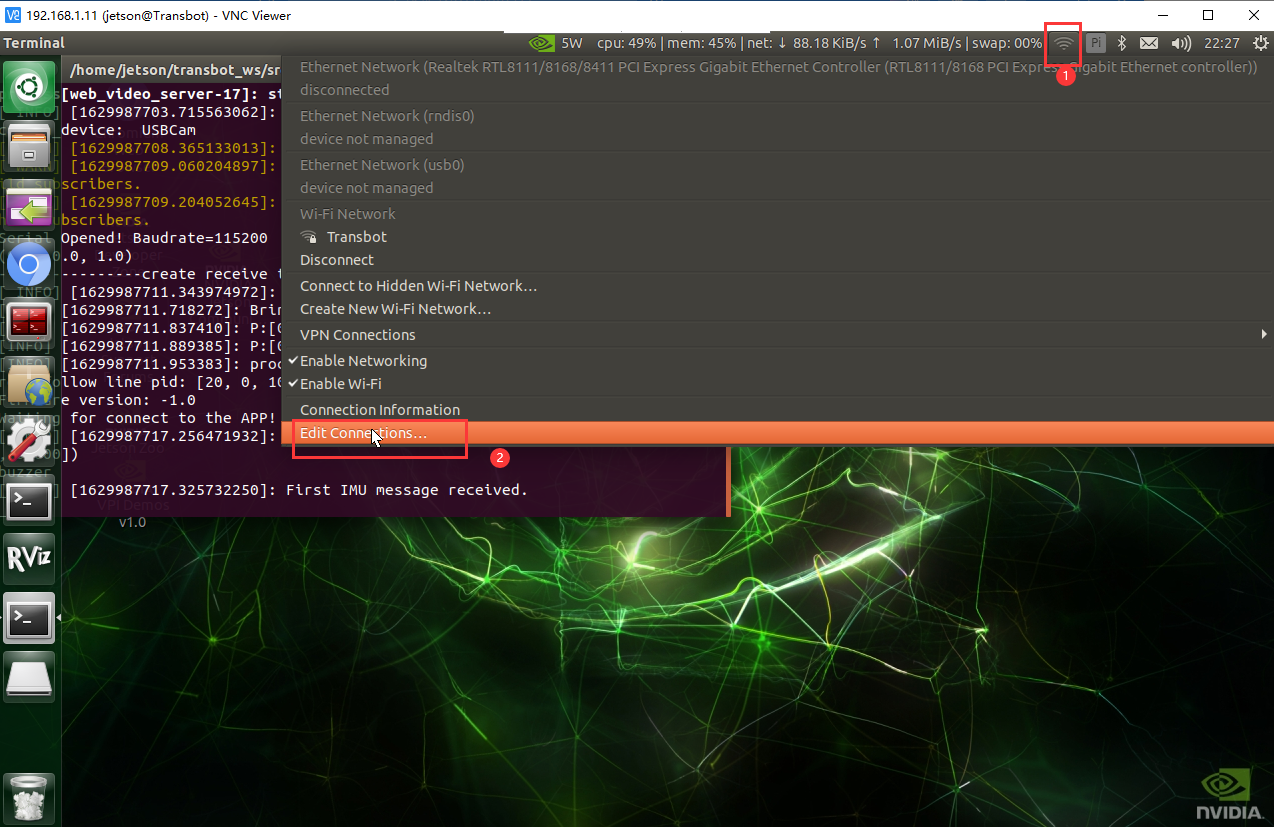
Click on "WiFi Icon" → "Edit Connection"
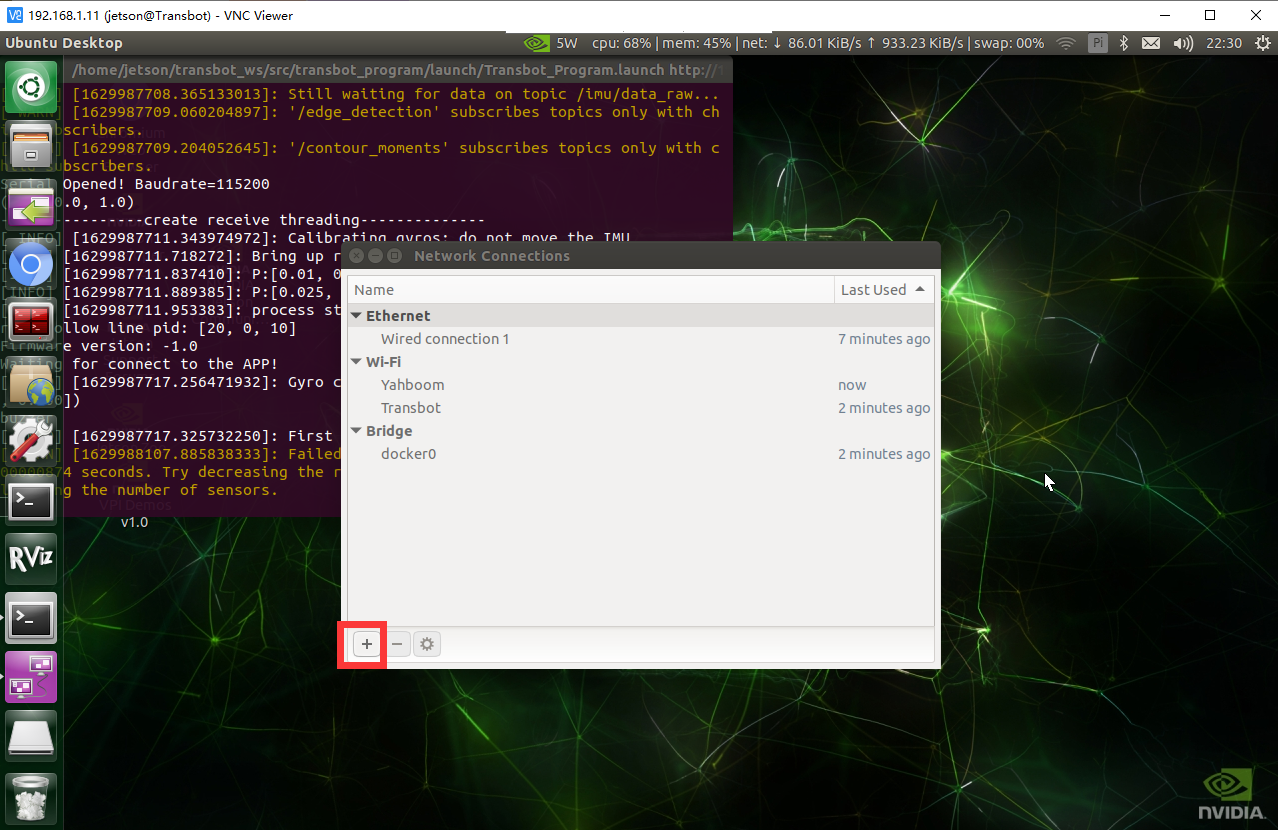
When the interface pops up, click "+" in the lower left corner
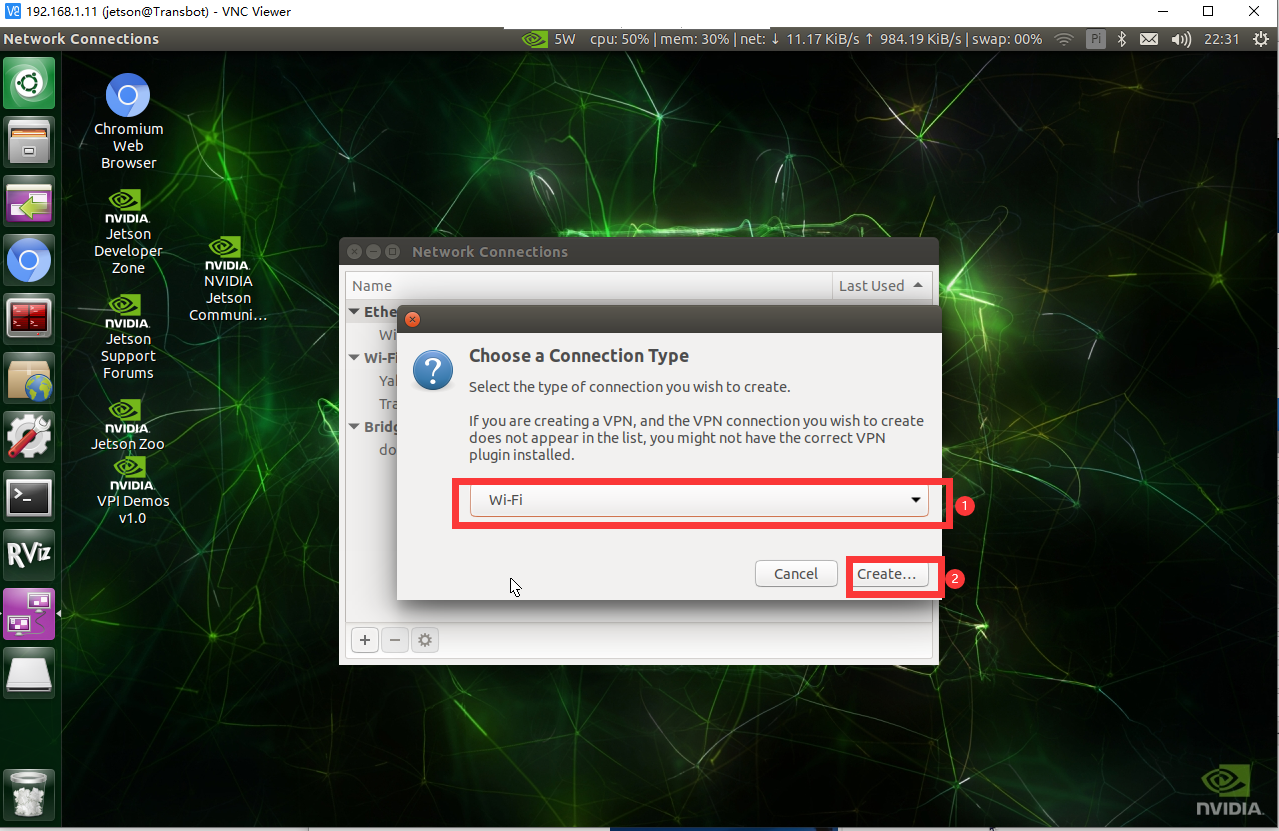
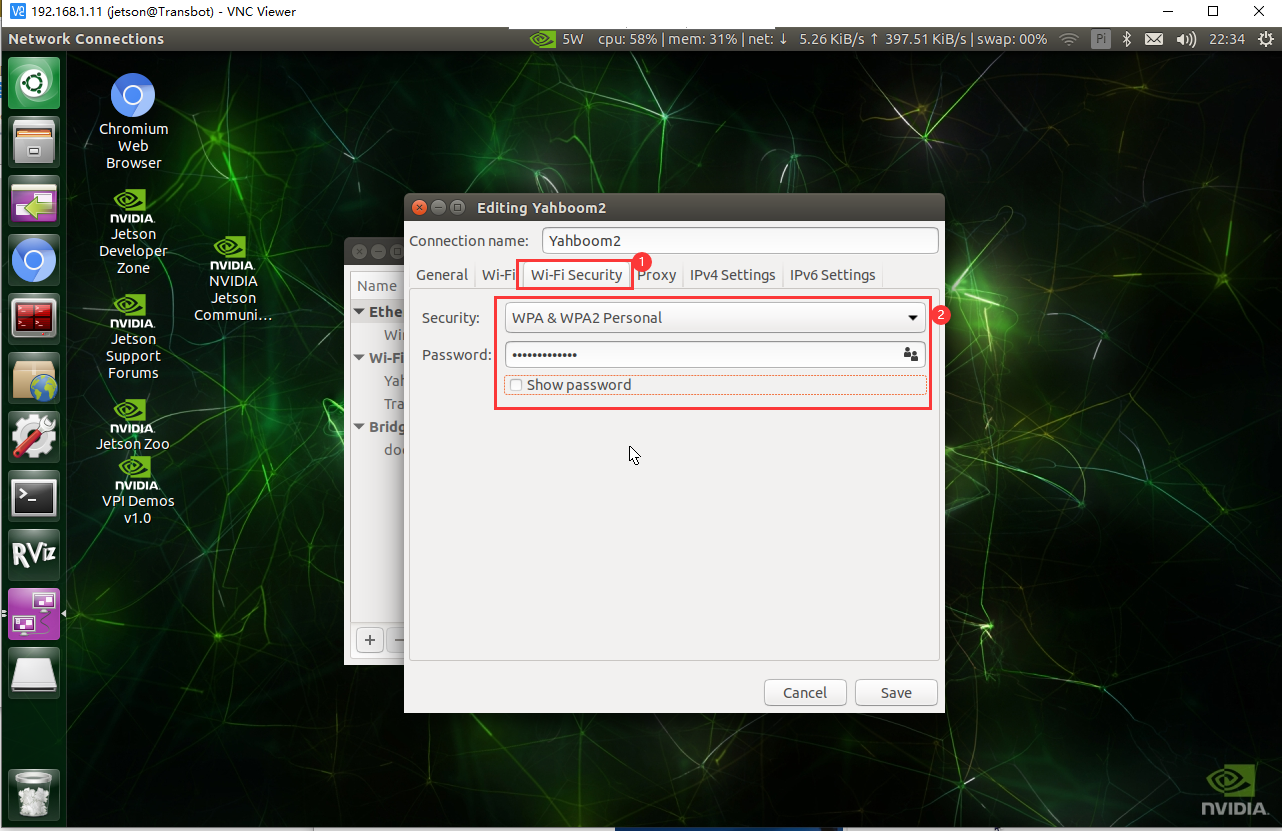
Fill in wifi information
Take connecting to Yahboom2 WiFi as an example, follow the steps below to connect to your own WiFi
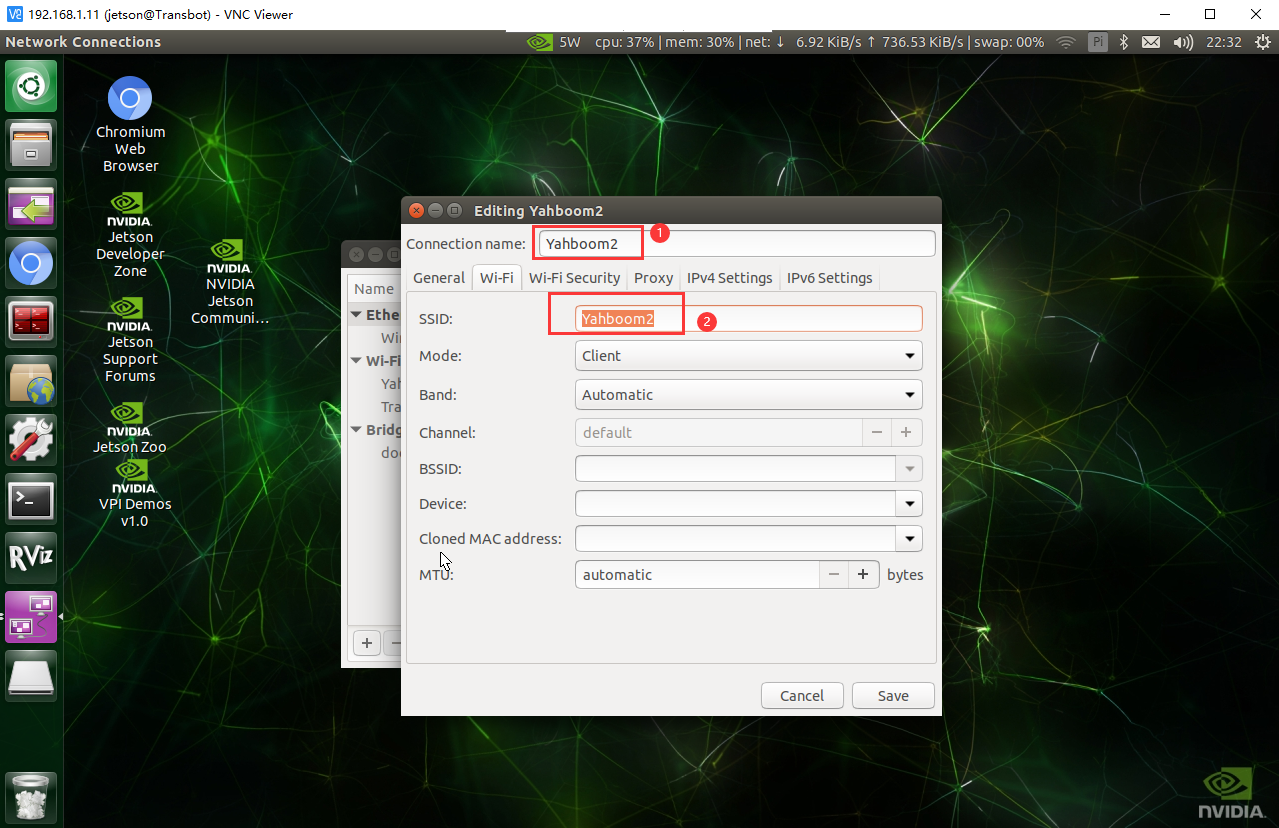
Set priority
The priority determines the order of networks that are preferred when starting the system. The larger the number, the higher the priority. The priority is to connect to this WiFi.
The priority of Transbot hotspot is 1, so if you want to automatically connect to WiFi when you turn it on, the priority of WiFi needs to be greater than 1

Restart to take effect
After the setting is completed, restart the Raspberry Pi and observe the IP address on the OLED display. If it changes, the connection is successful!
xxxxxxxxxxIf the IP address displayed by OLED remains unchanged and the hotspot does not disappear or the IP address does not appear in the IP address bar, it means that the WiFi name or password entered previously is incorrect.
Raspberry Pi 5
Note: Before connecting, make sure the computer is connected to the Transbot hotspot
1. VNC remote access
Users need to install RealVNC® Viewer or VNC Viewer software in advance, and then connect according to the IP displayed by Transbot_SE's OLED.
xxxxxxxxxxThe prerequisite for remote access is that the system's VNC service is turned on. This function is turned on by default when using our factory image.
Prerequisites
Same LAN
It is necessary to ensure that the remote device is in the same LAN. Generally, the computer/mobile phone is connected to the Raspberry Pi hotspot or the Raspberry Pi and the computer/mobile phone are connected to the same WiFi.
Remote Information
Transbot_SE's factory hotspot information: (The default IP address is 192.168.1.11, you can confirm the IP information by viewing the OLED display)
Hotspot name: Transbot
Password: 12345678
System user information:
Username: pi
Password:yahboom
xxxxxxxxxxRemote control needs to be on the same LAN: When connecting the computer to the Raspberry Pi hotspot, please select "Connect using a security key instead" and then enter the password!
VNC connection
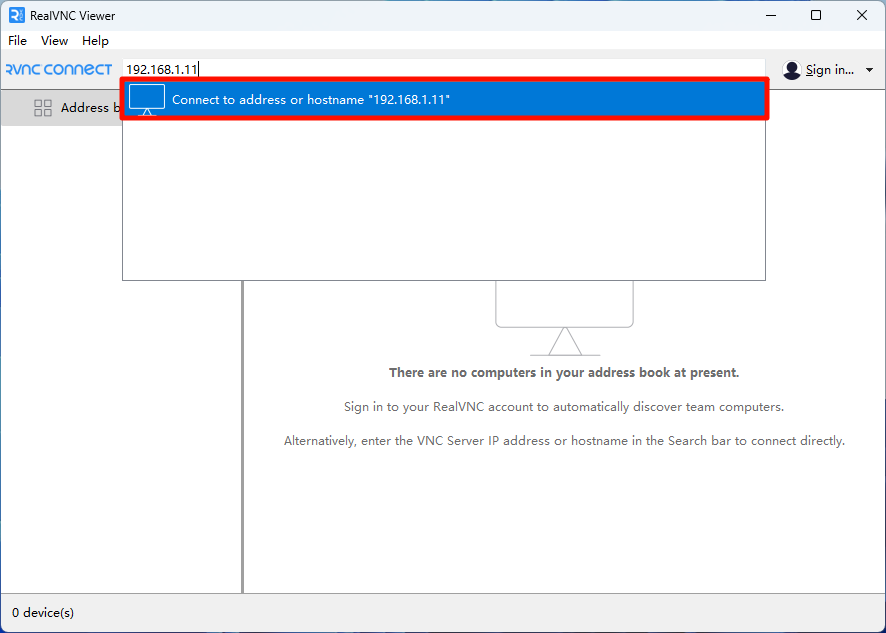
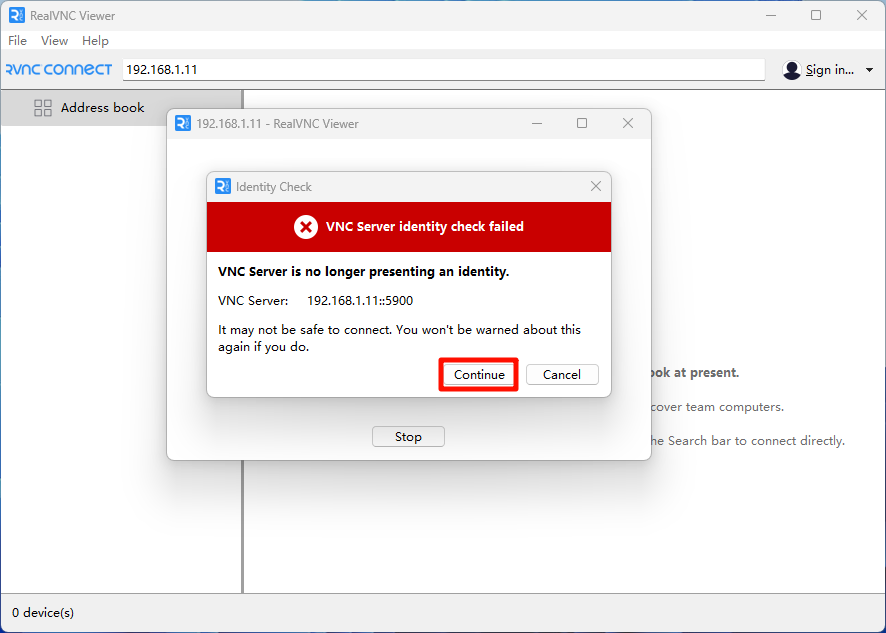
Enter the IP address of Transbot_SE: 192.168.1.11
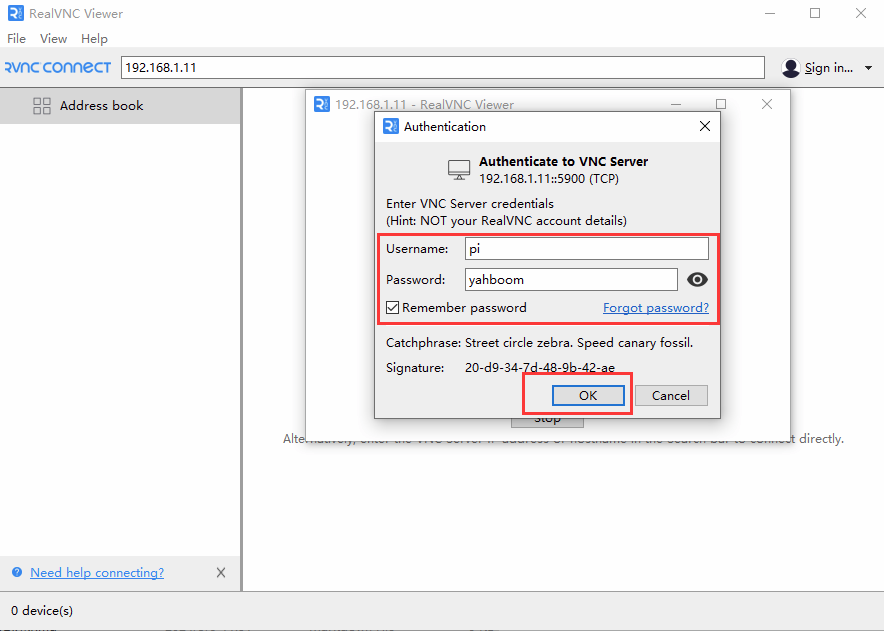
Remote login successful
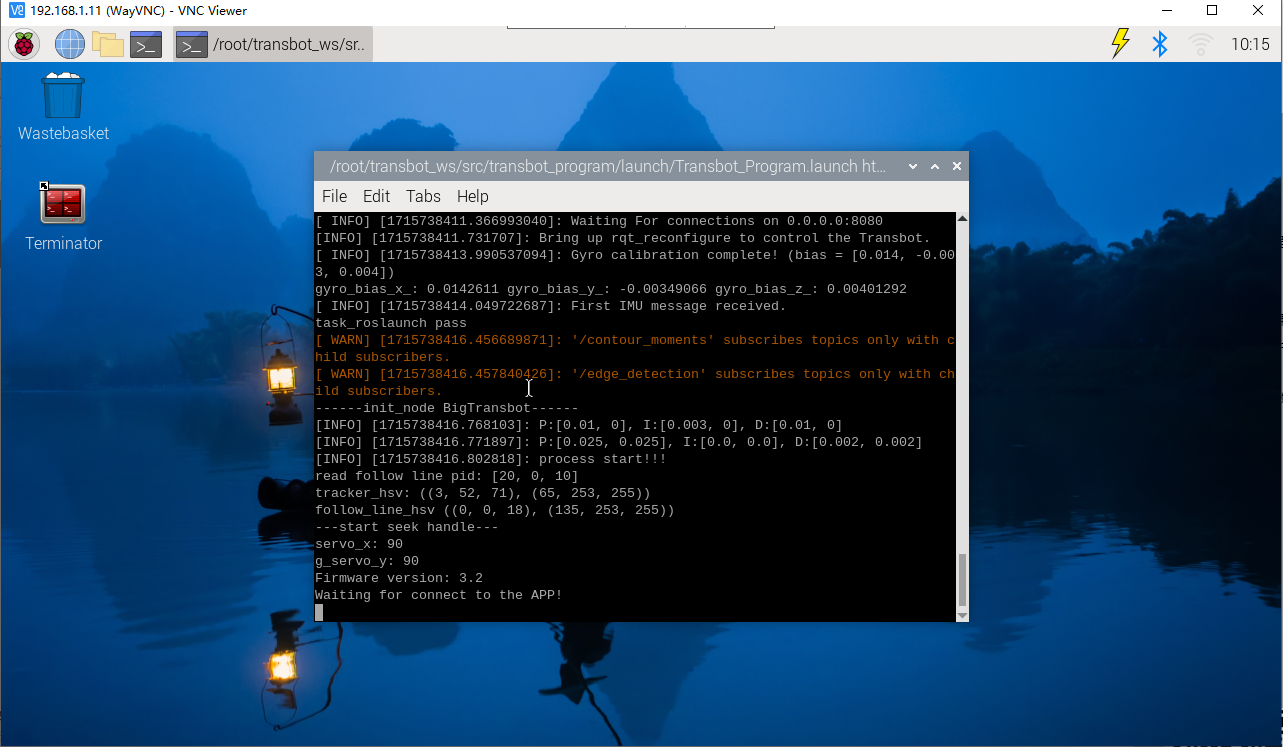
The terminal you see after logging in is the startup program terminal of Transbot_SE. We can judge whether the startup program is running normally by observing this terminal!
2. Connect to WiFi
Create WiFi
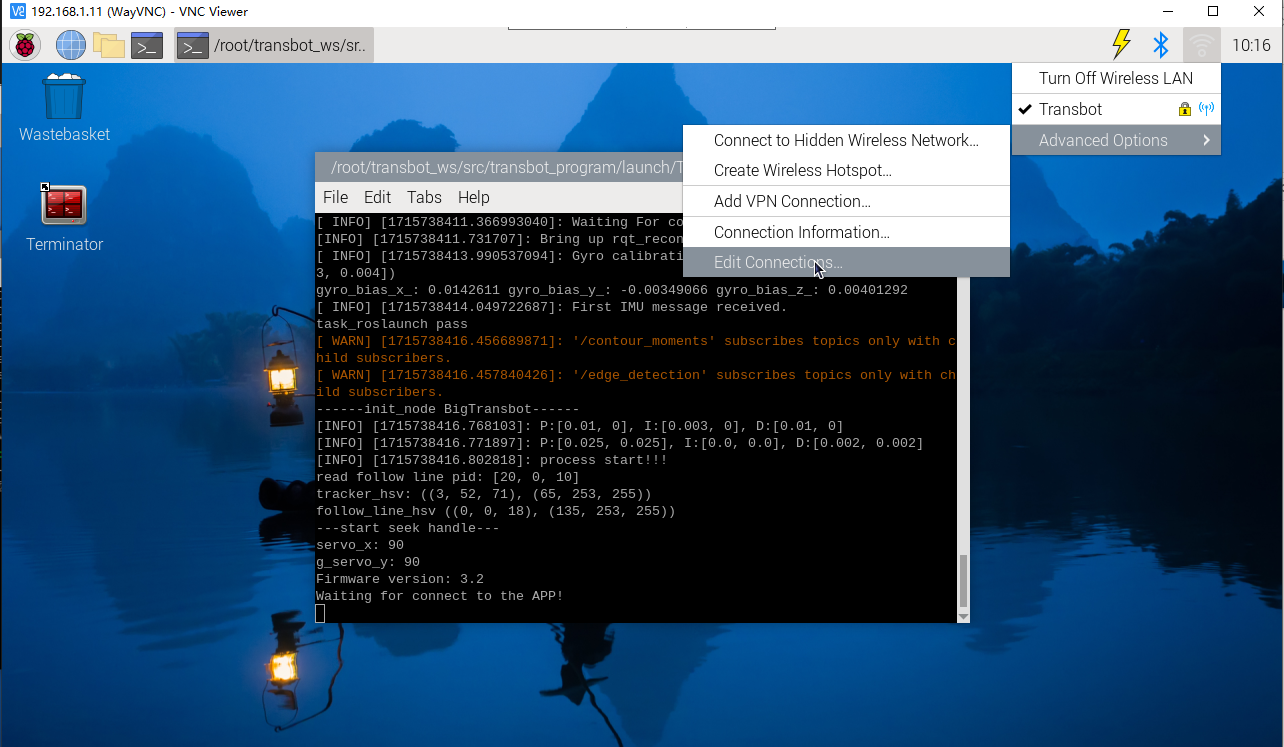
Click "WiFi Icon" → "Advanced Options" → "Edit Connection"
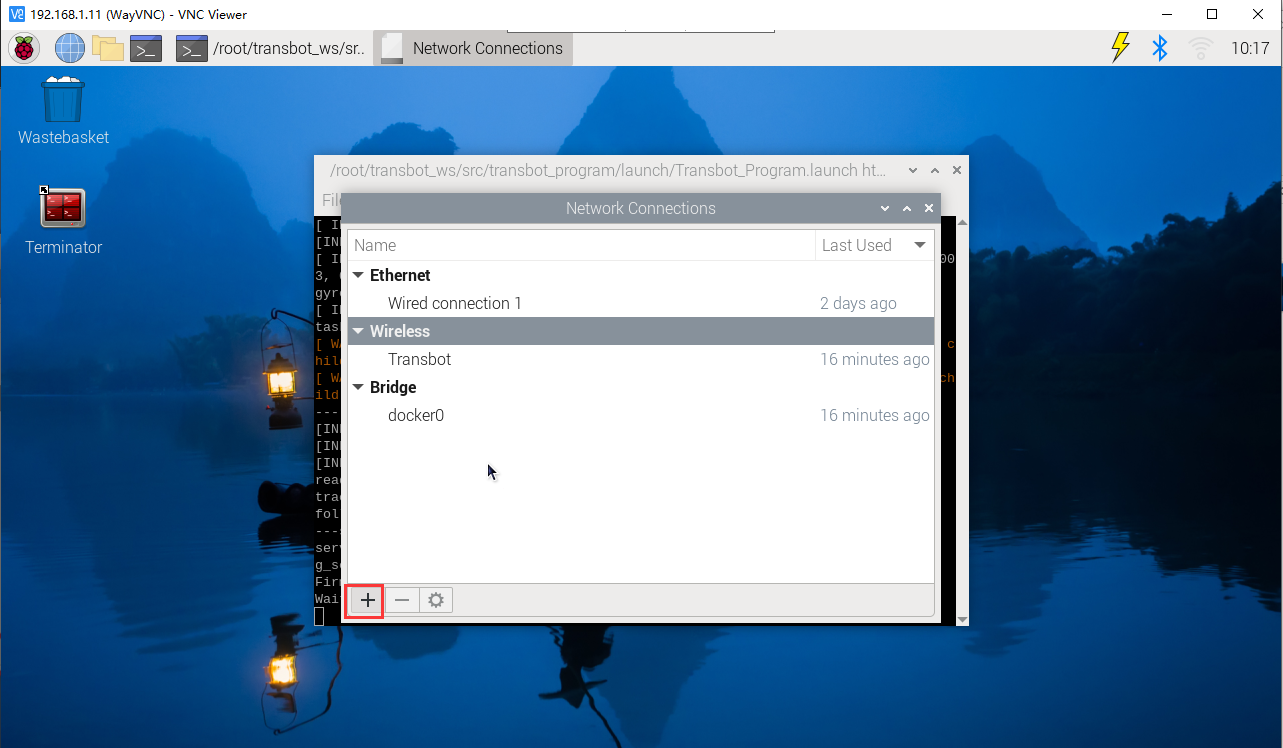
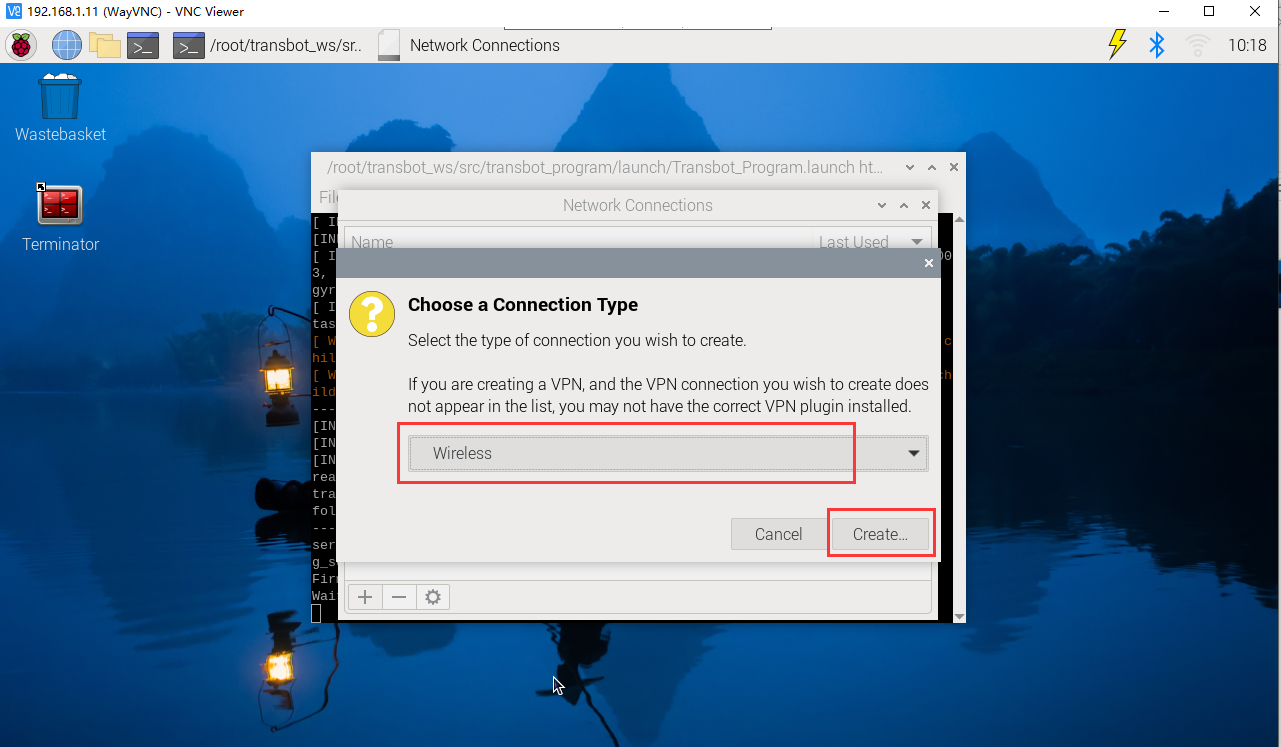
Select "Wireless" → "+" in the lower left corner
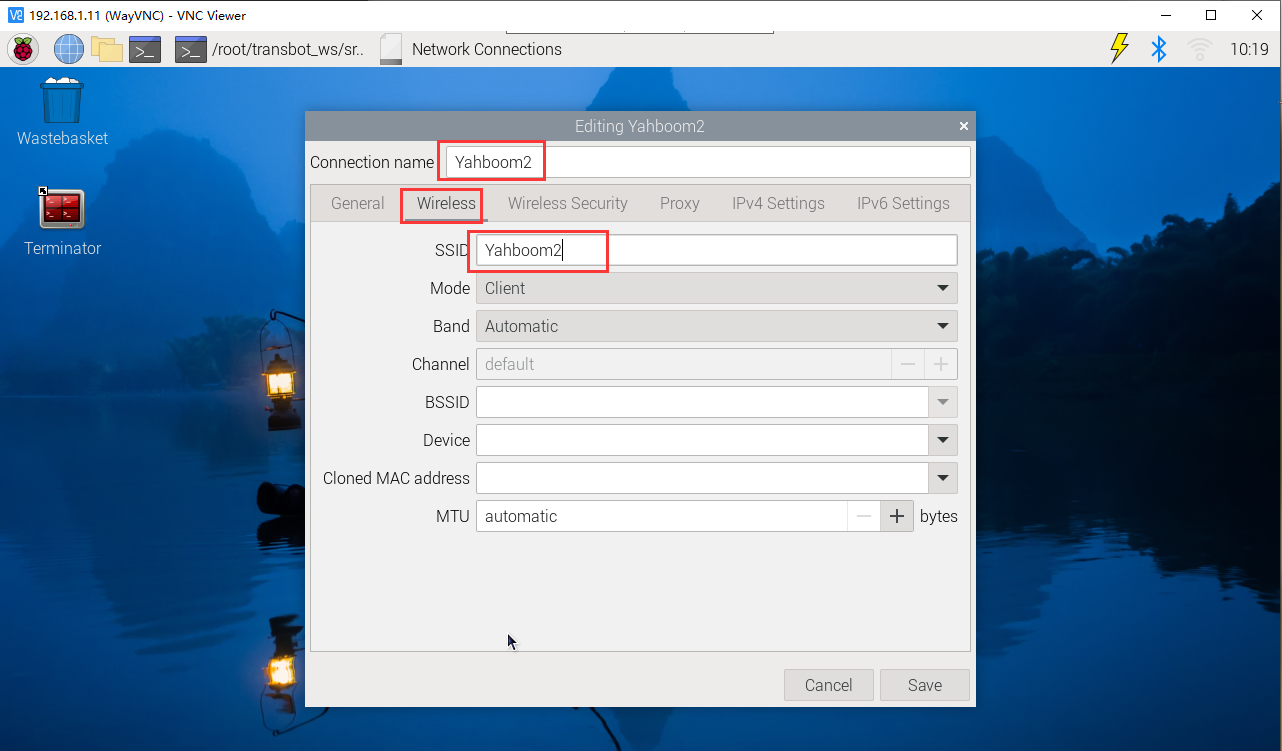
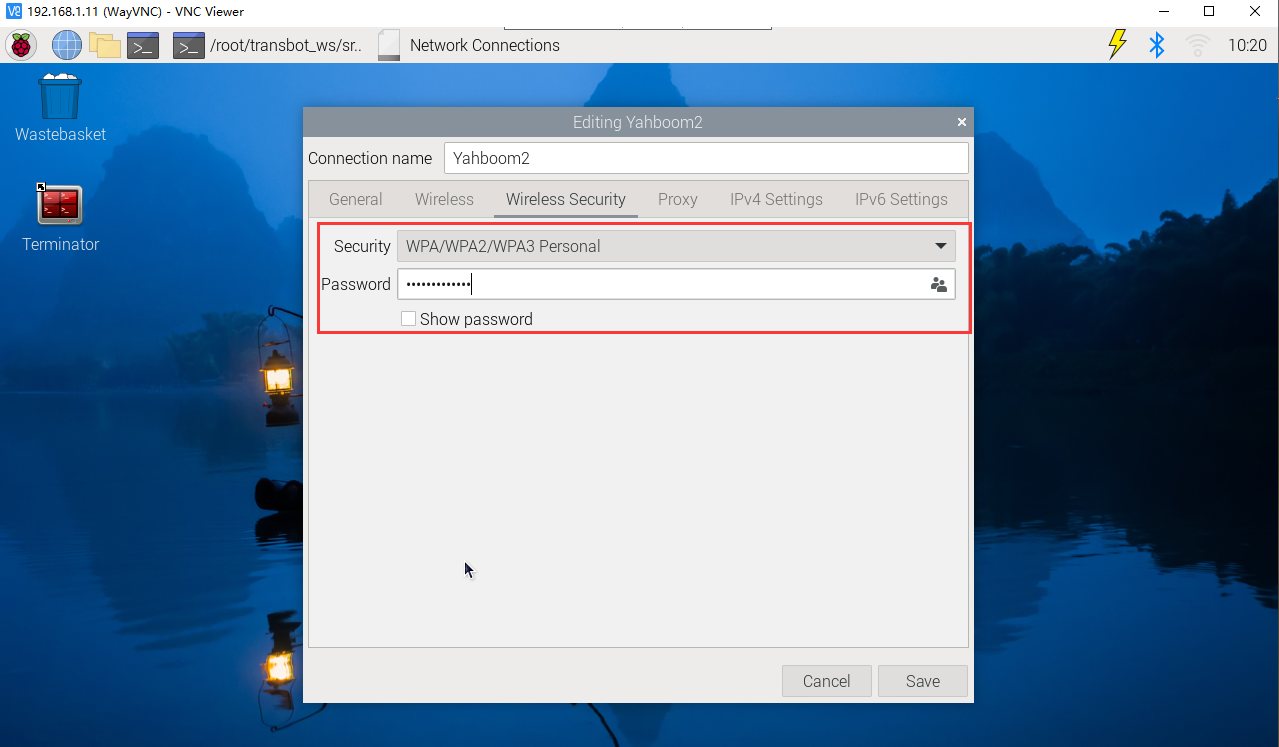
Fill in WiFi information
xxxxxxxxxxTake Yahboom2WiFi as an example, connected WiFi: Yahboom2
Set priority
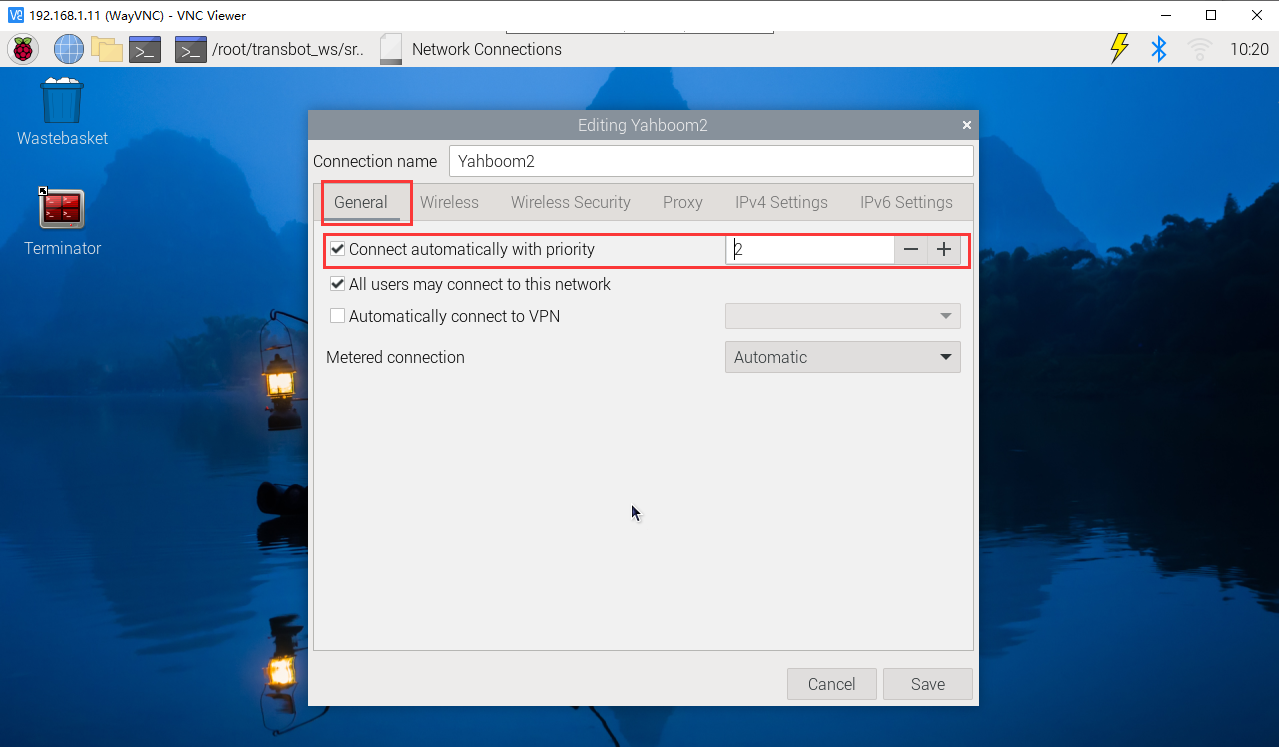
The priority determines the order of networks that are preferred when starting the system. The larger the number, the higher the priority. The priority is to connect to this WiFi.
The priority of Transbot hotspot is 1, so if you want to automatically connect to WiFi when you turn it on, the priority of WiFi needs to be greater than 1
Restart to take effect
After the setting is completed, restart the Raspberry Pi and observe the IP address on the OLED display. If it changes, the connection is successful!
If the IP address displayed by OLED remains unchanged and the hotspot does not disappear or the IP address does not appear in the IP address bar, it means that the WiFi name or password entered previously is incorrect.