Welcome to Transbot SE repository
4.yolov5 model training(jetson)
4 yolov5 model training
4 yolov5 model training 4.1 yolov5 introduction 4.2 folder structure 4.3 Environmental requirements 4.4 Use process 4.5 Custom training data set 4.5.1 Collecting datasets 4.5.2 make yaml file 4.5.3 Modify train.py 4.5.4 Modify the model configuration file 4.5.5 Modify detect.py 4.5.6 Train and predict
4.1 yolov5 introduction
In February 2020, Joseph Redmon, the father of YOLO, announced his withdrawal from the field of computer vision research, YOLOv4 was released on April 23, 2020, and YOLOv5 was released on June 10, 2020. The developers of YOLOv5 claim that YOLOv5 can achieve fast detection at 140 FPS on Tesla P100; while the detection speed of YOLOv4 is 50 FPS. Not only that, but the size of YOLOv5 is only 27 MB. And YOLOv4 is 244 MB. YOLOv5 is nearly 90% smaller than YOLOv4. In terms of accuracy, YOLOv5 is comparable to YOLOv4.
As a result, YOLOv5 is very fast, has a very lightweight model size, and is comparable in accuracy to the YOLOv4 benchmark.
The algorithm performance test chart of the author of Yolov5:

Video test official case
xxxxxxxxxxcd ~/software/yolov5-5.0python3 detection_video.py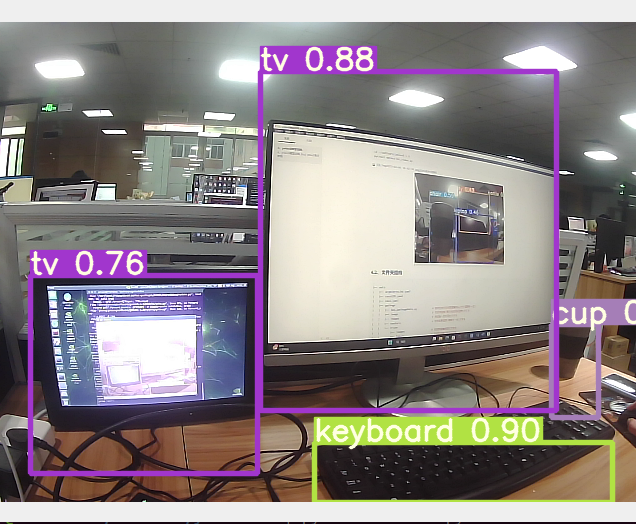
4.2 folder structure
xxxxxxxxxx.├── data│ ├── argoverse_hd.yaml│ ├── coco128.yaml│ ├── coco.yaml│ ├── garbage│ │ ├── Get_garbageData .py the py file of the corresponding dataset(need more)│ │ ├── image # Save the original image(target image to be recognized) folder│ │ ├── images # Test input image image folder│ │ ├── texture # Folder to store background images(needs more)│ │ └── train│ │ ├── images # The image folder where the dataset is stored│ │ ├── labels # label folder for storing datasets│ │ └── labels.cache│ ├── garbage.yaml├── hyp _.fine tune.yaml│ ├── hyp.scratch.yaml│ ├── images # Test input image image folder│ │ ├── bus.jpg│ │ └── zidane.jpg│ ├── scripts│ │ ├── get_argoverse_hd.sh│ │ ├── get_coco.sh # Download dataset script│ │ └── get_voc.sh│ └── voc.yaml├── detect # .py detect files├── Dockerfile├── hubconf.py├── LICENSE├── models # model configuration file│ ├── yolo.py│ ├── yolov5l.yaml│ ├── yolov5m.yaml│ ├── yolov5s.yaml│ └── yolov5x.yaml├── README.md├── requirements # .txt Environment requirements├── runs│ ├── detect│ │ └── exp # Test output image path folder│ │ ├── bus.jpg│ │ └── zidane.jpg│ └── train│ └── exp│ ├── results.png # training result image│ ├── results # .txt training log information│ ├── test_batch0_labels.jpg│ ├── test_batch0_pred.jpg # prediction image│ ├── test_batch1_labels.jpg│ ├── test_batch1_pred.jpg│ ├── test_batch2_labels.jpg├── ├── test_batch2_pred.jpg│ ├── train_batch0.jpg # training picture│ ├── train_batch1.jpg│ ├── train_batch2.jpg│ └── weights│ ├── best.pt # The best training model(generally choose it)│ └── last .pt The last trained model├── test # .py test file├── train # .py training file├── tutorial.ipynb # tutorial├── utils└── weights # The folder where the weight files(pre-trained models) are stored├── download_weights.sh└── yolov5s.pt
Note: There are verification pictures in the runs/exp file. After training an eTOCh, go and see to verify whether the pictures are correct. If they are not correct, adjust them quickly. Otherwise, you have to retrain after training all the adjustments.
label format
xxxxxxxxxxlabel x y w h
The value of x, y, w, h is the position where the image length and height are pressed [0:1]
4.3 Environmental requirements
The factory image is already configured, no need to install
x# pip install -r requirements.txt# base ----------------------------------------matplotlib > = 3.2.2numpy > = 1.18.5opencv - python > = 4.1.2PillowPyYAML > = 5.3.1scipy > = 1.4.1torch > = 1.7.0torchvision > = 0.8.1tqdm > = 4.41.0imgaug# logging -------------------------------------tensorboard > = 2.4.1# wandb# plotting ------------------------------------seaborn > = 0.11.0pandas# export --------------------------------------# coremltools>=4.1# onnx>=1.8.1# scikit-learn==0.19.2 # for coreml quantization# extras --------------------------------------thop # FLOPS computationpycocotools > = 2.0 # COCO mAP
Installation example
xxxxxxxxxxpip install imgaug
4.4 Use process
- After configuring according to the above process
- Under the path of [data/garbage/texture], fill in some background images([more])
- Run the [Get_garbageData.py] file to get the dataset(line 134 can modify the number of generated datasets [more])
- Run the [train.py] file to start training
- Run [detect.py] for image prediction
4.5 Custom training data set
4.5.1 Collecting datasets
First go to Baidu to download or other methods, in the [data/garbage/texture] path, fill in some background images([more])
Open the [Get_garbageData.py] file
xxxxxxxxxxsudo vim Get_garbageData.py
Modify the total number of generated datasets and fill in as required. [More], too few datasets will lead to suboptimal training results.
xxxxxxxxxximg_total = 10000
Run the [Get_garbageData.py] file to get the dataset
xxxxxxxxxxpython3 Get_garbageData.py
4.5.2 make yaml file
For example garbage.yaml:
xxxxxxxxxxtrain : ./garbage/train/images/ # Training set picture pathval: ./garbage/train/images/ # Verification set image path (also separate from training set)nc : 16 # number of categoriesnames : [ "Zip_top_can", "Apple_core" ...] # category name
4.5.3 Modify train.py
xxxxxxxxxxparser.add_argument('--weights', type = str, default = './weights/yolov5s.pt', help = 'initial weights path') # Line 458: parser.add_argument('--data', type = str, default = './garbage/garbage.yaml', help = 'data.yaml path') # Line 460: Custom training file parser.add_argument('--eTOChs', type = int, default = 300) # Line 462: Customize training eTOChs, how many rounds of training parser.add_argument('--batch-size', type = int, default = 16, help = 'total batch size for all GPUs') # parser.add_argument('--img-size', nargs = '+', type = int, default =[ 640, 640 ], help = '[train, test] image sizes') # image size parser.add_argument('--device', default = 'cpu', help = 'cuda device, ie 0 or 0,1,2,3 or cpu') # line 474: select CPU or GPU parser.add_argument('--project', default = 'runs/train', help = 'save to project/name') # training result output folder Other places according to your needs.
4.5.4 Modify the model configuration file
Modify the second line of the yaml file of the yolov5 neural network, and use which weight file to modify the corresponding yaml file.
Here we are using yolov5s.yaml, so just modify the second line of the models/yolov5s.yaml file
xxxxxxxxxxnc : 16 # number of classes
4.5.5 Modify detect.py
Similar to the place where the [train.py] file needs to be modified
xxxxxxxxxxparser.add_argument('--weights', nargs = '+', type = str, default = 'weights/yolov5s.pt', help = 'model.pt path(s)') # Line 151: Pretrained weights parser.add_argument('--source', type = str, default = 'data/images', help = 'source') # file/folder, 0 for webcam # Line 152: Input prediction image parser.add_argument('--img-size', type = int, default = 640, help = 'inference size(pixels)') # line 153: image size parser.add_argument('--device', default = 'cpu', help = 'cuda device, ie 0 or 0,1,2,3 or cpu') # line 156: select CPU or GPU parser.add_argument('--project', default = 'runs/detect', help = 'save results to project/name') # Line 165: Prediction results output folder Other places according to your needs.
4.5.6 Train and predict
After training the model, the final model will be produced in the [runs/train] folder after training.
xxxxxxxxxx# To use the trained best.pt weight file, it needs to be copied and pasted into the yolov5-5.0 folder, then run the following command:# To use the trained best.pt weight file, it needs to be copied and pasted into the yolov5-5.0 folder, then run the following command:python3 train.py
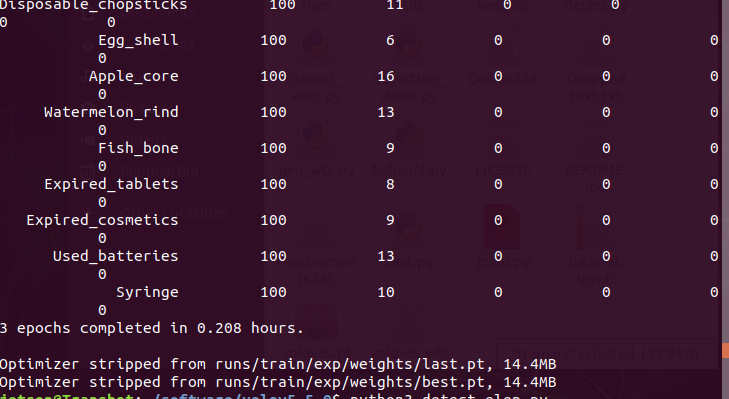
Image prediction, modify the model path and input image, predict the image, and the result is in the [runs/detect] folder.
xxxxxxxxxx# The detection effect below is from a model trained using 100 epochs and 10,000 images (since Jetson's performance is insufficient for training, the training was completed on Windows).# Copy and paste the trained best.pt weight file into the yolov5-5.0 folder, then run the following command.python3 detect_elep.py
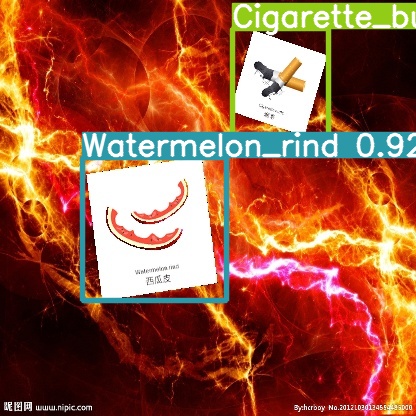 | 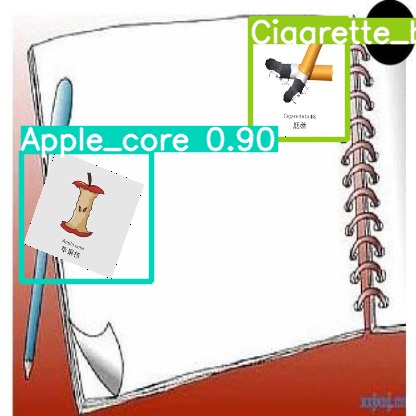 |
|---|
For real-time video monitoring, the model path needs to be modified.
python3 detection_video.py