yahboom
HomeLearn
Solution
Blog
Online Store
About Us
EN/中文
Raspberry Pi 5📖
00.Quick Start (Must See)
  • 1.Quick Start (Must See)
  • 2.TF card expand capacity
  • 3.Raspberry Pi 5 - 1GB Version Must - See Before Use
01.Introduction to Raspberry PI 5
  • 1. Introduction to Raspberry PI 5
  • 2. Raspberry PI system installation and backup
  • 3. Powering the Raspberry PI 5
  • 4. Startup of Raspberry PI 5
  • 5. Installation and introduction of shell and active radiator
  • 6. GPIO and 40-pin pins
  • 7. Tips for using Raspberry PI 5
  • 8. Raspberry PI PCIe connector
  • 9. MIPI CSI DSI connector
  • 10. UART connector
  • 11. Real-time clock
  • 12. Power over Ethernet (PoE) connector
02.Introduction to common mirror systems
  • 1. Official Raspberry PI system
  • 2. Ubuntu
03.Basic settings of Raspberry Pi
  • 1. Update and upgrade operating system
  • 2.Introduction to raspi-config tool
  • 3.config.txt file description
  • 4.Network Configuration
  • 5.remote access
  • 6.Transfer files remotely
  • 7.Set display resolution and rotation
  • 8.Set screen to sleep
  • 9.Get real-time temperature of Raspberry Pi
  • 10.Play audio and video
  • 11.Using USB camera
  • 12.Using MIPI camera
04.Basic programming course
1. C language programming
  • 1. C language environment construction
  • 2. Print Hello World
2. Python programming
  • 1.Python usage
  • 2.Use APT to install Python packages
  • 3.Python virtual environment
  • 4.GPIO Zero
  • 5.Pin output high and low levels
  • 6.Pin reads high and low levels
  • 7.Pin output PWM
3.Jupyter lab programming
  • 1.Jupyter Lab environment construction
  • 2.Basic use of Jupyter Lab
  • 3.Jupyter Lab plug-in installation
  • 4.Basic use of Jupyter Widgets
05.Advanced AI course
5.Advanced AI gameplay
  • 1. Human pose estimation
  • 2. target detection
  • 3.yolov5
  • 4. Camera display
  • 5. QR code
  • 6. face detection
  • 7. Color recognition
2.Getting started with Open Source CV
  • 1. Introduction to Open Source CV
  • 2. Read and display Open Source CV images
  • 3. Open Source CV image writing
  • 4. Open Source CV image quality
  • 5.Open Source CV pixel operation
3.Open Source CV Geometric Transformations
  • 1. Image resizing
  • 2. Cut the image
  • 3. Image translation
  • 4. Image mirroring
  • 5. Affine transformation
  • 6. Rotate the image
  • 7. Perspective transformation
4.Text Picture Drawing Open Source CV image processing and drawing text line segments
  • 1、Grey Processing
  • 2、image binaryzation
  • 3、edge detection
  • 4、Line segment drawing
  • 5、Rectangle and circle drawing
  • 6、Text image drawing
1.Open Source CV environment setup
  • Open Source CV environment setup
6.YOLOv11 development
  • 1. YOLOv11 environment construction
  • 2. CLI Usage
  • 3. Object Detection
  • 4. Instance Segmentation
  • 5. Pose Estimation
  • 6. Image Classification
  • 7. Oriented Bounding Boxes Object Detection
  • 8. Model conversion
  • 9. Dataset Annotation
  • 10. Model training_conversion
  • 11. Model prediction
7.YOLO26 development
  • 01.YOLO26 environment
  • 02.CLI use
  • 03.Object detection
  • 04.Instance segmentation
  • 05.Pose estimation
  • 06.Image classification
  • 07.Oriented bounding box object detection
  • 08.Model conversion
  • 09.Dataset annotation
  • 10.Model training - conversion
  • 11.Model prediction
06.Mediapipe course
  • 1. Face special effects
  • 2. Face detection
  • 3. Three-dimensional object recognition
  • 4. Paintbrush
  • 5. Finger control
  • 6. Gesture recognition
07.Docker Tutorial
  • 1.Overview and installation
  • 2.Common commands
  • 3.Understand and publish images
  • 4.Hardware interaction data processing
  • 5.Enter docker container
  • 6.Update docker images
  • 7. docker container to install ROS using accessories
08.ROS1 advanced tutorial
1.ROS1 basic course
  • 1.ROS introduction
  • 2.ROS installation
  • 3.ROS common command tools
  • 4.ROS workspace
  • 5.ROS function package
  • 6.ROS node
  • 7.ROS topic publisher
  • 8.ROS topic subscribers
  • 9.ROS service client
  • 10.ROS service server
  • 11.ROS action client
  • 12.ROS action server
  • 13.ROS custom message reception
  • 14.ROS-launch file
  • 15.ROS-TF transformation
  • 16.ROS parameter service
  • 17.ROS-rviz use
  • 18.ROS-rqt tool usage
  • 19.Topic message recording and playback
  • 20.urdf model introduction
  • 21.gazebo introduction
  • 22.ROS distributed communication
2.ROS1 vision application
  • 0.Precautions
  • 1.AR vision
  • 2.AR QR code
  • 3.ROS+Opencv basics
  • 4.Face recognition
  • 5.harris corner detection
  • 6.Target tracking algorithm
  • 7.Contour moment
  • 8.Polygon outline
  • 9.Discrete fourier transform algorithm
  • 10.Edge detection algorithm
  • 11.Face detection algorithm
  • 12.Optical flow detection algorithm
  • 13.Contour detection
  • 14.General contour detection
  • 15.Feature point tracking
  • 16.HLS color filtering
  • 17.Hough circle detection
  • 18.Hough linear detection
  • 19.HSV color filtering
  • 20.LK optical flow algorithm
  • 21.detection algorithm
  • 22.Phase dependent displacement detection
  • 23.Image pyramid sampling algorithm
  • 24.RGB color filtering
  • 25.Clear background detection algorithm
  • 26.Simplified optical flow algorithm
  • 27.Simple filter
  • 28.Threshold image processing
  • 29.Watershed segmentation algorithm
09.ROS2 advanced tutorial
1.ROS2 basic course
  • 1. Introduction to ROS2
  • 2.ROS2 install Humble
  • 3.ROS2 development environment
  • 4.ROS2 workspace
  • 5.ROS2 function package
  • 6.ROS2 node
  • 7.ROS2 topic communication
  • 8.ROS2 service communication
  • 9.ROS2 action communication
  • 10.ROS2 custom interface message
  • 11.ROS2 parameter service case
  • 12.ROS2 meta-function package
  • 13.ROS2 distributed communication
  • 14.ROS2 DDS
  • 15.ROS2 time related API
  • 16.ROS2 common command tools
  • 17.ROS2 rviz2 use
  • 18.ROS2 rqt toolbox
  • 19.ROS2 Launch startup file configuration
  • 20.ROS2 recording and playback tool
  • 21.ROS2 URDF model
  • 22.ROS2 Gazebo simulation platform
  • 23.ROS2 TF2 coordinate transformation
2.ROS2 vision application
  • 0.Precautions
  • 1.Opencv basic course
  • 2.ROS+opencv application
  • 3.QR code creation and recognition
  • 4.AR vision
  • 5.Interesting gameplay of mediapipe
10.Offline AI model coursenew
Offline large model (Text Interaction)
  • 0. AI large model image description
  • 1. Deployment of large AI model environments
  • 2. Switch Chinese input method
  • 3. Installation of large model dialogue platform
  • 4. Meta AI Llama 3.2 model
  • 5. Alibaba Cloud Qwen3 Model
  • 6. Microsoft Phi-4-mini model
  • 7. DeepSeek DeepSeek-R1 model
  • 8. Alibaba Cloud Qwen2.5vl Visual Multimodal Large Model
  • 9. Google Gemma3 Visual Multimodal Large Model
  • 10. Llava Visual Multimodal Large Model
  • 11.MiniCPM-V Visual Multimodal Large Model
  • 12. Multimodal Visual Understanding Applications
  • 13. Multimodal Text-Based Image Application
  • 14. Multimodal Video Analysis Application
  • 15. Multimodal visual positioning applications
  • 16. Multimodal table scanning application
  • 17. Multimodal Autonomous Agent Application
Offline large model (Voice Interaction)
  • 0. Voice Interaction Hardware Connection (Must Read)
  • 1. Offline speech-to-text (ASR)
  • 2. Offline Text-to-Speech (TTS)
  • 3. AI large model voice interaction
  • 4. Multimodal visual understanding and voice interaction
  • 5. Multimodal Text-Based Image Application
  • 6. Multimodal Video Analysis Application
  • 7. Multimodal visual positioning applications
  • 8. Multimodal table scanning application
  • 9. Multimodal Autonomous Agent Applications
  • 10. AI large model offline voice assistant
11.Online AI model coursenew
Online large model (text interaction)
  • 1.OpenRouter Large Model API Aggregation Platform
  • 2. Multimodal Visual Understanding Applications
  • 3. Multimodal visual positioning applications
  • 4. Multimodal table scanning application
  • 5. Multimodal Autonomous Agent Applications
Online large model (voice interaction)
  • 0. Voice Interaction Hardware Connection (Must Read)
  • 1. Online speech-to-text (ASR)
  • 2. Online Text-to-Speech (TTS)
  • 3. AI large model voice interaction
  • 4. Multimodal visual and voice interaction
  • 5. Multimodal visual positioning applications
  • 6. Multimodal table scanning application
  • 7. Multimodal Autonomous Agent Applications
  • 8. AI large model online voice assistant
12.OpenClaw Deployment and Basic Usagenew
  • 01. OpenClaw Deployment
  • 02. OpenClaw WhatsApp Plugin Application
  • 03. OpenClaw WebChat Interaction
  • 04. OpenClaw TUI Interaction
  • 05. OpenClaw Tools Introduction
  • 06. OpenClawGate Gateway User Manual
  • 07. OpenClaw Features Overview
  • 08. OpenClawHub Introduction (Skill Installation)
  • 09. OpenClaw Application - File Management
  • 10. OpenClaw Application - Camera
  • 11. OpenClaw Application - Browser Control
  • 12. OpenClaw Application - Script Execution
  • 13. OpenClaw Application - AI Programming (Peripheral & GPIO Control)
  • 14. OpenClaw Application - Dedicated AI Assistant
13.OpenClaw Advanced Developmentnew
1.Preparation Before Use
  • 01. Peripheral Hardware Configuration
  • 02. OpenClaw API-KEY Configuration
  • 03. OpenClaw Model Switching
  • 04. OpenClaw Prompts
  • 05. AI Voice Interaction Configuration
  • 06. 3D Configuration Tests
2.OpenClaw AI Programming Peripheral Control
  • 1. Servo Control
  • 2. RGB Strip
  • 3. OLED Display
  • 4. Temperature and Humidity Sensor
  • 5. Camera Application
  • 6. AI Script Peripheral Control
3.OpenClaw Peripheral Integration Applications
  • 1. Plant Care Assistant
  • 2. AI Calorie Estimation
  • 3. AI Rock Paper Scissors Game
  • 4. AI Pet
  • 5. AI Weather Station
  • 6. Temperature and Humidity Dashboard
  • 7. Scheduled Tasks
Download
  • SystemFile
  • Code
  • SoftWare
  • 3D_Model_File
  • GuideManual
Download ZIP

Welcome to Raspberry Pi 5 repository

2. target detection

2. Target detection

2. Target detection2. Target detection2.1. Model structure2.2. Code analysis2.3. Start


2. Target detection

The main problem solved in this section is how to use the dnn module in OpenCV to import a trained target detection network. But there are requirements for the version of opencv.

Currently, there are three main methods for using deep learning for target detection:

  • Faster R-CNNs
  • You Only Look Once(YOLO) -Single Shot Detectors(SSDs)

Faster R-CNNs is the most commonly heard neural network based on deep learning. However, this approach is technically difficult to understand (especially for deep learning newbies), difficult to implement, and difficult to train.

In addition, even if the "Faster" method is used to implement R-CNNs (where R represents the region proposal), the algorithm is still relatively slow, about 7FPS.

If we are pursuing speed, we can turn to YOLO because it is very fast and can reach 40-90 FPS on TianXGPU, and the fastest version may reach 155 FPS. But the problem with YOLO is that its accuracy needs to be improved.

SSDs were originally developed by Google and can be said to be a balance between the above two. Compared with Faster R-CNNs, its algorithm is more straightforward. Compared with YOLO, it is more accurate.

2.1. Model structure

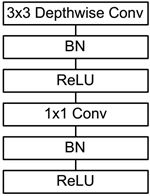
The main work of MobileNet is to use depthwise sparable convolutions (depth-level separable convolutions) to replace the past standard convolutions (standard convolutions) to solve the problems of computational efficiency and parameter quantity of convolutional networks. The MobileNets model is based on depthwise sparable convolutions (depth-level separable convolutions), which can decompose standard convolutions into a depth convolution and a point convolution (1 × 1 convolution kernel). Depthwise convolution applies each convolution kernel to each channel, while 1 × 1 convolution is used to combine the outputs of channel convolutions.

Batch Normalization (BN) will be added to the basic components of MobileNet, that is, in each SGD (stochastic gradient descent), standardization processing will be performed so that the mean of the result (all dimensions of the output signal) is 0 and the variance is 1. Generally, when you encounter problems such as slow convergence or gradient explosion during neural network training, you can try BN to solve the problem. In addition, in general use cases, BN can also be added to speed up training and improve model accuracy.

In addition, the model also uses the ReLU activation function, so the basic structure of depthwise separable convolution is as shown below:
Network Analysis (2): Detailed Explanation of MobileNets

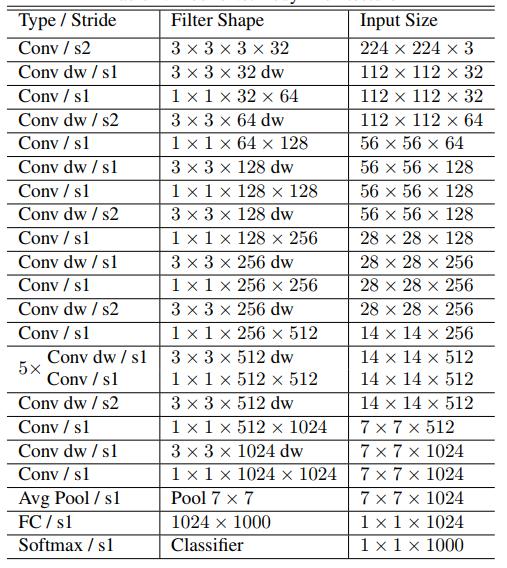
The MobileNets network is composed of many depthwise separable convolutions shown in the figure above. Its specific network structure is shown in the figure below:
Network Analysis (2): Detailed Explanation of MobileNets

2.2. Code analysis

List of recognized objects

[person, bicycle, car, motorcycle, airplane, bus, train,
  truck, boat, traffic light, fire hydrant, street sign,
  stop sign, parking meter, bench, bird, cat, dog, horse,
  sheep, cow, elephant, bear, zebra, giraffe, hat, backpack,
  umbrella, shoe, eye glasses, handbag, tie, suitcase,
  frisbee, skis, snowboard, sports ball, kite, baseball bat,
  baseball glove, skateboard, surfboard, tennis racket,
  bottle, plate, wine glass, cup, fork, knife, spoon, bowl,
  banana, apple, sandwich, orange, broccoli, carrot, hot dog,
  pizza, donut, cake, chair, couch, potted plant, bed, mirror,
  dining table, window, desk, toilet, door, tv, laptop, mouse,
  remote, keyboard, cell phone, microwave, oven, toaster,
  sink, refrigerator, blender, book, clock, vase, scissors,
  teddy bear, hair drier, toothbrush]

Load the category [object_detection_coco.txt], import the model [frozen_inference_graph.pb], and specify the deep learning framework [TensorFlow]

xxxxxxxxxx
#Load COCO class name
with open('object_detection_coco.txt', 'r') as f: class_names = f.read().split('\n')
# Display different colors for different targets
COLORS = np.random.uniform(0, 255, size=(len(class_names), 3))
#Load DNN image model
model = cv.dnn.readNet(model='frozen_inference_graph.pb', config='ssd_mobilenet_v2_coco.txt', framework='TensorFlow')

Import the image, extract the height and width, calculate a 300x300 pixel blob, and pass this blob into the neural network

xxxxxxxxxx
def Target_Detection(image):
     image_height, image_width, _ = image.shape
     #Create blob from image
     blob = cv.dnn.blobFromImage(image=image, size=(300, 300), mean=(104, 117, 123), swapRB=True)
     model.setInput(blob)
     output = model.forward()
     # Iterate through each test
     for detection in output[0, 0, :, :]:
         # Extract the confidence of the detection
         confidence = detection[2]
         # Only draw bounding boxes when the detection confidence is higher than a certain threshold, otherwise skip
         if confidence > .4:
             # Get the ID of the class
             class_id = detection[1]
             # Map class id to class
             class_name = class_names[int(class_id) - 1]
             color = COLORS[int(class_id)]
             # Get bounding box coordinates
             box_x = detection[3] * image_width
             box_y = detection[4] * image_height
             # Get the width and height of the bounding box
             box_width = detection[5] * image_width
             box_height = detection[6] * image_height
             # Draw a rectangle around each detected object
             cv.rectangle(image, (int(box_x), int(box_y)), (int(box_width), int(box_height)), color, thickness=2)
             #Write the class name text on the detected object
             cv.putText(image, class_name, (int(box_x), int(box_y - 5)), cv.FONT_HERSHEY_SIMPLEX, 1, color, 2)
     return image

2.3. Start

xxxxxxxxxx
cd /home/pi/yahboomcar_ws/src/yahboomcar_visual/detection
python target_detection_CSI.py (CSI camera)
python target_detection_USB.py (USB camera)

After clicking on the image box, use the [f] key on the keyboard to switch to human pose estimation.

xxxxxxxxxx
if action == ord('f') or action == ord('F'):state = not state # Function switching
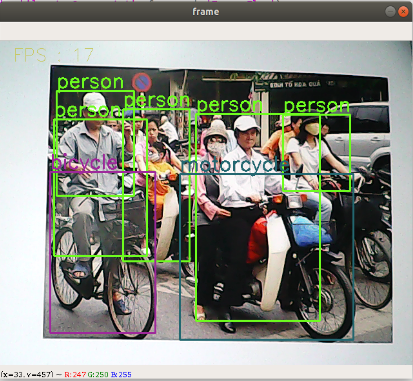
image-20210901172132630


Human pose estimation
yolov5

COMPANY

  • About us
  • Team Style
  • Blog

LEARNING & EXPLORATION

  • Tutorials
  • Edge AI hardware
  • Educational robots
  • Embedded intelligent hardware

WHERE TO BUY

  • Yahboom Online Store
  • Amazon
  • Alibaba
  • AliExpress
  • Mercado

TECHNOLOGY SUPPORT

  • Email: support@yahboom.com

BE A DISTRIBUTOR

  • Email: sales@yahboom.com
QR Code

Copyright © 2017-2026 Yahboom. All Rights Reserved.

EN/中文