Welcome to Raspberry Pi 5 repository
13.ROS custom message reception
13.ROS custom message reception
Although ros provides us with a variety of message types, sometimes we need to define some data types ourselves to use. Commonly used ros include topic data and service data.This course explains how to customize the interface message type and how to call it in the program.
13.1 Customized topic messages and usage
Generally, we will create a new folder under the function package folder, named msg, to store customized topic messages. Therefore, we will create a new folder msg under the directory of the learn_topic function package and enter it in the terminal.
cd ~/ros_ws/src/learn_topicmkdir msg13.1.1 Define msg file
Switch to the msg directory and create a new blank msg file. The suffix msg indicates that it is an msg file. Here we take Information.msg as an example. Copy the following code into the msg file you just created.
xxxxxxxxxxstring companystring city
13.1.2 Add function package dependencies in package.xml
xxxxxxxxxx<build_depend>message_generation</build_depend><exec_depend>message_runtime</exec_depend>
13.1.3 Add compilation options to CMakeLists.txt
xxxxxxxxxx#Add message_generation to find_packageadd_message_files(FILES Information.msg)generate_messages(DEPENDENCIES std_msgs)13.1.4 Compile files
xxxxxxxxxxcd ~/ros_wscatkin_make
After compilation is completed, enter rosmsg show learn_topic/Information to query the customized message type.

When the above screen appears, it means that a custom message type has been generated. Next, let’s see how to use it.
13.1.5 C++ program uses custom topic message type
We write a publisher and a subscriber to use custom topic messages. Create two new files in the src directory of the function package learn_topic. The commands are Information_publisher.cpp and Information_subscriber.cpp respectively. Copy the following codes into them.
Information_publisher.cpp
xxxxxxxxxx/*** This routine will publish the /company_info topic, the message type is the custom learn_topic::Information*/int main(int argc, char **argv){ // ROS node initialization ros::init(argc, argv, "company_Information_publisher"); // Create node handle ros::NodeHandle n; // Create a Publisher, publish a topic named /company_info, the message type is learn_topic::Person, and the queue length is 10 ros::Publisher Information_pub = n.advertise<learn_topic::Information>("/company_info", 10); // Set the loop frequency ros::Rate loop_rate(1); int count = 0; while (ros::ok()) { // Initialize messages of type learn_topic::Information learn_topic::Information info_msg; info_msg.company = "Yahboom"; info_msg.city = "Shenzhen"; // Release the news Information_pub.publish(info_msg); ROS_INFO("Information: company:%s city:%s ",info_msg.company.c_str(), info_msg.city.c_str()); loop_rate.sleep();// Delay according to cycle frequency } return 0;}Information_subscriber.cpp
xxxxxxxxxx/*** This routine will subscribe to the /company_info topic and customize the message type learn_topic::Information*/// After receiving the subscribed message, the message callback function will be entered to process the data.void CompanyInfoCallback(const learn_topic::Information::ConstPtr& msg){ // Print received messages ROS_INFO("This is: %s in %s", msg->company.c_str(), msg->city.c_str());}int main(int argc, char **argv){ ros::init(argc, argv, "company_Information_subscriber");// Initialize ROS node ros::NodeHandle n;// Here is the created node handle // Create a Subscriber, subscribe to the topic named topic/company_info, and register the callback function CompanyInfoCallback ros::Subscriber person_info_sub = n.subscribe("/company_info", 10,CompanyInfoCallback); ros::spin();// Loop waiting for callback function return 0;}Modify the CMakeLists.txt file and add the following content,
xadd_executable(Information_publisher src/Information_publisher.cpp)target_link_libraries(Information_publisher ${catkin_LIBRARIES})add_dependencies(Information_publisher ${PROJECT_NAME}_generate_messages_cpp)
add_executable(Information_subscriber src/Information_subscriber.cpp)target_link_libraries(Information_subscriber ${catkin_LIBRARIES})add_dependencies(Information_subscriber ${PROJECT_NAME}_generate_messages_cpp)Compile the function package and enter it in the terminal,
xxxxxxxxxxcd ~/ros_wscatkin_makeAfter the compilation is passed, reopen the two terminals and run Information_publisher and Information_subscriber respectively. Start roscore first and enter in the terminal.
xxxxxxxxxxroscore
Open another terminal,
xxxxxxxxxxrosrun learn_topic Information_publisher
Open another terminal,
xxxxxxxxxxrosrun learn_topic Information_subscriber
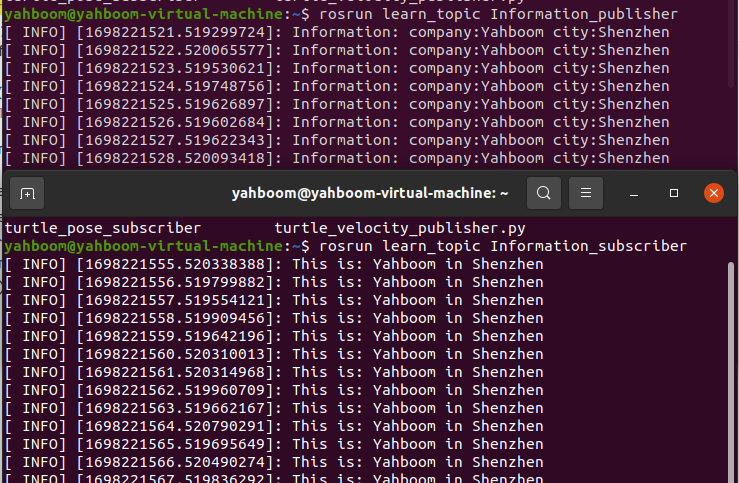
Information_publisher, as the publisher, continuously publishes message content to the topic "/company_info" and prints the published message; and Information_subscriber, as the subscriber, also continuously receives the content of the topic "/company_info" and then prints it out in the callback function. .
So how does the program call custom data? The core parts are as follows:
Introduce header files
xxxxxxxxxxThe former learn_topic is the name of the function package, and the latter Information.h is the name of the header file generated by the msg file just created.
Use custom message files
xxxxxxxxxx//Define custom message type variableslearning_topic::Information info_msg;//To copy a defined message, company and city are members of the messageinfo_msg.company = "Yahboom";info_msg.city = "Shenzhen";//Callback function definition data typevoid CompanyInfoCallback(const learning_topic::Information::ConstPtr& msg)
13.1.6 Python program uses custom message types
In the scripts folder of the function package, create two new files, named Information_publisher.py and Information_subscriber.py, and copy the following codes into them respectively.
xxxxxxxxxx#!/usr/bin/env python# -*- coding: utf-8 -*-import rospyfrom learn_topic.msg import Information #Import custom msgdef information_publisher(): rospy.init_node('information_publisher', anonymous=True)# ROS node initialization # Create a Publisher and publish a topic named /company_info. The message type is learn_topic::Information and the queue length is 6. info_pub = rospy.Publisher('/company_info', Information, queue_size=6) rate = rospy.Rate(10) #Set the loop frequency while not rospy.is_shutdown(): # Initialize messages of type learn_topic::Information info_msg = Information() info_msg.company = "Yahboom"; info_msg.city = "Shenzhen"; info_pub.publish(info_msg)# Release the news rospy.loginfo("This is %s in %s.", info_msg.company, info_msg.city)# Print release message rate.sleep()# Delay according to cycle frequencyif __name__ == '__main__': try: information_publisher() except rospy.ROSInterruptException: passInformation_subscriber.py
xxxxxxxxxx#!/usr/bin/env python# -*- coding: utf-8 -*-import rospyfrom learning_topic.msg import Information #Import custom msgdef CompanyInfoCallback(msg): rospy.loginfo("company: name:%s city:%s ", msg.company, msg.city)#Print subscription received informationdef Infomation_subscriber(): rospy.init_node('Infomation_subscriber', anonymous=True)# ROS node initialization #Create a Subscriber, subscribe to the topic named /company_info, and register the callback function personInfoCallback rospy.Subscriber("/company_info", Information, CompanyInfoCallback) rospy.spin()# Loop waiting for callback functionif __name__ == '__main__': Infomation_subscriber()After saving the two files, execution permissions need to be given.
xxxxxxxxxxcd ~/ros_ws/src/learn_topic/scriptssudo chmod a+x Information_publisher.pysudo chmod a+x Information_subscriber.py
Similarly, let's run these two programs to see, first start roscore,
xxxxxxxxxxroscore
Reopen the terminal and enter,
xxxxxxxxxxrosrun learn_topic Information_publisher.py
Enter from another terminal,
xxxxxxxxxxrosrun learn_topic Information_subscriber.py
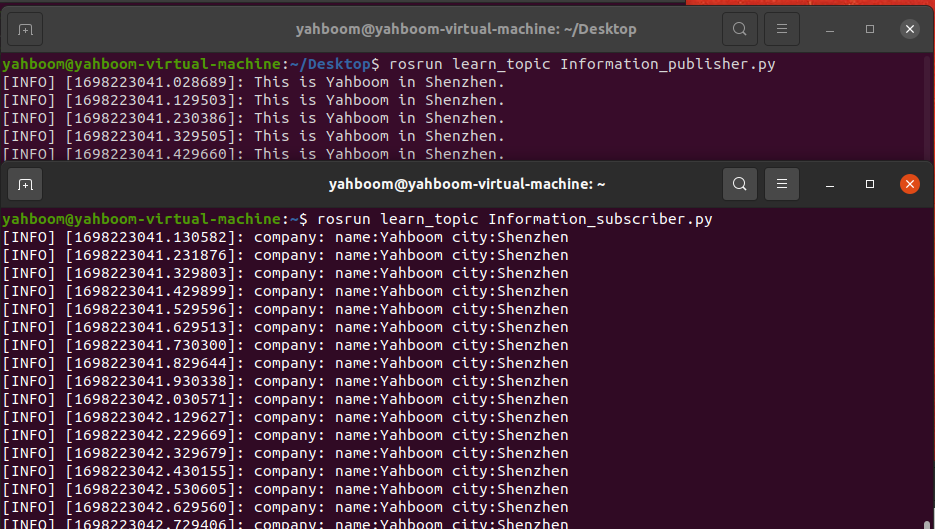
Python programs do not need to add header files, but they need to import libraries. Please refer to the following content for import and use.
xxxxxxxxxx#Import, learn_topic represents the function package, msg represents the msg folder under the function package, and Infomation represents the name of the custom msg file.from learn_topic.msg import Informationuse
xxxxxxxxxxinfo_msg = Information()info_msg.company = "Yahboom";info_msg.city = "Shenzhen";13.2 Customized service messages and usage
Generally, we will create a new folder under the function package folder, named srv, to store customized topic messages. Therefore, we will create a new folder srv under the directory of the learn_service function package and enter it in the terminal.
xxxxxxxxxxcd ~/ros_ws/src/learn_servicemkdir srv13.2.1 Define srv file
Switch to the srv directory and create a new blank srv file. The suffix srv indicates that it is an srv file. Here we take IntPlus.srv as an example. Copy the following code into the srv file you just created.
xxxxxxxxxxuint8 auint8 b---uint8 result
Here is an explanation of the structure of the srv file, which is divided into upper and lower parts by the symbol ---. The upper part represents the request and the lower part represents the response.
13.2.2 Add function package dependencies in package.xml
xxxxxxxxxx<build_depend>message_generation</build_depend><exec_depend>message_runtime</exec_depend>13.2.3 Add compilation options to CMakeList.txt
xxxxxxxxxx#Add message_generation to find_packageadd_service_files(FILES IntPlus.srv)generate_messages(DEPENDENCIES std_msgs)13.2.4 Compile function package
xxxxxxxxxxcd ~/ros_wscatkin_makeAfter the compilation is successful, enter the following command in the terminal to check whether a customized service message is generated.
xxxxxxxxxxrossrv show learn_service/IntPlus

The above screen appears, indicating that a customized service message has been generated. Next, let’s talk about how to use it in the program.
13.2.5 C++ program uses custom topic message type
We write a client and a server to use customized topic messages. Create two new files in the src directory of the function package learn_service. The commands are IntPlus_client.cpp and IntPlus_server.cpp respectively. Copy the following codes into them.
IntPlus_client.cpp
xxxxxxxxxx/*This routine will request the /Two_Int_Plus service, service data type learn_service::IntPlusAdd two integers and find the sum*/using namespace std;int main(int argc, char** argv){ int i,k; cin>>i; cin>>k; ros::init(argc, argv, "IntPlus_client");// Initialize ROS node ros::NodeHandle node;// Create node handle // After discovering the /Two_Int_Plus service, create a service client ros::service::waitForService("/Two_Int_Plus"); ros::ServiceClient IntPlus_client = node.serviceClient<learn_service::IntPlus>("/Two_Int_Plus"); // Initialize the request data of learn_service::IntPlus learn_service::IntPlus srv; srv.request.a = i; srv.request.b = k; ROS_INFO("Call service to plus %d and %d", srv.request.a, srv.request.b);//Request service call IntPlus_client.call(srv); // Display service call results ROS_INFO("Show the result : %d", srv.response.result);// Display service call results return 0;}IntPlus_server.cpp
xxxxxxxxxx/***This routine will execute the /Two_Int_Plus service, the service data type learn_service::IntPlus*/// service callback function, input parameter req, output parameter resbool IntPlusCallback(learn_service::IntPlus::Request &req,learn_service::IntPlus::Response &res){ ROS_INFO("number 1 is:%d ,number 2 is:%d ", req.a, req.b);// Show request data res.result = req.a + req.b ;// The feedback result is the sum of two numbers return res.result;}int main(int argc, char **argv){ ros::init(argc, argv, "IntPlus_server"); //ROS node initialization ros::NodeHandle n;// Create node handle // Create a server and register the callback function IntPlusCallback ros::ServiceServer Int_Plus_service = n.advertiseService("/Two_Int_Plus",IntPlusCallback); // Loop waiting for callback function ROS_INFO("Ready to caculate."); ros::spin(); return 0;}Modify the CMakeLists.txt file and add the following content,
xxxxxxxxxxadd_executable(IntPlus_server src/IntPlus_server.cpp)target_link_libraries(IntPlus_server ${catkin_LIBRARIES})add_dependencies(IntPlus_server ${PROJECT_NAME}_generate_messages_cpp)
add_executable(IntPlus_client src/IntPlus_client.cpp)target_link_libraries(IntPlus_client ${catkin_LIBRARIES})add_dependencies(IntPlus_client ${PROJECT_NAME}_generate_messages_cpp)
Compile the function package and enter it in the terminal,
xxxxxxxxxxcd ~/ros_wscatkin_makeAfter the compilation is passed, reopen the two terminals and run IntPlus_server and IntPlus_client respectively. Start roscore first and enter in the terminal.
xxxxxxxxxxroscore
Then reopen a terminal,
xxxxxxxxxxrosrun learn_service IntPlus_server
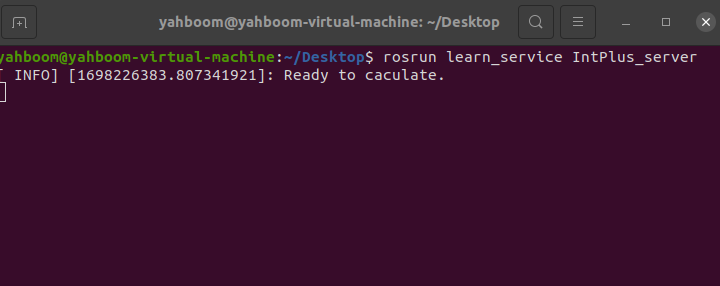
Open another terminal and enter,
xxxxxxxxxxrosrun learn_service IntPlus_client
Then enter two numbers in the terminal and press Enter. The server will calculate and return the value. The returned value is printed on the client terminal.
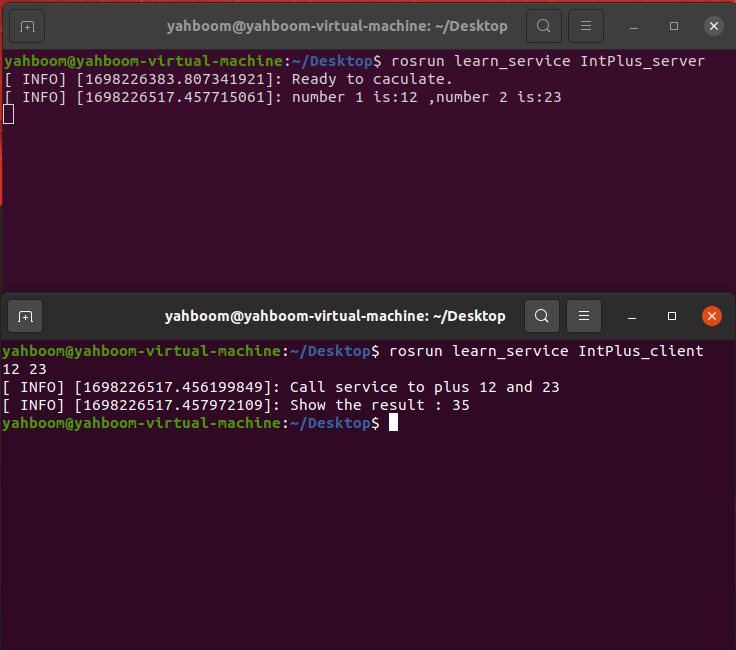
IntPlus_serverr serves as the server. After running, it provides the operation of calculating the addition of two int data. When no client calls the service, it will display and print
Ready to caculate. When IntPlus_client is run, it will look for/Two_Int_PlusFor the service, after entering two int-type data, press Enter to confirm; the server starts computing after receiving the data, and then returns a result to the client, and the client terminal will print out this value. So how does the program call custom data? The core parts are as follows:Introduce header files
xxxxxxxxxxThe former learn_service is the name of the function package, and the latter IntPlus.h is the name of the header file generated by the srv file just created.
Use custom service files
xxxxxxxxxxclient:learning_server::IntPlus srv;srv.request.a = i;srv.request.b = k;ros::ServiceClient IntPlus_client = node.serviceClient<learning_server::IntPlus>("/Two_Int_Plus");IntPlus_client.call(srv);server:ros::ServiceServer Int_Plus_service = n.advertiseService("/Two_Int_Plus",IntPlusCallback);bool IntPlusCallback(learning_server::IntPlus::Request &req,learning_server::IntPlus::Response &res)
13.2.6 Python program uses custom message types
In the scripts folder of the function package, create two new files, named IntPlus_client.py and IntPlus_server.py, and copy the following codes into them respectively.
IntPlus_client.py
xxxxxxxxxx#!/usr/bin/env python# -*- coding: utf-8 -*-import sysimport rospyfrom learn_service.srv import IntPlus, IntPlusRequestdef Plus_client(): #ROS node initialization rospy.init_node('IntPlus_client') rospy.wait_for_service('/Two_Int_Plus') try: Plus_client = rospy.ServiceProxy('/Two_Int_Plus', IntPlus) response = Plus_client(22, 20)# Request service call, enter request data return response.result except rospy.ServiceException as e: print ("failed to call service : %s"%e)if __name__ == "__main__": #Call the service and display the call results print ("Show two_int_plus result : %s" %(Plus_client()))IntPlus_server.py
xxxxxxxxxx#!/usr/bin/env python# -*- coding: utf-8 -*-import rospyfrom learn_service.srv import IntPlus, IntPlusResponsedef IntPlusCallback(req): rospy.loginfo("Ints: a:%d b:%d", req.a, req.b)# Show request data return IntPlusResponse(req.a+req.b)# feedback datadef IntPlus_server(): rospy.init_node('IntPlus_server')# ROS node initialization # Create a server and register the callback function IntPlusCallback s = rospy.Service('/Two_Int_Plus', IntPlus, IntPlusCallback) print ("Ready to caculate two ints.")# Loop waiting for callback function rospy.spin()if __name__ == "__main__": IntPlus_server()After saving the two files, execution permissions need to be given.
xxxxxxxxxxcd ~/ros_ws/src/learn_topic/scriptssudo chmod a+x IntPlus_client.pysudo chmod a+x IntPlus_server.pySimilarly, let's run these two programs to see, first start roscore,
xxxxxxxxxxroscore
Open another terminal and enter,
xxxxxxxxxxrosrun learn_service IntPlus_server.py
Open another terminal and enter,
xxxxxxxxxxrosrun learn_service IntPlus_client.py
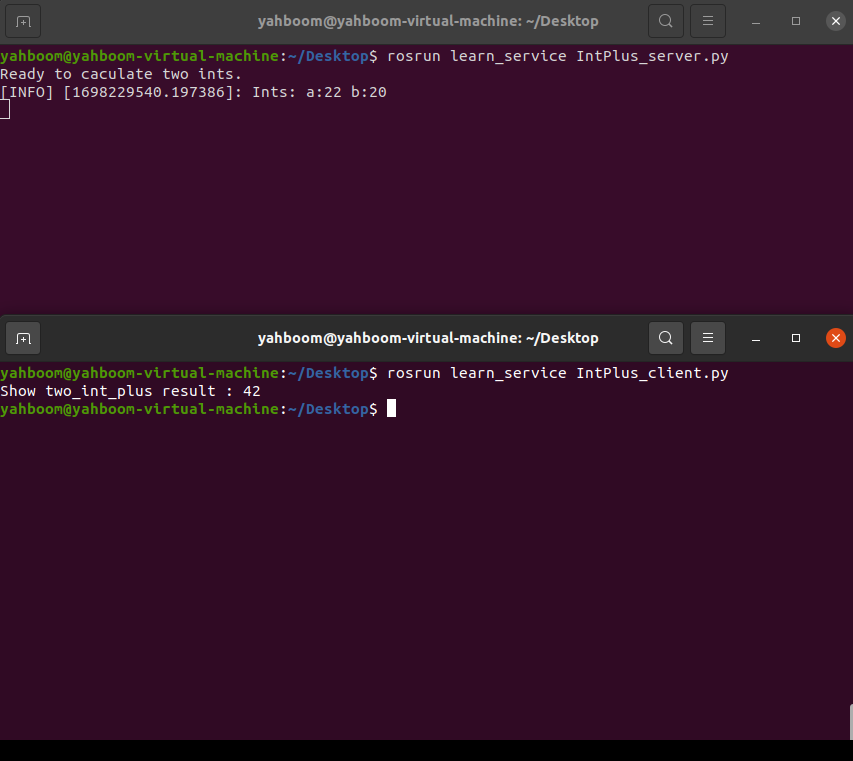
The effect is half that of the C++ version, but there is no need to enter numbers after running IntPlus_client.py here. 22 and 20 have been specified in the program. After finding the service, the server directly calculates the result, and then returns it to the client for display.
Python programs do not need to add header files, but they need to import libraries. Please refer to the following content for import and use.
xxxxxxxxxx#serverfrom learning_server.srv import IntPlus, IntPlusResponse#clientfrom learning_server.srv import IntPlus, IntPlusRequestuse,
xxxxxxxxxx#servers = rospy.Service('/Two_Int_Plus', IntPlus, IntPlusCallback)return IntPlusResponse(req.a+req.b)#feedback data#clientresponse = Plus_client(12, 20)# Request service call, enter request datareturn response.result