Welcome to Raspberry Pi 5 repository
1.Opencv basic course
1. Opencv basic course
1.1. Reading pictures and displaying them
1.1.1. Image reading
img = cv2.imread('yahboom.jpg', 0) The first parameter is the path of the image, and the second parameter is how to read the image.
cv2.IMREAD_UNCHANGED: Keep the original format unchanged, -1;
cv2.IMREAD_GRAYSCALE: Read the image in grayscale mode, which can be represented by 0;
cv2.IMREAD_COLOR:, read in a color picture, which can be represented by 1;
cv2.IMREAD_UNCHANGED: Read in an image and include its alpha channel, which can be represented by 2.
1.1.2. Image display
cv.imshow('frame', frame): Open a window named frame and display frame data (image/video data)
Parameter meaning:
The first parameter represents the name of the window created and opened;
The second parameter indicates the image to be displayed.
1.1.3. Code and actual effect display
Run the program,
cd /root/yahboomcar_ros2_ws/yahboomcar_ws/src/yahboomcar_astra/scripts/opencv/python3 1_1.py
xxxxxxxxxximport cv2 as cvif __name__ == '__main__': img = cv.imread('yahboom.jpg') while True : cv.imshow("frame",img) action = cv.waitKey(10) & 0xFF if action == ord('q') or action == 113: break img.release() cv.destroyAllWindows()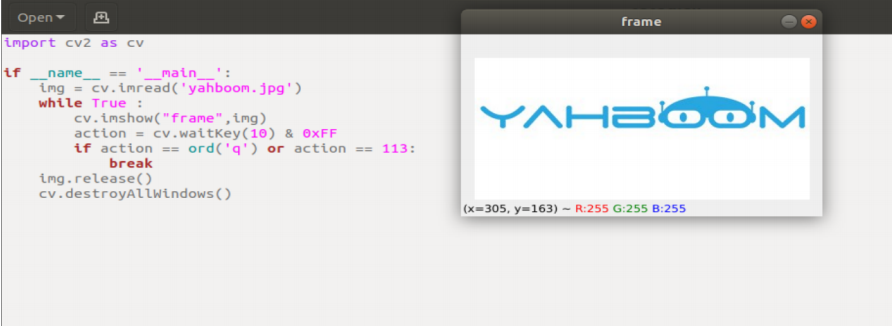
1.2. Opencv image writing
1.2.1. Function method: cv2.imwrite('new_img_name', img)
Parameter meaning:
The first parameter is the saved filename and the second parameter is the saved image.
1.2.2. Code and actual effect display
Run the program,
xxxxxxxxxxcd /root/yahboomcar_ros2_ws/yahboomcar_ws/src/yahboomcar_astra/scripts/opencv/python3 1_2.py
xxxxxxxxxximport cv2 as cvif __name__ == '__main__': img = cv.imread('yahboom.jpg') cv.imwrite("yahboom_new.jpg",img) #新建文件yahboom_new.jpg,并且把yahboom.jpg写进去 new_img = cv.imread('yahboom_new.jpg') #读取新写入的图片 while True : cv.imshow("frame",img) cv.imshow("new_frame",new_img) action = cv.waitKey(10) & 0xFF if action == ord('q') or action == 113: break img.release() cv.destroyAllWindows()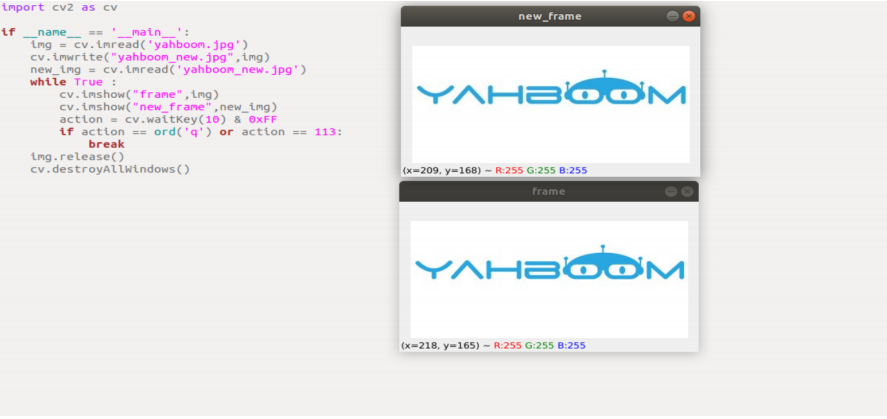
1.3. Opencv camera reads and displays video
1.3.1, Camera Reading
capture=cv.VideoCapture(0)
Parameter meaning:
The parameter in VideoCapture() is 0, which means opening the notebook's built-in camera. If the parameter is the video file path, the video will be opened, such as cap =
cv2.VideoCapture(“../test.avi”)
1.3.2. Display camera video
ret,img = frame.read()
Return value meaning:
ret: ret is a bool value to determine whether the correct frame is read back
img: image data of each frame
1.3.3. Code and actual effect display
Run the program,
xxxxxxxxxxcd /root/yahboomcar_ros2_ws/yahboomcar_ws/src/yahboomcar_astra/scripts/opencv/python3 1_3.py
xxxxxxxxxximport cv2 as cvif __name__ == '__main__': frame = cv.VideoCapture(0) while frame.isOpened(): ret,img = frame.read() cv.imshow('frame',img) action = cv.waitKey(10) & 0xFF if action == ord('q') or action == 113: break frame.release() cv.destroyAllWindows()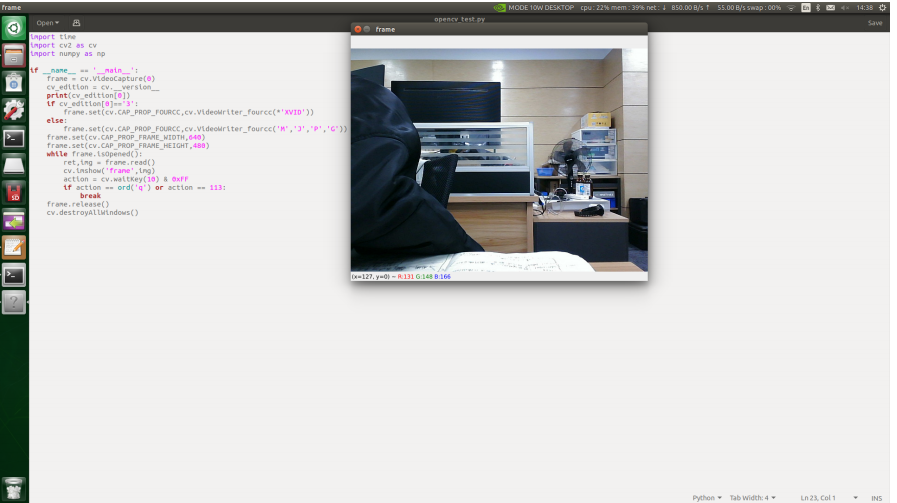
1.4, openc pixel operation
1.4.1, Pixel operation, we can change any position to a new pixel color.
First, we need to read the image, then modify the value of bgr and assign an area to black.
1.4.2, Code and actual effect display
Run program
xxxxxxxxxxcd /root/yahboomcar_ros2_ws/yahboomcar_ws/src/yahboomcar_astra/scripts/opencv/python3 1_4.py
xxxxxxxxxximport cv2if __name__ == '__main__': img = cv2.imread('yahboom.jpg') (b,g,r) = img[100,100] print(b,g,r) i=j=0 for j in range(1,255): img[i,j] = (0,0,0) for j in range(1,255): img[i,j] = (0,0,0) while True : cv2.imshow("frame",img) action = cv2.waitKey(10) & 0xFF if action == ord('q') or action == 113: break img.release() cv2.destroyAllWindows()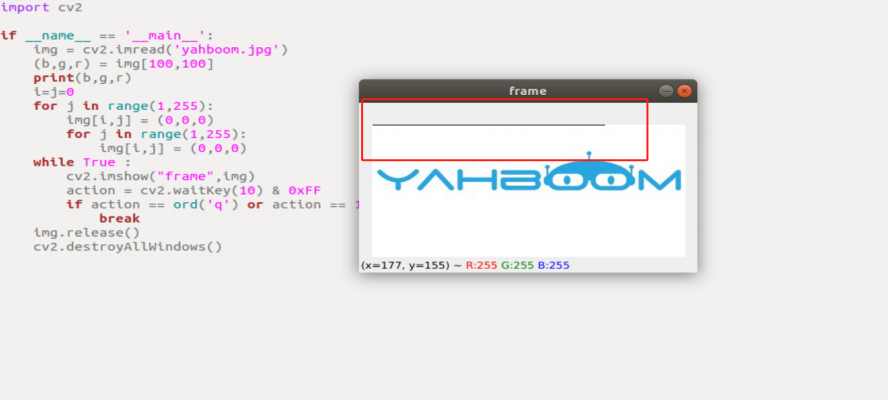
The red box part is the modified pigment value.
2.1, opencv image scaling
2.1.1, cv2.resize(InputArray src,OutputArray dst, Size, fx, fy, interpolation)
Parameter meaning:
InputArray src: input image
OutputArray ds: output picture
Size: output image size
fx, fy: scaling coefficients along the x-axis and y-axis
interpolation: insertion method, you can choose INTER_NEAREST (nearest neighbor interpolation), INTER_LINEAR (bilinear interpolation (default
Default settings)), INTER_AREA (resampling using pixel area relationships), INTER_CUBIC (bicubic interpolation of 4x4 pixel neighborhoods)
value), INTER_LANCZOS4 (Lanczos interpolation of 8x8 pixel neighborhoods)
requires attention:
The output size format is (width, height)
The default interpolation method is: bilinear interpolation
2.1.2. Code and actual effect display
Run program
xxxxxxxxxxcd /root/yahboomcar_ros2_ws/yahboomcar_ws/src/yahboomcar_astra/scripts/opencv/python3 2_1.py
xxxxxxxxxximport cv2if __name__ == '__main__': img = cv2.imread('yahboom.jpg') print(img.shape) x, y = img.shape[0:2] img_test1 = cv2.resize(img, (int(y / 2), int(x / 2))) while True : cv2.imshow("frame",img) cv2.imshow('resize0', img_test1) action = cv2.waitKey(10) & 0xFF if action == ord('q') or action == 113: break img.release() cv2.destroyAllWindows()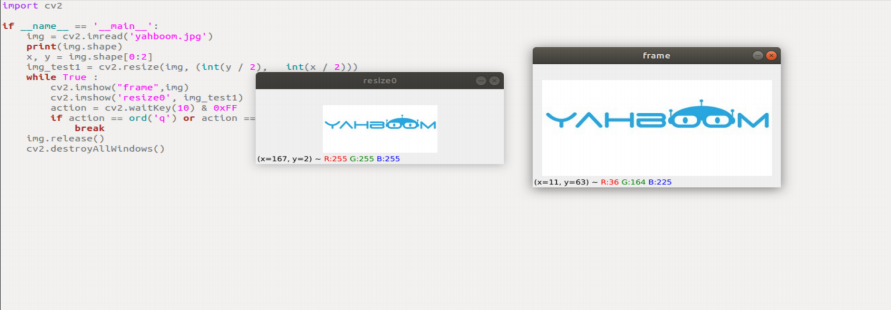
2.2, opencv image cropping
2.2.1. Picture cutting
First read the image, and then get the pixel area in the array. In the following code, select the shape area X: 300-500 Y: 500-700. Note that the image size is 800*800, so the selected area should not exceed this resolution.
2.2.2. Code and actual effect display
Run program
xxxxxxxxxxcd /root/yahboomcar_ros2_ws/yahboomcar_ws/src/yahboomcar_astra/scripts/opencv/python3 2_2.py
xxxxxxxxxximport cv2if __name__ == '__main__': img = cv2.imread('yahboom.jpg') dst = img[0:100,100:200] while True : cv2.imshow("frame",img) cv2.imshow('dst', dst) action = cv2.waitKey(10) & 0xFF if action == ord('q') or action == 113: break img.release() cv2.destroyAllWindows()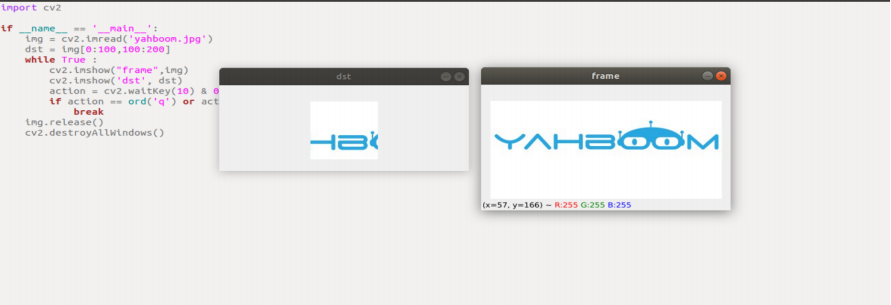
2.3, opencv image translation
2.3.1, cv2.warpAffine(src, M, dsize[,dst[, flags[, borderMode[, borderValue]]]])
Parameter meaning:
src: input image
M: transformation matrix
dsize: size of output image
flags: combination of interpolation methods (int type!)
borderMode: border pixel mode (int type!)
borderValue: (emphasis!) border padding value; by default, it is 0
Among the above parameters: M is an affine transformation matrix, which generally reflects the relationship of translation or rotation, and is a 2×3 transformation matrix of the InputArray type.
In daily affine transformation, it can be achieved by setting only the first three parameters, such as cv2.warpAffine(img,M,(rows,cols))
Basic affine transformation effect.
2.3.2. How to get the transformation matrix M? Here is an example to illustrate:
The original image src is converted into the target image dst through the transformation matrix M:
dst(x, y) = src(M11x + M12y+M13, M21x+M22y+M23)
Move the original image src to the right by 200 and down by 100 pixels, then the corresponding relationship is:
dst(x, y) = src(x+200, y+100)
Complete the above expression, that is:
dst(x, y) = src(1·x + 0·y + 200, 0·x + 1·y + 100)
According to the above expression, it can be determined that the value of each element in the corresponding transformation matrix M is:
M11=1
M12=0
M13=200
M21=0
M22=1
M23=100
Substituting the above values into the transformation matrix M, we get:
M = [ ]
2.3.3. Code and actual effect display
xxxxxxxxxxcd /root/yahboomcar_ros2_ws/yahboomcar_ws/src/yahboomcar_astra/scripts/opencv/python3 2_3.py
xxxxxxxxxximport cv2import numpy as npif __name__ == '__main__': img = cv2.imread('yahboom.jpg') imgInfo = img.shape height = imgInfo[0] width = imgInfo[1] matShift = np.float32([[1,0,10],[0,1,10]])# 2*3 dst = cv2.warpAffine(img, matShift, (width,height)) while True : cv2.imshow("frame",img) cv2.imshow('dst', dst) action = cv2.waitKey(10) & 0xFF if action == ord('q') or action == 113: break img.release() cv2.destroyAllWindows()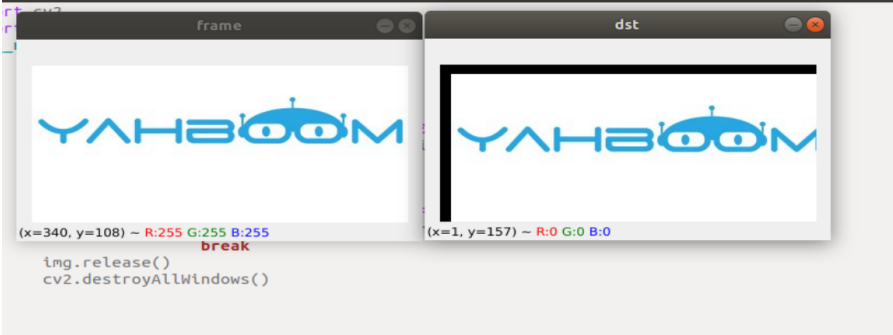
2.4, opencv image mirroring
2.4.1. Principle of image mirroring
There are two types of image mirroring transformation: horizontal mirroring and vertical mirroring. Horizontal mirroring takes the vertical centerline of the image as the axis and swaps the pixels of the image, that is, swapping the left and right halves of the image. Vertical mirroring takes the horizontal centerline of the image as the axis and swaps the upper and lower halves of the image.
Transformation principle:
Let the width of the image be width and the length be height. (x,y) are the transformed coordinates, (x0,y0) are the coordinates of the original image,
Horizontal mirror transformation
Forward mapping: x=width-x0-1,y=y0
Backward mapping: x0=width-x-1,y0=y
Vertical mirror transformation
Up mapping: x=x0,y=height-y0-1
Down mapping: x0=x, y0=height-y-1
Summary: During horizontal mirror transformation, the entire image is traversed, and then each pixel is processed according to the mapping relationship. In fact, horizontal mirror transformation is to change the column of image coordinates to the right, and the right column to the left. The transformation can be done in column units. The same is true for vertical mirror transformation, which can be transformed in row units.
2.4.2. Take vertical transformation as an example to see how Python implements it
xxxxxxxxxxcd /root/yahboomcar_ros2_ws/yahboomcar_ws/src/yahboomcar_astra/scripts/opencv/python3 2_4.py
xxxxxxxxxximport cv2import numpy as npif __name__ == '__main__': img = cv2.imread('yahboom.jpg') imgInfo = img.shape height = imgInfo[0] width = imgInfo[1] deep = imgInfo[2] newImgInfo = (height*2,width,deep) dst = np.zeros(newImgInfo,np.uint8)#uint8 for i in range(0,height): for j in range(0,width): dst[i,j] = img[i,j] dst[height*2-i-1,j] = img[i,j] while True : cv2.imshow("frame",img) cv2.imshow('dst', dst) action = cv2.waitKey(10) & 0xFF if action == ord('q') or action == 113: break img.release() cv2.destroyAllWindows()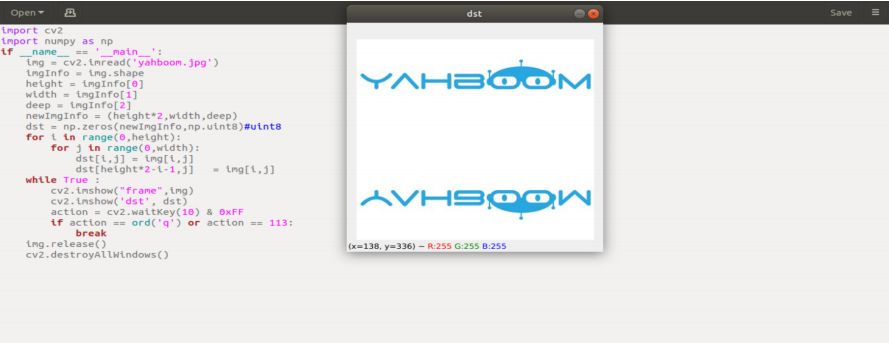
3.1. Opencv image grayscale processing
3.1.1. Image grayscale
The process of converting a color image into a grayscale image is the grayscale processing of the image. The color of each pixel in a color image is determined by three components: R, G, and B, and each component can take a value of 0-255, so there can be more than 16 million pixels (256256256=1677256) The range of color changes. The grayscale image is a special color image with the same three components of R, G, and B. The variation range of one pixel is 256. Therefore, in digital image processing, images in various formats are generally converted into grayscale. image to make subsequent images less computationally intensive. The description of a grayscale image, like a color image, still reflects the distribution and characteristics of the overall and local chroma and highlight levels of the entire image.
3.1.2. Image grayscale processing
Grayscale processing is the process of converting a color image into a grayscale image. The color image is divided into three components: R, G, and B, which display various colors such as red, green, and blue respectively. Grayscale is the process of making the color R, G, and B components equal. Pixels with large grayscale values are brighter (the maximum pixel value is 255, which is white), and vice versa (the lowest pixel is 0, which is black). The core idea of image grayscale is R = G = B. This value is also called grayscale value.
Maximum value method: Make the converted values of R, G, and B equal to the largest of the three values before conversion, that is: R=G=B=max (R, G, B). The grayscale image converted by this method is very bright.
Average method: The values of R, G, and B after conversion are the average values of R, G, and B before conversion. That is: R=G=B=(R+G+B)/3. This method produces softer grayscale images.
In OpenCV, use cv2.cvtColor(img1, cv2.COLOR_BGR2GRAY) to grayscale the image
3.1.3. Code and actual effect display
Run the program,
xxxxxxxxxxcd /root/yahboomcar_ros2_ws/yahboomcar_ws/src/yahboomcar_astra/scripts/opencv/python3 3_1.py
xxxxxxxxxximport cv2import numpy as npif __name__ == '__main__': img = cv2.imread('yahboom.jpg') gray = cv2.cvtColor(img,cv2.COLOR_BGR2GRAY) while True : cv2.imshow("frame",img) cv2.imshow('gray', gray) action = cv2.waitKey(10) & 0xFF if action == ord('q') or action == 113: break img.release() cv2.destroyAllWindows()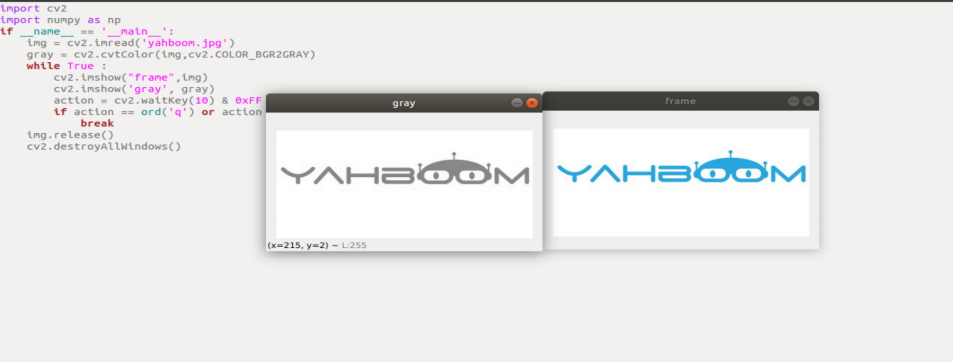
3.2. Opencv image binarization processing
3.2.1. Core idea of binarization
Set a threshold, and the value greater than the threshold is 0 (black) or 255 (white), so that the image is called a black and white image. The threshold can be fixed or adaptive. The adaptive threshold is generally a comparison of a point pixel with the mean value of regional pixels or the weighted sum of Gaussian distribution at this point, in which a difference value may or may not be set.
3.2.2, cv2.threshold (src, threshold, maxValue, thresholdType)
Parameter meaning:
src: original image
threshold: current threshold
maxVal: maximum threshold, generally 255
thresholdType: Threshold type, generally has the following values:
THRESH_BINARY = 0, #The gray value of pixels greater than the threshold is set to maxValue (for example, the maximum 8-bit gray value is 255), and the gray value of pixels whose gray value is less than the threshold is set to 0.
THRESH_BINARY_INV = 1, #The gray value of pixels greater than the threshold is set to 0, and the gray value of pixels less than the threshold is set to maxValue.
THRESH_TRUNC = 2,#The gray value of pixels greater than the threshold is set to 0, and the gray value of pixels less than the threshold is set to maxValue.
THRESH_TOZERO = 3, #The gray value of the pixels less than the threshold will not be changed, and the gray values of the parts greater than the threshold will all become 0.
THRESH_TOZERO_INV = 4 #If the gray value of the pixel is greater than the threshold, no change will be made. If the gray value of the pixel is less than the threshold, all the gray values will be changed to 0.
return value:
retval: consistent with parameter thresh 3
dst: result image
Note: Before binarization, we need to grayscale the color image to obtain a grayscale image.
3.2.3、代码与实际效果展示
Run program
xxxxxxxxxxcd /root/yahboomcar_ros2_ws/yahboomcar_ws/src/yahboomcar_astra/scripts/opencv/python3 3_2.py
xxxxxxxxxximport cv2import numpy as npif __name__ == '__main__': img = cv2.imread('yahboom.jpg') gray = cv2.cvtColor(img,cv2.COLOR_BGR2GRAY) ret,thresh1=cv2.threshold(gray,180,255,cv2.THRESH_BINARY_INV) while True : cv2.imshow("frame",img) cv2.imshow('gray', gray) cv2.imshow("binary",thresh1) action = cv2.waitKey(10) & 0xFF if action == ord('q') or action == 113: break img.release() cv2.destroyAllWindows()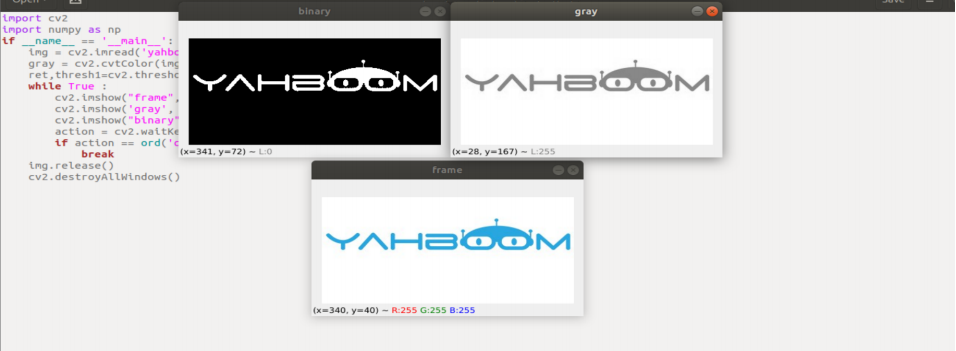
3.3, opencv image edge detection
3.3.1. The purpose of image edge detection
Significantly reduce the data size of the image while retaining the original image attributes. There are currently many algorithms for edge detection. Although the Canny algorithm is old, it can be said that it is a standard algorithm for edge detection and is still widely used in research.
3.3.2. Canny edge detection algorithm
Among currently commonly used edge detection methods, the Canny edge detection algorithm is one of the methods that is strictly defined and can provide good and reliable detection. Because it has the advantages of meeting the three criteria of edge detection and being simple to implement, it has become one of the most popular algorithms for edge detection.
The Canny edge detection algorithm can be divided into the following 5 steps:
Use Gaussian filter to smooth the image and filter out noise
Calculate the gradient strength and direction of each pixel in the image
Apply Non-Maximum Suppression to eliminate spurious responses caused by edge detection
Apply Double-Threshold detection to determine real and potential edges
Final edge detection by suppressing isolated weak edges
3.3.3, opencv implementation steps
Image grayscale: gray=cv2.cvtColor(img,cv2.COLOR_BGR2GRAY)
Gaussian filtered (noise reduction processing) image: GaussianBlur(src, ksize, sigmaX [, dst [, sigmaY [, borderType]]]) -> dst
src: input image, usually a grayscale image
ksize: Gaussian kernel size
sigmaX: Gaussian kernel standard deviation in the X direction
sigmaY: Gaussian kernel standard deviation in Y direction
dst: processed image
The Canny method processes the image: edges=cv2.Canny(image, threshold1, threshold2[, apertureSize[,L2gradient]])
edges: calculated edge image
image: The calculated edge image, usually the image obtained after Gaussian processing
threshold1: the first threshold in the process
threshold2: the second threshold during processing
apertureSize: aperture size of Sobel operator
L2gradient: The flag for calculating the gradient magnitude of the image. The default value is False. If True, the more accurate L2 norm is used for the calculation (that is, the sum of the squares of the derivatives in both directions and then the square root), otherwise the L1 norm is used (the absolute values of the derivatives in the two directions are directly added).
3.3.4, code and actual effect display
Run the program,
xxxxxxxxxxcd /root/yahboomcar_ros2_ws/yahboomcar_ws/src/yahboomcar_astra/scripts/opencv/python3 3_3.py
xxxxxxxxxximport cv2import numpy as npif __name__ == '__main__': img = cv2.imread('yahboom.jpg') gray = cv2.cvtColor(img,cv2.COLOR_BGR2GRAY) imgG = cv2.GaussianBlur(gray,(3,3),0) dst = cv2.Canny(imgG,50,50) while True : cv2.imshow("frame",img) cv2.imshow('gray', gray) cv2.imshow("canny",dst) action = cv2.waitKey(10) & 0xFF if action == ord('q') or action == 113: break img.release() cv2.destroyAllWindows()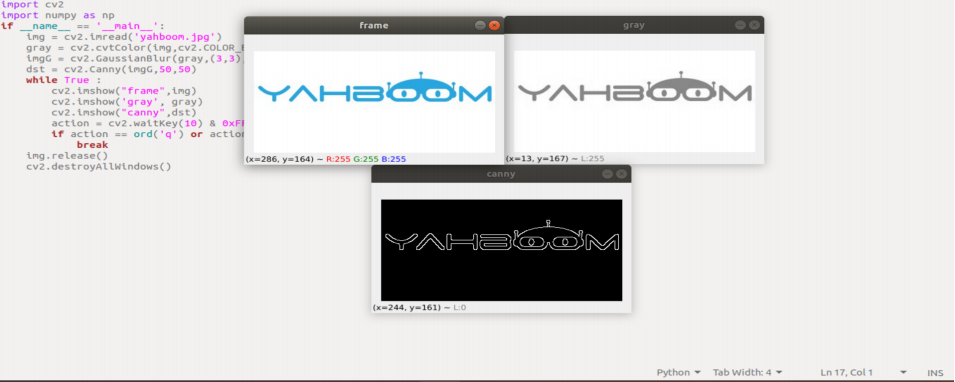
3.4, opencv line segment drawing
3.4.1, cv2.line (dst, pt1, pt2, color, thickness=None, lineType=None, shift=None)
Parameter meaning:
dst: output image
pt1, pt2: required parameters. The coordinate points of the line segment represent the starting point and the ending point respectively.
color: required parameter. Used to set the color of line segments
thickness: optional parameter. Used to set the width of the line segment
lineType: optional parameter. Used to set the type of line segment, optional 8 (8 adjacent connecting lines - default), 4 (4 adjacent connecting lines) and cv2.LINE_AA is anti-aliasing
3.4.2. Code and actual effect display
Run the program,
xxxxxxxxxxcd /root/yahboomcar_ros2_ws/yahboomcar_ws/src/yahboomcar_astra/scripts/opencv/python3 3_4.py
xxxxxxxxxximport cv2import numpy as npif __name__ == '__main__': img = cv2.imread('yahboom.jpg') line = cv2.line(img, (50,20), (20,100), (255,0,255), 10) while True : cv2.imshow("line",line) action = cv2.waitKey(10) & 0xFF if action == ord('q') or action == 113: break img.release() cv2.destroyAllWindows()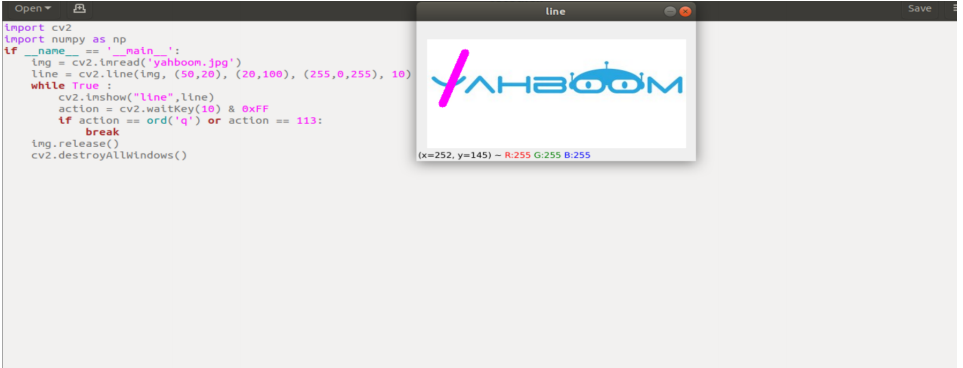
3.5, opencv draws rectangle
3.5.1, cv2.rectangle (img, pt1, pt2, color, thickness=None, lineType=None, shift=None)
Parameter meaning:
img: canvas or carrier image
pt1, pt2: required parameters. The vertices of a rectangle represent the vertices and diagonal vertices respectively, that is, the upper left corner and the lower right corner of the rectangle (these two vertices can determine a unique rectangle), which can be understood as diagonals.
color: required parameter. Used to set the color of the rectangle
thickness: optional parameter. Used to set the width of the rectangular side. When the value is a negative number, it means filling the rectangle.
lineType: optional parameter. Used to set the type of line segment, optional 8 (8 adjacent connecting lines - default), 4 (4 adjacent connecting lines) cv2.LINE_AA is anti-aliasing
3.5.2, code and effect display
Run the program,
xxxxxxxxxxcd /root/yahboomcar_ros2_ws/yahboomcar_ws/src/yahboomcar_astra/scripts/opencv/python3 3_5.py
xxxxxxxxxximport cv2import numpy as npif __name__ == '__main__': img = cv2.imread('yahboom.jpg') rect = cv2.rectangle(img, (50,20), (100,100), (255,0,255), 10) while True : cv2.imshow("line",rect) action = cv2.waitKey(10) & 0xFF if action == ord('q') or action == 113: break img.release() cv2.destroyAllWindows()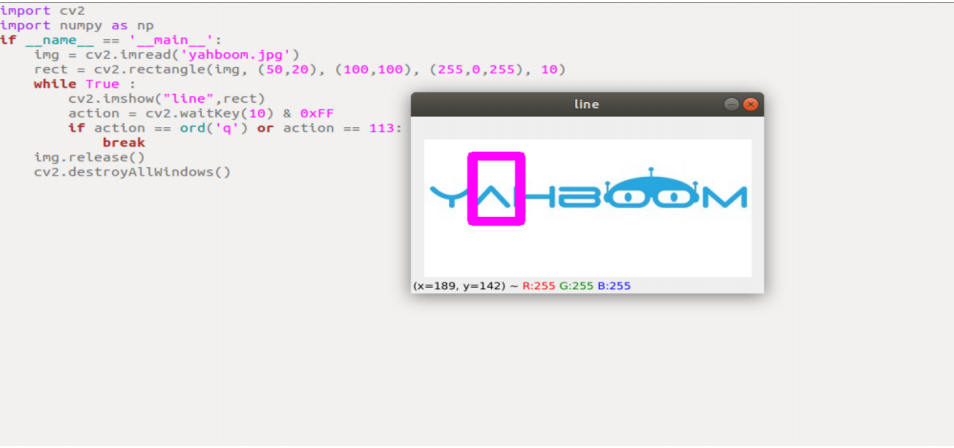
3.6, opencv draws a circle
3.6.1, cv2.circle(img, center, radius, color[,thickness[,lineType]])
Parameter meaning:
img: painting or vector image cloth
center: is the coordinate of the center of the circle, format: (50,50)
radius: radius
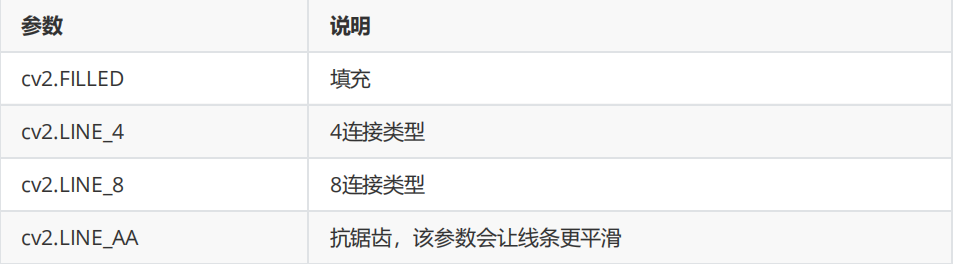
thickness: line thickness. The default is 1. If -1, it will be filled solid
lineType: line type. The default is 8, connection type. As shown in the following table
3.6.2. Code and actual effect display
Run the program,
xxxxxxxxxxcd /root/yahboomcar_ros2_ws/yahboomcar_ws/src/yahboomcar_astra/scripts/opencv/python3 3_6.py
xxxxxxxxxximport cv2import numpy as npif __name__ == '__main__': img = cv2.imread('yahboom.jpg') circle = cv2.circle(img, (80,80), 50, (255,0,255), 10) while True : cv2.imshow("circle",circle) action = cv2.waitKey(10) & 0xFF if action == ord('q') or action == 113: break img.release() cv2.destroyAllWindows()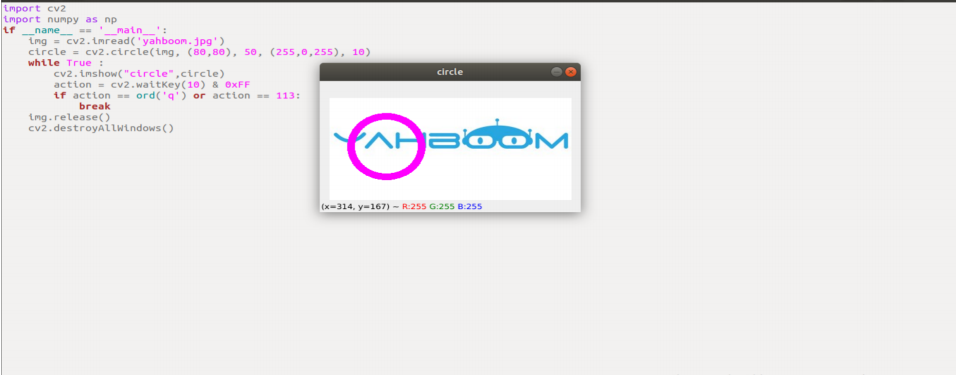
3.7, opencv draws ellipse
3.7.1, cv2.ellipse(img, center, axes, angle, StartAngle, endAngle, color[,thickness[,lineType])
Parameter meaning:
center: center point of the ellipse, (x, y)
axes: refers to the short radius and long radius, (x, y)
StartAngle: The angle of the starting angle of the arc
endAngle: the angle of the arc’s end angle
img, color, thickness, lineType can refer to the description of the circle
3.7.2, code and actual effect display
Run the program,
xxxxxxxxxxcd /root/yahboomcar_ros2_ws/yahboomcar_ws/src/yahboomcar_astra/scripts/opencv/python3 3_7.py
xxxxxxxxxximport cv2import numpy as npif __name__ == '__main__': img = cv2.imread('yahboom.jpg') ellipse = cv2.ellipse(img, (80,80), (20,50),0,0, 360,(255,0,255), 5) while True : cv2.imshow("ellipse",ellipse) action = cv2.waitKey(10) & 0xFF if action == ord('q') or action == 113: break img.release() cv2.destroyAllWindows()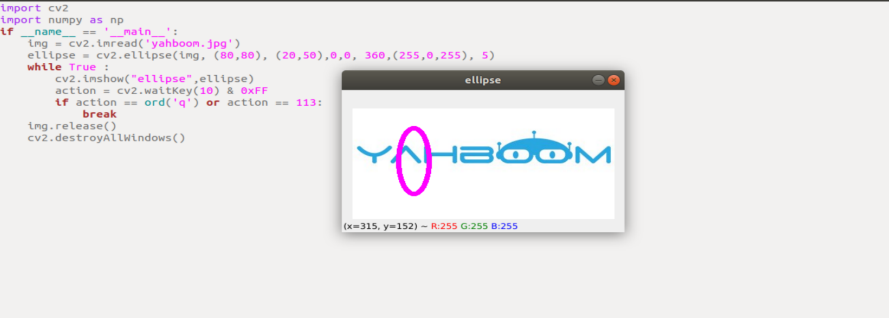
3.8, opencv draws polygons
3.8.1, cv2.polylines(img,[pts],isClosed, color[,thickness[,lineType]])
Parameter meaning:
pts: vertices of polygon
isClosed: Whether it is closed. (True/False)
Other parameters refer to the drawing parameters of the circle
3.8.2. Code and actual effect display
Run program
xxxxxxxxxxcd /root/yahboomcar_ros2_ws/yahboomcar_ws/src/yahboomcar_astra/scripts/opencv/python3 3_8.py
xxxxxxxxxximport cv2import numpy as npif __name__ == '__main__': img = cv2.imread('yahboom.jpg') points = np.array([[120,50], [40,140], [120,70], [110,110], [50,50]],np.int32) polylines = cv2.polylines(img, [points],True,(255,0,255), 5) while True : cv2.imshow("polylines",polylines) action = cv2.waitKey(10) & 0xFF if action == ord('q') or action == 113: break img.release() cv2.destroyAllWindows()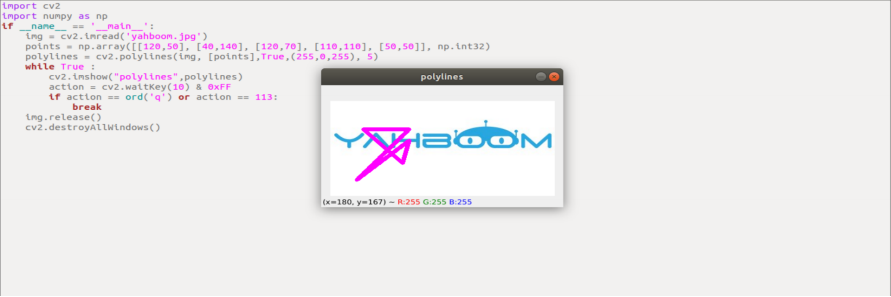
3.9, opencv draws text
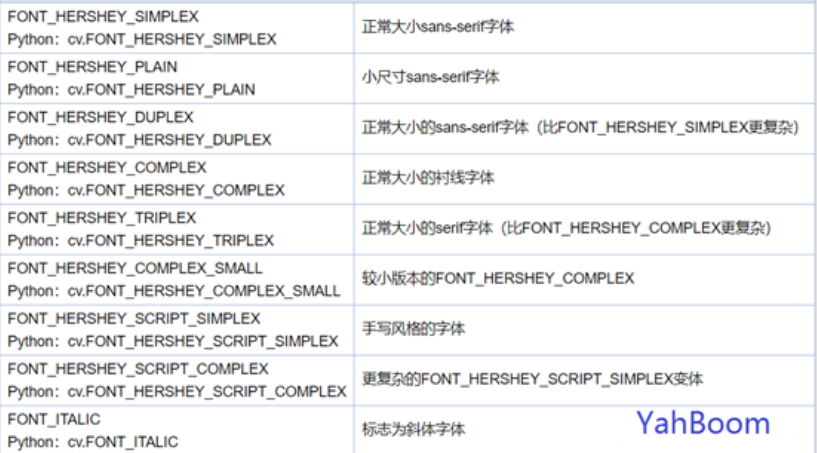
3.9.1, cv2.putText(img, str, origin, font, size, color, thickness)
Parameter meaning:
img: input image
str: drawn text
origin: coordinates of the upper left corner (integer), which can be understood as where the text starts.
font: font
size: font size
color: font color
thickness: font thickness
Among them, the font is optional,
3.9.2. Code and actual effect display
Run program
xxxxxxxxxxcd /root/yahboomcar_ros2_ws/yahboomcar_ws/src/yahboomcar_astra/scripts/opencv/python3 3_9.py
xxxxxxxxxximport cv2import numpy as npif __name__ == '__main__': img = cv2.imread('yahboom.jpg') cv2.putText(img,'This is Yahboom!',(50,50),cv2.FONT_HERSHEY_SIMPLEX,1,(0,200,0),2) while True : cv2.imshow("img",img) action = cv2.waitKey(10) & 0xFF if action == ord('q') or action == 113: break img.release() cv2.destroyAllWindows()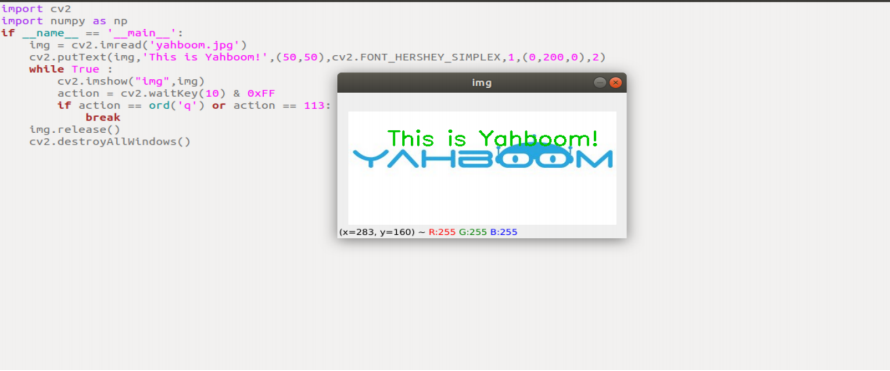
4.1, opencv repair picture
Image inpainting is a class of algorithms in computer vision whose goal is to fill in regions within an image or video. The area is identified using a binary mask, and filling is usually done based on the area boundary information that needs to be filled. The most common application of image restoration is to restore old scanned photos. It is also used to remove small unwanted objects from images.
4.1.1, dst = cv2.inpaint(src, inpaintMask, inpaintRadius, flags)
Parameter meaning:
src: source image, which is the image that needs to be repaired
inpaintMask: Binary mask indicating which pixels to inpaint.
dst: result image
inpaintRadius: represents the radius of repair
flags: Repair algorithm, mainly INPAINT_NS (Navier-Stokes based method) or INPAINT_TELEA (Fastmarching based method)
Navier-Stokes based repairs should be slower and tend to produce blurrier results than fast marching methods. In practice, we did not find this to be the case. INPAINT_NS produced better results in our tests and was slightly faster than INPAINT_TELEA.
4.1.2. Code and actual effect display
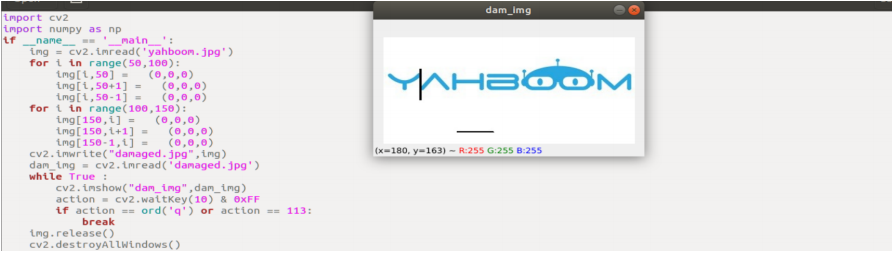
(1) First, we add damage to the intact picture, which can be understood as modifying the pixel value of a specific part of it.
Run the program,
xxxxxxxxxxcd /root/yahboomcar_ros2_ws/yahboomcar_ws/src/yahboomcar_astra/scripts/opencv/python3 4_1_1.py
xxxxxxxxxximport cv2import numpy as npif __name__ == '__main__': img = cv2.imread('yahboom.jpg') for i in range(50,100): img[i,50] = (0,0,0) img[i,50+1] = (0,0,0) img[i,50-1] = (0,0,0) for i in range(100,150): img[150,i] = (0,0,0) img[150,i+1] = (0,0,0) img[150-1,i] = (0,0,0) cv2.imwrite("damaged.jpg",img) dam_img = cv2.imread('damaged.jpg') while True : cv2.imshow("dam_img",dam_img) action = cv2.waitKey(10) & 0xFF if action == ord('q') or action == 113: break img.release() cv2.destroyAllWindows()After running, a picture will be generated, which is regarded as a damaged picture of the original picture.
(2) To repair the photo just created, first read it, then create the mask, and finally use the function to repair it
Run program
xxxxxxxxxxcd /root/yahboomcar_ros2_ws/yahboomcar_ws/src/yahboomcar_astra/scripts/opencv/python3 4_1_2.py
xxxxxxxxxximport cv2import numpy as npif __name__ == '__main__': dam_img = cv2.imread('damaged.jpg') imgInfo = dam_img.shape height = imgInfo[0] width = imgInfo[1] paint = np.zeros((height,width,1),np.uint8) for i in range(50,100): paint[i,50] = 255 paint[i,50+1] = 255 paint[i,50-1] = 255 for i in range(100,150): paint[150,i] = 255 paint[150+1,i] = 255 paint[150-1,i] = 255 dst_img = cv2.inpaint(dam_img,paint,3,cv2.INPAINT_TELEA) while True : cv2.imshow("dam_img",dam_img) cv2.imshow("paint",paint) cv2.imshow("dst",dst_img) action = cv2.waitKey(10) & 0xFF if action == ord('q') or action == 113: break img.release() cv2.destroyAllWindows()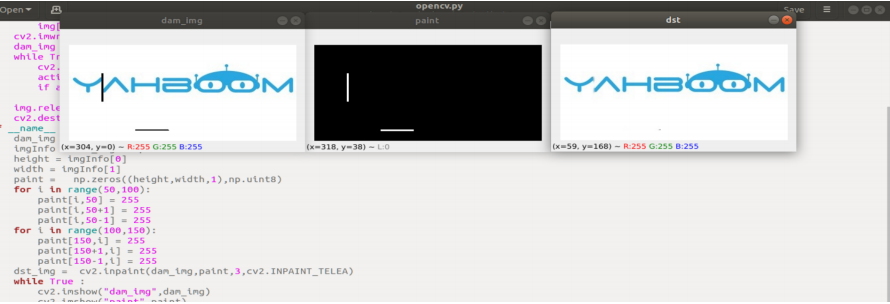
As shown in the figure, the left is before repair, the middle is the mask image, and the right is the original image after repair.
4.2. Opencv image brightness enhancement
Implementation process: synchronously amplify the three-channel value of each pixel while keeping the channel value between 0-255. In fact, it is to traverse each pixel, add and subtract values to them, and then determine whether the three channels rgb In the range of 0-255, if it is greater or less than, it takes the value 255 or 0.
4.2.1, code and actual effect display
Run the program,
xxxxxxxxxxcd /root/yahboomcar_ros2_ws/yahboomcar_ws/src/yahboomcar_astra/scripts/opencv/python3 4_2.py
xxxxxxxxxximport cv2import numpy as npif __name__ == '__main__': img = cv2.imread('yahboom.jpg') imgInfo = img.shape height = imgInfo[0] width = imgInfo[1] dst = np.zeros((height,width,3),np.uint8) for i in range(0,height): for j in range(0,width): (b,g,r) = img[i,j] bb = int(b) + 100 gg = int(g) + 100 rr = int(r) + 100 if bb > 255: bb = 255 if gg > 255: gg = 255 if rr > 255: rr = 255 dst[i,j] = (bb,gg,rr) while True : cv2.imshow("dst",dst) action = cv2.waitKey(10) & 0xFF if action == ord('q') or action == 113: break img.release() cv2.destroyAllWindows()The picture on the left is the original picture, and the picture on the back is the photo after increasing the brightness.
4.3. Opencv picture microdermabrasion and whitening
OpenCV implements the function of skin resurfacing and whitening images. The principle of implementation is basically the same as that of "1.20 OpenCV Image Brightness Enhancement", except that here we do not need to process the r value, we only need to follow this formula, p = p (x)*1.4+ y, where p(x) represents the b channel or g channel, and y represents the value that needs to be increased or decreased. Similarly, after adding the value, we need to make a judgment on the value.
4.3.1. Code and actual effect display
Run program
xxxxxxxxxxcd /root/yahboomcar_ros2_ws/yahboomcar_ws/src/yahboomcar_astra/scripts/opencv/python3 4_3.py
xxxxxxxxxximport cv2import numpy as npif __name__ == '__main__': img = cv2.imread('yahboom.jpg') imgInfo = img.shape height = imgInfo[0] width = imgInfo[1] dst = np.zeros((height,width,3),np.uint8) for i in range(0,height): for j in range(0,width): (b,g,r) = img[i,j] bb = int(b*1.4) + 5 gg = int(g*1.4) + 5 if bb > 255: bb = 255 if gg > 255: gg = 255 dst[i,j] = (bb,gg,r) while True : cv2.imshow("origin",img) cv2.imshow("dst",dst) action = cv2.waitKey(10) & 0xFF if action == ord('q') or action == 113: break img.release() cv2.destroyAllWindows()