yahboom
HomeLearn
Solution
Blog
Online Store
About Us
EN/中文
Raspbot V2📖
1.About Raspbot V2
  • 1. First trial
  • 2. Expansion board interface distribution
  • 3. About battery and charging
  • 4. Install servo PTZ
  • 5.Servo Gimbal Installation
  • 6. Important Notes (Read Before Starting)
2.Assembly
  • Installation Video
3.Car basic course
  • 0. Preparation before development
  • 1.Buzzer control
  • 2.Key reading
  • 3.RGB control
  • 4.Servo control (PTZ control)
  • 5.Motor control
  • 6.Printing ultrasonic data
  • 7.Tracking module status printing
  • 8.IR control key value printing
4.Car motion control course
  • 0.Mecanum wheel motion principle
  • 1.Car vertical movement
  • 2.Car diagonal movement
  • 3.Car sideways movement
  • 4.Car rotation movement
  • 5.Car patrol
5.Car advanced courses
  • 1.Infrared patrol car
  • 2.Ultrasonic avoid
  • 3.Ultrasonic follow
  • 4.Infrared tracking+ ultrasonic avoid
  • 5.Restricting
  • 6.Infrared remote control car
6.OpenCV courses
A. Getting Started with OpenCV
  • 1. Introduction to OpenCV
  • 2.OpenCV image reading and display
  • 3. OpenCV image writing
  • 4. OpenCV Image Quality
  • 5.OpenCV pixel operations
B. OpenCV geometric transformation
  • 1. Image scaling
  • 2. Image cutting
  • 3. Image translation
  • 4. Image mirroring
  • 5. Affine Transformation
  • 6. Image Rotation
  • 7. Perspective Transformation
C. OpenCV image processing and text line drawing
  • 1. Grayscale processing
  • 2. Image Binarization
  • 3. Edge Detection
  • 4. Line drawing
  • 5. Rectangle and circle drawing
  • 6. Text and image drawing
D. Image beautification
  • 1. Color Image Histogram
  • 2. Histogram Equalization
  • 3. Image repair
  • 4. Brightness enhancement
  • 5. Smooth and whiten
  • 6. Gaussian mean filtering
  • 7. Median Filter
E. Machine Learning
  • 1. KNN
  • 2. SVM
7.AI vision recognition course
  • 1.Camera driver tutorial
  • 2.Color recognition
  • 3.HSV value test
  • 4.Object Recognition
  • 5.QR code recognition
  • 6.Face recognition
  • 7.License Plate Recognition
  • 8. Human Pose Estimation
  • 9. Target detection
  • 10.yolov5-lite
  • 11. Gesture Recognition
  • 12. Face Detection
  • 13. Face effects
  • 14. 3D Object Recognition
  • 15. Paintbrush
  • 16. Finger control
8.AI vision interaction module
  • 1. Color tracking
  • 2. Color follows
  • 3. QR code recognition to control movement
  • 4. Face tracking
  • 5. Face following
  • 6. Visual tracking
  • 7. Garbage identification
  • 8. Track map Autopilot(purchased separately)
  • 9. Gesture following
9.Voice control basic course(For Superior Kit)new
  • 1.Voice control car movement
  • 2.Voice control RGB light
  • 3.Voice control color recognition
  • 4.Voice control autonomous driving
  • 5.Voice control car tracking
10.AI large model knowledge(For Superior Kit)new
  • 1.AI large model types and principles
  • 2.RAG retrieval enhancement and model training samples
  • 3.Embodied intelligent robot system architecture
  • 4.Embodied intelligent functions core source code
  • 5.Configure AI large model(Required)
11.AI Large Model Development(For Superior Kit & Reference)new
  • 1.Register a model service provider account
  • 2. Configuring API-KEY(Optional)
  • 3. Introduction to Dify
  • 4. Basic Dify Features
  • 5. Deploy the RAG knowledge base
  • 6. AI Large Model Development - chatbot
  • 7. RAG knowledge base + chatbot
  • 8. AI agent workflow
  • 9. Custom wake-up response
  • 10. Core module testing tools
12.AI large basic course(For Superior Kit)new
  • 1.Free conversation
  • 2.Text-to-picture
  • 3.Scene description
  • 4.Video description
  • 5.Intelligent action choreography
  • 6.Dual-model agent application
13.ROS2-Robot chassis control course
  • 1. Robot information release
  • 2. Robot keyboard control
  • 3. URDF Model
14.ROS2-OpenCV course
  • 1.ROS+Opencv application
  • 2. AR Vision
  • 3. Mediapipe fun gameplay
  • 4. Gesture control car movement
  • 5. Gesture control car actions
  • 6. Palm control car movement
  • 7. Palm control servo PTZ
  • 8. Visual tracking
  • 9. AprilTag code recognition
  • 10. AprilTag tag code tracking
  • 11. AprilTag tag code follow
15.Development environment course
  • 1. Introduction to Raspberry Pi 5
  • 2. Image writing and backup
  • 3. Start the Raspberry Pi 5
  • 4. Remote Access
  • 5. Remote file transfer
  • 6. Common Linux commands and use of vim editor
  • 7. Install Raspbot V2 driver library
  • 8. Jupyter Lab environment construction
  • 9. Jupyter Lab plugin installation
  • 10. Basic use of Jupyter Widgets
16.Raspberry Pi basic settings
  • 1.Update and upgrade the operating system
  • 2. Introduction to raspi-config tool
  • 3. config.txt file description
  • 4. Network Configuration
  • 5. Set display resolution and rotation
  • 6. Set screen sleep
  • 7. Get real-time temperature of RPi
  • 8. Play audio and video
  • 9. Use USB Camera
  • 10.Use MIPI camera
17.Docker course
  • 1. Overview and installation
  • 2. Common commands
  • 3. Understand and publish images
  • 4. Docker data processing
  • 5. Enter docker container
18.ROS2 basic course
  • 1. Introduction to ROS2
  • 2.ROS2 install Humble
  • 3. ROS2 development environment
  • 4. ROS2 workspace
  • 5. ROS2 function package
  • 6. ROS2 node
  • 7.ROS2 topic communication
  • 8. ROS2 service communication
  • 9. ROS2 action communication
  • 10. ROS2 custom interface message
  • 11. ROS2 parameter service case
  • 12. ROS2 meta-function package
  • 13. ROS2 distributed communication
  • 14. ROS2 DDS
  • 15. ROS2 time related API
  • 16. ROS2 common command tools
  • 17. ROS2 rviz2 use
  • 18. ROS2 rqt toolbox
  • 19. ROS2 Launch startup file configuration
  • 20. ROS2 recording and playback tool
  • 21. ROS2 URDF model
  • 22. ROS2 Gazebo simulation platform
  • 23.ROS2 TF2 coordinate transformation
Download
  • APP(iOS/Android)
  • Code
  • System_File
  • Instruction Manual
  • Hardware_Info
  • 3D_Model_File
  • ROS2_Basic_VM
Download ZIP

Welcome to Raspbot V2 repository

当製品の日本語版マニュアル資料は、こちらからご取得ください。

6. ROS2 node

6. ROS2 Nodes

1. Node Introduction

Regardless of the communication method used, the construction of communication objects relies on nodes. In ROS2, each node generally corresponds to a single functional module (for example, a radar driver node might be responsible for publishing radar messages, while a camera driver node might be responsible for publishing image messages). A complete robotic system may consist of many nodes working together. In ROS2, a single executable file (C++ program or Python program) can contain one or more nodes.

2. Node Creation Process

  1. Create a Program File
  2. Import Related ROS Libraries
  3. Write Node Functions
  4. Write the Configuration File
  5. Compile and Run

3. Hello World Node Example

This section uses the Python package as an example.

3.1. Creating the Python Package

Replace -workspace with your actual workspace path.

xxxxxxxxxx
cd workspace/src
ros2 pkg create pkg_helloworld_py --build-type `ment_python` --dependencies `rclpy` --node-name `helloworld`

3.2. Writing Code

Executing the above command will create pkg_helloworld_py and a helloworld.py file for writing the node:
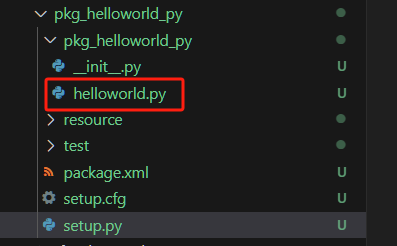
image-20231023163116372

Delete the original helloworld.py Write the following code:

xxxxxxxxxx
​
import rclpy                                     # ROS2 Python interface library
from rclpy.node import Node                      # ROS2 node class
import time
​
"""
Create a HelloWorld node and log "Hello World" during initialization.
"""
class HelloWorldNode(Node):
    def __init__(self, name):
        super().__init__(name)                     # Initialize the ROS2 node parent class
        while rclpy.ok():                          # Check if the ROS2 system is running properly
            self.get_logger().info("Hello World")  # Output ROS2 logs
            time.sleep(0.5)                        # Sleep control loop time
​
def main(args=None):                               # Main entry point for the ROS2 node
    rclpy.init(args=args)                          # Initialize the ROS2 Python interface
    node = HelloWorldNode("helloworld")            # Create and initialize the ROS2 node object
    rclpy.spin(node)                               # Loop and wait for ROS2 to exit.
    node.destroy_node()                            # Destroy the node object
    rclpy.shutdown()                               # Close the ROS2 Python interface
​

After writing the code, you need to set the package's compilation options to let the system know the entry point for the Python program. Open the package's setup.py file and add the following entry point configuration:
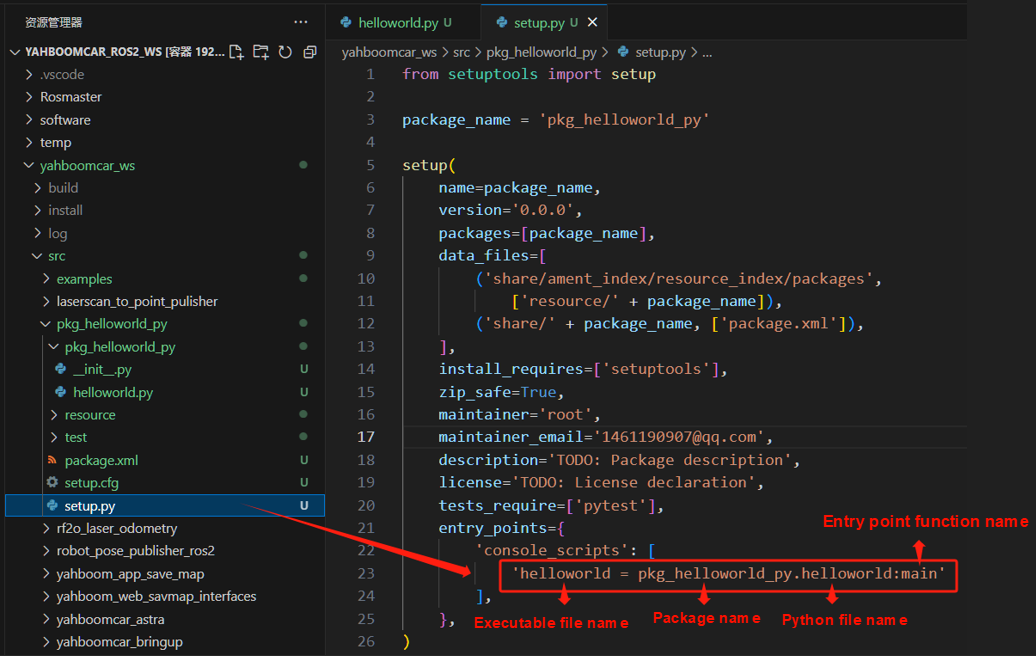
image-20231023172134879

3.3. Compiling the Package

  • Compiling the Package
xxxxxxxxxx
colcon build --packages-select pkg_helloworld_py
  • Refresh the environment variables in the workspace
xxxxxxxxxx
source install/setup.bash

3.4. Running the Node

xxxxxxxxxx
ros2 run pkg_helloworld_py helloworld

After running successfully, you can see the "Hello World" string being printed in a loop in the terminal:
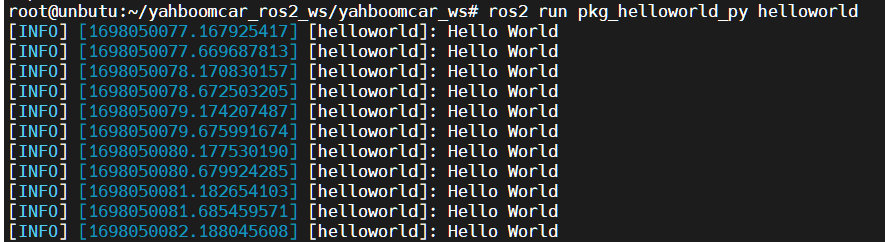
image-20231023163749024

ROS2 function package
ROS2 topic communication

COMPANY

  • About us
  • Team Style
  • Blog

LEARNING & EXPLORATION

  • Tutorials
  • Edge AI hardware
  • Educational robots
  • Embedded intelligent hardware

WHERE TO BUY

  • Yahboom Online Store
  • Amazon
  • Alibaba
  • AliExpress
  • Mercado

TECHNOLOGY SUPPORT

  • Email: support@yahboom.com

BE A DISTRIBUTOR

  • Email: sales@yahboom.com
QR Code

Copyright © 2017-2026 Yahboom. All Rights Reserved.

EN/中文