yahboom
HomeLearn
Solution
Blog
Online Store
About Us
EN/中文
Raspbot V2📖
1.About Raspbot V2
  • 1. First trial
  • 2. Expansion board interface distribution
  • 3. About battery and charging
  • 4. Install servo PTZ
  • 5.Servo Gimbal Installation
  • 6. Important Notes (Read Before Starting)
2.Assembly
  • Installation Video
3.Car basic course
  • 0. Preparation before development
  • 1.Buzzer control
  • 2.Key reading
  • 3.RGB control
  • 4.Servo control (PTZ control)
  • 5.Motor control
  • 6.Printing ultrasonic data
  • 7.Tracking module status printing
  • 8.IR control key value printing
4.Car motion control course
  • 0.Mecanum wheel motion principle
  • 1.Car vertical movement
  • 2.Car diagonal movement
  • 3.Car sideways movement
  • 4.Car rotation movement
  • 5.Car patrol
5.Car advanced courses
  • 1.Infrared patrol car
  • 2.Ultrasonic avoid
  • 3.Ultrasonic follow
  • 4.Infrared tracking+ ultrasonic avoid
  • 5.Restricting
  • 6.Infrared remote control car
6.OpenCV courses
A. Getting Started with OpenCV
  • 1. Introduction to OpenCV
  • 2.OpenCV image reading and display
  • 3. OpenCV image writing
  • 4. OpenCV Image Quality
  • 5.OpenCV pixel operations
B. OpenCV geometric transformation
  • 1. Image scaling
  • 2. Image cutting
  • 3. Image translation
  • 4. Image mirroring
  • 5. Affine Transformation
  • 6. Image Rotation
  • 7. Perspective Transformation
C. OpenCV image processing and text line drawing
  • 1. Grayscale processing
  • 2. Image Binarization
  • 3. Edge Detection
  • 4. Line drawing
  • 5. Rectangle and circle drawing
  • 6. Text and image drawing
D. Image beautification
  • 1. Color Image Histogram
  • 2. Histogram Equalization
  • 3. Image repair
  • 4. Brightness enhancement
  • 5. Smooth and whiten
  • 6. Gaussian mean filtering
  • 7. Median Filter
E. Machine Learning
  • 1. KNN
  • 2. SVM
7.AI vision recognition course
  • 1.Camera driver tutorial
  • 2.Color recognition
  • 3.HSV value test
  • 4.Object Recognition
  • 5.QR code recognition
  • 6.Face recognition
  • 7.License Plate Recognition
  • 8. Human Pose Estimation
  • 9. Target detection
  • 10.yolov5-lite
  • 11. Gesture Recognition
  • 12. Face Detection
  • 13. Face effects
  • 14. 3D Object Recognition
  • 15. Paintbrush
  • 16. Finger control
8.AI vision interaction module
  • 1. Color tracking
  • 2. Color follows
  • 3. QR code recognition to control movement
  • 4. Face tracking
  • 5. Face following
  • 6. Visual tracking
  • 7. Garbage identification
  • 8. Track map Autopilot(purchased separately)
  • 9. Gesture following
9.Voice control basic course(For Superior Kit)new
  • 1.Voice control car movement
  • 2.Voice control RGB light
  • 3.Voice control color recognition
  • 4.Voice control autonomous driving
  • 5.Voice control car tracking
10.AI large model knowledge(For Superior Kit)new
  • 1.AI large model types and principles
  • 2.RAG retrieval enhancement and model training samples
  • 3.Embodied intelligent robot system architecture
  • 4.Embodied intelligent functions core source code
  • 5.Configure AI large model(Required)
11.AI Large Model Development(For Superior Kit & Reference)new
  • 1.Register a model service provider account
  • 2. Configuring API-KEY(Optional)
  • 3. Introduction to Dify
  • 4. Basic Dify Features
  • 5. Deploy the RAG knowledge base
  • 6. AI Large Model Development - chatbot
  • 7. RAG knowledge base + chatbot
  • 8. AI agent workflow
  • 9. Custom wake-up response
  • 10. Core module testing tools
12.AI large basic course(For Superior Kit)new
  • 1.Free conversation
  • 2.Text-to-picture
  • 3.Scene description
  • 4.Video description
  • 5.Intelligent action choreography
  • 6.Dual-model agent application
13.ROS2-Robot chassis control course
  • 1. Robot information release
  • 2. Robot keyboard control
  • 3. URDF Model
14.ROS2-OpenCV course
  • 1.ROS+Opencv application
  • 2. AR Vision
  • 3. Mediapipe fun gameplay
  • 4. Gesture control car movement
  • 5. Gesture control car actions
  • 6. Palm control car movement
  • 7. Palm control servo PTZ
  • 8. Visual tracking
  • 9. AprilTag code recognition
  • 10. AprilTag tag code tracking
  • 11. AprilTag tag code follow
15.Development environment course
  • 1. Introduction to Raspberry Pi 5
  • 2. Image writing and backup
  • 3. Start the Raspberry Pi 5
  • 4. Remote Access
  • 5. Remote file transfer
  • 6. Common Linux commands and use of vim editor
  • 7. Install Raspbot V2 driver library
  • 8. Jupyter Lab environment construction
  • 9. Jupyter Lab plugin installation
  • 10. Basic use of Jupyter Widgets
16.Raspberry Pi basic settings
  • 1.Update and upgrade the operating system
  • 2. Introduction to raspi-config tool
  • 3. config.txt file description
  • 4. Network Configuration
  • 5. Set display resolution and rotation
  • 6. Set screen sleep
  • 7. Get real-time temperature of RPi
  • 8. Play audio and video
  • 9. Use USB Camera
  • 10.Use MIPI camera
17.Docker course
  • 1. Overview and installation
  • 2. Common commands
  • 3. Understand and publish images
  • 4. Docker data processing
  • 5. Enter docker container
18.ROS2 basic course
  • 1. Introduction to ROS2
  • 2.ROS2 install Humble
  • 3. ROS2 development environment
  • 4. ROS2 workspace
  • 5. ROS2 function package
  • 6. ROS2 node
  • 7.ROS2 topic communication
  • 8. ROS2 service communication
  • 9. ROS2 action communication
  • 10. ROS2 custom interface message
  • 11. ROS2 parameter service case
  • 12. ROS2 meta-function package
  • 13. ROS2 distributed communication
  • 14. ROS2 DDS
  • 15. ROS2 time related API
  • 16. ROS2 common command tools
  • 17. ROS2 rviz2 use
  • 18. ROS2 rqt toolbox
  • 19. ROS2 Launch startup file configuration
  • 20. ROS2 recording and playback tool
  • 21. ROS2 URDF model
  • 22. ROS2 Gazebo simulation platform
  • 23.ROS2 TF2 coordinate transformation
Download
  • APP(iOS/Android)
  • Code
  • System_File
  • Instruction Manual
  • Hardware_Info
  • 3D_Model_File
  • ROS2_Basic_VM
Download ZIP

Welcome to Raspbot V2 repository

当製品の日本語版マニュアル資料は、こちらからご取得ください。

2.Color recognition

2. Color recognition

2. Color recognition2.1. Introduction to HSV color space:2.2. Conversion of three color spaces (gray BGR HSV):2.3. Experimental results

2.1. Introduction to HSV color space:

RGB color space is the most familiar color space, that is, the three-primary color space. Any color can be mixed from these three colors. However, the effective processing of color space images is generally carried out in HSV space. HSV (hue, saturation, brightness value) is a color space created based on the intuitive characteristics of color, also known as the hexagonal pyramid model.

Why choose HSV space instead of RGB space? For images, it is feasible to identify the corresponding color in RGB space, HSV space or other color spaces. The reason for choosing HSV is that the hue represented by H can basically determine a certain color, and then combined with the saturation and brightness information to judge whether it is greater than a certain threshold. RGB is composed of three components, and the contribution ratio of each component needs to be judged. That is, the recognition range of HSV space is wider and more convenient.

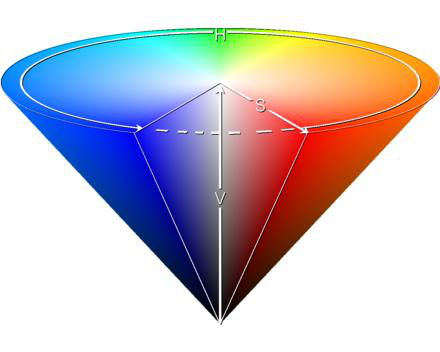
The following figure is the HSV color space model
2.2. Conversion of three color spaces (gray BGR HSV):

There are more than 150 color space conversion methods in OpenCV, but we often use only two, namely BGR->Gray and BGR->HSV. Note that Gray and HSV cannot be converted to each other. Color space conversion: cv2.cvtColor(input_image, flag)

BGR->Gray: flag is cv2.COLOR_BGR2GRAY

BGR->HSV: flag is cv2.COLOR_BGR2HSV

Value range of HSV color space in OpenCV:

H [0, 179] S [0, 255] V [0, 255]

The following figure shows the value range of common colors:
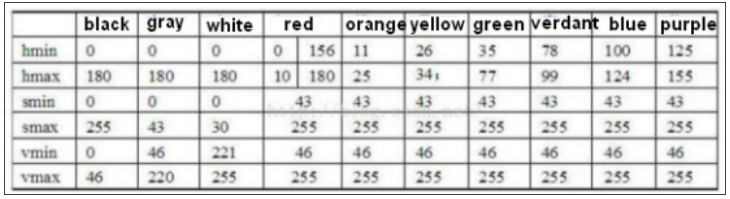
Based on the above range, our goal is to identify whether it is the color range we set, and replace this color with white first, replace the non-this color with black, and finally replace the white part with the original image.

2.3. Experimental results

Source code path:

/home/pi/project_demo/07.AI_Visual_Recognition/02.Color_Recog/02_color_detection.ipynb

​x
#bgr8转jpeg格式 bgr8 to jpeg format
import enum
import cv2

def bgr8_to_jpeg(value, quality=75):
    return bytes(cv2.imencode('.jpg', value)[1])
xxxxxxxxxx
#显示摄像头组件 Display camera components
import cv2
import traitlets
import ipywidgets.widgets as widgets
from IPython.display import display
import time
# 线程功能操作库 Thread function operation library
import threading
import inspect
import ctypes

image_widget = widgets.Image(format='jpeg', width=640, height=480)
display(image_widget)
xxxxxxxxxx
def _async_raise(tid, exctype):
    """raises the exception, performs cleanup if needed"""
    tid = ctypes.c_long(tid)
    if not inspect.isclass(exctype):
        exctype = type(exctype)
    res = ctypes.pythonapi.PyThreadState_SetAsyncExc(tid, ctypes.py_object(exctype))
    if res == 0:
        raise ValueError("invalid thread id")
    elif res != 1:
        # """if it returns a number greater than one, you're in trouble,
        # and you should call it again with exc=NULL to revert the effect"""
        ctypes.pythonapi.PyThreadState_SetAsyncExc(tid, None)
        
def stop_thread(thread):
    _async_raise(thread.ident, SystemExit)
xxxxxxxxxx
image = cv2.VideoCapture(0) #打开摄像头/dev/video0 Open the camera /dev/video0
image.set(3, 320)
image.set(4, 240)
image.set(5, 30)  #设置帧率 Setting the frame rate
# image.set(cv2.CAP_PROP_FOURCC, cv2.VideoWriter.fourcc('M', 'J', 'P', 'G'))
image.set(cv2.CAP_PROP_BRIGHTNESS, 0) #设置亮度 -64 - 64  0.0 Set Brightness -64 - 64 0.0
image.set(cv2.CAP_PROP_CONTRAST, 2.0) #设置对比度 -64 - 64  2.0 Set Contrast -64 - 64 2.0
image.set(cv2.CAP_PROP_EXPOSURE, 156.0) #设置曝光值 1.0 - 5000  156.0 Set the exposure value 1.0 - 5000 156.0
ret, frame = image.read()

#CSI摄像头打开方式 CSI camera opening method
# from picamera2 import Picamera2, Preview
# import libcamera
# picam2 = Picamera2()  
# camera_config = picam2.create_preview_configuration(main={"format":'RGB888',"size":(320,240)})
# camera_config["transform"] = libcamera.Transform(hflip=1, vflip=1)
# picam2.configure(camera_config) 
# picam2.start() 
# frame = picam2.capture_array()
image_widget.value = bgr8_to_jpeg(frame)
xxxxxxxxxx
import numpy as np
# 默认选择红色的,想识别其他请注释下面红色区间代码,放开后面其他区间代码段 The red one is selected by default. If you want to identify other codes, please comment the red code section below and release the other code sections below.
# 红色区域 Red Zone
global color_lower
color_lower = np.array([0, 43, 46])
global color_upper
color_upper = np.array([10, 255, 255])
# #绿色区间 Green Zone
# color_lower = np.array([35, 43, 46])
# color_upper = np.array([77, 255, 255])

# #蓝色区间 Blue Zone
# color_lower=np.array([100, 43, 46])
# color_upper = np.array([124, 255, 255])

# #黄色区间 Yellow Zone
# color_lower = np.array([26, 43, 46])
# color_upper = np.array([34, 255, 255])

# #橙色区间 Orange Zone
# color_lower = np.array([11, 43, 46])
# color_upper = np.array([25, 255, 255])
xxxxxxxxxx
def Color_Recongnize():
    t_start = time.time()
    fps = 0
    while True:
        ret, frame = image.read() #USB摄像头 USB Camera
        #frame = picam2.capture_array() #CSI摄像头 CSI Camera
        
        frame = cv2.resize(frame, (320, 240))
        frame_ = cv2.GaussianBlur(frame,(5,5),0)                    
        hsv = cv2.cvtColor(frame,cv2.COLOR_BGR2HSV)
        mask = cv2.inRange(hsv,color_lower,color_upper)  
        mask = cv2.erode(mask,None,iterations=2)
        mask = cv2.dilate(mask,None,iterations=2)
        mask = cv2.GaussianBlur(mask,(5,5),0)     
        cnts = cv2.findContours(mask.copy(),cv2.RETR_EXTERNAL,cv2.CHAIN_APPROX_SIMPLE)[-2] 
        if len(cnts) > 0:
            cnt = max (cnts, key = cv2.contourArea)
            (color_x,color_y),color_radius = cv2.minEnclosingCircle(cnt)
            if color_radius > 10:
                # 将检测到的颜色用原形线圈标记出来 Mark the detected color with a prototype circle
                cv2.circle(frame,(int(color_x),int(color_y)),int(color_radius),(255,0,255),2)  
                    # Proportion-Integration-Differentiation
        fps = fps + 1
        mfps = fps / (time.time() - t_start)
        cv2.putText(frame, "FPS " + str(int(mfps)), (40,40), cv2.FONT_HERSHEY_SIMPLEX, 0.8, (0,255,255), 3)
        # 实时传回图像数据进行显示 Real-time image data transmission for display
        image_widget.value = bgr8_to_jpeg(frame)
        # print(g_mode)

xxxxxxxxxx
thread1 = threading.Thread(target=Color_Recongnize)
thread1.daemon=True
thread1.start()
xxxxxxxxxx
stop_thread(thread1)
image.release() #USB摄像头  USB Camera            #使用完成对象记住释放掉对象,不然下一个程序使用这个对象模块会被占用,导致无法使用 Remember to release the object after using it, otherwise the object module will be occupied by the next program, making it unusable.

#CSI摄像头 CSI Camera
# picam2.stop()
# picam2.close()

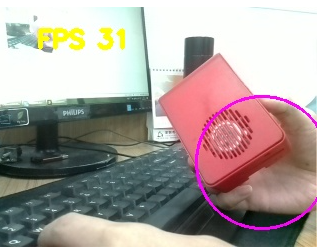
This is the effect of using the default HSV value to recognize red. It can be seen that the recognition effect may not be ideal, and your own hands may be mistakenly recognized. This is because different settings of different cameras and camera images will result in different video screen colors, which may be brighter, darker, greener, etc., resulting in the default HSV value recognition not being very accurate.

Camera driver tutorial
HSV value test

COMPANY

  • About us
  • Team Style
  • Blog

LEARNING & EXPLORATION

  • Tutorials
  • Edge AI hardware
  • Educational robots
  • Embedded intelligent hardware

WHERE TO BUY

  • Yahboom Online Store
  • Amazon
  • Alibaba
  • AliExpress
  • Mercado

TECHNOLOGY SUPPORT

  • Email: support@yahboom.com

BE A DISTRIBUTOR

  • Email: sales@yahboom.com
QR Code

Copyright © 2017-2026 Yahboom. All Rights Reserved.

EN/中文