yahboom
HomeLearn
Solution
Blog
Online Store
About Us
EN/中文
Raspbot V2📖
1.About Raspbot V2
  • 1. First trial
  • 2. Expansion board interface distribution
  • 3. About battery and charging
  • 4. Install servo PTZ
  • 5.Servo Gimbal Installation
  • 6. Important Notes (Read Before Starting)
2.Assembly
  • Installation Video
3.Car basic course
  • 0. Preparation before development
  • 1.Buzzer control
  • 2.Key reading
  • 3.RGB control
  • 4.Servo control (PTZ control)
  • 5.Motor control
  • 6.Printing ultrasonic data
  • 7.Tracking module status printing
  • 8.IR control key value printing
4.Car motion control course
  • 0.Mecanum wheel motion principle
  • 1.Car vertical movement
  • 2.Car diagonal movement
  • 3.Car sideways movement
  • 4.Car rotation movement
  • 5.Car patrol
5.Car advanced courses
  • 1.Infrared patrol car
  • 2.Ultrasonic avoid
  • 3.Ultrasonic follow
  • 4.Infrared tracking+ ultrasonic avoid
  • 5.Restricting
  • 6.Infrared remote control car
6.OpenCV courses
A. Getting Started with OpenCV
  • 1. Introduction to OpenCV
  • 2.OpenCV image reading and display
  • 3. OpenCV image writing
  • 4. OpenCV Image Quality
  • 5.OpenCV pixel operations
B. OpenCV geometric transformation
  • 1. Image scaling
  • 2. Image cutting
  • 3. Image translation
  • 4. Image mirroring
  • 5. Affine Transformation
  • 6. Image Rotation
  • 7. Perspective Transformation
C. OpenCV image processing and text line drawing
  • 1. Grayscale processing
  • 2. Image Binarization
  • 3. Edge Detection
  • 4. Line drawing
  • 5. Rectangle and circle drawing
  • 6. Text and image drawing
D. Image beautification
  • 1. Color Image Histogram
  • 2. Histogram Equalization
  • 3. Image repair
  • 4. Brightness enhancement
  • 5. Smooth and whiten
  • 6. Gaussian mean filtering
  • 7. Median Filter
E. Machine Learning
  • 1. KNN
  • 2. SVM
7.AI vision recognition course
  • 1.Camera driver tutorial
  • 2.Color recognition
  • 3.HSV value test
  • 4.Object Recognition
  • 5.QR code recognition
  • 6.Face recognition
  • 7.License Plate Recognition
  • 8. Human Pose Estimation
  • 9. Target detection
  • 10.yolov5-lite
  • 11. Gesture Recognition
  • 12. Face Detection
  • 13. Face effects
  • 14. 3D Object Recognition
  • 15. Paintbrush
  • 16. Finger control
8.AI vision interaction module
  • 1. Color tracking
  • 2. Color follows
  • 3. QR code recognition to control movement
  • 4. Face tracking
  • 5. Face following
  • 6. Visual tracking
  • 7. Garbage identification
  • 8. Track map Autopilot(purchased separately)
  • 9. Gesture following
9.Voice control basic course(For Superior Kit)new
  • 1.Voice control car movement
  • 2.Voice control RGB light
  • 3.Voice control color recognition
  • 4.Voice control autonomous driving
  • 5.Voice control car tracking
10.AI large model knowledge(For Superior Kit)new
  • 1.AI large model types and principles
  • 2.RAG retrieval enhancement and model training samples
  • 3.Embodied intelligent robot system architecture
  • 4.Embodied intelligent functions core source code
  • 5.Configure AI large model(Required)
11.AI Large Model Development(For Superior Kit & Reference)new
  • 1.Register a model service provider account
  • 2. Configuring API-KEY(Optional)
  • 3. Introduction to Dify
  • 4. Basic Dify Features
  • 5. Deploy the RAG knowledge base
  • 6. AI Large Model Development - chatbot
  • 7. RAG knowledge base + chatbot
  • 8. AI agent workflow
  • 9. Custom wake-up response
  • 10. Core module testing tools
12.AI large basic course(For Superior Kit)new
  • 1.Free conversation
  • 2.Text-to-picture
  • 3.Scene description
  • 4.Video description
  • 5.Intelligent action choreography
  • 6.Dual-model agent application
13.ROS2-Robot chassis control course
  • 1. Robot information release
  • 2. Robot keyboard control
  • 3. URDF Model
14.ROS2-OpenCV course
  • 1.ROS+Opencv application
  • 2. AR Vision
  • 3. Mediapipe fun gameplay
  • 4. Gesture control car movement
  • 5. Gesture control car actions
  • 6. Palm control car movement
  • 7. Palm control servo PTZ
  • 8. Visual tracking
  • 9. AprilTag code recognition
  • 10. AprilTag tag code tracking
  • 11. AprilTag tag code follow
15.Development environment course
  • 1. Introduction to Raspberry Pi 5
  • 2. Image writing and backup
  • 3. Start the Raspberry Pi 5
  • 4. Remote Access
  • 5. Remote file transfer
  • 6. Common Linux commands and use of vim editor
  • 7. Install Raspbot V2 driver library
  • 8. Jupyter Lab environment construction
  • 9. Jupyter Lab plugin installation
  • 10. Basic use of Jupyter Widgets
16.Raspberry Pi basic settings
  • 1.Update and upgrade the operating system
  • 2. Introduction to raspi-config tool
  • 3. config.txt file description
  • 4. Network Configuration
  • 5. Set display resolution and rotation
  • 6. Set screen sleep
  • 7. Get real-time temperature of RPi
  • 8. Play audio and video
  • 9. Use USB Camera
  • 10.Use MIPI camera
17.Docker course
  • 1. Overview and installation
  • 2. Common commands
  • 3. Understand and publish images
  • 4. Docker data processing
  • 5. Enter docker container
18.ROS2 basic course
  • 1. Introduction to ROS2
  • 2.ROS2 install Humble
  • 3. ROS2 development environment
  • 4. ROS2 workspace
  • 5. ROS2 function package
  • 6. ROS2 node
  • 7.ROS2 topic communication
  • 8. ROS2 service communication
  • 9. ROS2 action communication
  • 10. ROS2 custom interface message
  • 11. ROS2 parameter service case
  • 12. ROS2 meta-function package
  • 13. ROS2 distributed communication
  • 14. ROS2 DDS
  • 15. ROS2 time related API
  • 16. ROS2 common command tools
  • 17. ROS2 rviz2 use
  • 18. ROS2 rqt toolbox
  • 19. ROS2 Launch startup file configuration
  • 20. ROS2 recording and playback tool
  • 21. ROS2 URDF model
  • 22. ROS2 Gazebo simulation platform
  • 23.ROS2 TF2 coordinate transformation
Download
  • APP(iOS/Android)
  • Code
  • System_File
  • Instruction Manual
  • Hardware_Info
  • 3D_Model_File
  • ROS2_Basic_VM
Download ZIP

Welcome to Raspbot V2 repository

当製品の日本語版マニュアル資料は、こちらからご取得ください。

3. Understand and publish images

Understand and publish images


Understand and publish images3.1, Understanding of images3.2, UnionFS (Union File System)3.3, Image layering3.3.1, Layered Understanding3.3.2, The benefits of using layered docker images3.4, Create and publish images3.4.1, Create images3.4.2. Publish images

3.1, Understanding of images

  1. An image is a lightweight, executable, independent software package that contains all the content needed to run a certain software. We package applications and configurations into a complete, deliverable, and deployable operating environment, including code, libraries required for runtime, environment variables, and configuration files. This packaged operating environment is the image image file.
  2. Only through image files can docker container instances be generated.

3.2, UnionFS (Union File System)

  1. Union File System (UnionFS) is a layered, lightweight, high-performance file system. It is the basis of docker images, and supports file system modifications as a single submission to be superimposed layer by layer, and different directories can be mounted under the same virtual file system.
  2. Images can be inherited through layering, and various specific application images can be made based on the basic image.

Characteristics of Union File System: Multiple file systems can be loaded at the same time, but from the outside, only one file system can be seen; Union loading will superimpose each layer of file system, so that the final file system will contain files and directories of all layers.

3.3, Image layering

When downloading an image, pay attention to the download log output, you can see that it is downloaded layer by layer:
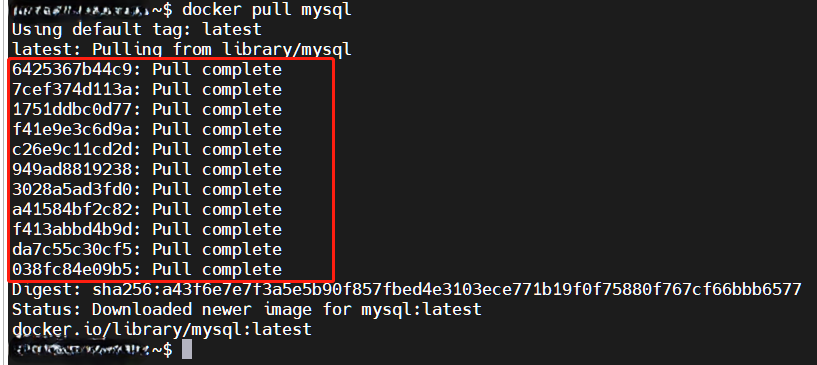
image-20230424154810939

# To view the image layer, you can use the command: docker image inspect image name
pi@yahboom:~$ docker image inspect mysql:latest
[
    {
        "Id": "sha256:5371f8c3b63eec64a33b35530be5212d6148e0940111b57b689b5ba1ffe808c8",
        .........
        "RootFS": {
            "Type": "layers",
            "Layers": [
                "sha256:d6d4fc6aef875958d6186f85f03d88e6bb6484ab2dd56b30a79163baceff2f6d",
                "sha256:05c3b0b311a02bc56ca23105a76d16bc9b8c1d3e6eac808f4efb1a2e8350224b",
                "sha256:7b80f7f05642477ebc7d93de9539af27caab7c41a768db250fe3fe2b5506ca2c",
                "sha256:50e037faefab22cb1c75e60abb388b823e96a845650f3abd6d0a27e07a5a1d5e",
                "sha256:66040abb3f7201d2cc64531349a8225412db1029447a9431d59d999c941d56f6",
                "sha256:857162425652837a362aa5f1c3d4974cc83702728793de52ba48176d5367a89b",
                "sha256:7eebed3016f6b6ab68aa8e6be35f0689a3c18d331b7b542984a0050b859eaf26",
                "sha256:2fc4c142633d57d795edc0f3fd457f99a35fa611eab8b8c5d75c66e6eb729bc2",
                "sha256:7fde2d12d484f0c14dabd9ca845da0bcdaf60bd773a58ca2d73687473950e7fe",
                "sha256:9319848a00d38e15b754fa9dcd3b6e77ac8506850d32d8af493283131b9745a3",
                "sha256:5ff94d41f068ea5b52244393771471edb6a9a10f7a4ebafda9ef6629874a899b"
            ]
        },
        "Metadata": {
            "LastTagTime": "0001-01-01T00:00:00Z"
        }
    }
]


3.3.1, Layered Understanding

  • All docker images start with a base image layer. When modifications or new content is added, a new image layer will be created on top of the current image layer.
  • For a simple example, if a new image is created based on ubuntu 20.04, this is the first layer of the new image; if a python package is added to the image, a second image layer will be created on top of the base image layer; if a security patch is added, a third image layer will be created.
  • Docker images are read-only. When the container is started, a new writable layer is loaded on top of the image! This layer is what we usually call the container layer, and everything below the container is called the image layer!

3.3.2, The benefits of using layered docker images

Resource sharing, for example, if multiple images are built from the same base image, then the host only needs to keep a base image on the disk, and only needs to load a base image in the memory, so that it can serve all containers, and each layer of the image can be shared.

3.4, Create and publish images

3.4.1, Create images

Method 1, submit an image from the container:

​x
# command
docker commit -m="committed description" -a="author" container id target image name to be created: [label name] [-m -a parameters can also be omitted]

# test
pi@yahboom:~$ docker ps -a
CONTAINER ID   IMAGE           COMMAND       CREATED       STATUS                   PORTS     NAMES
c54bf9efae47   ubuntu:latest   "/bin/bash"   3 hours ago   Up 24 minutes                      funny_hugle
3b9c01839579   hello-world     "/hello"      3 hours ago   Exited (0) 3 hours ago             jovial_brown
pi@yahboom:~$ docker commit c54bf9efae47 ubuntu:1.0
sha256:78ca7be949b6412f74ba12e8d16bd548aaa7c3fa25134326db3a67784f848f8f
pi@yahboom:~$ docker images   # Generated ubuntu:1.0 image
REPOSITORY                   TAG       IMAGE ID       CREATED         SIZE
ubuntu                       1.0       78ca7be949b6   5 seconds ago   69.2MB
yahboomtechnology/ros-foxy   3.4.0     49581aa78b6b   5 hours ago     24.3GB
yahboomtechnology/ros-foxy   3.3.9     cefb5ac2ca02   4 days ago      20.5GB
yahboomtechnology/ros-foxy   3.3.8     49996806c64a   4 days ago      20.5GB
yahboomtechnology/ros-foxy   3.3.7     8989b8860d17   5 days ago      17.1GB
yahboomtechnology/ros-foxy   3.3.6     326531363d6e   5 days ago      16.1GB
ubuntu                       latest    bab8ce5c00ca   6 weeks ago     69.2MB
hello-world                  latest    46331d942d63   13 months ago   9.14kB

Method 2: Dockerfile to create an image:

xxxxxxxxxx
# command
docker build -f dockerfile file path -t new image name: TAG . # The docker build command ends with a . to indicate the current directory
# test
docker build -f dockerfile-ros2 -t yahboomtechnology/ros-foxy:1.2 .

For more information about writing Dockerfile, please refer to: https://docs.docker.com/develop/develop-images/dockerfile_best-practices/


3.4.2. Publish images

A docker repository is a place where image files are stored. The largest public repository is dockerhub (https://hub.docker.com/), which stores a large number of images for users to download.

Steps to publish images to docker hub:

  1. Address: https://hub.docker.com/, register an account first
  2. Ensure that the account can be logged in normally

image-20230424151714735

  1. Use the tag command to modify the image name

The specification for publishing an image to docker hub is:

xxxxxxxxxx
docker push registered username/image name

For example, my registered username is: pengan88, so I need to modify the image name first

xxxxxxxxxx
# command:
docker tag image ID modified image name

# test
pi@yahboom:~$ docker images
REPOSITORY                   TAG       IMAGE ID       CREATED         SIZE
ubuntu                       1.0       78ca7be949b6   5 seconds ago   69.2MB
ubuntu                       latest    bab8ce5c00ca   6 weeks ago     69.2MB
hello-world                  latest    46331d942d63   13 months ago   9.14kB
pi@yahboom:~$ docker tag 78ca7be949b6 pengan88/ubuntu:1.0
pi@yahboom:~$ docker images
REPOSITORY                   TAG       IMAGE ID       CREATED          SIZE
pengan88/ubuntu              1.0       78ca7be949b6   23 minutes ago   69.2MB
ubuntu                       1.0       78ca7be949b6   23 minutes ago   69.2MB
ubuntu                       latest    bab8ce5c00ca   6 weeks ago      69.2MB
hello-world                  latest    46331d942d63   13 months ago    9.14kB
  1. Log in to docker hub to publish the image:
xxxxxxxxxx
pi@yahboom:~$ docker login -u pengan88
Password:     # Enter the account and password registered with Docker Hub here
WARNING! Your password will be stored unencrypted in /home/jetson/.docker/config.json.
Configure a credential helper to remove this warning. See
https://docs.docker.com/engine/reference/commandline/login/#credentials-store

Login Succeeded
pi@yahboom:~$ docker push pengan88/ubuntu:1.0
The push refers to repository [docker.io/pengan88/ubuntu]
ca774712d11b: Pushed
874b048c963a: Mounted from library/ubuntu
1.0: digest: sha256:6767d7949e1c2c2adffbc5d3c232499435b95080a25884657fae366ccb71394d size: 736
  1. Visit docker hub to see that it has been successfully released
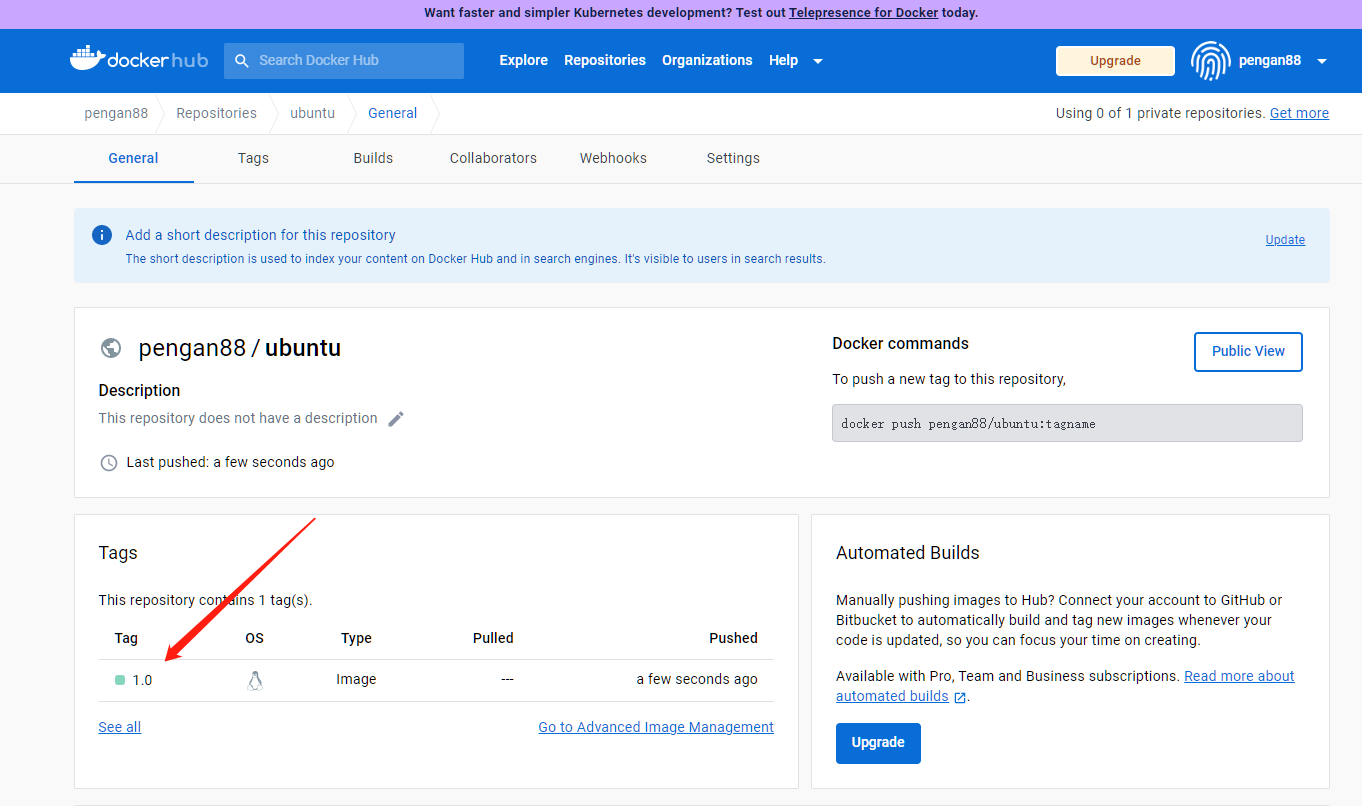
image-20230424152530278

Common commands
Docker data processing

COMPANY

  • About us
  • Team Style
  • Blog

LEARNING & EXPLORATION

  • Tutorials
  • Edge AI hardware
  • Educational robots
  • Embedded intelligent hardware

WHERE TO BUY

  • Yahboom Online Store
  • Amazon
  • Alibaba
  • AliExpress
  • Mercado

TECHNOLOGY SUPPORT

  • Email: support@yahboom.com

BE A DISTRIBUTOR

  • Email: sales@yahboom.com
QR Code

Copyright © 2017-2026 Yahboom. All Rights Reserved.

EN/中文