Welcome to Raspbot V2 repository
当製品の日本語版マニュアル資料は、こちらからご取得ください。
23.ROS2 TF2 coordinate transformation
23. ROS2 TF2 Coordinate Transformation
1. Introduction to TF2
Coordinate systems are a very familiar concept and a key foundation in robotics. In a complete robotic system, there are many coordinate systems. How do we manage the positional relationships between these coordinate systems? ROS provides a powerful coordinate system management tool: TF2.
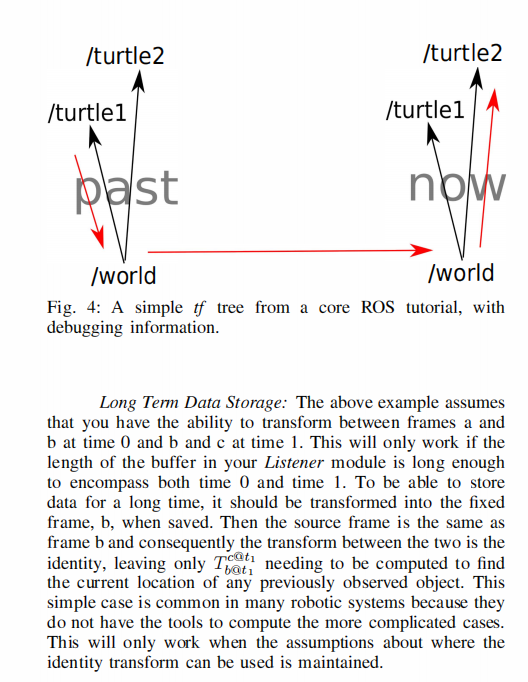
TF System Reference: tf: The transform library | IEEE Conference Publication | IEEE Xplore
2. Coordinate Systems in Robotics
Coordinate systems are also crucial in mobile robot systems. For example, the center point of a mobile robot is the base coordinate system (Base Link), and the position of the radar is called the laser link. As the robot moves, the odometry accumulates its position. The reference system for this position is called the odom coordinate system (odom). The odometry itself is subject to accumulated errors and drift. The reference system for absolute position is called the map coordinate system (map).
The relationships between layers of coordinate systems are complex. Some are relatively fixed, while others are constantly changing. Even seemingly simple coordinate systems can become complex within a spatial context, making a good coordinate system management system extremely important.
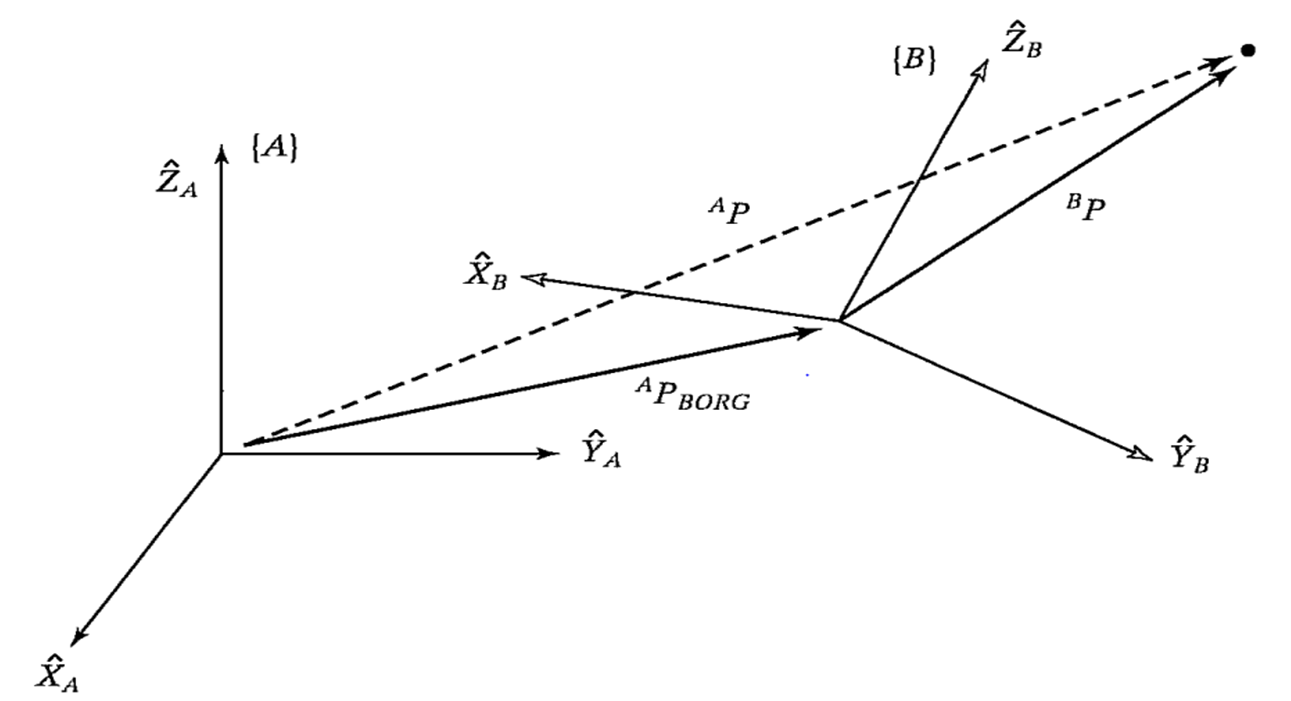
The basic theory of coordinate system transformations is explained in every robotics textbook. It can be broken down into two components: translation and rotation. These components are described by a four-by-four matrix. When plotting a coordinate system in space, the transformation between these two components is essentially a mathematical description of vectors.
The underlying principles of the TF functionality in ROS encapsulate these mathematical transformations. For detailed theoretical knowledge, please refer to robotics textbooks. We will primarily explain how to use the TF coordinate management system.
3. TF Command Line Operations
Let's first use an example with two turtles to understand a robot following algorithm based on coordinate systems. For ease of demonstration, this lesson is best conducted in a virtual machine
3.1 Installing Related Tools
This example requires installing the corresponding function packages, the TF turtle simulator example, and the TF tree visualization tool.
xxxxxxxxxxsudo apt install ros-${ROS_DISTRO}-turtle-tf2-py ros-humble-tf2-toolssudo pip3 install transforms3dsudo apt install ros-${ROS_DISTRO}-rqt-tf-tree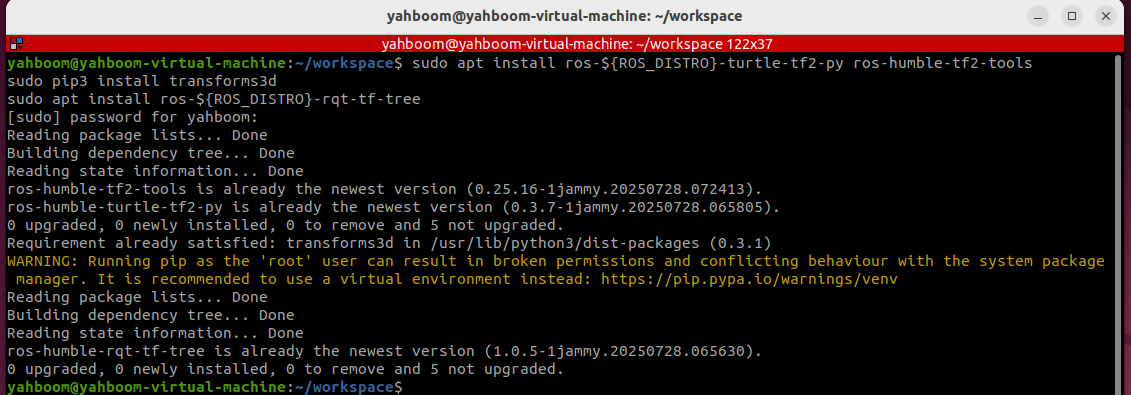
3.2 Starting Up
Then you can start the system using a launch file. You can then control one of the turtles, and the other will automatically follow.
xxxxxxxxxxros2 launch turtle_tf2_py turtle_tf2_demo.launch.pyros2 run turtlesim turtle_teleop_keyWhen we control the movement of one turtle, the other turtle will follow.
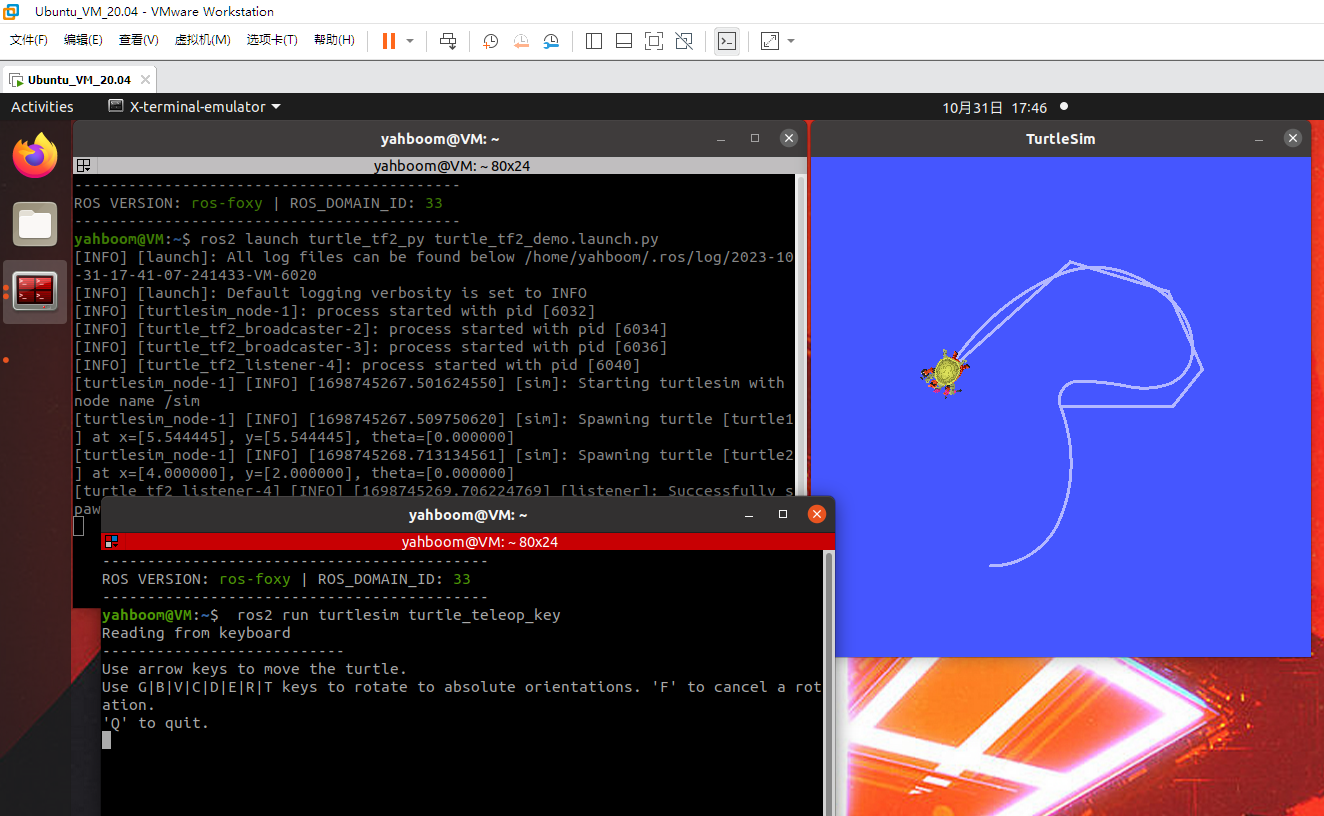
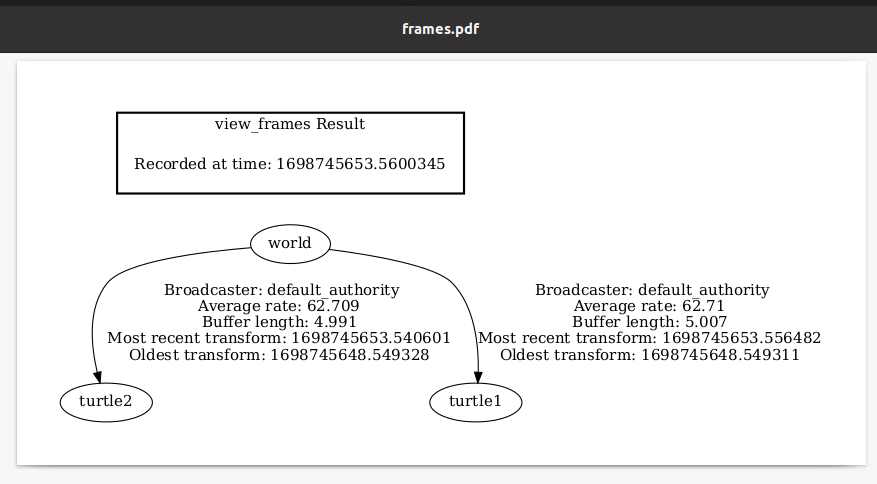
3.3 Viewing the TF Tree
xxxxxxxxxxros2 run rqt_tf_tree rqt_tf_tree
You can view the TF transformation tree in the rqt window.
3.4 Querying Coordinate Transformation Information
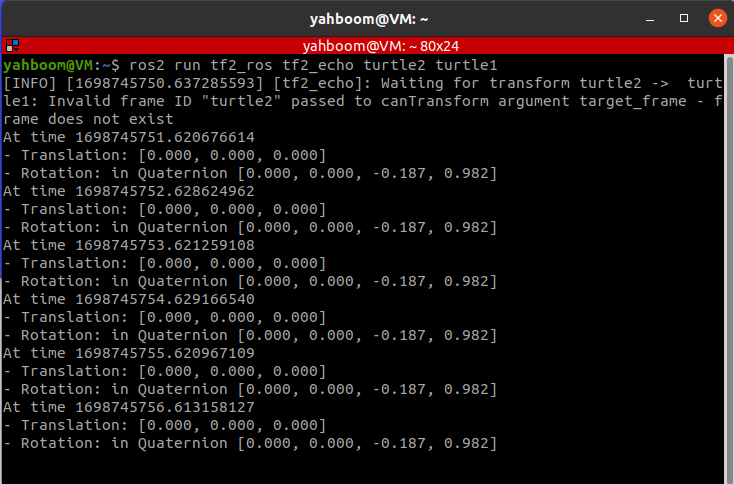
Just viewing the coordinate system structure is not enough. If we want to know the specific relationship between two coordinate systems, we can use the tf2_echo tool:
xxxxxxxxxxros2 run tf2_ros tf2_echo turtle2 turtle1After running successfully, the terminal will repeatedly print the coordinate system transformation values.
3.5 Coordinate System Visualization
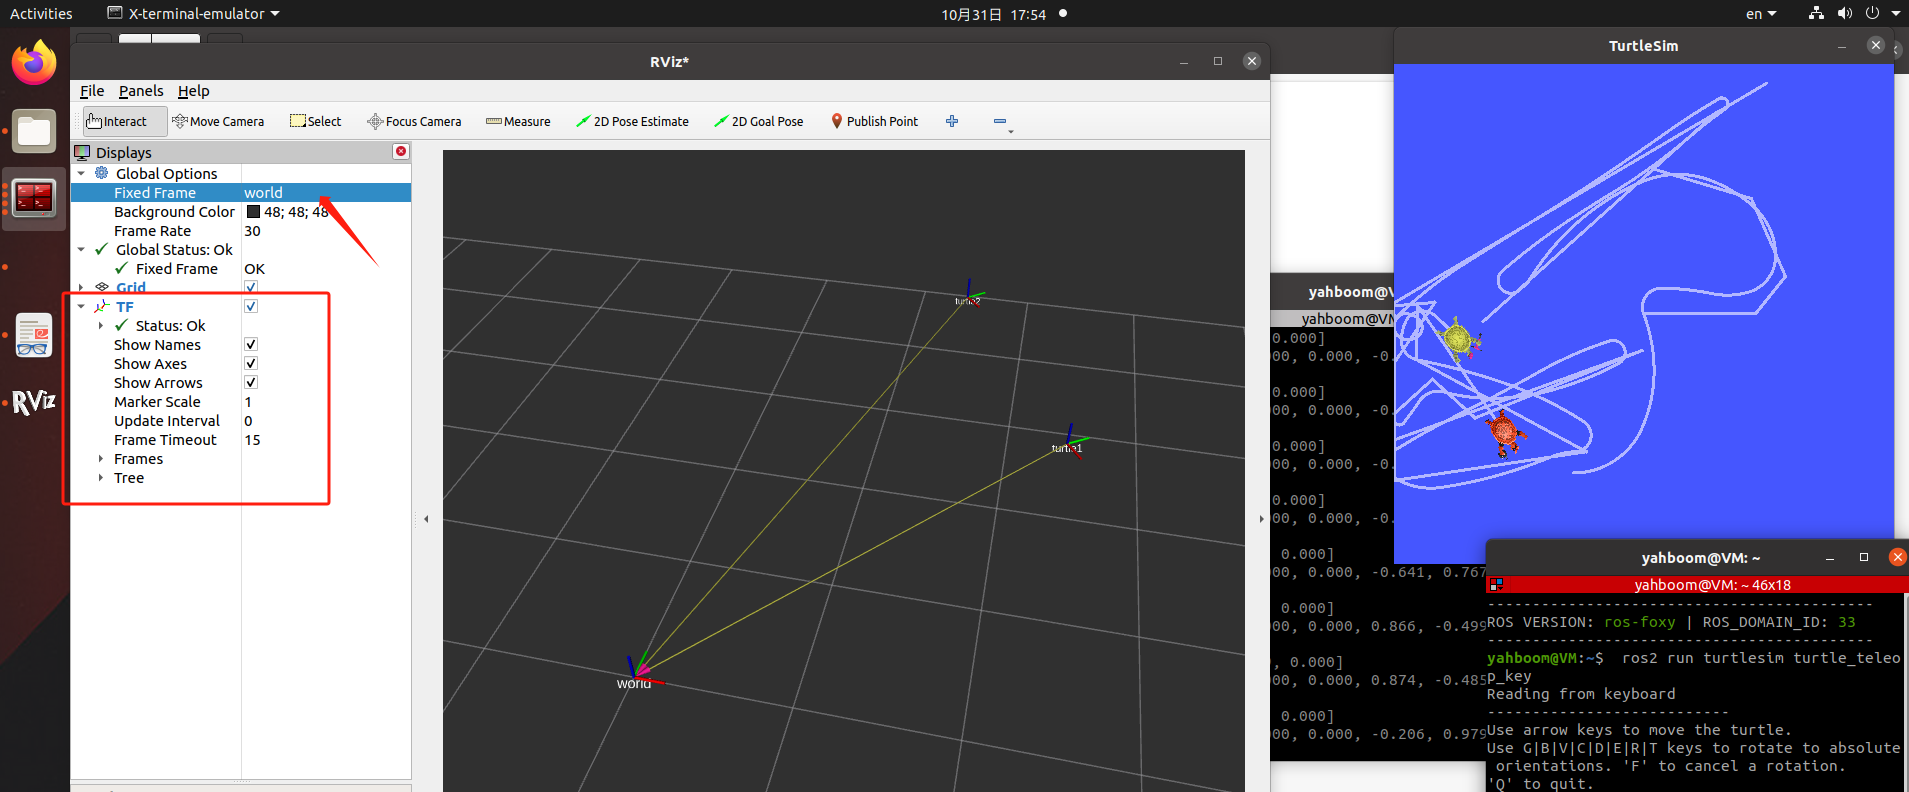
- Run rviz2 and add the TF display plugin.
xxxxxxxxxxrviz2
Set the reference coordinate system in rviz2 to "world," add the TF display plugin, and then animate the turtle. The coordinate axes in rviz will begin to move. Isn't this more intuitive?
4. Static Coordinate Transformation
A static coordinate transformation refers to a fixed relative position between two coordinate systems. For example, the position between the radar and base_link is fixed.
Example: For ease of demonstration, this lesson is best performed in a virtual machine
4.1. Publishing the pose from A to B
xxxxxxxxxxros2 run tf2_ros static_transform_publisher 0 0 3 0 0 3.14 A B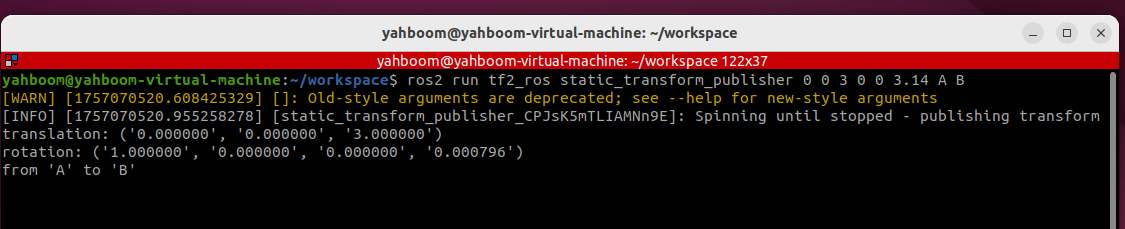
4.2. Monitoring/Getting TF Relationships
xxxxxxxxxxros2 run tf2_ros tf2_echo A B
4.3. RIVZ Visualization
- Run rviz2 and add the TF display plugin.
xxxxxxxxxxrviz2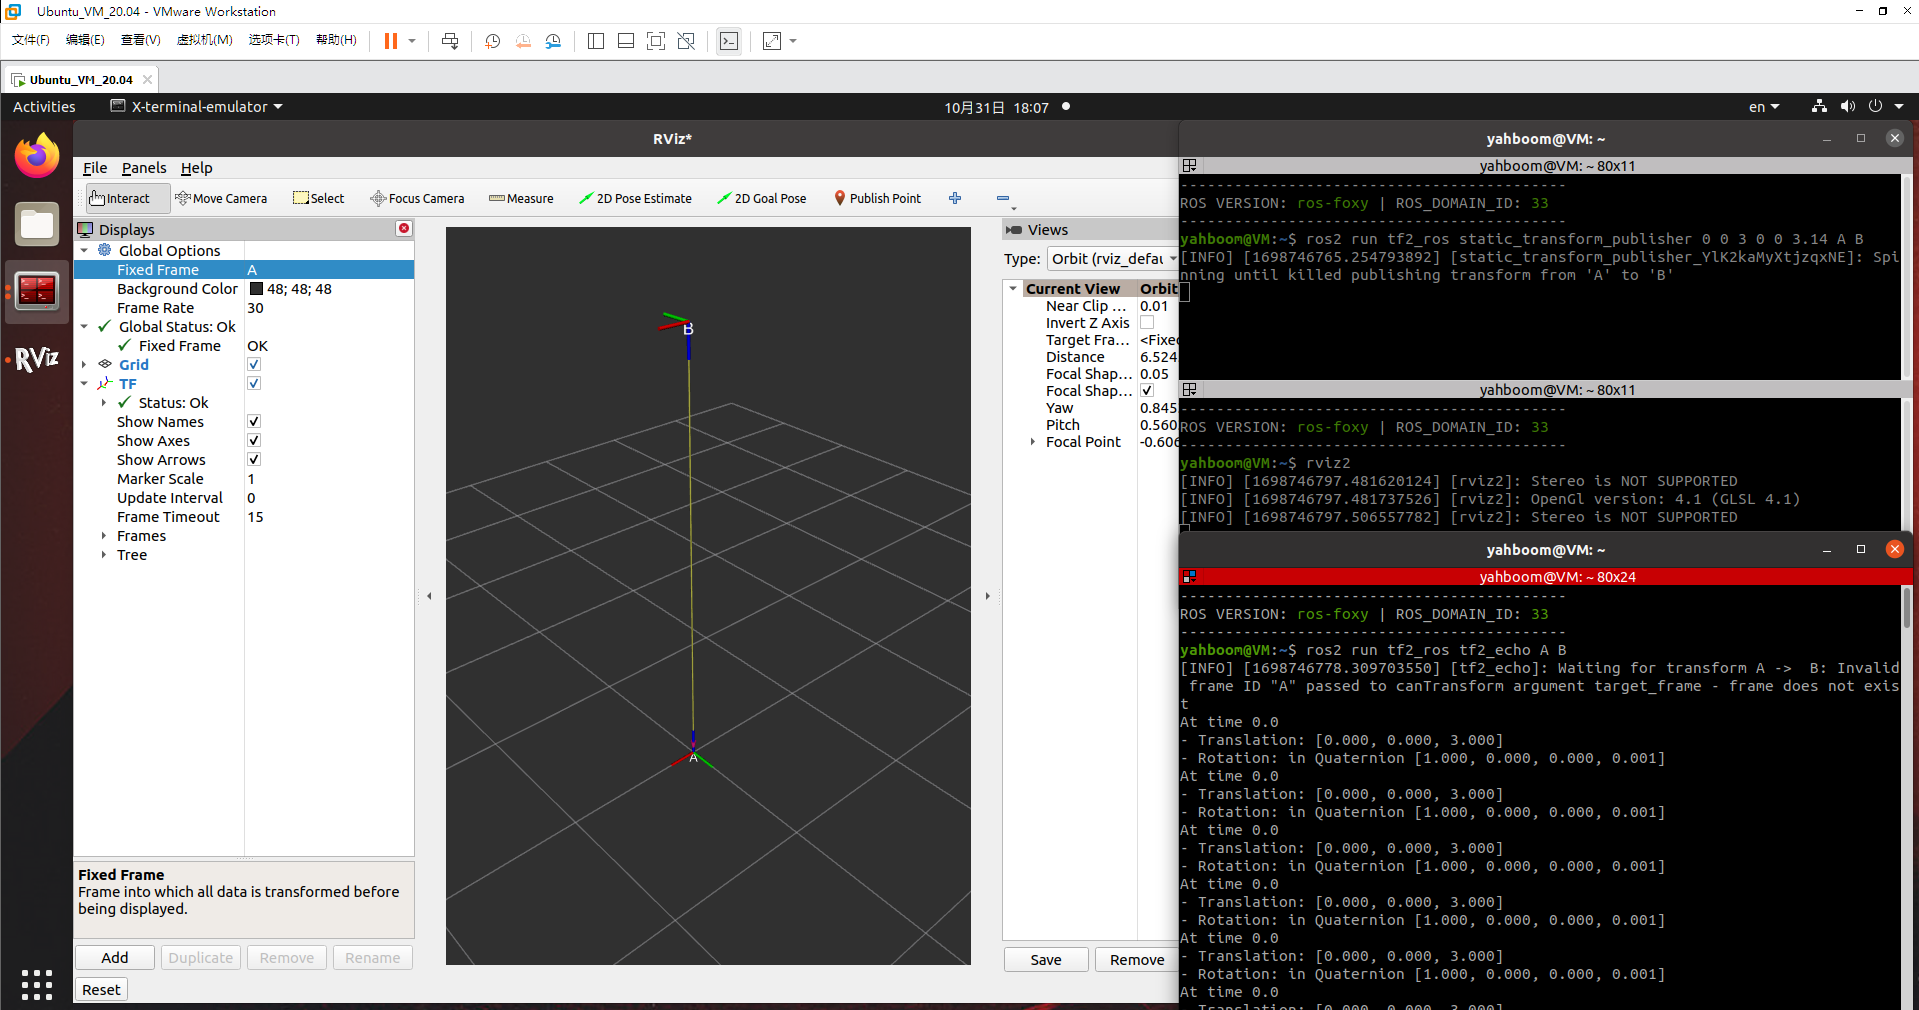
5. Case Introduction
In the previous lesson, we explained the TF relationship in the system-provided turtle following example. In this lesson, we will implement this functionality ourselves.
Course Content:
- Implementing a turtle-following example through programming
- Mastering the implementation of a dynamic broadcaster through programming
- Mastering the implementation of coordinate transformations between monitoring coordinate systems through programming
- Mastering the use of PID control to convert physical quantities (distance, angle) into speed control variables
Advanced Content:
- Understanding the TF system's ability to transform coordinate systems across time dimensions
6. Analysis of the Principles of the Turtle-Following Example
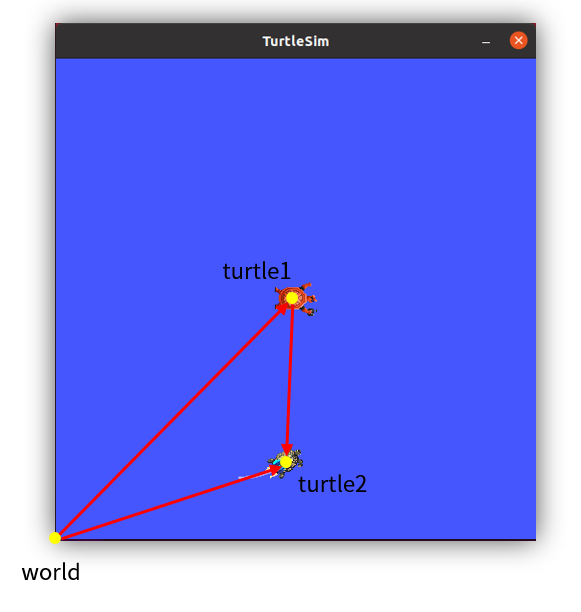
In a two-turtle simulator, we can define three coordinate systems. For example, the simulator's global reference system is called "world," and the turtle1 and turtle2 coordinate systems are at the center of the two turtles. Thus, the relative position of turtle1 and the world coordinate system represents the position of turtle1, and similarly for turtle2.
To make Turtle 2 move toward Turtle 1, we draw a line connecting the two and add an arrow. Does this remind you of vector calculations learned in high school? Vectors are used to describe coordinate transformations, so in this following example, TF can be used to solve this problem perfectly.
The length of a vector represents distance, and the direction represents angle. With distance and angle, we can calculate the speed by setting a random time. Then, we encapsulate and publish the speed topic, and Turtle 2 can start moving.
So the core of this example is to perform vector calculations using the coordinate system. Since the two turtles are constantly moving, the vectors must also be calculated according to a certain period. This requires the use of TF's dynamic broadcast and monitoring.
7. Create a new package
- Create a new package in the src directory of the workspace to store our files.
xxxxxxxxxxros2 pkg create pkg_tf --build-type ament_python --dependencies rclpy --node-name turtle_tf_broadcasterExecuting the above command will create the pkg_tf package and a turtle_tf_broadcaster node. The relevant configuration files will be configured. Add the following code to the turtle_tf_broadcaster.py file:
xxxxxxxxxximport rclpy # ROS2 Python interface libraryfrom rclpy.node import Node # ROS2 node classfrom geometry_msgs.msg import TransformStamped # Coordinate transformation messageimport tf_transformations # TF coordinate transformation libraryfrom tf2_ros import TransformBroadcaster # TF coordinate transformation broadcasterfrom turtlesim.msg import Pose # TurtleSim turtle position messageclass TurtleTFBroadcaster(Node): def __init__(self, name): super().__init__(name) # Initialize the ROS2 node parent class self.declare_parameter('turtlename', 'turtle') # Create a parameter for the turtle name self.turtlename = self.get_parameter( # Externally set parameter value takes precedence; otherwise, default value is used. 'turtlename').get_parameter_value().string_value self.tf_broadcaster = TransformBroadcaster(self) # Create and initialize a TF coordinate transformation broadcast object self.subscription = self.create_subscription( # Create a subscriber to subscribe to turtle position messages Pose, f'/{self.turtlename}/pose', # Use the turtle name obtained from the parameters self.turtle_pose_callback, 1) def turtle_pose_callback(self, msg): # Create a callback function to handle turtle position messages and convert them into coordinate transformations transform = TransformStamped() # Create a coordinate transformation message object transform.header.stamp = self.get_clock().now().to_msg() # Set the timestamp of the coordinate transformation message transform.header.frame_id = 'world' # Set the source coordinate system for the coordinate transformation transform.child_frame_id = self.turtlename # Set the target coordinate system for the coordinate transformation transform.transform.translation.x = msg.x # Set the X, Y, and Z translations in the coordinate transformation transform.transform.translation.y = msg.y transform.transform.translation.z = 0.0 q = tf_transformations.quaternion_from_euler(0, 0, msg.theta) # Convert Euler angles to quaternions (roll, pitch, yaw) transform.transform.rotation.x = q[0] # Set the X, Y, and Z rotations (quaternions) in the coordinate transformation transform.transform.rotation.y = q[1] transform.transform.rotation.z = q[2] transform.transform.rotation.w = q[3] # Send the transformation self.tf_broadcaster.sendTransform(transform) # Broadcast the coordinate transformation. When the turtle's position changes, the coordinate transformation information will be updated in time.def main(args=None): rclpy.init(args=args) # Initialize the ROS2 Python interface node = TurtleTFBroadcaster("turtle_tf_broadcaster") # Create and initialize a ROS2 node object rclpy.spin(node) # Loop and wait for ROS2 to exit node.destroy_node() # Destroy the node object rclpy.shutdown() # Shut down the ROS2 Python interface
- Next, create a new file [turtle_following.py] in the same directory as turtle_tf_broadcaster.py and add the following code:
xxxxxxxxxximport mathimport rclpy # ROS2 Python interface libraryfrom rclpy.node import Node # ROS2 node classimport tf_transformations # TF coordinate transformation libraryfrom tf2_ros import TransformException # TF left-side transformation exception classfrom tf2_ros.buffer import Buffer # Buffer class for storing coordinate transformation informationfrom tf2_ros.transform_listener import TransformListener # Listener class for coordinate transformationsfrom geometry_msgs.msg import Twist # ROS2 velocity control messagefrom turtlesim.srv import Spawn # Turtle spawning service interfaceclass TurtleFollowing(Node): def __init__(self, name): super().__init__(name) # Initialize the ROS2 node parent class self.declare_parameter('source_frame', 'turtle1') # Create a parameter for the source coordinate frame name self.source_frame = self.get_parameter( # Externally set parameter values ••take precedence; otherwise, use the default values. 'source_frame').get_parameter_value().string_value self.tf_buffer = Buffer() # Create a buffer to store coordinate transformation information self.tf_listener = TransformListener(self.tf_buffer, self) # Create a coordinate transformation listener self.spawner = self.create_client(Spawn, 'spawn') # Create a client to request turtle spawning self.turtle_spawning_service_ready = False # Flag indicating whether the turtle spawning service has been requested self.turtle_spawned = False # Flag indicating whether the turtle was successfully spawned self.publisher = self.create_publisher(Twist, 'turtle2/cmd_vel', 1) # Create a velocity topic for following the moving turtle self.timer = self.create_timer(1.0, self.on_timer) # Create a fixed-period timer to control the movement of the following turtle def on_timer(self): from_frame_rel = self.source_frame # Source coordinate system to_frame_rel = 'turtle2' # Target coordinate system if self.turtle_spawning_service_ready: # If the turtle spawning service has been requested if self.turtle_spawned: # If the follower turtle has been spawned try: now = rclpy.time.Time() # Get the current time in the ROS system trans = self.tf_buffer.lookup_transform( ## Monitor the coordinate transformation from the source coordinate system to the target coordinate system at the current moment to_frame_rel, from_frame_rel, now) except TransformException as ex: # If the coordinate transformation acquisition fails, report the exception self.get_logger().info( f'Could not transform {to_frame_rel} to {from_frame_rel}: {ex}') return msg = Twist() # Create a speed control message scale_rotation_rate = 1.0 # Calculate angular velocity based on the turtle's angle. msg.angular.z = scale_rotation_rate * math.atan2( trans.transform.translation.y, trans.transform.translation.x) scale_forward_speed = 0.5 # Calculate linear velocity based on the turtle's distance. msg.linear.x = scale_forward_speed * math.sqrt( trans.transform.translation.x ** 2 + trans.transform.translation.y ** 2) self.publisher.publish(msg) # Publish velocity command for the turtle to follow. else: # If the following turtle is not spawned. if self.result.done(): # Check if the turtle is spawned. self.get_logger().info( f'Successfully spawned {self.result.result().name}') self.turtle_spawned = True else: # Still no following turtle spawned. self.get_logger().info('Spawn is not finished') else: # If no turtle spawning service is requested if self.spawner.service_is_ready(): # If the turtle spawning server is ready request = Spawn.Request() # Create a request data request.name = 'turtle2' # Set the content of the request data, including turtle name, xy position, and posture request.x = float(4) request.y = float(2) request.theta = float(0) self.result = self.spawner.call_async(request) # Send service request self.turtle_spawning_service_ready = True # Set the flag to indicate that the request has been sent else: self.get_logger().info('Service is not ready') # Turtle spawning server is not readydef main(args=None): rclpy.init(args=args) # ROS2 Python interface initialization node = TurtleFollowing("turtle_following") # Create and initialize a ROS2 node object. rclpy.spin(node) # Loop and wait for ROS2 to exit. node.destroy_node() # Destroy the node object rclpy.shutdown() # Shut down the ROS2 Python interface.
- Create a new launch folder under the pkg_tf package, create a new file [turtle_following.launch.py] in the launch folder, and add the following content:
xxxxxxxxxxfrom launch import LaunchDescriptionfrom launch.actions import DeclareLaunchArgumentfrom launch.substitutions import LaunchConfigurationfrom launch_ros.actions import Nodedef generate_launch_description(): return LaunchDescription([ DeclareLaunchArgument('source_frame', default_value='turtle1', description='Target frame name.'), Node( package='turtlesim', executable='turtlesim_node', ), Node( package='pkg_tf', executable='turtle_tf_broadcaster', name='broadcaster1', parameters=[ {'turtlename': 'turtle1'} ] ), Node( package='pkg_tf', executable='turtle_tf_broadcaster', name='broadcaster2', parameters=[ {'turtlename': 'turtle2'} ] ), Node( package='pkg_tf', executable='turtle_following', name='listener', parameters=[ {'source_frame': LaunchConfiguration('source_frame')} ] ), ])
8. Edit the configuration file
8.1. Configuration in setup.py
- Import relevant libraries
xxxxxxxxxximport osfrom glob import glob- Add the turtle_following node information and add the following command to copy the launch file to the shared directory in the install.
xxxxxxxxxx(os.path.join('share',package_name,'launch'),glob('launch/*')),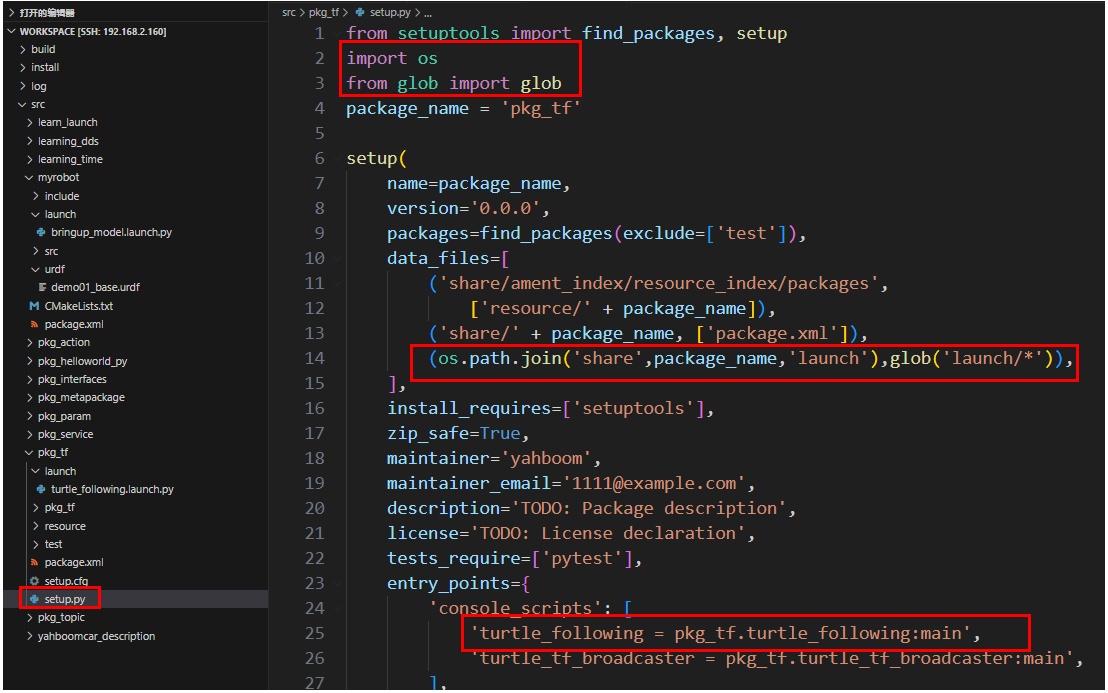
9. Compile the package
xxxxxxxxxxcolcon build --packages-select pkg_tf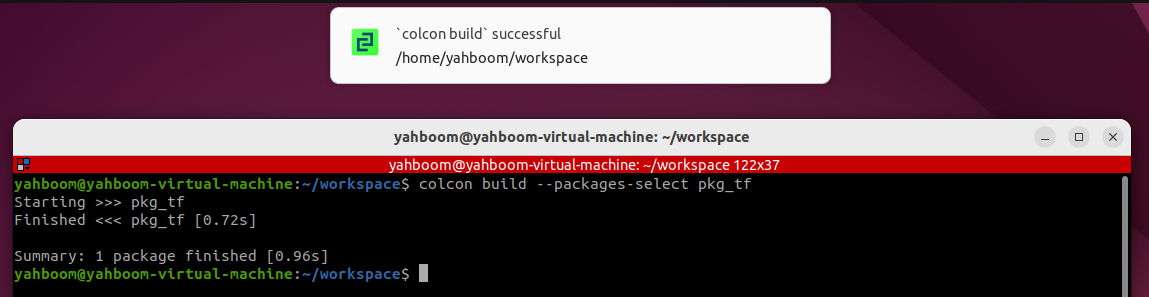
10. Run the Program
- Refresh the terminal environment variables, then run
xxxxxxxxxxros2 launch pkg_tf turtle_following.launch.py
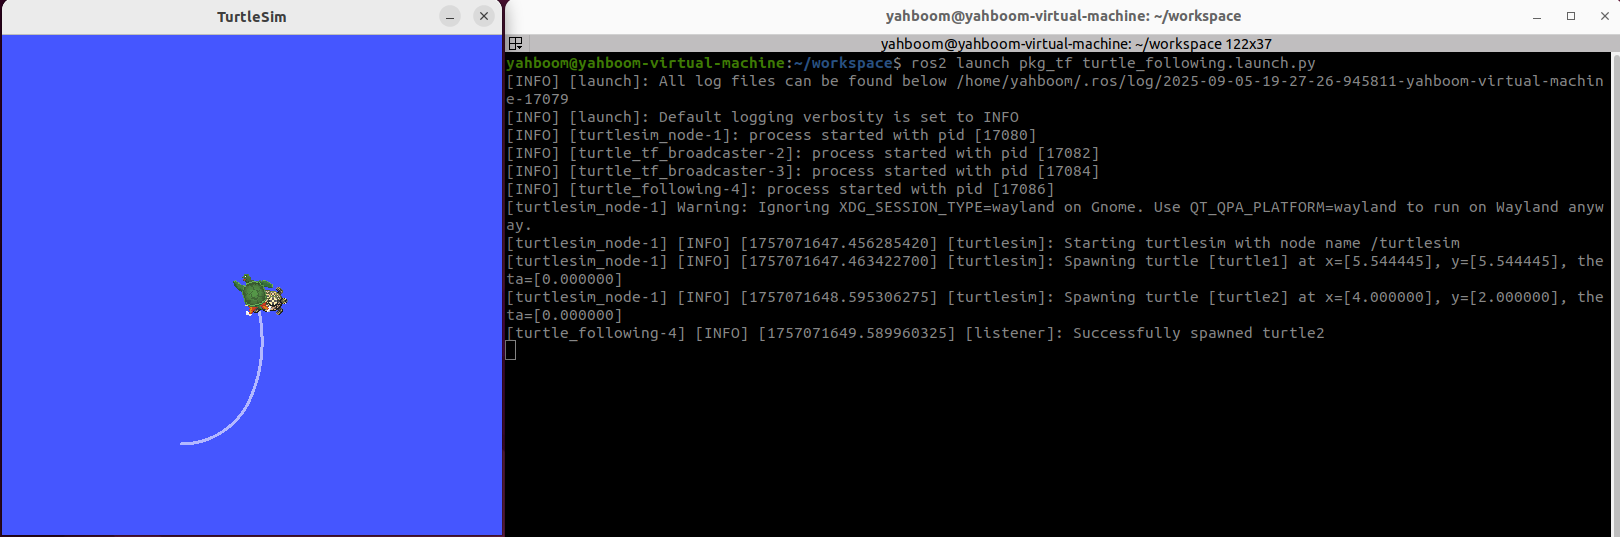
- Start the turtle keyboard control node, controlling the movement of the first turtle; the second turtle will automatically follow.
xxxxxxxxxxros2 run turtlesim turtle_teleop_key
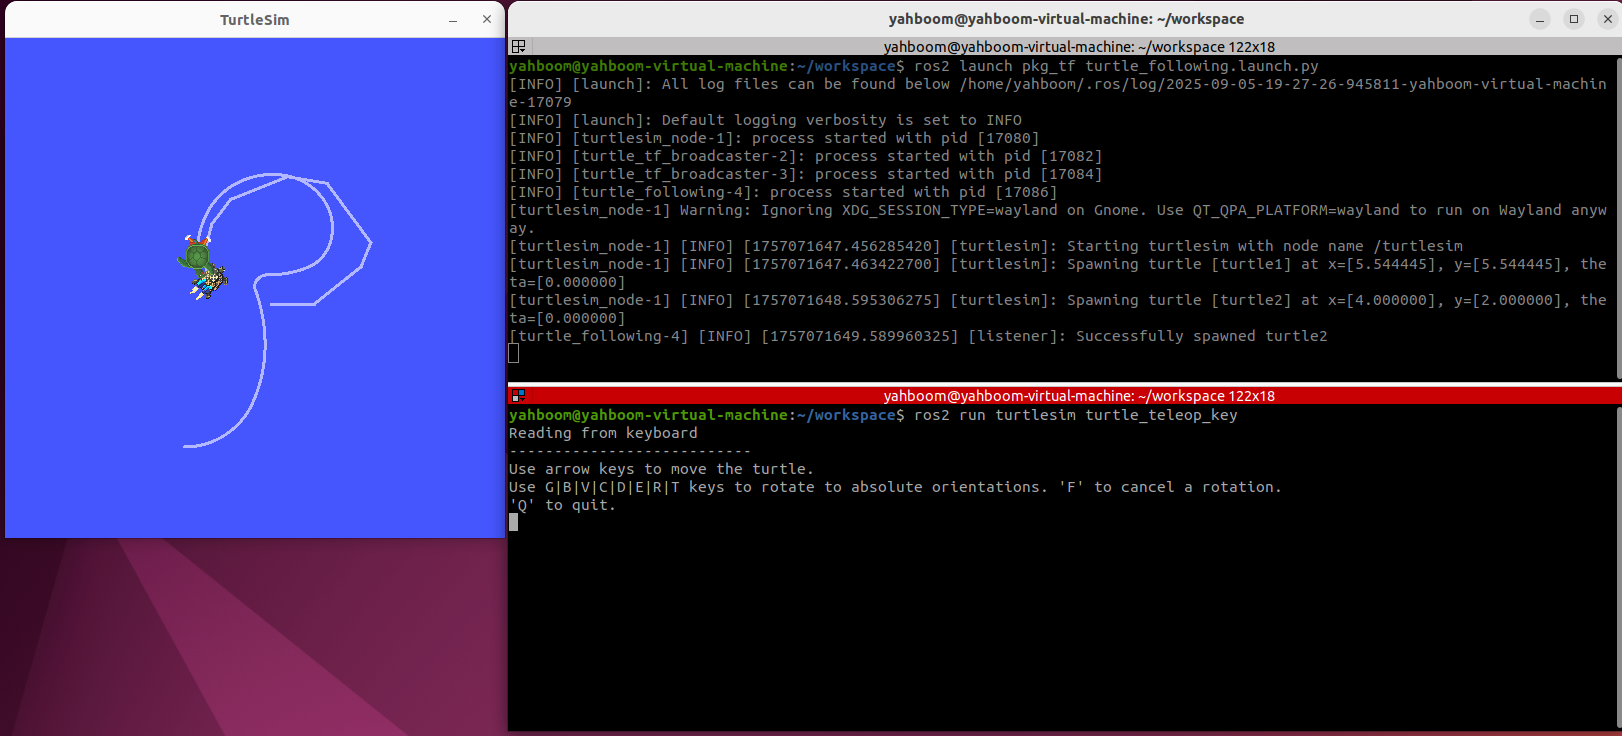
In this terminal, press the up, down, left, and right keys on your keyboard to control the movement of one turtle. The other turtle will follow until they overlap.
11. Advanced Content
- Understanding TF's Cross-Time Transformation Capabilities
Buffer automatically caches all TF transformation relationships within the TF system over the past 10 seconds (you can set any desired cache duration using the Buffer constructor). All transformations in the buffer are timestamp-based and traceable. Even if two coordinate systems are at different points in time, the transformation relationship between them can be found. For a detailed explanation of this principle, please refer to the references for designing TF systems (the references are in this section's folder, or you can click the link at the beginning of this section).

- The following is a supplement to the turtle following example above. The red arrow indicates that the transformation between two coordinate systems at different points in time can be found across time.