Welcome to Raspbot V2 repository
当製品の日本語版マニュアル資料は、こちらからご取得ください。
6.Face recognition
6. Face recognition
6.1. Face Recognition
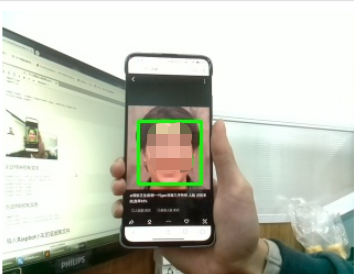
The most basic task of face recognition is "face detection". You must first "capture" a face in order to recognize it when comparing it with a new face in the future. We only provide the face detection method here. Interested students can build their own classifiers and their own face datasets for name recognition. The most common way to detect faces is to use "Haar cascade classifiers". Object detection using cascade classifiers based on Haar features is an efficient object detection method proposed by Paul Viola and Michael Jones in the paper "Rapid Object Detection using a Boosted Cascade of Simple Features" in 2001. This machine learning method is based on training cascade functions with a large number of positive and negative images, which are then used to detect objects in other images. Here, we will use it for face recognition. Initially, the algorithm requires a large number of positive images (face images) and negative images (images without faces) to train the classifier. Then we need to extract features from them. The good news is that OpenCV has trainers and detectors. If you want to train your own object classifier, such as cars, airplanes, etc., you can create one using OpenCV. Here we use a pre-trained classifier. In OpenCV, static images and real-time video face detection have similar operations. In layman's terms, video face detection is just reading each frame of the image from the camera and then detecting it using the static image detection method. Face detection first requires a classifier:
@ Face detector (default): haarcascade_frontalface_default.xml
@ Face detector (fast Harr): haarcascade_frontalface_alt2.xml
@ Face detector (side view): haarcascade_profileface.xml
@ Eye detector (left eye): haarcascade_lefteye_2splits.xml
@ Eye detector (right eye): haarcascade_righteye_2splits.xml
@ Mouth detector: haarcascade_mcs_mouth.xml
@ Nose detector: haarcascade_mcs_nose.xml
@ Body detector: haarcascade_fullbody.xml
@ Face detector (fast LBP): lbpcascade_frontalface.xml
@ Only open eyes can be detected:
@ haarcascade_eye.xml
@ haarcascade_eye_tree_eyeglasses.xml [Only when the person being tested is wearing glasses]
@ https://github.com/opencv/opencv/tree/master/data Download classifier file location
@ Note that the following return values are all four: coordinate X, coordinate Y, width W, height H
haarcascade_profileface.xml is Haar cascade data, which can be obtained from data/haarcascades in the OpenCV3 source code. Next, actual face detection is performed through face_cascade.detectMultiScale(). We cannot directly pass each frame of the image obtained by the camera into .detectMultiScale(), but should first convert the image into a grayscale image, because face detection requires such a color space.
(Note: Be sure to enter the correct location of haarcascade_profileface.xml.)
6.2. OpenCV detection API function:
detectMultiScale(const Mat& image, vector& objects, double scaleFactor=1.1,int minNeighbors, int flag,cvSize)
image: the input grayscale image
objects: the rectangular box vector group of the detected object
scaleFactor: the scale parameter in each image scale, the default value is 1.1. The scale_factor parameter can determine how big the jump is between two window scans of different sizes. If this parameter is set large, the calculation will be faster, but if the window misses a face of a certain size, the object may be lost.
minNeighbors: The parameter is the number of neighbors that each cascade rectangle should retain, the default is 3.
minNeighbors controls false detections, and the default value of 3 indicates that there are at least 3 overlapping detections before we think that the face really exists.
minSize: minimum size of the target
maxSize: maximum size of the target
6.3. Code implementation
Source code path:
/home/pi/project_demo/07.AI_Visual_Recognition/06.Face_recognition/06_Face_recognition.ipynb
x#bgr8转jpeg格式 bgr8转jpeg格式 bgr8 to jpeg formatimport enumimport cv2
def bgr8_to_jpeg(value, quality=75): return bytes(cv2.imencode('.jpg', value)[1])xxxxxxxxxx#摄像头显示组件 Camera display assemblyimport cv2import ipywidgets.widgets as widgetsimport threadingimport timeimport sysxxxxxxxxxximage = cv2.VideoCapture(0) #打开摄像头/dev/video0 Open the camera /dev/video0image.set(3,320)image.set(4,240)image.set(cv2.CAP_PROP_BRIGHTNESS, 0.0) #设置亮度 -64 - 64 0.0 Set Brightness -64 - 64 0.0image.set(cv2.CAP_PROP_CONTRAST, 2.0) #设置对比度 -64 - 64 2.0 Set Contrast -64 - 64 2.0image.set(cv2.CAP_PROP_EXPOSURE, 156.0) #设置曝光值 1.0 - 5000 156.0 Set the exposure value 1.0 - 5000 156.0ret, frame = image.read()
# from picamera2 import Picamera2, Preview# import libcamera# picam2 = Picamera2() # camera_config = picam2.create_preview_configuration(main={"format":'RGB888',"size":(320,240)})# camera_config["transform"] = libcamera.Transform(hflip=1, vflip=1)# picam2.configure(camera_config) # picam2.start() # frame = picam2.capture_array()image_widget = widgets.Image(format='jpeg', width=640, height=480)image_widget.value = bgr8_to_jpeg(frame)xxxxxxxxxx# 线程功能操作库 Thread function operation libraryimport inspectimport ctypesdef _async_raise(tid, exctype): """raises the exception, performs cleanup if needed""" tid = ctypes.c_long(tid) if not inspect.isclass(exctype): exctype = type(exctype) res = ctypes.pythonapi.PyThreadState_SetAsyncExc(tid, ctypes.py_object(exctype)) if res == 0: raise ValueError("invalid thread id") elif res != 1: # """if it returns a number greater than one, you're in trouble, # and you should call it again with exc=NULL to revert the effect""" ctypes.pythonapi.PyThreadState_SetAsyncExc(tid, None) def stop_thread(thread): _async_raise(thread.ident, SystemExit)xxxxxxxxxx# body_haar = cv2.CascadeClassifier("haarcascade_upperbody.xml")face_haar = cv2.CascadeClassifier("haarcascade_frontalface_default.xml") #检测人脸 Detecting faceseye_haar = cv2.CascadeClassifier("haarcascade_eye_tree_eyeglasses.xml") #检测戴眼镜的眼睛 Detecting eyes with glassesdef Camera_display(): while 1: ret, frame = image.read() # frame = picam2.capture_array() # 把图像转为黑白图像 Convert the image to black and white gray_img = cv2.cvtColor(frame, cv2.COLOR_BGR2GRAY)# # 检测图像中的所有行人 Detect all pedestrians in the image# bodies = body_haar.detectMultiScale(gray_img, 1.3, 5)# for body_x,body_y,body_w,body_h in bodies:# cv2.rectangle(frame, (body_x, body_y), (body_x+body_w, body_y+body_h), (0,255,0), 2)
# detectMultiScale(const Mat& image, vector& objects, double scaleFactor=1.1,int minNeighbors, int flag,cvSize)# 1. image为输入的灰度图像 # 2. objects为得到被检测物体的矩形框向量组 # 3. scaleFactor为每一个图像尺度中的尺度参数,默认值为1.1。scale_factor参数可以决定两个不同大小的窗口扫描之间有多大的跳跃,这个参数设置的大,则意味着计算会变快,但如果窗口错过了某个大小的人脸,则可能丢失物体。# 4. minNeighbors参数为每一个级联矩形应该保留的邻近个数(没能理解这个参数,-_-|||),默认为3。minNeighbors控制着误检测,默认值为3表明至少有3次重叠检测,我们才认为人脸确实存。# 5. minSize为目标的最小尺寸# 6. minSize为目标的最大尺寸
# 1. image is the input grayscale image# 2. objects is the rectangular box vector group of the detected object# 3. scaleFactor is the scale parameter in each image scale, and the default value is 1.1. The scale_factor parameter can determine how big the jump is between two window scans of different sizes. If this parameter is set large, the calculation will be faster, but if the window misses a face of a certain size, the object may be lost.# 4. The minNeighbors parameter is the number of neighbors that each cascade rectangle should retain (I didn't understand this parameter, -_-|||), and the default value is 3. minNeighbors controls false detections. The default value of 3 indicates that there are at least 3 overlapping detections before we think that the face really exists.# 5. minSize is the minimum size of the target# 6. minSize is the maximum size of the target faces = face_haar.detectMultiScale(gray_img, 1.1, 3) for face_x,face_y,face_w,face_h in faces: cv2.rectangle(frame, (face_x, face_y), (face_x+face_w, face_y+face_h), (0,255,0), 2) #绿色线框框出检测到的人脸 eyes = eye_haar.detectMultiScale(gray_img, 1.1, 3) for eye_x,eye_y,eye_w,eye_h in eyes: cv2.rectangle(frame, (eye_x,eye_y), (eye_x+eye_w, eye_y+eye_h), (255,0,0), 2) #蓝色线框框出检测到的戴眼镜的眼睛 image_widget.value = bgr8_to_jpeg(frame) time.sleep(0.010)xxxxxxxxxxdisplay(image_widget)#启动线程 Starting a Threadthread1 = threading.Thread(target=Camera_display)thread1.daemon=Truethread1.start()xxxxxxxxxx#结束进程,释放摄像头,需要结束时执行 End the process, release the camera, and execute when it is finishedstop_thread(thread1)# picam2.stop()# picam2.close()image.release()