Welcome to ROSMASTER M3 repository
6.Path Replanning
Path Replanning
Path Replanning1. Course Content2. Edit Road Network3. Run Path Replanning Case3.1 Start Agent3.2 Start Sensors and Odometry3.3 Start Road Network Planning and Navigation Node4. Query Obstacle Cost Threshold4.1 View Obstacle Cost Values4.2 Modify Threshold for Triggering Replanning5. Source Code Analysis5.1 Obstacle Detection and Replanning Strategy5.2 Query Map Cost Value Implementation Method
1. Course Content
Basic
Run the example program. On the basis of road network planning and navigation, if it is detected that the driving path is blocked during driving, it will enter replanning to find a new path in the road network
Advanced
- Understand the implementation method of replanning and how to change the replanning strategy (strategies are not unique, you can implement them according to your needs)
- Debug and change obstacle detection thresholds according to queried cost values
2. Edit Road Network
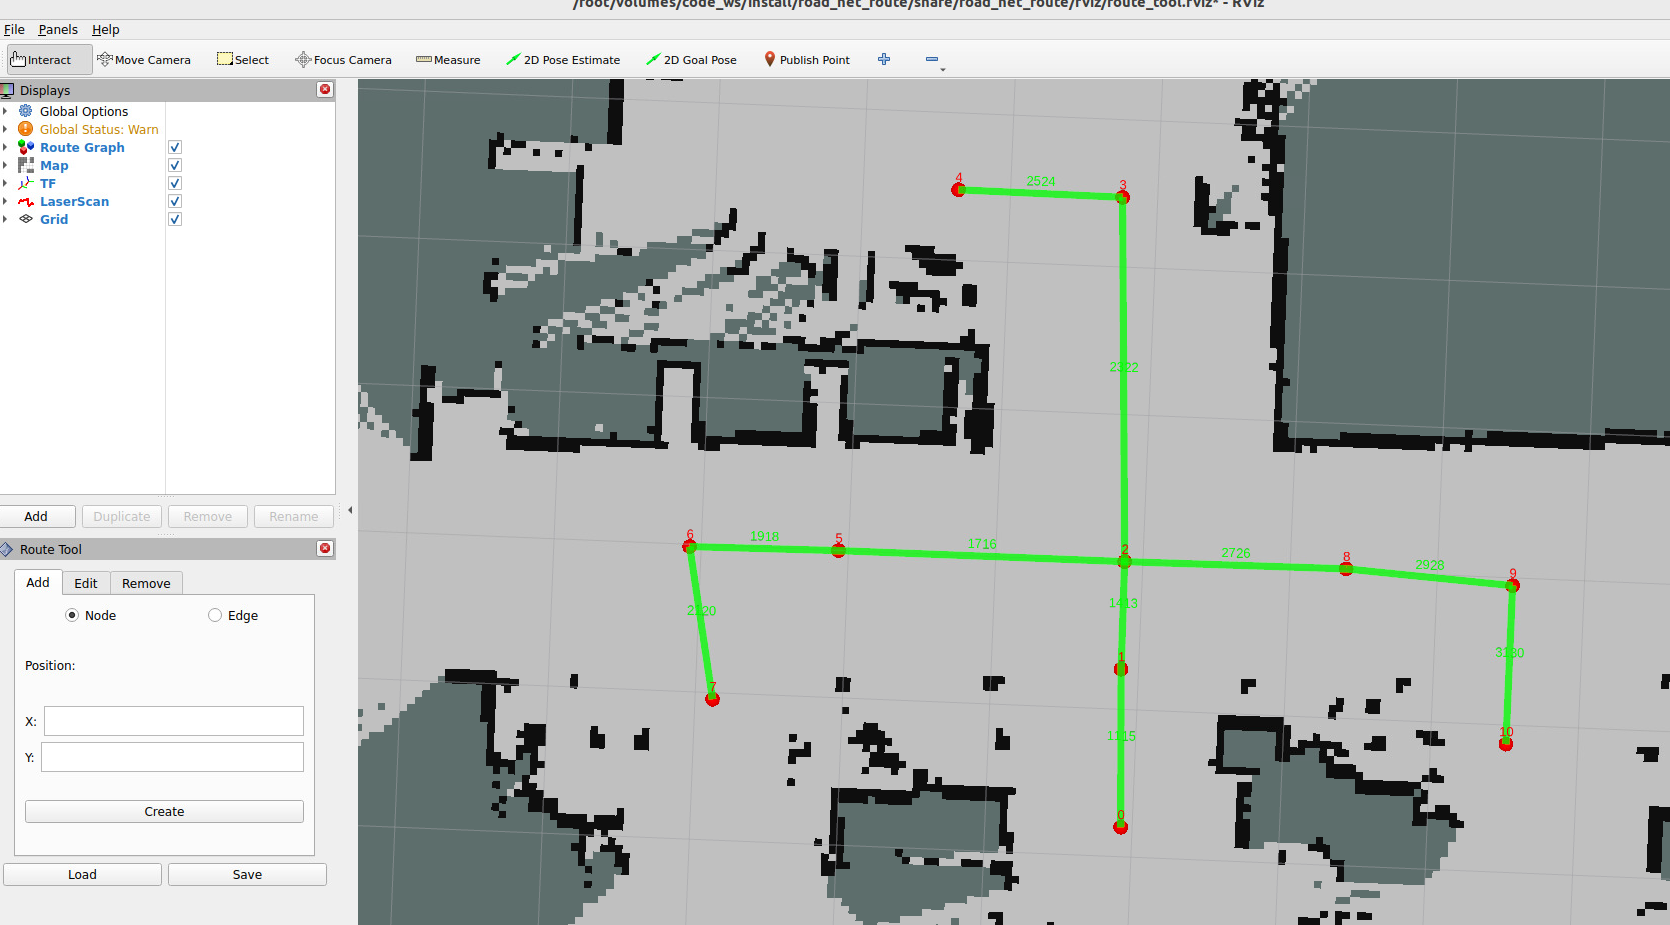
- To demonstrate the replanning function, we add some edges to the road network in the previous course example. For opening and editing road network operations, refer to: Section 4 of 03-Road Network Annotation: Loading and Modifying Road Network Description
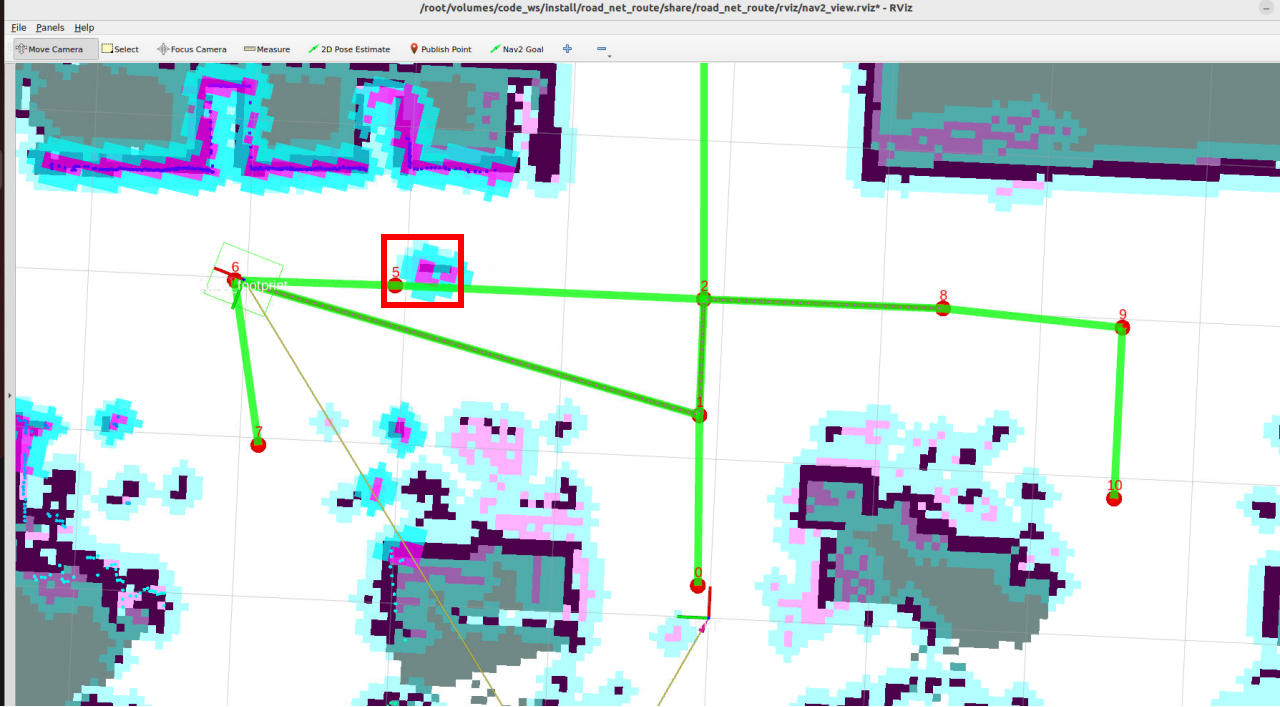
- For example, add bidirectional edges between waypoints 1 and 6
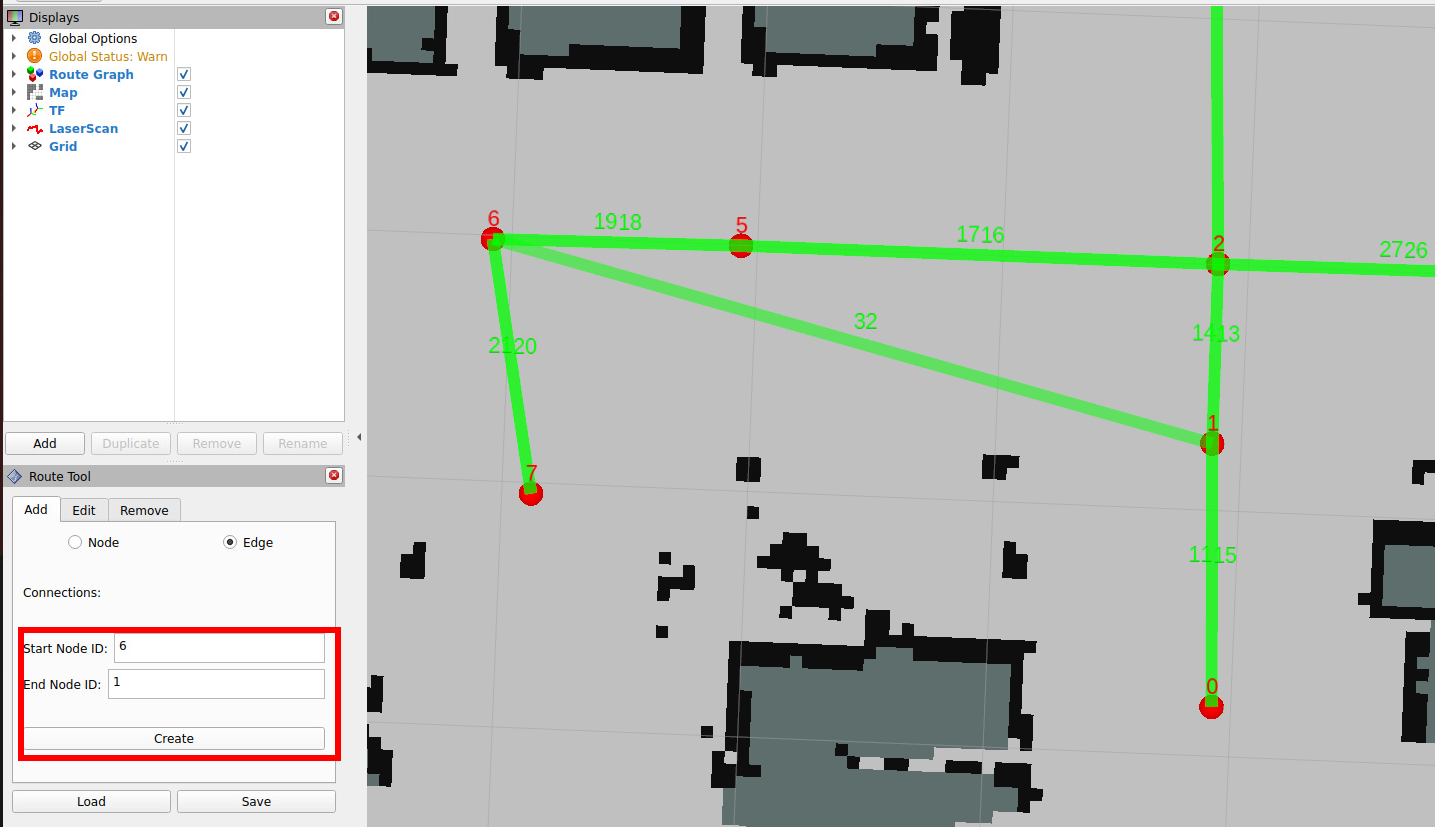
- All operations will have corresponding records in the terminal

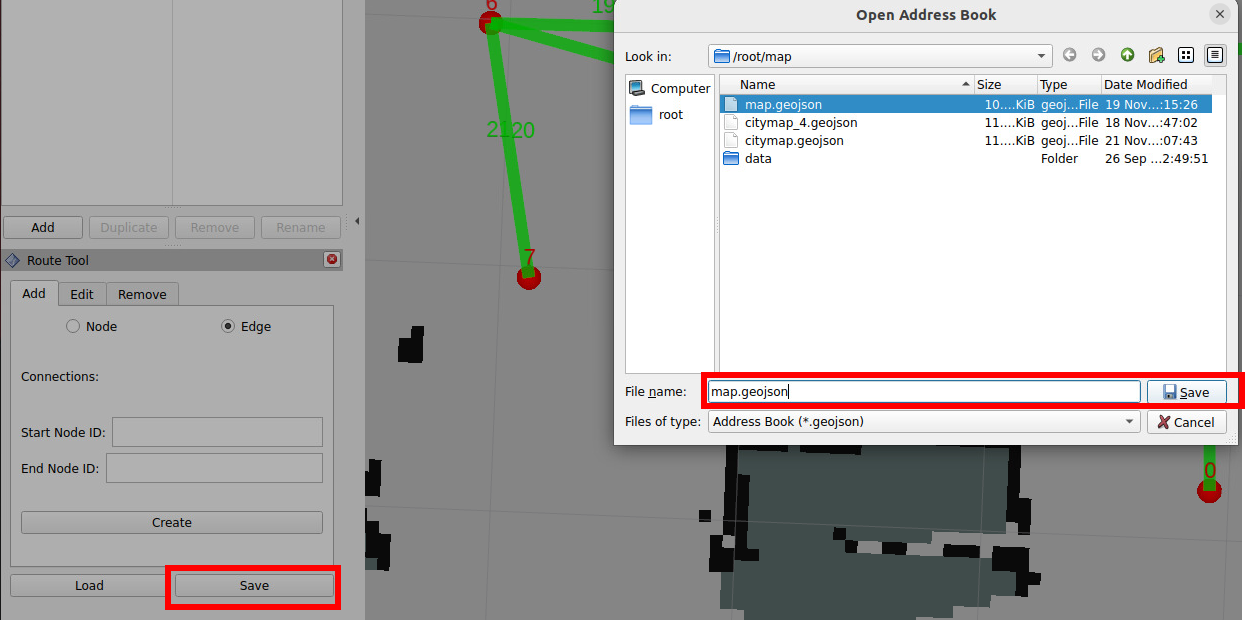
- Then save the file
3. Run Path Replanning Case
3.1 Start Agent
- Use the following command to start the microROS agent and connect to the chassis
[!WARNING]
The commands for starting the agent, sensors and odometry, and road network planning navigation nodes here are the same as the previous lesson. If already started, no need to start again
start_kilted_agent
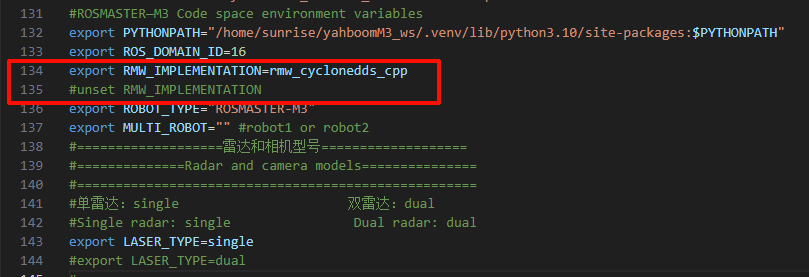
- Modify ROS communication middleware DDS
[!WARNING]
For Raspberry Pi 5 users, if the ROS container is not started, you need to start the container first,
xxxxxxxxxxbringup_m3Open a terminal inside the container,
xxxxxxxxxxexec_m3Open ~/.bashrc, uncomment this line, and change it to the DDS communication middleware as shown in the figure (only the road network planning and navigation chapter needs to use cyclondds, please restore the environment variables after completing the road network chapter!!)
xxxxxxxxxxvim ~/.bashrc
- RDK & PI5 mainboards
- ORIN mainboard
xxxxxxxxxx:wq #Save and exitsource ~/.bashrc #Update environment

3.2 Start Sensors and Odometry
- Open a terminal on the host to start the vehicle's radar fusion node and odometry fusion
- (For PI5 users, start in the
m3 container)
xxxxxxxxxxros2 launch m3_bringup car_base.launch.py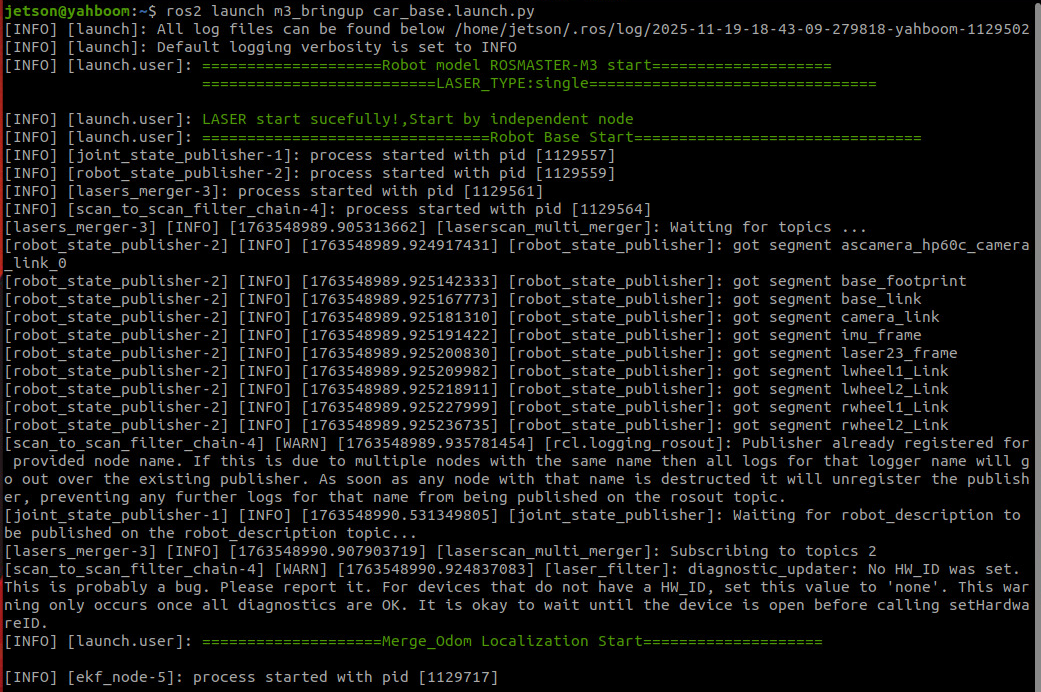
3.3 Start Road Network Planning and Navigation Node
- If the ros2_kilted docker container is not started, you need to start the container first
xxxxxxxxxxbringup_ros2kilted- Open a terminal inside the container
xxxxxxxxxxexec_ros2kilted- (PI5 & RDK mainboards) Visualization is started on the accompanying virtual machine
Rosmaster-RoadNet-Ubuntu24.04,
xxxxxxxxxxrviz2 -d /home/yahboom/code_ws/src/road_net_route/rviz/nav2_view.rviz - Start road network planning and navigation node
xxxxxxxxxxros2 launch road_net_route roadnet_nav2.launch.py[!TIP]
Optional startup parameter description
map The grid map file name to be loaded, default value is
map.yamlpose_map The pose map file name to be loaded. When the navigation global positioning method uses slam_toolbox pure localization, the pose map must be passed, default value is
mapparams_file Navigation parameter file, default value is
os.path.join(get_package_share_directory('road_net_route'), 'config', 'nav2_kilted.yaml')roadnet_file Road network description file, default value is
map.geojsonlocalization_mode Global positioning method, default is
slam_toolbox
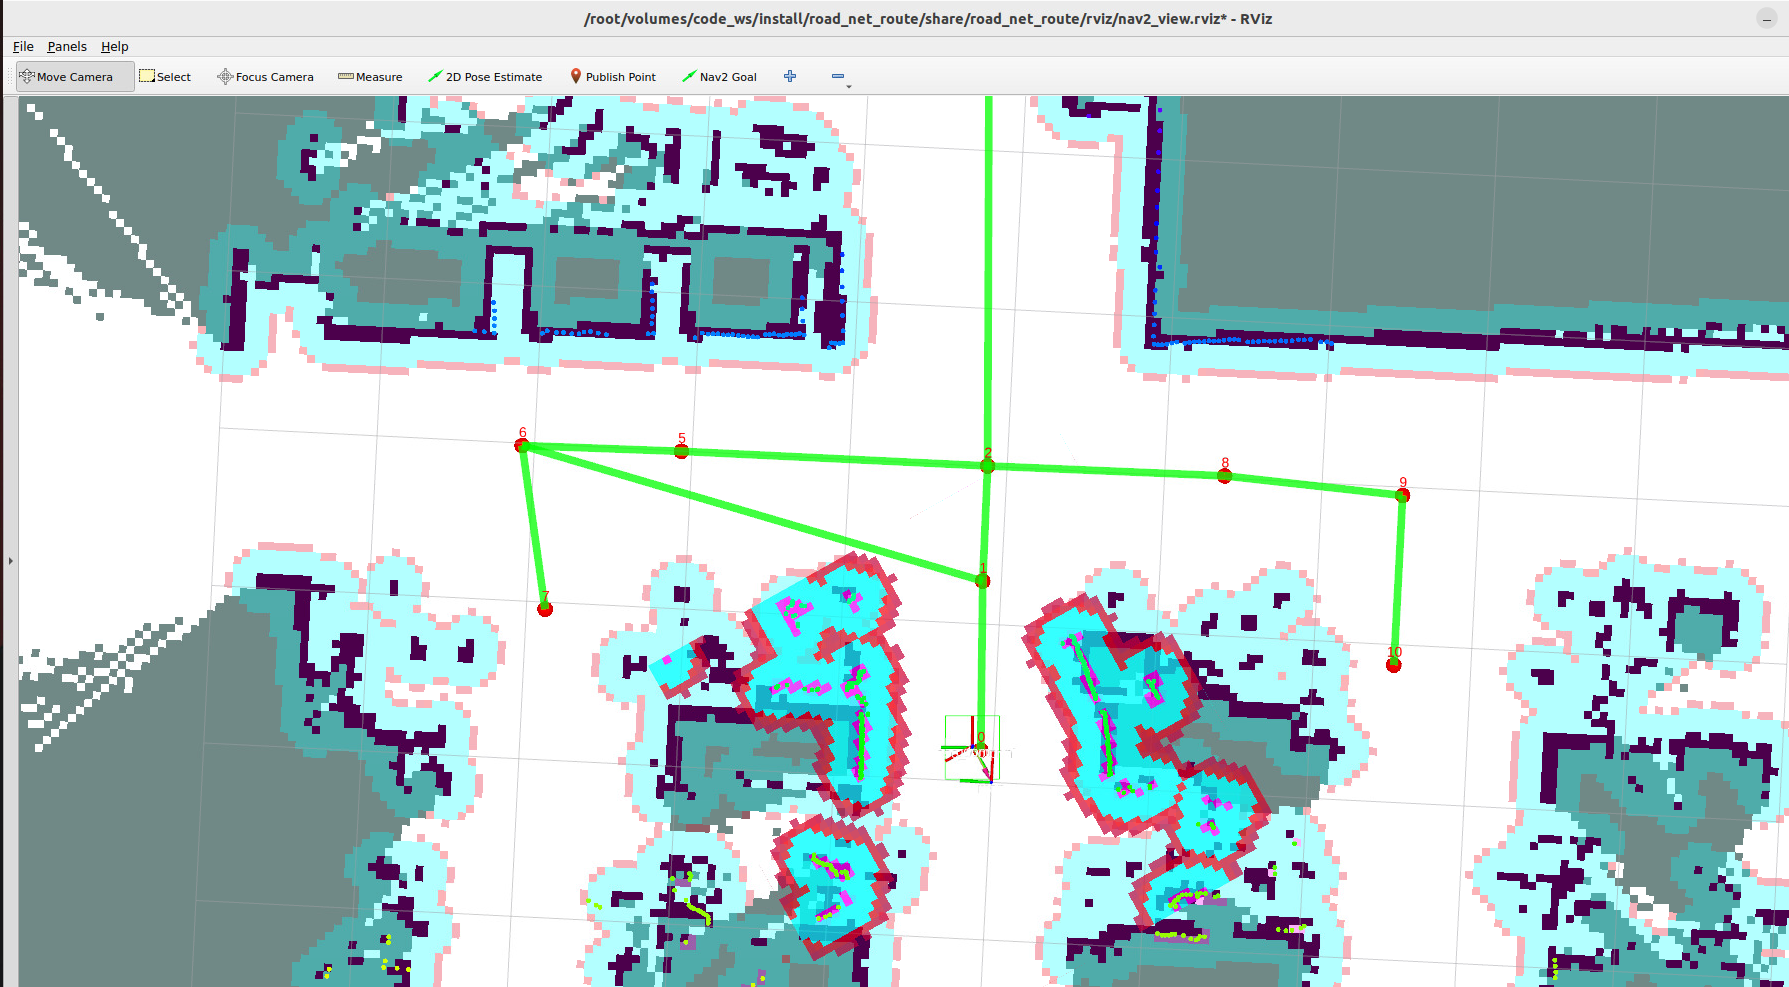
- The test scenario here is: travel from waypoint 8 along the road network to waypoint 6, then place obstacles on the path planned by the road network to trigger the replanning strategy
xxxxxxxxxxros2 topic pub -1 /road_net_nav_id std_msgs/msg/Int16MultiArray "{data: [8, 6]}"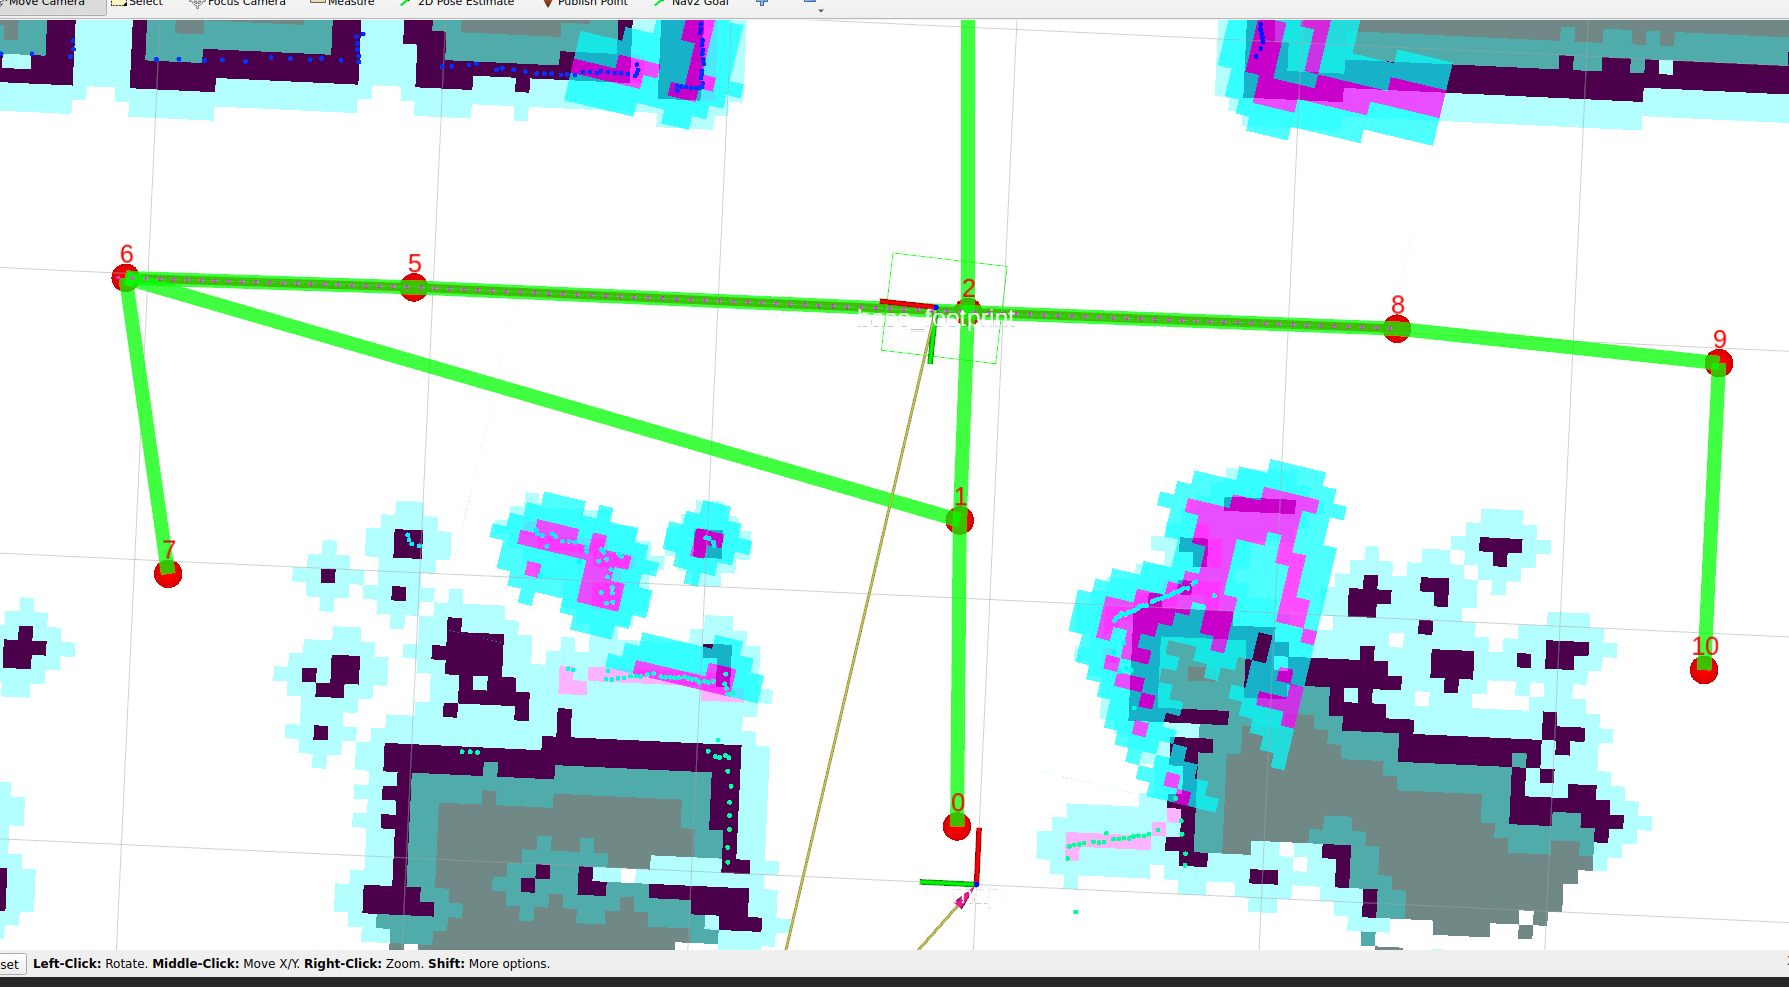
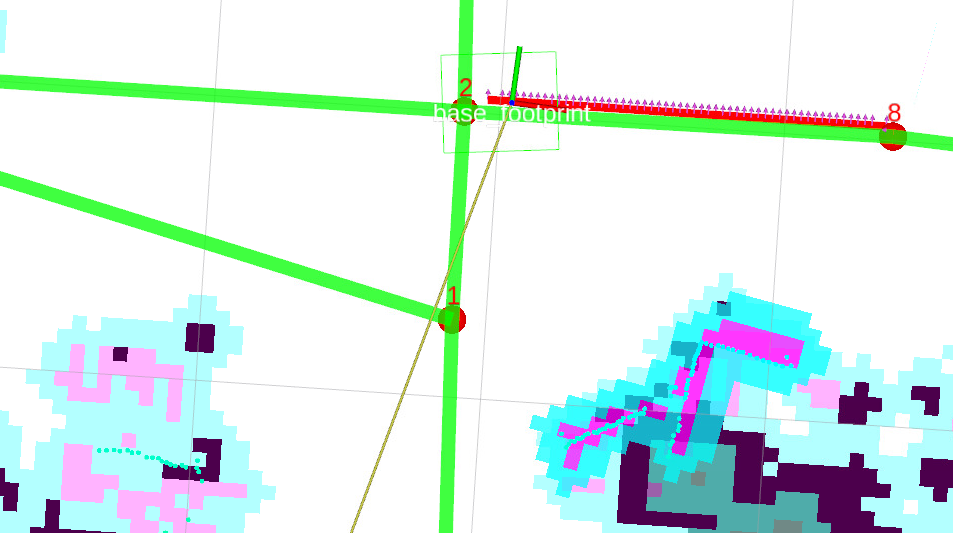
- Here you can see the terminal will prompt that there are obstacles on the path, then trigger replanning

- Here it is detected that there are obstacles on the path, after the path is impassable, retreat to the last passed waypoint 8
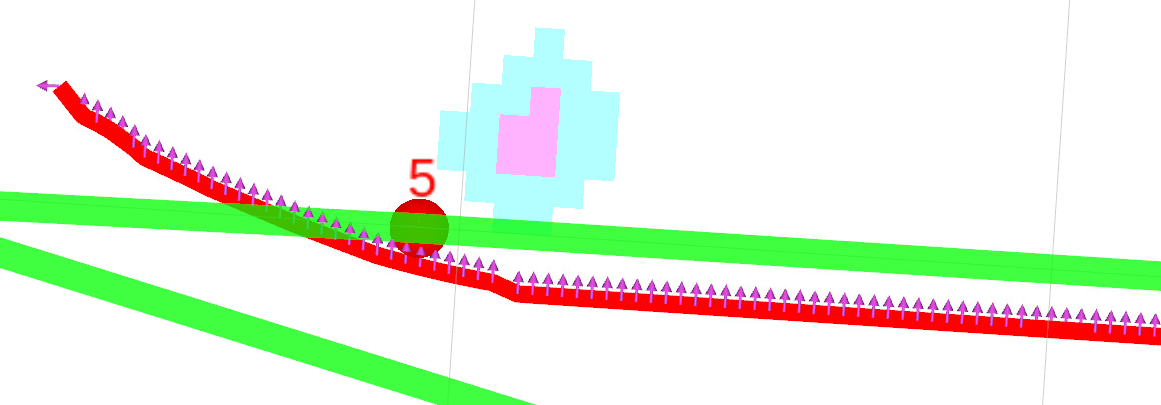
- Then retry to plan a drivable path from waypoint 8, then reach the target waypoint 6
4. Query Obstacle Cost Threshold
- Here the detection of obstacles on the path is determined by detecting the cost value on the global path and the number of points with high cost values in the global path. The threshold for triggering replanning can be set by yourself
[!NOTE]
- The obstacle detection threshold generally uses the factory default!!! If there are special scenario requirements, you can refer to this part of the tutorial to adjust the threshold for triggering replanning
- Cost value is the value used in the cost map to describe the occupied range of obstacles. The closer to the obstacle, the higher the cost value.
4.1 View Obstacle Cost Values
- Click the Publish Point tool, then use the left mouse button to click on the map where you want to view the map cost value, you can view the cost value of the specified position
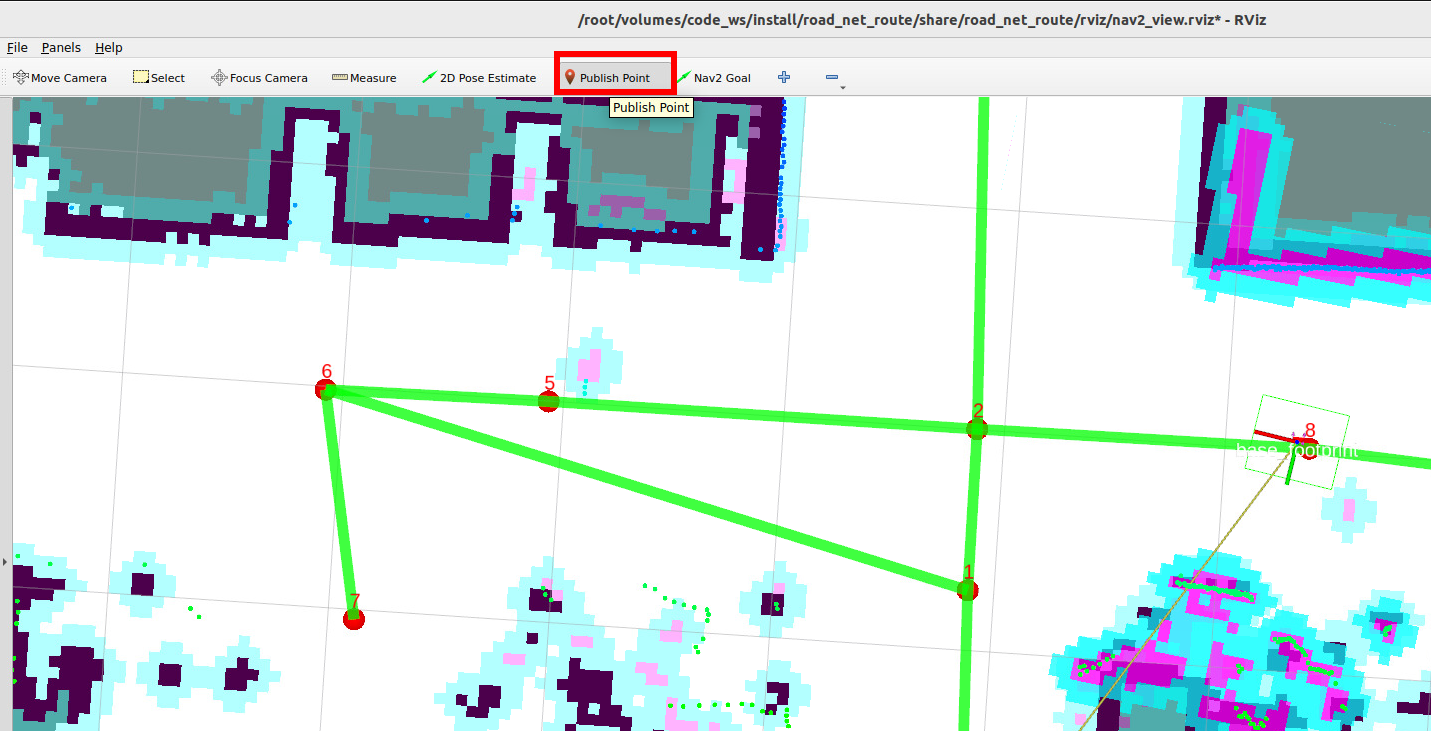
- You can see that the cost value is 0 where there are no obstacles, and the cost value at the obstacle center is 99-100

4.2 Modify Threshold for Triggering Replanning
- Configuration file path
xxxxxxxxxx/home/jetson/yahboomM3_ws/ros2_kilted/volumes/code_ws/src/road_net_route/config/nav2_kilted.yaml- Find the route_bridge node configuration parameters in the configuration file, where
COST_THRESHOLDandPATH_OBSTACLES_THRESHOLDjointly determine the trigger threshold
xxxxxxxxxxroute_bridge ros__parameters roadnet_file'/root/map/map.geojson' COST_THRESHOLD60 replace2idTrue PATH_OBSTACLES_THRESHOLD5Specific obstacle detection logic is as follows
The global path planned by the road network function is the
nav_msgs/msg/Pathmessage type in ROS, which is a path composed of multiple pose points. During road network navigation, it will detect whether all pose points on the global path have points with high cost values in the global cost map.- If the cost value of a certain pose point on the path exceeds the COST_THRESHOLD threshold, mark that point on the path as a high cost value pose point
- Finally calculate how many pose points on the global are cost value pose points
- If the total number of high cost value pose points is greater than PATH_OBSTACLES_THRESHOLD, then this path is considered impassable and needs replanning
[!TIP]
If obstacle detection is not sensitive enough, you can reduce COST_THRESHOLD and PATH_OBSTACLES_THRESHOLD. If it is too sensitive, you can reduce these two values or adjust the obstacle inflation radius (for modifying obstacle inflation radius, refer to 4.1 Navigation Controller Debugging in 04-Inter-Road Network Planning and Navigation)
5. Source Code Analysis
- Implementation program source code path:
xxxxxxxxxx/home/jetson/yahboomM3_ws/ros2_kilted/volumes/code_ws/src/road_net_route/road_net_route/route_bridge.py
5.1 Obstacle Detection and Replanning Strategy
- Traverse each pose point of the global path, check if there are obstacles exceeding the threshold on the path through the global cost map, return a boolean value indicating whether the path is blocked by obstacles.
- World coordinates to map coordinates: Call the cost map's
worldToMapValidatedmethod to convert world coordinate system(wx, wy)to cost map's grid coordinates(mx, my)(cost map is a 2D grid map, each grid corresponds to a cost value). - Coordinate validity check: If the converted grid coordinates are
None, it means this path point is outside the global cost map range, print warning log and skip this point. - Parameters:
path:Path→ ROS2'snav_msgs/msg/Pathmessage type, stores the robot's global planned path, contains a series of poses (poses). - Return value:
bool→Truemeans the number of obstacles on the path exceeds the threshold,Falsemeans the path is feasible.
xdef __check_path_obstacles(self, path:Path)->bool: """Check for obstacles on the global path.""" pose_array=[] for pose in path.poses: wx=pose.pose.position.x wy=pose.pose.position.y mx, my = self.global_costmap.worldToMapValidated(wx,wy ) if mx is None or my is None: self.get_logger().warn(f"Path point ({wx}, {wy}) is outside global costmap") continue cost = self.global_costmap.getCostXY(int(mx),int(my)) if cost > self.COST_THRESHOLD: pose_array.append(pose) if len(pose_array) >self.PATH_OBSTACLES_THRESHOLD: self.get_logger().info(f"Path contains {len(pose_array)} potential obstacles.") return True return False
- When obstacles are detected on the global path, let the robot go back to the previous waypoint and replan the path.
xxxxxxxxxxdef __reroute_strategy_1(self,last_id): '''Replanning Strategy 1: Go back to the previous waypoint and replan the drivable path.''' navigator= BasicNavigator() goal_x,goal_y=self.__get_node_coordinates(last_id) if goal_x is not None and goal_y is not None: goal_pose = PoseStamped() goal_pose.header.frame_id = "map" goal_pose.pose.position.x = goal_x goal_pose.pose.position.y = goal_y back_lastid = navigator.goToPose(goal_pose) while not navigator.isTaskComplete(task=back_lastid): time.sleep(0.1) if navigator.getResult() == TaskResult.SUCCEEDED: self.get_logger().info("back to last id success.") else: self.get_logger().info("back to last id failed.")
handle_id_navigation and handle_pose_navigation are the core code responsible for road network planning and navigation. The following parts in these two functions are the logic for detecting paths and triggering replanning
When the path is detected as infeasible, call Replanning Strategy 1: Let the robot go back to the previous waypoint (coordinates corresponding to
last_node_id). The core logic of this method has been explained before: initialize navigator → get coordinates oflast_node_id→ send navigation task "go back to this waypoint" → wait for task completion and print results. Move the robot from the current obstacle area back to safe predefined waypoint, providing a stable starting point for subsequent path replanning.The complete process is as follows:
Robot normally executes path tracking, gets navigation feedback
feedbackin real time.Detect whether there are obstacles on the path in
feedback:- If no obstacles: continue executing the original path, no processing needed.
- If there are obstacles: trigger replanning logic.
Robot goes back to the previous safe waypoint (
last_node_id).Use this waypoint as the starting point to replan the path to the target waypoint (
goal_id).Get feedback of the new path, let the robot track the new path and continue moving.
xxxxxxxxxxif feedback is not None and self.__check_path_obstacles(feedback.path): self.__reroute_strategy_1(last_node_id) route_task = self.navigator.getAndTrackRoute(last_node_id, goal_id) feedback = self.navigator.getFeedback(task=route_task) follow_path_task = self.navigator.followPath(feedback.path)
xxxxxxxxxx def handle_id_navigation(self, start_id:int, goal_id:int): '''Road network ID navigation''' route_task = self.navigator.getAndTrackRoute(start_id, goal_id) feedback=None follow_path_task=RunningTask.NONE last_feedback = None last_node_id =999 while not self.navigator.isTaskComplete(task=route_task): feedback = self.navigator.getFeedback(task=route_task) if feedback is not None and self.__check_path_obstacles(feedback.path): self.__reroute_strategy_1(last_node_id) route_task = self.navigator.getAndTrackRoute(last_node_id, goal_id) feedback = self.navigator.getFeedback(task=route_task) follow_path_task = self.navigator.followPath(feedback.path) while feedback is not None: if last_feedback is not None and (feedback.last_node_id != last_feedback.last_node_id or feedback.next_node_id != last_feedback.next_node_id): self.get_logger().info(f'id:{feedback.last_node_id} ------> id:{feedback.next_node_id} edge:{feedback.current_edge_id}') last_feedback = feedback last_node_id=feedback.last_node_id if feedback.rerouted : self.get_logger().info('reroute a new path to follow!') follow_path_task = self.navigator.followPath(feedback.path) feedback = self.navigator.getFeedback(task=route_task) if self.navigator.isTaskComplete(task=follow_path_task): print(follow_path_task) self.get_logger().info('Controller completed its task!') if follow_path_task != RunningTask.NONE : self.navigator.cancelTask() result = self.navigator.getResult() if result == TaskResult.SUCCEEDED: self.get_logger().info(Fore.GREEN+"navigation task completed."+Fore.RESET) self.action_feedback_pub.publish(String(data="road_net_nav_succeeded")) elif result == TaskResult.CANCELED: self.get_logger().warn("Navigation task canceled.") elif result == TaskResult.FAILED: self.get_logger().error("Navigation task failed.") self.action_feedback_pub.publish(String(data="road_net_nav_failed")) def handle_pose_navigation(self, goal_pose:PoseStamped): '''Handle arbitrary pose navigation''' transform = self.tf_buffer.lookup_transform("map", "base_footprint", rclpy.time.Time(),rclpy.duration.Duration(seconds=5.0)) if transform is None: self.get_logger().info(Fore.RED+"Failed to get TF transform "+Fore.RESET) return else: start_pose = PoseStamped() start_pose.header = transform.header start_pose.pose.position.x = transform.transform.translation.x start_pose.pose.position.y = transform.transform.translation.y start_pose.pose.orientation = transform.transform.rotation self.get_logger().info(Fore.CYAN + f"current:{transform.transform.translation}"+Fore.RESET) nearest_start_node_id, nearest_start_distance = self.__find_nearest_node(start_pose.pose.position.x, start_pose.pose.position.y) nearest_goal_node_id, nearest_goal_distance = self.__find_nearest_node(goal_pose.pose.position.x, goal_pose.pose.position.y) if self.replace2id: self.get_logger().info(Fore.CYAN + f"nearest_start_node_id:{nearest_start_node_id}, distance:{nearest_start_distance}" f"\nnearest_goal_node_id:{nearest_goal_node_id}, distance:{nearest_goal_distance}"+Fore.RESET) route_task = self.navigator.getAndTrackRoute(start=nearest_start_node_id,goal=nearest_goal_node_id) else: route_task = self.navigator.getAndTrackRoute(start=start_pose,goal=goal_pose,use_start=True) feedback=None follow_path_task=RunningTask.NONE last_feedback = None last_node_id =999 while not self.navigator.isTaskComplete(task=route_task): feedback = self.navigator.getFeedback(task=route_task) if feedback is not None and self.__check_path_obstacles(feedback.path): self.__reroute_strategy_1(last_node_id) route_task = self.navigator.getAndTrackRoute(last_node_id, nearest_goal_node_id) feedback = self.navigator.getFeedback(task=route_task) follow_path_task = self.navigator.followPath(feedback.path) while feedback is not None: if last_feedback is not None and (feedback.last_node_id != last_feedback.last_node_id or feedback.next_node_id != last_feedback.next_node_id): self.get_logger().info(f'id:{feedback.last_node_id} ------> id:{feedback.next_node_id} edge:{feedback.current_edge_id}') last_feedback = feedback last_node_id=feedback.last_node_id if feedback.rerouted : self.get_logger().info('reroute a new path to follow!') follow_path_task = self.navigator.followPath(feedback.path) feedback = self.navigator.getFeedback(task=route_task) if self.navigator.isTaskComplete(task=follow_path_task): self.get_logger().info('Controller completed its task!') if follow_path_task != RunningTask.NONE : self.navigator.cancelTask() result = self.navigator.getResult() if result == TaskResult.SUCCEEDED: if self.__adjust_pose(goal_pose): self.get_logger().info(Fore.GREEN+"navigation task completed."+Fore.RESET) self.action_feedback_pub.publish(String(data="road_net_nav_succeeded")) elif result == TaskResult.CANCELED: self.get_logger().info(Fore.YELLOW+"navigation task canceled."+Fore.RESET) elif result == TaskResult.FAILED: self.get_logger().info(Fore.RED+"navigation task failed."+Fore.RESET) self.action_feedback_pub.publish(String(data="road_net_nav_failed"))
5.2 Query Map Cost Value Implementation Method
- Call the global cost map's
worldToMapValidatedmethod to convert world coordinates(x, y)to cost map's grid coordinates(mx, my). - Cost map is a 2D grid map (each grid corresponds to a small area in the real world, 0.05m×0.05m),
worldToMapValidatedis a safe conversion method: if coordinates exceed the cost map range, returnNone, avoiding out-of-bounds errors caused by direct conversion. - Get cost value: Call the cost map's
getCostXYmethod, pass in the integer form of grid coordinates (grid coordinates are discrete integers, avoid errors caused by passing in floating-point type), get the cost valuecostof this grid.
xxxxxxxxxx def get_costmap_value(self, msg:PointStamped): '''In RViz, you can click to view the cost of a point on the global cost map.''' x=msg.point.x y=msg.point.y mx, my = self.global_costmap.worldToMapValidated(x, y) if mx is None or my is None: self.get_logger().warn(f"Path point ({x}, {y}) is outside global costmap") return cost = self.global_costmap.getCostXY(int(mx),int(my)) self.get_logger().info(f"clicked_point in global_costmap cost:{cost}")