Welcome to ROSMASTER M3 repository
04.Facial Landmark Detection
Facial Landmark Detection
1. Course Content
- Run example programs, use the mediapipe framework to detect facial features.
2. Program Startup
For Raspberry Pi 5 users, if the ROS container is not started, you need to start the container first,
xxxxxxxxxxbringup_m3Open a terminal inside the container,
xxxxxxxxxxexec_m3- Run facial landmark detection node
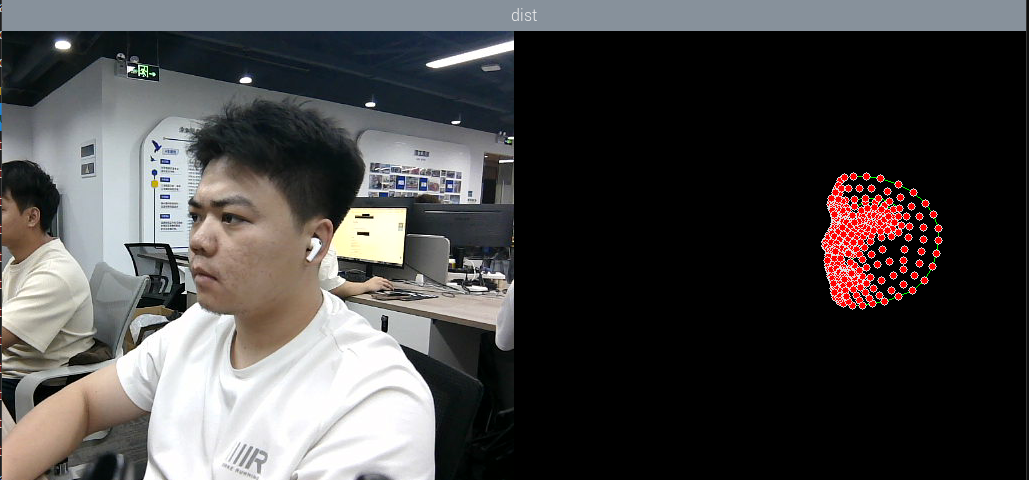
xxxxxxxxxxros2 launch m3_bringup mediapipe_demo.launch.py demo:=FaceMeshAfter the program runs, as shown in the figure below, the detected facial points will be displayed on the right side of the image,
3. Source Code Analysis
- Program code path:
xxxxxxxxxx~/yahboomM3_ws/code_ws/src/m3_common_demo/m3_common_demo/mediapipe/04_FaceMesh.pyImport the required library files,
xxxxxxxxxximport rclpyfrom rclpy.node import Node#import mediapipe libraryimport mediapipe as mpimport cv2 as cvimport numpy as npimport timeimport osfrom cv_bridge import CvBridgefrom sensor_msgs.msg import Imagefrom arm_msgs.msg import ArmJointsimport cv2print("import done")Initialize data and define publishers and subscribers,
xxxxxxxxxxdef __init__(self, name,staticMode=False, maxFaces=2, minDetectionCon=0.5, minTrackingCon=0.5): super().__init__(name) self.mpDraw = mp.solutions.drawing_utils #Use the class in the mediapipe library to define a face object self.mpFaceMesh = mp.solutions.face_mesh self.faceMesh = self.mpFaceMesh.FaceMesh( static_image_mode=staticMode, max_num_faces=maxFaces, min_detection_confidence=minDetectionCon, min_tracking_confidence=minTrackingCon ) #Define the properties of joint connection lines, which will be used in subsequent joint point connection functions self.lmDrawSpec = mp.solutions.drawing_utils.DrawingSpec(color=(0, 0, 255), thickness=-1, circle_radius=3) self.drawSpec = self.mpDraw.DrawingSpec(color=(0, 255, 0), thickness=1, circle_radius=1) self.rgb_bridge = CvBridge() #Define the subscriber for color image topic self.sub_rgb = self.create_subscription(Image,"/camera/color/image_raw",self.get_RGBImageCallBack,100)Color image callback function,
xxxxxxxxxxdef get_RGBImageCallBack(self,msg): #Use CvBridge to convert color image message data to image data rgb_image = self.rgb_bridge.imgmsg_to_cv2(msg, "bgr8") #Pass the obtained image to the defined pubFaceMeshPoint function, draw=False means not drawing joint points on the original color image frame, img = self.pubFaceMeshPoint(rgb_image, draw=False) #Merge the two images dist = self.frame_combine(frame, img) key = cv2.waitKey(1) cv.imshow('dist', dist)pubFaceMeshPoint function,
xxxxxxxxxxdef pubFaceMeshPoint(self, frame, draw=True): #Create a new image based on the input image size, the image data type is uint8 img = np.zeros(frame.shape, np.uint8) #Convert the color space of the input image from BGR to RGB for subsequent image processing imgRGB = cv.cvtColor(frame, cv.COLOR_BGR2RGB) #Call the process function in the mediapipe library for image processing. In init, the self.faceMesh object was created and initialized self.results = self.faceMesh.process(imgRGB) #Check if self.results.multi_face_landmarks exists, i.e., whether face is recognized if self.results.multi_face_landmarks: for i in range(len(self.results.multi_face_landmarks)): if draw: self.mpDraw.draw_landmarks(frame, self.results.multi_face_landmarks[i], self.mpFaceMesh.FACEMESH_CONTOURS, self.lmDrawSpec, self.drawSpec) #Connect each joint point on the previously created blank image self.mpDraw.draw_landmarks(img, self.results.multi_face_landmarks[i], self.mpFaceMesh.FACEMESH_CONTOURS, self.lmDrawSpec, self.drawSpec) return frame, imgThe frame_combine image merging function is mentioned in the first lesson of this chapter. You can refer to the analysis of this function in [1. Hand Detection].