yahboom
HomeLearn
Solution
Blog
Online Store
About Us
EN/中文
ROSMASTER M3📖
00.Configuration and Operation Guide
  • 1.Quick start handle to control the car
  • 2.Log in to the car and view the code
  • 3.Enter the Docker (For RPI5)
  • 4.Camera and Radar Configuration (Must Read)
  • 5.Assembly video
  • 6.Modify Control Board Firmware Parameters
01.Chassis Control Course
  • 01.ROS control
  • 02.Handle control
  • 03.Keyboard control
  • 04.Robot state estimation
  • 05.Data remote visualization
  • 06.Line velocity calibration
  • 07.Angular velocity calibration
  • 08.Robot URDF model
  • 09.Line patrol automatic driving
  • 10.Patrol
02.Lidar Course
  • 01.Lidar introduction and use
  • 02.Lidar point cloud fusion and filtering
  • 03.Lidar obstacle avoidance
  • 04.Lidar tracking
  • 05.Lidar guard
  • 06.Gmapping-SLAM mapping
  • 07.Cartographer-SLAM mapping
  • 08.slam_toolbox mapping
  • 09.Lifelong mapping
  • 10.Navigation2 single-point navigation avoid
  • 11.Navigation2 multi-point navigation avoid
  • 12.Cartographer relocalization navigation
  • 13.slam_toolbox localization and navigation
  • 14.Synchronous mapping and navigation
  • 15.RTAB-Map mapping
  • 16.RTAB-Map navigation
  • 17.APP mapping and navigation
03.AI Model Basics
  • 1.AI large model types and principles
  • 2.RAG retrieval enhancement and model training samples
  • 3.Embodied intelligent robot system architecture
  • 4.Embodied intelligent functions core source code
04.AI Model Development
  • 01.Register a model service provider account
  • 02.Configuring API-KEY
  • 03.Introduction to Dify
  • 04.Basic Dify Features
  • 05.AI Large Model Development - chatbot
  • 06.Deploy the RAG knowledge base
  • 07.RAG knowledge base + chatbot
  • 08.AI agent workflow
  • 09.Custom wake-up response
  • 10.Core module testing tools
05.AI Model - Voice Version
  • 1.Semantic understand and command follow
  • 2.Multimodal visual understanding
  • 3.Multimodal visual understanding+SLAM navigation
  • 4.Intention estimation
06.AI Model - Text Version
  • 1.Semantic understand and command follow
  • 2.Multimodal visual understanding
  • 3.Multimodal visual understanding+SLAM navigation
  • 4.Intention estimation
07.Road Network Planning and Navigation
  • 1.Introduction and Quick Start
  • 2.Constructing a Pose Map
  • 3.Road Network Labelling
  • 4.Inter-Road Network Planning and Navigation
  • 5.Free-Pose Road Network Navigation
  • 6.Path Replanning
08.Autonomous Driving expand(Need purchase track map)
  • 01.Environment Setup & Precautions
  • 02.YOLO Environment Configuration
  • 03.Data Collection
  • 04.Data Annotation
  • 05.YOLOv11 Model Training
  • 06.Model Format Conversion
  • 07.Vehicle Centerline Calibration
  • 08.Lane Detection
  • 09.Lane-Keeping Autonomous Driving
  • 10.Traffic Sign Recognition
  • 11.Comprehensive Autonomous Driving Applications
  • 12.Autonomous Driving Debugging Module
  • 13.Road Network Planning with Track Map
  • 14.Road Network Planning with Traffic Sign Recognition
  • 15.AI Model with Road Network Planning
  • 16.AI Model with Track Map and SLAM Navigation
  • 17.AI Model with Road Network Planning and Autonomous Driving
09.Depth Camera Course
  • 01.Dabai_DCW2 Camera Introduction
  • 02.Nuwa-HP60C Camera Introduction
  • 03.Depth Pseudo-Color Image
  • 04.Depth Camera Distance Measurement
  • 05.Wood Block Volume Measurement
  • 06.Edge Detection
  • 07.YOLOv11 Object Detection
  • 08.YOLOv11 Object Tracking
  • 09.Color Following
  • 10.Face Following
  • 11.QR Code Following
  • 12.Machine Code Following
  • 13.KCF Object Tracking
  • 14.QR Code Motion Control
  • 15.AR Vision
10.Mediapipe Visual Course
  • 01.Hand Detection
  • 02.Posture Detection
  • 03.Overall Detection
  • 04.Facial Landmark Detection
  • 05.3D Object Recognition
  • 06.Face Detection
  • 07.Gesture Recognition
  • 08.Face Special Effects
  • 09.Brush
  • 10.Finger Control
  • 11.Palm Target Positioning
  • 12.Fingertip Trajectory Recognition
  • 13.Gesture Following
  • 14.Posture Following
  • 15.Gesture Motion Control
11.Multi-vehicle Course
  • 1.Multi-vehicle Control
  • 2.Multi-vehicle Navigation
  • 3.Multi-vehicle Platoon
12.AI Large Model Basic Course
Offline large model (Text Interaction)
  • 0. AI Large Model Mirroring Explanation
  • 1. Deployment of large-scale AI models
  • 2. Installation of the large model dialogue platform
  • 3. Meta AI Llama 3.2 model
  • 4. Alibaba Cloud Qwen3 Model
  • 5. DeepSeek DeepSeek-R1 model
  • 6. Microsoft Phi-4 mini model
  • 7. Alibaba Cloud Qwen2.5vl Visual Multimodal Large Model
  • 8. Google Gemma3 Visual Multimodal Large Model
  • 9. Llava Visual Multimodal Large Model
  • 10. Multimodal Visual Understanding Applications
  • 11.MiniCPM-V Visual Multimodal Large Model
  • 12. Multimodal Text-Based Image Application
  • 13. Multimodal Video Analysis Application
  • 14. Multimodal table scanning application
  • 15. Multimodal visual positioning applications
  • 16. Multimodal Autonomous Agent Application
Offline large model (Voice Interaction)
  • 0. Voice Interaction Hardware Connection (Must Read)
  • 1. Offline speech-to-text (ASR)
  • 2. Offline Text-to-Speech (TTS)
  • 3. AI large model voice interaction
  • 4. Multimodal visual understanding and voice interaction
  • 5. Multimodal Text-Based Image Application
  • 6. Multimodal Video Analysis Application
  • 7. Multimodal visual positioning applications
  • 8. Multimodal table scanning application
  • 9. Multimodal Autonomous Agent Applications
  • 10. AI large model offline voice assistant
Online large model (Text Interaction)
  • 1. OpenRouter Large Model API Aggregation Platform
  • 2. Multimodal visual understanding applications
  • 3. Multimodal visual positioning applications
  • 4. Multimodal table scanning application
  • 5. Multimodal Autonomous Agent Applications
Online large model (Voice Interaction)
  • 0. Voice Interaction Hardware Connection (Must Read)
  • 1. Online speech-to-text (ASR)
  • 2. Online Text-to-Speech (TTS)
  • 3. AI large model voice interaction
  • 4. Multimodal visual and voice interaction
  • 5. Multimodal visual positioning applications
  • 6. Multimodal table scanning application
  • 7. Multimodal Autonomous Agent Applications
  • 8. AI large model online voice assistant
13.Control Board Course
1.Development environment setup
  • 1.Introduction to the Control Board
  • 2.Set up the STM32CUBEIDE development environment
  • 3.Burning STM32 firmware using SWD
  • 4.Burning STM32 firmware using serial port
  • 5.Compile the microros driver library
  • 6.Install and start the microros agent
  • 7.Import Project
2.Control board STM32 basic routine
  • 1.Turn on the LED light
  • 2.Button functions
  • 3.Drive the buzzer
  • 4.Serial communication
  • 5.Battery voltage detection
  • 6.Driving PWM Servo
  • 7.Drive motor
  • 8.Read motor encoder data
  • 9.PID control of motor speed
  • 10.Robot kinematics analysis theory
  • 11.Read IMU data
  • 12.Read Lidar data
  • 13.Flash access data
  • 14.Driving OLED Displays
  • 15.Driving RGB light strip
  • 16.SBUS model aircraft remote control
  • 17.USB controller remote control
  • 18.CAN bus communication
3.Control board micro_ros basic routine
  • 1.Post a topic
  • 2.Subscribe to a topic
  • 3.Multi-topic subscription and publishing
  • 4.Subscribe to the buzzer topic
  • 5.Subscribe to the bus servo topic
  • 6.Subscribe to the rate control topic
  • 7.Release Speed Topic
  • 8.Publish IMU data topic
  • 9.Publish radar data topic
14.Main Control Course
Jetson Orin Nano_NX
  • 1.Jetson Orin board introduction
  • 2.Restore the factory image system
  • 3.Backup SSD system
  • 4.SSD expansion
  • 5.Network configuration
  • 6.SSH remote login
  • 7.VNC remote control
  • 8.Remote file transfer
  • 9.Jtop tool
  • 10.Exchange space expansion
Raspberry Pi
  • 1. Introduction to Raspberry PI 5
  • 2. Raspberry PI system installation and backup
  • 3. Powering the Raspberry PI 5
  • 4. Startup of Raspberry PI 5
  • 5. Update and upgrade operating system
  • 6. Introduction to raspi-config tool
  • 7. config.txt file description
  • 8. Network Configuration
  • 9. remote access
  • 10. Transfer files remotely
  • 11. Set display resolution and rotation
  • 12. Set screen to sleep
  • 13. Play audio and video
  • 14. Using USB camera
  • 15. Using MIPI camera
  • 16. Get real-time temperature of Raspberry Pi
RDKX5
  • 1.Introduction to RDK X5 board
  • 2.Write system file
  • 3.Hardware interface description
  • 4.Install case and other accessories
  • 5.Network configuration
  • 6.Remote login
  • 7.Update system
  • 8.srpi-config user guide
  • 9.config. txt configuration file
  • 10.Self-startup setting
  • 11.RDK exclusive command usage
  • 12.Linux command usage
  • 13.GPIO readwrite operation
  • 14.Image classification algorithm
  • 15.Use USB camera
  • 16.Use MIPI camera
  • 17.Binocular camera depth algorithm
15.YOLOv11 Development (ORIN)
  • 1.YOLO environment construction
  • 2.CLI use
  • 3.Object detection
  • 4.Instance segmentation
  • 5.Pose estimation
  • 6.Image classification
  • 7.Oriented object detection
  • 8.Model conversion
  • 9.Dataset annotation
  • 10.Model Training_Conversion
  • 11.Model prediction
16.YOLOv11 Development(RDKX5)
  • 1.YOLO environment construction
  • 2.CLI use
  • 3.Object detection
  • 4.Instance segmentation
  • 5.Pose estimation
  • 6.Image classification
  • 7.Oriented object detection
  • 8.Model prediction
  • 9.Model Quantization
17.YOLOv11 Development (RPI)
  • 1.YOLO environment construction
  • 2.CLI use
  • 3.Object detection
  • 4.Instance segmentation
  • 5.Pose estimation
  • 6.Image classification
  • 7.Oriented object detection
  • 8.Model conversion
  • 9.Model prediction
18.Linux Operating System
  • 1.Introduction to Linux system
  • 2.Ubuntu file system
  • 3.Ubuntu common commands
  • 4.Ubuntu common editors
  • 5.Ubuntu software operation commands
  • 6.Virtual machine installation
  • 7.SSH remote control
  • 8.VNC remote control
  • 9.Transfer files remotely
  • 10.Driver library and communication
  • 11.Static IP and hotspot mode
  • 12.Bind device ID
  • 13.Capacity expansion and resource allocation
  • 14.Update system software sources
  • 15.Set root user password
  • 16.sudo free password
  • 17.Connect to WiFi network
  • 18.View system version
  • 19.Customized service management
  • 20.Back up system image
19.ROS2 Basic Course
  • 1.Introduction to ROS2
  • 2.ROS2 install Humble
  • 3.ROS2 development environment
  • 4.ROS2 workspace
  • 5.ROS2 function package
  • 6.ROS2 node
  • 7.ROS2 topic communication
  • 8.ROS2 service communication
  • 9.ROS2 action communication
  • 10.ROS2 custom interface message
  • 11.ROS2 parameter service case
  • 12.ROS2 meta-function package
  • 13.ROS2 distributed communication
  • 14.ROS2 DDS
  • 15.ROS2 time related API
  • 16.ROS2 common command tools
  • 17.ROS2 rviz2 use
  • 18.ROS2 rqt toolbox
  • 19.ROS2 Launch startup file configuration
  • 20.ROS2 recording and playback tool
  • 21.ROS2 URDF model
  • 22.ROS2 Gazebo simulation platform
  • 23.ROS2 TF2 coordinate transformation
20.Docker Course
  • 1、Docker overview and docker installation
  • 2、Common commands for docker image containers
  • 3、Docker images deeply understand and publish images
  • 4、Docker hardware interaction and data processing
  • 5、Enter the bot's docker container
  • 6、Robot development environment construction in Docker
21.Image Processing Basics Course
  • 1. Introduction to Open Source CV
  • 2. Image reading and display
  • 3. Image writing
  • 4. Image quality
  • 5. Pixel Operation
  • 6. Image zoom
  • 7. Image cutting
  • 8. Image translation
  • 9. Image Mirroring
  • 10. Affine Transformation
  • 11. Image Rotation
  • 12. Perspective Transformation
  • 13. Grayscale processing
  • 14. Image Binarization
  • 15. Edge Detection
  • 16. Line drawing
  • 17. Rectangle and circle drawing
  • 18. Drawing text and pictures
Download
  • Mapping_APP(iOS_Android)
  • MainBoard_AI_Pure_System
  • Robot_Image_System_File
  • Code-Firmware
  • Instruction_Manual
  • VM_File
  • Software_Tools
  • Firmware_DriverFile
  • 3D_Model_File
  • ROS2_Basic_VM
  • Other_Annex
Download ZIP

Welcome to ROSMASTER M3 repository

1. Introduction to Raspberry PI 5

1. Introduction to Raspberry PI 5

This chapter introduces information about Raspberry Pi 5.

1. Introduction to Raspberry Pi 5

1.1. Preparation before use

To use the Raspberry Pi, you will need the following:

A Raspberry Pi motherboard;

apower;

An SD card and a card reader;

You can set up a Raspberry Pi as an interactive computer with a desktop, or as a headless computer that can only be accessed over the network. To set up a Raspberry Pi as a headless computer, there is no need to prepare any additional peripherals. You can pre-configure the hostname, user account, network connection and SSH when installing the operating system .

If you want to use the Raspberry Pi directly with a desktop interactable, you will need the following additional accessories:

A monitor and HDMI cable;

A set of keyboard and mouse.

1.2. Introduction

Raspberry Pi 5 uses a 64-bit quad-core Arm Cortex-A76 processor running at 2.4GHz, which improves CPU performance by 2 to 3 times compared to Raspberry Pi 4. Additionally, it features an 800MHz VideoCore VII GPU that delivers a massive graphics performance boost, dual 4Kp60 display outputs via HDMI, and state-of-the-art camera support via a redesigned Raspberry Pi image signal processor. It provides consumers with a smooth desktop experience and opens new application doors for industrial customers.

This is the first full-size Raspberry Pi computer to use silicon made in-house. The RP1 provides most of the I/O functionality for the Raspberry Pi 5 and brings a huge change in peripheral performance and functionality. Aggregate USB bandwidth has more than doubled, allowing for faster data transfer to external UAS drives and other high-speed peripherals; the dedicated dual-lane 1Gbps MIPI camera and display interface used on earlier models has been replaced by a pair of quad-lane 1.5Gbps MIPI Transceiver replacement, total bandwidth is tripled, supporting any combination of up to two cameras or displays; peak SD card performance is doubled by supporting SDR104 high-speed mode; the platform debuts a single-lane PCI Express 2.0 interface for high-speed Bandwidth peripherals are supported.

1.3. Comparison with Raspberry Pi 4B parameters
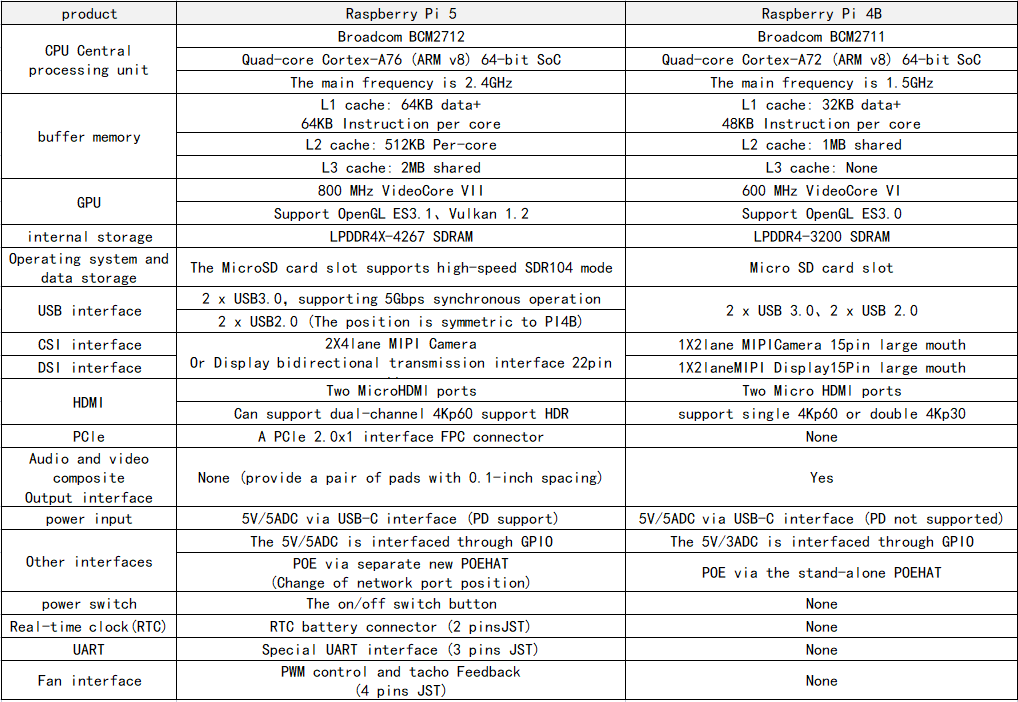
img

Its main features are as follows:

˙Quad-core Arm Cortex-A76 @ 2.4GHz

˙Dual 4kp60 HDMI display output, supports HDR

˙VideoCore VII graphics card, supports OpenGL-ES 3.1, Vulkan 1.2

˙Raspberry Pi connector for PCIe (1 2.0 port, additional HAT required)

˙802.11ac dual-band Wi-Fi and Bluetooth 5.0 (supports BLE)

˙Real-time clock (RTC) and RTC battery interface

˙Fan interface

˙Power button

1.4. Function distribution
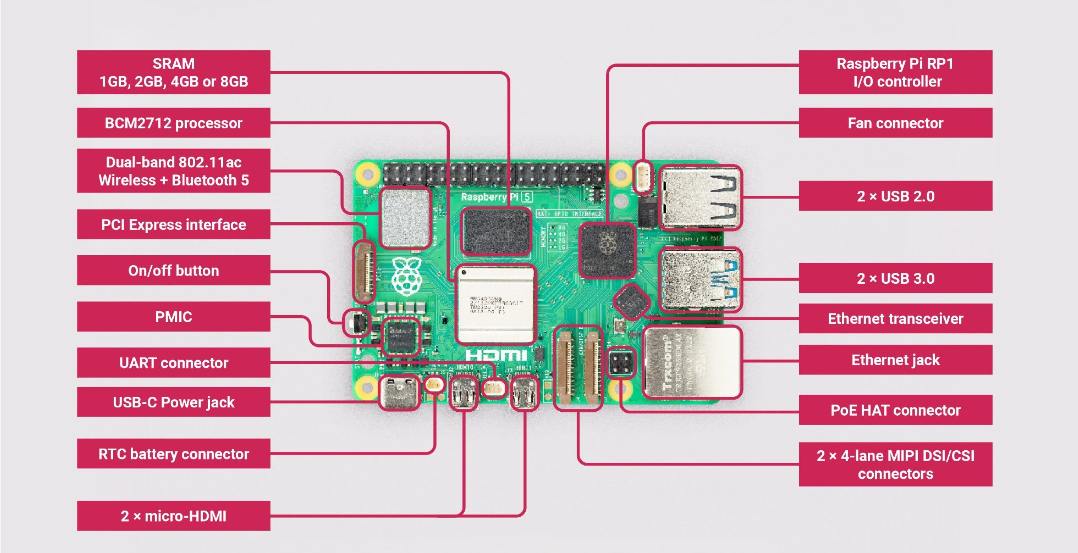
img

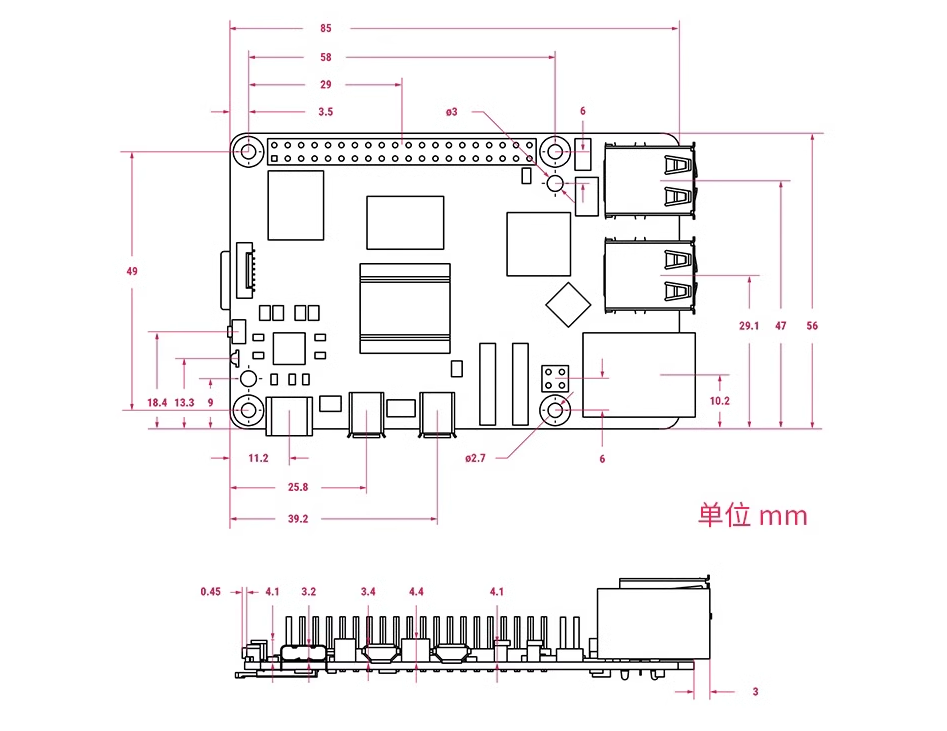
1.5. Dimensional drawing (unit: mm)

img

Exchange space expansion
Raspberry PI system installation and backup

COMPANY

  • About us
  • Team Style
  • Blog

LEARNING & EXPLORATION

  • Tutorials
  • Edge AI hardware
  • Educational robots
  • Embedded intelligent hardware

WHERE TO BUY

  • Yahboom Online Store
  • Amazon
  • Alibaba
  • AliExpress
  • Mercado

TECHNOLOGY SUPPORT

  • Email: support@yahboom.com

BE A DISTRIBUTOR

  • Email: sales@yahboom.com
QR Code

Copyright © 2017-2026 Yahboom. All Rights Reserved.

EN/中文