Welcome to ESP32 Core Board repository
2. Environment Setup (Linux)
Linux Environment Setup — VMware + Ubuntu + ESP-IDF 5.5.2
Linux Environment Setup — VMware + Ubuntu + ESP-IDF 5.5.21. Overview2. Official Environment Acquisition3. Preparation3.1 Hardware Requirements3.2 Downloads Required4. Enable CPU Virtualization4.1 Check Virtualization Status4.2 BIOS Enabling Steps5. Install VMware Workstation5.1 Installation Steps6. Import Virtual Machine Image6.1 Extract the Image6.2 Open the Virtual Machine6.3 Adjust VM Settings (As Needed)6.4 Start the Virtual Machine6.5 VM Environment Overview6.6 Snapshot Management7. Connect Development Board to VM7.1 USB Passthrough7.2 Verify Serial Port8. Build Verification9. FAQ10. Appendix: Complete Official Manual Installation GuideOfficial Documentation LinksVersion Selection Recommendations
1. Overview
Compilation speed of ESP-IDF on Linux is significantly faster than on Windows (native GCC toolchain without intermediate layer overhead), and it avoids Windows path length limitations and encoding issues. Some features (such as audio codecs and AI XiaoZhi firmware) have strict ESP-IDF version requirements, and version switching is more flexible in a Linux environment.
This tutorial provides a pre-packaged Ubuntu 24.04 virtual machine image with ESP-IDF 6.0.2/5.5.5 + VSCode + all toolchains pre-installed. Import and it's ready to use.
The process has two steps:
Install VMware Workstation — Virtualization software
Import the virtual machine image — Load pre-configured Ubuntu + ESP-IDF environment
Snapshots have already been taken for the user inside the image. If you make mistakes or damage the environment, you can restore to a clean initial state with one click.
2. Official Environment Acquisition
If you are an advanced user and prefer to build your own environment instead of using a virtual machine, Espressif provides complete Linux installation documentation and toolchains:
.png)
| Resource | Address |
|---|---|
| ESP-IDF Programming Guide (Linux) | Installation of ESP-IDF and Tools on Linux - ESP32-S3 - — ESP-IDF Programming Guide v6.0.2 documentation |
| ESP-IDF GitHub Repository | https://github.com/espressif/esp-idf |
General Steps for Official Manual Installation (for reference, not required):
x# 1. Install system dependenciessudo apt-get install git wget flex bison gperf python3 python3-pip \ python3-venv cmake ninja-build ccache libffi-dev libssl-dev \ dfu-util libusb-1.0-0
# 2. Clone ESP-IDFmkdir -p ~/esp && cd ~/espgit clone --recursive https://github.com/espressif/esp-idf.gitcd esp-idf && git checkout v5.5.5
# 3. Install toolchain./install.sh esp32s3
# 4. Activate environment. ./export.shOfficial manual installation takes approximately 1-2 hours (including toolchain download and compilation) and has high network requirements. To lower the barrier to entry, we provide pre-configured virtual machine images, skipping the tedious environment setup process, so readers can directly proceed to code learning.
3. Preparation
3.1 Hardware Requirements
| Item | Requirement |
|---|---|
| Operating System | Windows 10 / 11 (64-bit) |
| CPU | Supports virtualization technology (Intel VT-x or AMD-V), must be enabled in BIOS |
| Memory | ≥ 16 GB (8 GB recommended for virtual machine allocation) |
| Disk Space | ≥ 120 GB (VM image ~65 GB + decompression space) |
| USB Port | At least 1 USB-A / USB-C (for connecting development board, must be passed through to VM) |
3.2 Downloads Required
| File | Description | Download Address |
|---|---|---|
| VMware Workstation Installer | Virtualization software | 6. Software Tools → VMware → VMware-workstation-full-17.6.2-24409262.zip |
| Ubuntu + ESP-IDF VM Image | Pre-configured Ubuntu 24.04 + ESP-IDF 6.0.2/5.5.5 + VSCode | 6. Software Tools → Linux VM → Ubuntu.rar |
The VM image comes pre-installed with: Ubuntu 24.04, ESP-IDF 6.0.2/5.5.5, VSCode + ESP-IDF extension, CH340 driver, Python 3, Git. After importing, you can compile and flash directly without any additional configuration.
4. Enable CPU Virtualization
Virtual machines require CPU hardware virtualization support. Most laptops/desktops have it disabled by default and require manual enabling in BIOS.
4.1 Check Virtualization Status
Ctrl + Shift + Esc → Performance tab → Check "Virtualization" status in the bottom-right corner:
| Display | Status |
|---|---|
| Enabled | No action needed, proceed to Chapter 5 |
| Disabled | Need to enter BIOS to enable |
4.2 BIOS Enabling Steps
Restart the computer, press the BIOS hotkey on the boot logo screen (common:
F2/Del/F10/Esc, depends on motherboard)Go to Advanced or Configuration tab
Find one of the following options and set it to Enabled:
Common Names in BIOS Intel Virtualization Technology (VT-x) AMD SVM Mode Virtualization Technology SVM Press
F10to save and exit, computer will restart automatically
5. Install VMware Workstation
5.1 Installation Steps
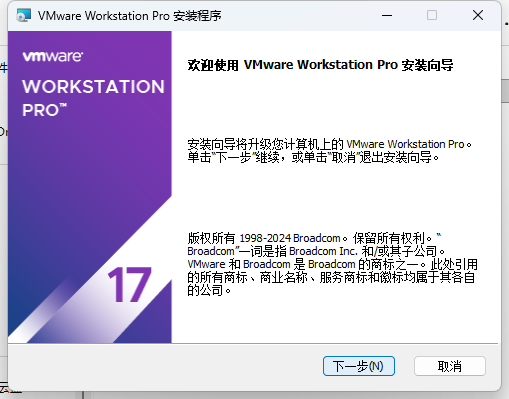
Double-click the VMware installer (e.g.,
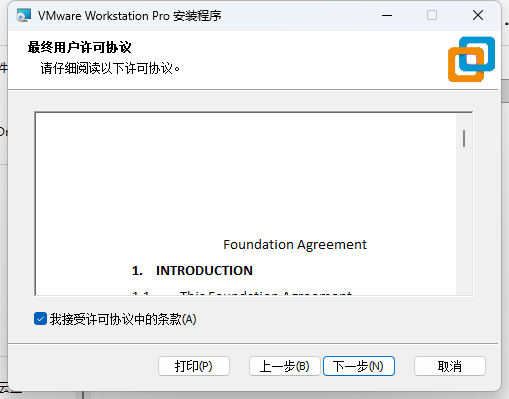
VMware-workstation-full-17.6.2-24409262.exe)Click Next, read the license agreement, check I accept the terms in the license agreement
Choose installation path (recommended to keep default
C:\Program Files (x86)\VMware\VMware Workstation\), click Next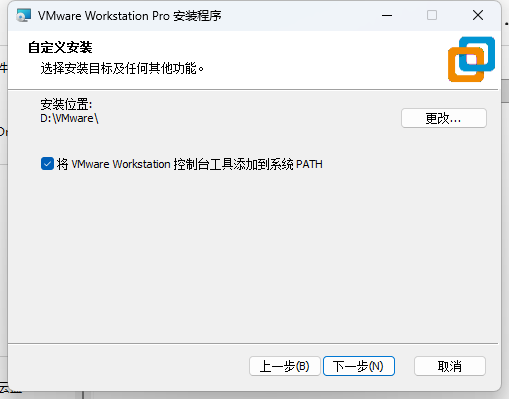
Uncheck Check for product updates on startup and Join the VMware Customer Experience Improvement Program, click Next
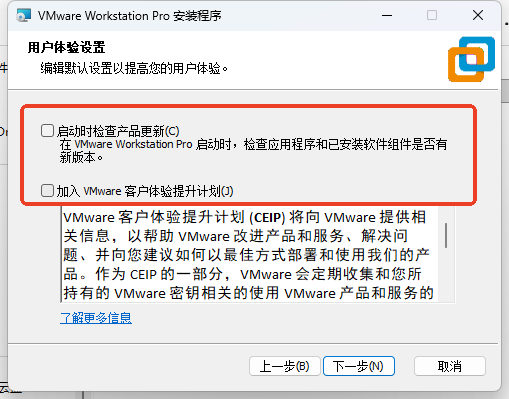
Check Desktop and Start Menu shortcuts, click Next
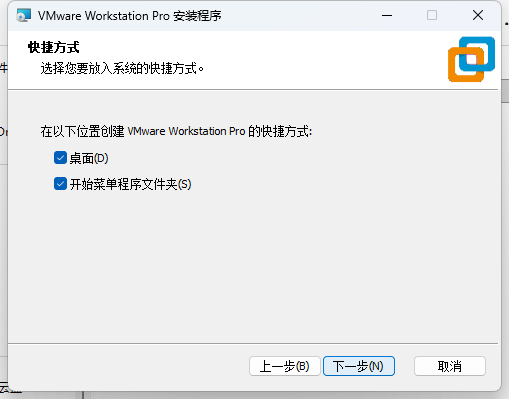
Click Install/Upgrade, wait for installation to complete
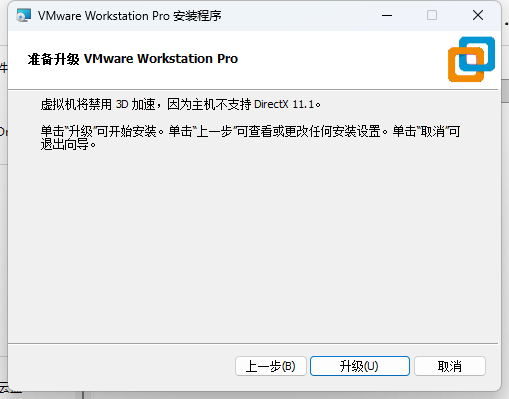
Click License to enter a key, or choose Try for 30 days, click Finish
VMware Workstation 17 Personal is now free for individuals. You can register for a free account on the VMware website to get it.
6. Import Virtual Machine Image
6.1 Extract the Image
Extract the downloaded VM image archive (e.g., Ubuntu24.04-ESP-IDF.7z) to a disk directory with ≥ 100 GB free space.
xxxxxxxxxxD:\Ubuntu\├── Ubuntu24.04-ESP-IDF.vmx ← VM configuration file (double-click to open)├── Ubuntu24.04-ESP-IDF.vmdk ← Virtual disk (~65 GB)├── Ubuntu24.04-ESP-IDF-sXXXX.vmdk ← Snapshot data└── ...
6.2 Open the Virtual Machine
Open VMware Workstation, click Open a Virtual Machine

Navigate to the extracted directory, select
Ubuntu 64-bit.vmx, click OpenThe VM appears in the left list, named
Ubuntu 64-bit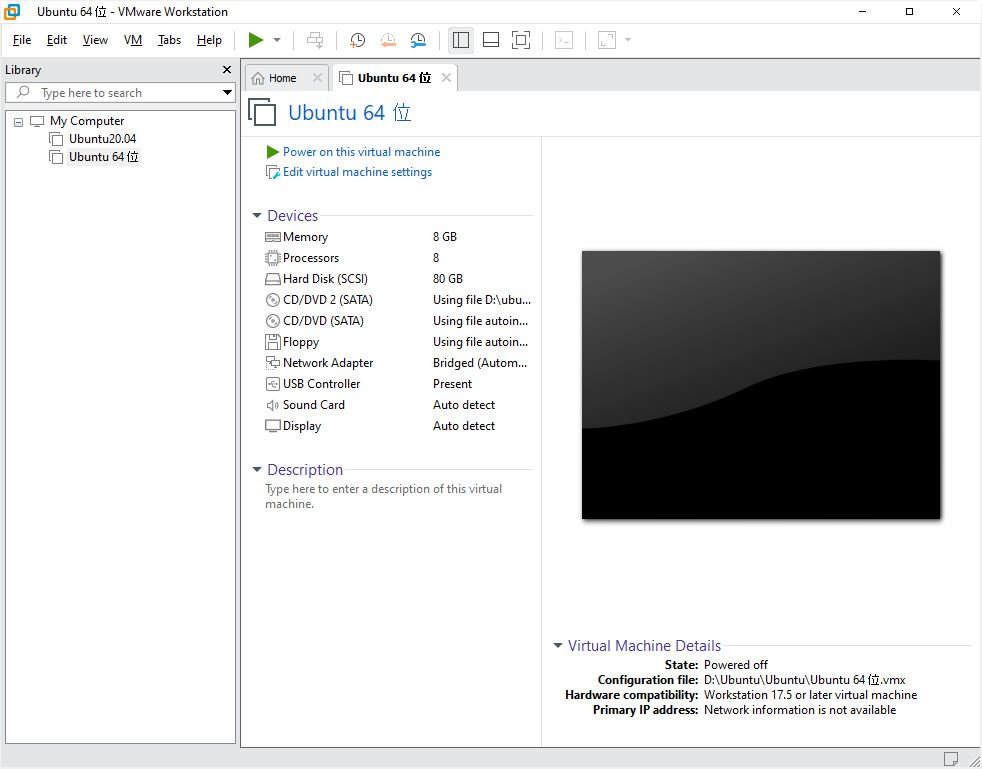
6.3 Adjust VM Settings (As Needed)
Click Edit virtual machine settings (or right-click → Settings), adjust based on your physical machine configuration:
| Hardware Item | Recommended Value | Description |
|---|---|---|
| Memory | 8 GB (8192 MB) | If physical memory is above 16GB, allocate 8GB; minimum no less than 4GB |
| Processors | 4 cores | Compilation speed is positively correlated with core count |
| Hard Disk | Default (100 GB, dynamic expansion) | Enough for ESP-IDF framework + multiple projects |
| USB Controller | USB 3.1 compatible | Ensures the development board is recognized by the VM |
Allocating too much memory and CPU may cause the host machine to lag. Recommended not to exceed 50% of the host's physical configuration.
6.4 Start the Virtual Machine
Click Power on this virtual machine
On first boot, you may be prompted "I moved the virtual machine" or "I copied it" — select I moved the virtual machine (preserves MAC address and network configuration)
Login password: 1
Wait for Ubuntu to boot (~30-60 seconds), auto-login to desktop
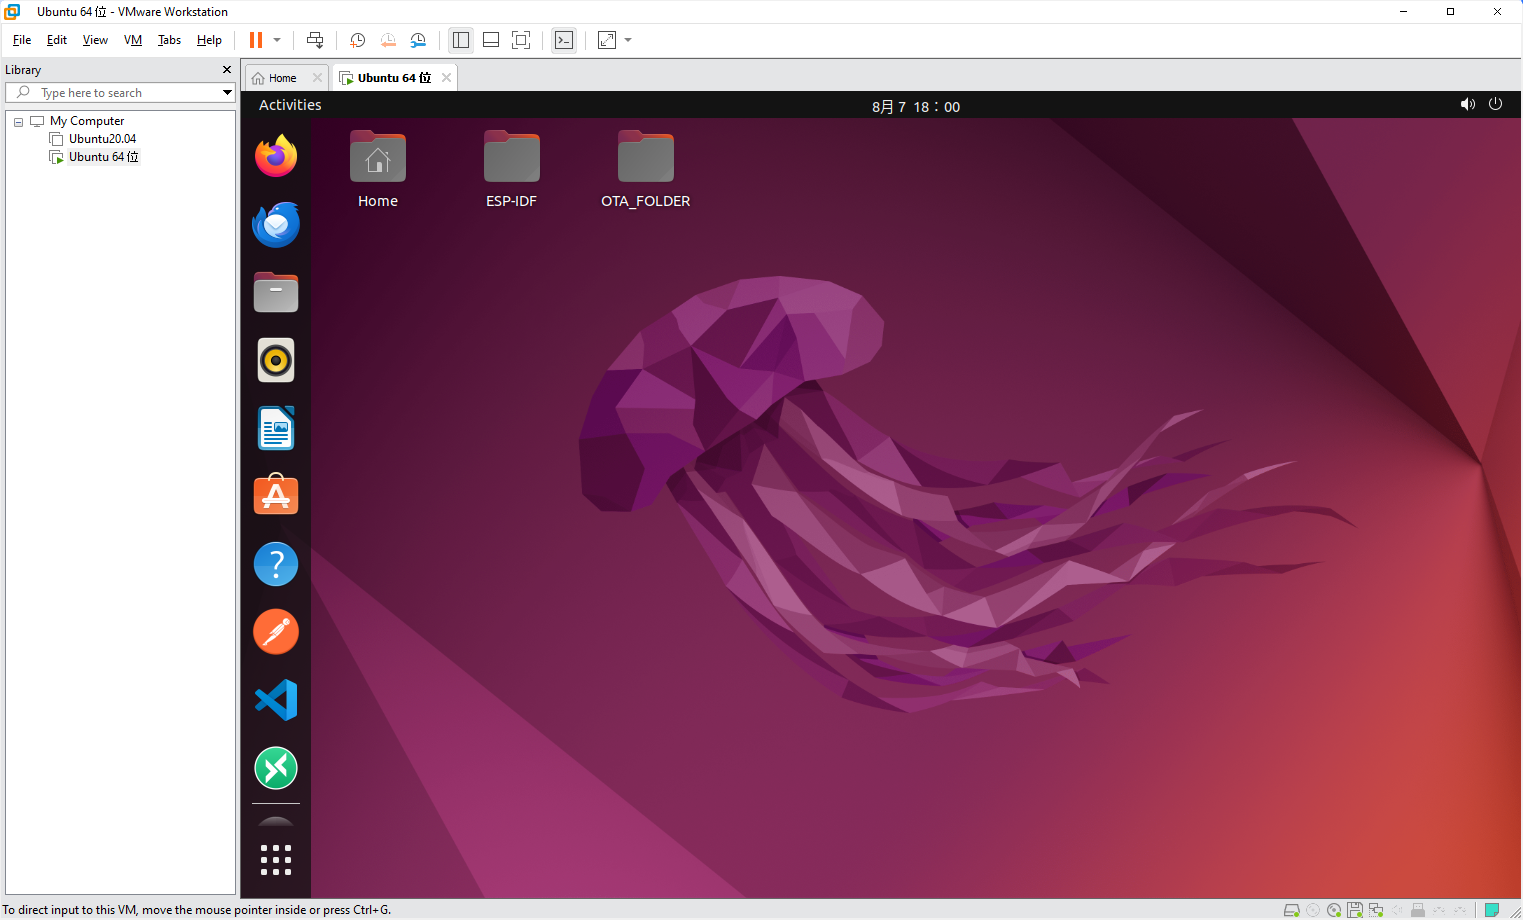
6.5 VM Environment Overview
After login, the desktop and taskbar are ready:
| Component | Version | Description |
|---|---|---|
| Ubuntu | 24.04 LTS | Long-term support version, stable and reliable |
| ESP-IDF | 6.0.2/5.5.2 | Installed to ~/esp, toolchain ready |
| VSCode | Latest stable | ESP-IDF extension + C/C++ extension installed |
| Python | 3.12 | ESP-IDF toolchain dependency |
| Git | System built-in | Version management and repository cloning |
| CH340 Driver | Built into kernel | Driver-free, plug in the development board and it's recognized |
6.6 Snapshot Management
The VM supports snapshots, allowing you to save the current state as a restore point:
Take Snapshot: VMware menu → VM → Snapshot → Take Snapshot, enter a name (e.g., "Initial Environment-ESP-IDF 6.0.2/5.5.2")
Restore Snapshot: VMware menu → VM → Snapshot → Select the corresponding snapshot → Go to
It is recommended to take a snapshot immediately after completing the environment setup. If you make mistakes later or the system becomes corrupted, you can restore with one click.
7. Connect Development Board to VM
7.1 USB Passthrough
Connect the ESP32-S3 development board to the computer using a USB cable
In VMware menu: VM → Removable Devices → Find the corresponding USB device → Click Connect (disconnect from host)
A checkmark
√appears next to the device, indicating it has been passed through to the VM
After passthrough, the development board is only recognized by the VM, and it will temporarily disappear from the host's (Windows) Device Manager. It will automatically return to Windows after disconnecting from the VM.
7.2 Verify Serial Port
Open Terminal inside the VM (Ctrl + Alt + T), execute:
xxxxxxxxxxls /dev/ttyUSB* # CH340 driver → /dev/ttyUSB0ls /dev/ttyACM* # CP2102 driver → /dev/ttyACM0If /dev/ttyUSB0 appears, the development board has been correctly recognized by the VM.
If there is no output, check if USB passthrough was successful (VMware bottom-right USB icon status), or reconnect the USB cable.
8. Build Verification
Open the project in VSCode, or use the terminal to verify the environment:
xxxxxxxxxx# Activate ESP-IDF environmentsource ~/esp/esp-idf/export.sh
# Enter hello_world examplecd ~/esp/esp-idf/examples/get-started/hello_world
# Set target chipidf.py set-target esp32s3
# Buildidf.py build
# Flash (/dev/ttyUSB0 replaced with actual serial port)idf.py -p /dev/ttyUSB0 flash
# Monitoridf.py -p /dev/ttyUSB0 monitor
Build success indicator:
xxxxxxxxxxProject build complete.
9. FAQ
| Symptom | Cause | Solution |
|---|---|---|
| VM reports "VT-x is disabled in BIOS" on startup | CPU virtualization not enabled | Restart and enter BIOS to enable VT-x / AMD SVM |
| VM runs sluggishly | Insufficient allocated resources | Increase memory to 8 GB + CPU to 4 cores; close large applications on host |
| Development board not found in USB device list | VMware USB service not started | On host, open services.msc → restart VMware USB Arbitration Service |
/dev/ttyUSB0 does not exist in VM | USB passthrough failed or driver not loaded | Confirm the device is checked in VMware menu; use lsusb to check if CH340 is visible |
| Flash fails with "Permission denied" | No read/write permission for serial port | sudo chmod 666 /dev/ttyUSB0 or sudo usermod -aG dialout $USER |
VSCode terminal cannot use idf.py | Environment variables not activated | First execute source ~/esp/esp-idf/export.sh, or add alias in .bashrc |
| ESP-IDF version mismatch | Project requires specific version | Refer to official documentation to switch versions: git checkout vX.X.X && ./install.sh |
| VM disk space insufficient | Virtual disk is full | Clean ~/esp/esp-idf/build directory; or expand virtual disk size |
10. Appendix: Complete Official Manual Installation Guide
The VM we provide has already completed all the following steps for you. If you choose not to use a VM, below is the complete installation process recommended by Espressif.
Official Documentation Links
| Resource | Address |
|---|---|
| ESP-IDF Programming Guide | https://docs.espressif.com/projects/esp-idf/zh_CN/stable/esp32s3/index.html |
| Linux/macOS Environment Setup | https://docs.espressif.com/projects/esp-idf/zh_CN/stable/esp32s3/get-started/linux-macos-setup.html |
| ESP-IDF Release Pages | https://github.com/espressif/esp-idf/releases |
| ESP-IDF Toolchain Downloads | https://dl.espressif.com/ |
| ESP-IDF Official Forum | https://esp32.com/ |
Version Selection Recommendations
| Project Type | Recommended Version |
|---|---|
| This tutorial series (basic peripherals / communication / FreeRTOS) | ESP-IDF 6.0.2 |
| AI XiaoZhi firmware compilation | ESP-IDF ≥ 5.5.2 (Must use 5.x series, 6.0.x is NOT acceptable) |
| New project development | Current latest Stable version |
ESP-IDF 5.x and 6.0.x have many API incompatibilities (esp_netif interface restructuring, Wi-Fi driver changes, etc.). Some open-source projects have not yet adapted to 6.0.x. ** beginners are recommended to follow the tutorial and use v6.0.2**, as the environment is most mature.