Welcome to ESP32 Core Board repository
4. Flash Read and Write
Flash Read and Write Experiment
Flash Read and Write Experiment1. Flash Read and Write Overview2. Core Concepts2.1 NVS and Preferences2.2 NVS Supported Data Types2.3 Namespaces and Key-Value Pairs2.4 Delete with Shift-Forward Algorithm3. Hardware Dependencies4. Project Architecture and Flow5. Source Code5.1 Initialization and Boot Read5.2 Append Write5.3 Delete with Shift-Forward Algorithm5.4 Traverse Read5.5 Clear All Data6. Operation Flow6.1 Compile and Flash6.2 Normal Phenomena6.3 Verification Methods7. Common Issues
1. Flash Read and Write Overview
ESP32's internal SPI Flash can not only store firmware but also be partitioned for user data storage. This experiment uses Arduino's Preferences library (a high-level wrapper for ESP-IDF NVS) to implement CRUD operations on key-value pairs: append write, traverse read, delete by index (with shift-forward algorithm), and one-click clear.
NVS (Non-Volatile Storage) is a key-value storage library provided by ESP-IDF, based on a dedicated partition of SPI Flash. NVS encapsulates wear-leveling and power-failure protection on Flash, allowing developers to read and write persistent data like using a "dictionary" without worrying about the underlying erase/write details.
Typical Application Scenarios:
| Application Type | Examples |
|---|---|
| Configuration Storage | Wi-Fi SSID/password, device name, calibration parameters |
| Status Recording | Device running time, last shutdown state, error log count |
| User Data | Preset parameter tables, historical records, offline cache |
| Firmware Management | OTA upgrade flags, firmware version number |
2. Core Concepts
2.1 NVS and Preferences
NVS (Non-Volatile Storage) is a lightweight key-value storage library implemented by ESP-IDF on SPI Flash. Preferences is Arduino's wrapper for it:
xxxxxxxxxxArduino Preferences → ESP-IDF NVS → SPI Flash partition → Wear-Leveling (WL) protection
2.2 NVS Supported Data Types
| Type | Functions | Size |
|---|---|---|
| Integer | nvs_set_i8() / nvs_set_i16() / nvs_set_i32() / nvs_set_i64() | 1~8 bytes |
| String | nvs_set_str() | Variable, ≤ 1984 bytes |
| Binary Blob | nvs_set_blob() | Variable, ≤ 1984 bytes |
2.3 Namespaces and Key-Value Pairs
Namespace: Equivalent to a folder; data in different namespaces does not interfere with each other. This experiment uses
"data_store"Key-Value Pair: Each storage item consists of a key (string) and a value (int/float/string/bytes)
begin(namespace, readonly)mount → operate →end()commit and release
2.4 Delete with Shift-Forward Algorithm
NVS itself only supports remove(key) deletion by key and cannot automatically "fill gaps". This experiment implements a shift-forward strategy: suppose dat3 is deleted, dat4→dat3, dat5→dat4... finally delete the extra datN, decrement counter by 1, ensuring key names are always consecutively numbered from 1.
3. Hardware Dependencies
Pure software experiment, no external hardware required. Only USB cable needed to view serial interaction menu.
ESP32-S3 NVS Hardware Features:
| Feature | Parameter |
|---|---|
| Storage medium | Internal SPI Flash (partitioned via partition table) |
| Maximum key count | Limited by Flash partition size (typically hundreds to thousands) |
| Key name length | Up to 15 characters |
| Value types | int8/16/32/64, float/double, string, blob (binary) |
| Maximum string length | 4000 bytes (limited by NVS page size) |
| Erase/write cycles | About 100,000 times/sector (wear-leveling algorithm distributes writes evenly) |
| Power-failure protection | Yes (end() calls nvs_commit for atomic write, power failure won't corrupt existing data) |
| Write granularity | Cached per namespace, end() commits all at once |
4. Project Architecture and Flow
xxxxxxxxxxsetup()├─ Serial.begin(115200)├─ Read saved dataCount in read-only mode└─ Print interaction menu (1=Write 2=Read 3=Delete 4=Clear)loop()└─ if Serial.available():├─ cmd=1 → Wait for user input → putString("datN", content) → dataCount++├─ cmd=2 → Iterate i=1..count → getString("datN") → Print├─ cmd=3 → Shift-forward algorithm → remove(datN) → dataCount--└─ cmd=4 → clear() → dataCount=0
5. Source Code
Source Code Location:
Source code → Arduino → 2.Serial communication → 4.FLASH → 4.FLASH.ino
5.1 Initialization and Boot Read
Read-only mode quickly reads the saved entry count without holding a write lock.
xxxxxxxxxxPreferences prefs;int dataCount = 0;
void setup() { Serial.begin(115200);
prefs.begin(STORAGE_NAMESPACE, true); // Read-only mode dataCount = prefs.getInt("count", 0); // Returns default 0 if key doesn't exist prefs.end();
Serial.println("1=Write 2=Read 3=Delete 4=Clear");}The second parameter
0ingetInt("count", 0)is the default value — returns 0 instead of error when the key doesn't exist.
5.2 Append Write
Open in read-write mode, generate key name datN, write content and update counter.
xxxxxxxxxxif (cmd == "1") { // Wait for user input content... prefs.begin(STORAGE_NAMESPACE, false); // Read-write mode dataCount++; char key[16]; sprintf(key, "dat%d", dataCount); // Key name: "dat1", "dat2"... prefs.putString(key, content); prefs.putInt("count", dataCount); // Update counter prefs.end(); // Commit write}
prefs.end()actually commits the write to Flash. Power failure beforeend()loses this write but doesn't damage existing data.
Important note for append write:
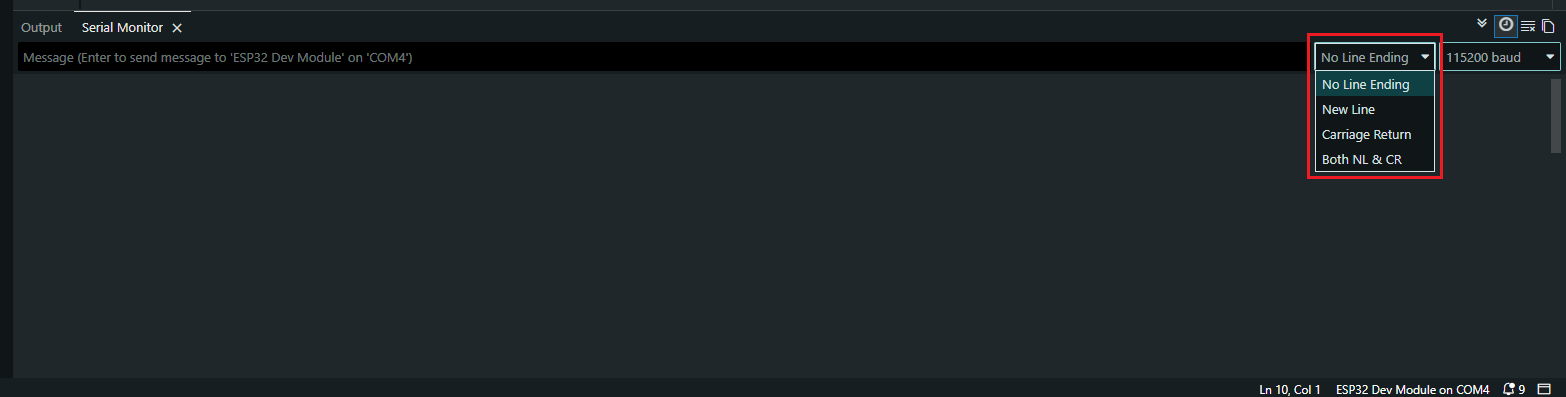
Serial monitor send settings must select No line ending.
If newline or carriage return is used as message terminator, pressing enter automatically appends
\r\ncharacters;
If only enter is pressed without valid text input, the program reads empty content containing only newline characters, ultimately writing invalid empty data to Preferences.
5.3 Delete with Shift-Forward Algorithm
After deleting datDelNum, shift subsequent data forward to maintain consecutive key names.
xxxxxxxxxxfor (int i = delNum; i < total; i++) { char srcKey[16], dstKey[16]; sprintf(srcKey, "dat%d", i + 1); // Source key (next one) sprintf(dstKey, "dat%d", i); // Destination key (current position) String nextData = prefs.getString(srcKey, ""); prefs.putString(dstKey, nextData); // Shift forward}sprintf(key, "dat%d", total);prefs.remove(key); // Delete the extra last entrydataCount = total - 1;prefs.putInt("count", dataCount);Why is the shift-forward algorithm needed?
prefs.remove(key)only deletes a single entry. After deletion, key names will have gaps (e.g., dat1→dat2→dat4). If subsequent append writes only rely ondataCountauto-increment, dat3's position will always be empty. The shift-forward algorithm ensures consecutive key names and, combined with append write logic, prevents "ghost holes".
5.4 Traverse Read
Open in read-only mode, loop through all datN keys and print. The second parameter "" in getString(key, "") is the default value when the key doesn't exist.
xxxxxxxxxxelse if (cmd == "2") {  prefs.begin(STORAGE_NAMESPACE, true);         // Read-only mode  int total = prefs.getInt("count", 0);
  if (total == 0) {    Serial.println("No data");  } else {    for (int i = 1; i <= total; i++) {      char key[16];      sprintf(key, "dat%d", i);                  // Construct key name "dat1", "dat2"...      String data = prefs.getString(key, "");    // Returns empty string "" if not exists      Serial.printf("Entry %d: %s\r\n", i, data.c_str());    }  }  prefs.end();}
Call
prefs.end()for each read operation as well. Although read-only mode doesn't hold a write lock, timely resource release is good programming practice.
5.5 Clear All Data
prefs.clear() clears all key-value pairs in the current namespace at once, much faster than remove() one by one.
xxxxxxxxxxelse if (cmd == "4") { prefs.begin(STORAGE_NAMESPACE, false); // Read-write mode prefs.clear(); // Clear all key-value pairs in this namespace dataCount = 0; // Reset counter to zero prefs.end(); Serial.println("All data cleared!");}
clear()only clears the current namespace"data_store"and does not affect other namespaces. The underlying operation marks old NVS pages as erased and allocates new pages — the entire namespace's data is one batch operation, more than 10 times faster thanremove()one by one. Note don't forget to synchronously resetdataCountin memory, otherwise the counter will be inconsistent with actual storage.
6. Operation Flow
6.1 Compile and Flash
Arduino Flash Process: See 1. Before Development → 2. Build and Flash.
Open
4.FLASH.inoOpen Serial Monitor (115200 bps), set line ending to "Newline"
6.2 Normal Phenomena
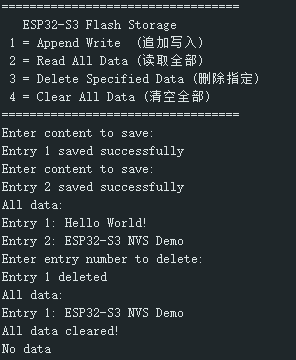
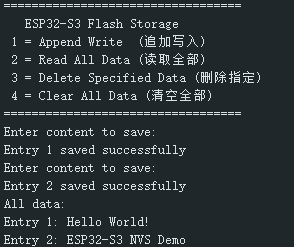
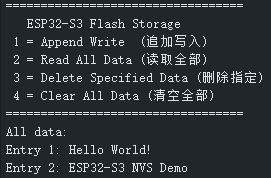
Interact via commands in the serial monitor:
x==================================ESP32-S3 Flash Storage1 = Append Write (追加写入)2 = Read All Data (读取全部)3 = Delete Specified Data (删除指定)4 = Clear All Data (清空全部)==================================Enter content to save:Entry 1 saved successfullyEnter content to save:Entry 2 saved successfullyAll data:Entry 1: Hello World!Entry 2: ESP32-S3 NVS DemoEnter entry number to delete:Entry 1 deletedAll data:Entry 1: ESP32-S3 NVS DemoAll data cleared!No data
Before power off:
After power cycle reconnect:
6.3 Verification Methods
| Operation | Expected Result |
|---|---|
| Write, power cycle, restart, read | Data still present (power-failure safe) |
| Write 5 entries, delete #3, read | Consecutive key names: dat1~dat4 |
Input 4, restart, read | Shows "No data" |
7. Common Issues
| Phenomenon | Cause | Solution |
|---|---|---|
| Data lost after restart | prefs.end() not called | Must call end() after each write |
| Write fails/hangs | Opened for write in read-only mode | Second parameter of begin(ns, false) must be false |
| Key not found but data exists | Counter inconsistent with actual storage | Check if delete logic correctly updates count |
| Compilation error Preferences.h not found | ESP32 board package not installed | Install ESP32 Arduino Core in IDE |